Transcription
Expense TrackerUser Guide
COPYRIGHT 1994-2018 Automation Centre, L.C. All Rights Reserved. This manual and the softwaredescribed in it are copyrighted with all rights reserved. No part of this publication may bereproduced, transmitted, transcribed stored in any retrieval system or translated into anylanguage in any form without the express written permission of Automation Centre, L.C.TRADEMARKSTrackerOffice is a registered trademark of Automation Centre, and Tracker Suite,TrackerSuite.Net, Personnel Tracker.Net, Customer Tracker.Net, Project Tracker.Net, ExpenseTracker.Net, Purchase Tracker.Net, Asset Tracker.Net, Payment Tracker.Net, InvoiceTracker.Net, Time Tracker.Net, Support Tracker.Net, Personnel Tracker, Customer Tracker,Project Tracker, Expense Tracker, Purchase Tracker, Time Tracker, Prospect Tracker, ApplicantTracker, Asset Tracker, Support Tracker, Tracker Data Warehouse, Tracker Suite for HR, TrackerSuite for Projects, Tracker Suite for Sales, Tracker Suite for IT are all trademarks of theAutomation Centre. IBM Notes, Domino, and Notes are registered trademarks of InternationalBusiness Machines Corporation. Microsoft, Microsoft Project, Microsoft Word, Excel, Exchange,Outlook, and SQL Server are registered trademarks of the Microsoft Corporation. Any brandnames, company names, or trademarks in this manual are trademarks or registered trademarksof their respective companies.LIMITED WARRANTY ON SOFTWAREExcept as provided in the license agreement, if any, Automation Centre and its suppliers disclaimall implied warranties on the software and manuals, including, without limitation, warranties ofmerchantability, performance, and fitness for a particular purpose. Neither the Automation Centrenor its suppliers will be liable for any bug, error, omission, defect, deficiency or nonconformity inany software. As a result, the software is sold “As Is,” and the purchaser assumes the entire riskas to its quality and performance.Automation Centre and its suppliers shall in no event be liable for direct, indirect, specialincidental, contingent or consequential damages resulting from any defect in the software or itsdocumentation including damages from loss of data, downtime, loss of goodwill, damage to orreplacement of equipment or property, even if the Automation Centre has been advised of thepossibility of such damages. You agree that the Automation Centre and its suppliers’ liabilityarising out of contract, negligence, strict liability in tort or warranty shall not exceed any amountspaid by you for this product. Any written or oral information or advice given about this productfrom the Automation Centre or its dealers, distributors, employees, or agents will in no wayincrease the scope of this warranty, nor may you rely on such oral or written communication.Some states do not allow the exclusion or limitation of implied warranties or liability for incidentalor consequential damages, so the above limitation or exclusion may not apply to you. Thiswarranty gives you specific legal rights, and you may also have other rights that vary from state tostate. The laws of the State of Arizona shall govern this agreement.DISCLAIMEROn an ongoing basis, Automation Centre continues to make improvements to both our Softwareand Documentation as our goal is to enhance the overall user experience with Tracker Suite. Inthis pursuit, while Automation Centre makes every effort to ensure that our User Guides matchour software, some features or functionality within the Tracker Suite modules may differ from theirrespective User Guides between releases.Automation Centre435 E. 9th StreetTucson, AZ 85705(520) 882 – 9287www.Acentre.com
Expense Tracker User GuideiContents1. Introduction . 1About this Guide . 1Notes, Tips and Comments . 1Other Help Sources . 2About Expense Tracker . 2Typical User Roles . 3Expense Tracker Standard Features . 3The Expense Report Process . 5Integration with Other Modules . 5Summary . 62. Expense Tracker Basics . 7Opening Expense Tracker . 7Managing Personal Expense Reports . 10Creating a New Expense Report . 10Creating an Expense Report from a Template . 14Updating a Personal Expense Report . 14Summary . 143. Advanced Expense Tracker . 15Creating an Expense Report for another User. 15Reviewing Expense Reports. 16Tracking Expense Reports with Other Views . 16Approving or Disapproving Expense Reports . 17Submitting an Expense Report for Review . 18Financial Review of Expense Reports . 18Remove from Inbox . 18Approving an Expense Report from Email . 18Processing Expense Reports . 20Processing Multiple Expense Reports . 21Un-processing Expense Reports . 21Editing Approved or Processed Expense Reports . 21Archiving/Un-archiving an Expense Report . 22Deleting an Expense Report . 22Summary . 224. Reporting . 23Tracker Reports . 23A. Troubleshooting and Support . 24Expense TrackerDocument Version 06.16.2017
iiContentsTechnical Support. 24FiguresFigure 1 - The Expense Tracker Process . 5Figure 2 - Tracker Suite Welcome Screen . 8Figure 3- The Expense Tracker Outbox . 10Figure 4 - A Personal Expense Report (Local Form). 10Figure 5 - Expense Report Awaiting Approval . 17Figure 6 - Exception Highlighting . 18Figure 7 - Emailed Expense Report for Approval . 19Figure 8 - Accounting Inbox . 20Figure 9 - Processing an Expense Report. 21Figure 10 - Expense Report Snapshot Selection . 22Figure 11 – Time and Expense Ledger Report . 23Expense TrackerDocument Version 06.16.2017
Expense Tracker User Guide11. IntroductionWelcome to the Expense Tracker User Guide. Expense Tracker is a useful tool forautomating and managing your expense reporting processes.About this GuideThis guide describes the features of Expense Tracker. It is intended to serve as acentral guide for all the major functionality and specific operations that a user canperform. It also covers the necessary information required to properly configure theapplication.This documentation has been designed to be read in either electronic or hardcopyformat. If you are reading the electronic copy, the text has been cross-referenced, sowhen you are referred to a page number or section, you can press CTRL and click thattext and it will take you to the relevant information.This guide should be treated as a companion guide to the Tracker Suite BaseInstallation Guide and the Tracker Suite Base Configuration Guide. It is also assumedthat the reader has a basic familiarity with browser functionality and terminology,specifically Internet Explorer (IE), Chrome and Mozilla Firefox.Refer to the Tracker Suite Base Installation Guide and the Tracker Suite BaseConfiguration Guide for: An overview of the Tracker Suite philosophy and how the various modules fittogether. A review of Tracker Suite views, tools, and functionality common to all TrackerSuite modules. Complete installation and configuration instructions including information on theTracker Suite security model. A glossary of Tracker Suite terms.Notes, Tips and CommentsWithin this manual, you will find the following icons with comments and key informationabout Expense Tracker.Expense TrackerDocument Version 06.16.2017
2IntroductionNotesThe Note icon designates useful sidecomments and information.ImportantThe Important icon designates crucialinformation or warnings that could havepotentially serious consequences.TipThe Tip icon designates helpful troubleshootingor technical information, or perhaps an alternateshortcut.Other Help SourcesIn addition to this guide, more information about the Tracker Suite products is located atthe Tracker Suite website: http://www.TrackerSuite.Net.Users can visit our website for further information about our products, including salesliterature, demos, and FAQ databases. For general information about our company, theAutomation Centre, visit http://www.Acentre.com.About Expense TrackerExpense Tracker records and monitors employee project and travel expenses. Itautomates the entire expense tracking process, eliminating inefficient and wastefulpaper expense forms and their processing routines.Employees submit Expense Reports online, charging their expenses to projects oractivities. These Expense Reports are automatically routed to the appropriatesupervisor for approval. The supervisor can manage expenses associated with projectswith useful, customized views. When an Expense Report is approved, it isautomatically forwarded to accounting for billing. All actions against the ExpenseReport are recorded throughout the whole process.Expense Tracker integrates and shares information with other Tracker Suite modules tocompletely automate your organization’s front office business activities. In addition,Expense Tracker also integrates with QuickBooks Online Edition, the setup andExpense TrackerDocument Version 06.16.2017
Expense Tracker User Guide3configuration of which is described in the Tracker Base Installation Guide and theTracker Base Configuration Guide.Typical User RolesExpense Tracker has work areas for specific user roles. The table below lists some ofthe common user roles and how they use Expense Tracker.RolesUse Expense Tracker toEmployees Create and submit Expense Reports.Accurately charge expenses to appropriate projectsor activities.Managers Approve or disapprove employee ExpenseReports.Verify that expenses are charged to appropriateprojects or activities.Manage on-time creation and updating of ExpenseReports.Create and submit Expense Reports for employeesor contractors who do not have access to thedatabase or cannot create their own ExpenseReports (working off-site or sick). Accounting / Payroll Process Expense Reports for billing and payrollfunctions.Human Resources Maintain approval rules in the workflow profile.Executives Monitor project status and expenses associatedwith projects.Expense Tracker Standard Features Easy-to-use online Expense Reports. Items entered are charged to clients, projects, or marked as non-billable.Expense TrackerDocument Version 06.16.2017
4Introduction In/Out boxes allow users to track their Expense Reports as they move throughthe approval process. Expense Tracker Suite monitors and records all activity to reports, includingauthorization, creation, and modifications. Secure and automated routing based on pre-determined roles and approvalcycles configured in Workflow Profile. All billing information is carried through the entire Expense Reporting process. Detailed billing slips suitable for mailing are automatically generated. Supports the billing of expenses back to customers or internal cost centers. Up-to-date accounts payable lists. Automatic reporting allows for real-time data viewing by employee, project,customer, cost center, or period. Currency and rate conversion support. The ability to set company policy checks and limits on charge amounts. Faster access to Expense Reports. Ability to create an unlimited number of line items on the Expense Report. Automatic posting to the SQL Tracker Data Warehouse Database. Supports all date and time and number formats. Expense Report Entry on IE, Chrome and Firefox browsers.Expense TrackerDocument Version 06.16.2017
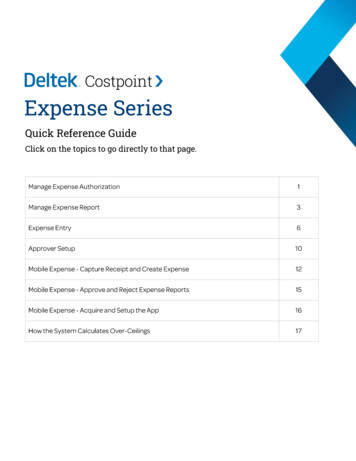
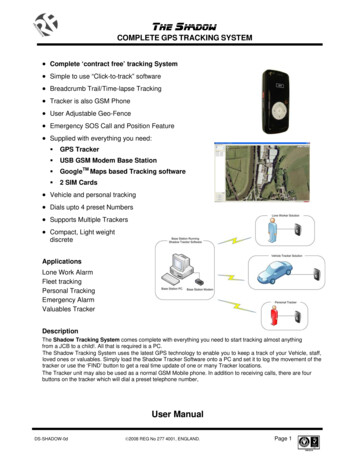
Expense Tracker User Guide5The Expense Report ProcessFigure 1 - The Expense Tracker ProcessIntegration with Other ModulesExpense Tracker interacts with Personnel Tracker, Project Tracker, and CustomerTracker as shown in below. Personnel Tracker: Personnel Tracker provides the list of people who cansubmit an Expense Report as well provides other person related information likeBusiness Unit, Manager etc. The user’s Person Document also includes theemployees’ expense and travel authorizations, as well as their approval workflowfor expense reports. Multiple workflows may be defined, Project Tracker: Project Tracker provides the list of projects against whichExpense can be charged.Expense TrackerDocument Version 06.16.2017
6Introduction Customer Tracker: Customer Tracker is a Customer Relationship Management(CRM) solution that automates your customer service processes by allowingother Tracker Suite modules electronic access to current CRM data such asCustomer Information, Contacts, Contracts, Activities and related History.All Expense Report related data is pushed to the Tracker Reports, a powerful reportingengine.SummaryThis chapter provided an overview of the Expense Tracker module and how itstreamlines the expense reporting and approval process.This chapter examined the role-based user interface Tracker Suite provides, and howthe various user roles, including Employees, Managers, Accounting and Payroll, HRand Executives interact with Expense Tracker. In the following chapters, we will take acloser look at these role-based interactions as we learn how Expense Reports arecreated, approved and processed.We also touched on the interaction between Expense Tracker and other Tracker Suitemodules, Personnel Tracker, Project Tracker, Customer Tracker and the TrackerReports. The reports available are discussed in Chapter 4. Reporting.In the next chapter, we will look at the Expense workspace and how it is utilized.Expense TrackerDocument Version 06.16.2017
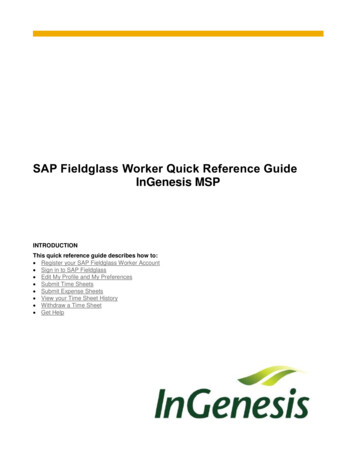
Expense Tracker User Guide72. Expense Tracker BasicsIn this chapter, we will learn the basic functions of Expense Tracker that all employeesutilize in creating and tracking their Expense Reports.In the next chapter, we will look at the experience of Managers with Expense Tracker,and the exclusive features available to them to better manage the expense reportingprocess of the organization.In this section, we will review the Expense Tracker workspace, how to access it andhow to navigate within it, and how the user’s role in Tracker Suite shapes their workexperience and access privileges.For more information on setting up Expense Tracker (as well as the other Tracker Suitemodules), please refer to the Tracker Suite Base Installation Guide and the TrackerSuite Base Configuration Guide.Opening Expense TrackerTo access Expense Tracker, open a supported internet browser (IE, Chrome, andFirefox) and enter the URL that corresponds to the location of Tracker Suite on yourWeb server. By default, Tracker Suite is installed in the TrackerApps folder on your Webserver. Typically, you can access Tracker Suite by navigating tohttp://tracker/trackerapps/Depending on the web server and domain configurations, a company may accessTracker Suite differently.For example, a company using the domainwww.Bizco.com might access Tracker Suite .After opening Tracker Suite in a Web browser, you are presented with a screen similarto the one shown below.Expense TrackerDocument Version 06.16.2017
8Expense Tracker BasicsNavigatorFigure 2 - Tracker Suite Welcome ScreenTo open Expense Tracker, click the Tracker icon in the lower left corner of the screen toopen the Navigator. A menu will appear of the various Tracker Suite modules that havebeen installed. Click Expense Tracker to bring up a sub-menu of available views, suchas New Expense Report, Inbox and Outbox.The available menu items in the Navigator are controlled by the user’s role in ExpenseTracker. For example, Administrators will typically have more menu items available tothem than other users such as Managers.Following is an overview of all the menu items available in Expense Tracker, with a briefdescription. New Expense Report: For creating a new Expense Report. Typically availableto all users.Expense TrackerDocument Version 06.16.2017
Expense Tracker User Guide 9Inbox / Outbox: These are message boxes for an internal email account formanaging Expense Reports. All users have their own Inbox and Outbox. Theyare utilized in different ways, depending on the user’s role.For example:The regular Inbox/Outbox views are utilized to track the user’s saved, approved,or disapproved Expense Reports.The Accounting Inbox/Outbox views are utilized to manage Expense Reportsawaiting processing. All Expense Reports: A view of all Expense Reports in the system that have notbeen disapproved or fulfilled. This view is typically available to Managers andAdministrators. Administration Dashboard: The views and tools within this category are usedfor high-level management of the Expense Reporting process, includingadministrative dashboards as well as views of archived and cancelled ExpenseReports. Proxy Inbox: A view that will show all Expense Reports where the current useris a proxy and can approver and disapprove an Expense Report. Expense Code Templates: A view of Expense Report templates that simplifyreporting. For example, a “Per Diem” template could be created with allocationsfor meals and travel, which could be utilized by travelling salespeople or projectstaff working in the field.Expense TrackerDocument Version 06.16.2017
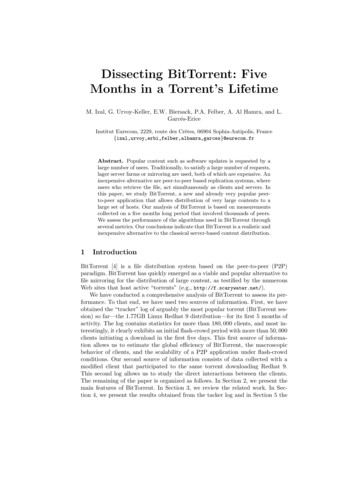
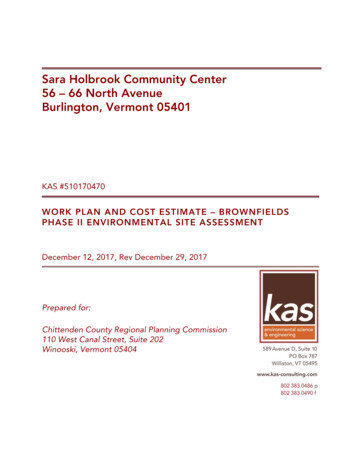
10Expense Tracker BasicsManaging Personal Expense ReportsExpense Tracker offers users the ability to track and review their own Expense Reportswith an easy-to-use Inbox / Outbox interface.Figure 3- The Expense Tracker Outbox The Inbox holds all Expense Reports that the user has saved but not submitted,as well as Expense Reports which have been returned to them after beingdisapproved by the user’s Manager, or Accounting. The Outbox provides links to all the Expense Reports the user has submitted thathave been approved, as well as those Expense Reports awaiting approval. TheOutbox allows users to easily track the status of their Expense Reports.Creating a New Expense ReportTo create a new Expense Report, either navigate to the New Expense Report view, orclick New Expense Report in the top menu of the Inbox / Outbox view, to open a newExpense Report.Figure 4 - A Personal Expense Report (Local Form)Expense TrackerDocument Version 06.16.2017
Expense Tracker User Guide111. Select the International Form if this Expense Report includes expenses incurredoutside the United States.2. If the time period for the Expense Report is not the default value, choose a newPeriod Start date by clicking the arrow button next to the field.3. Provide a detailed overview of the Expense Report in the Description field.4. There are a several ways to enter line items in the Expense Report:a. Enter your first expense item on the first row, select the appropriateProject, Code, Disc, Pay Type, Amount, etc. and then click the Add Rowbutton or the Insert icon (identified on the first row.). This will carry down the Date and Projectb. You can also use the Add Expense button, which bring up a form insteadof grid for entry, but will not carry down previous information unless yousubsequently click the Fill From Previous button on this form.c. You can type information directly into the line-item fields. A type-aheadfunction will generate possible values in the text fields, based on availableprojects and the configuration of Expense Tracker. Values outside ofthese parameters will not be accepted.d. If you would like to select a project or projects to charge the line itemsagainst, click the Select Project button. A window will appear with a list ofthe projects. Check the boxes next to the projects you would like to chargethe items against, and click OK. A line item will be created for each projectyou selected. If you click the Add Row button after using the SelectProject button, the default project will be the last project you selected.5. If you would like to create a new Expense Report from a template, click theSelect Template button. Creating Expense Report templates is discussed later.6. Utilize the checkbox to indicate if the line item is billable or non-billable.Expense TrackerDocument Version 06.16.2017
12Expense Tracker BasicsThe Billable checkbox may not be editable, depending onthe configuration of Expense Tracker. This is discussedlater in Expense Tracker Administration.7. The Non-Reim checkboxes mark expenses for which employees do not need tobe reimbursed.8. If the International Form is used or if the tax fields are marked to be displayed inlocal form, the columns for Tax Type and Tax Amount will be displayed. Theseare used to record the type and amount of tax charged for the expense. Thechoices for Tax Type include GST: Goods and Services Tax and VAT: ValueAdded Tax. These are defined in Company Global setup document.9. If the International Form is used, the columns for Currency and Rate will bedisplayed. Select the currency that was originally used to pay for the expenseand the exchange rate will automatically be populated from the currency profile.The default exchange rate can be edited directly on the form.10. The Receipt Total is the total amount paid for the expense in the originalcurrency.11. The Receipt Curr is also only available in the international form. The Totalcolumn displays how much the employee will be reimbursed for in the company’sdefault currency.12. The Receipt Total is the total amount paid for the expense in the originalcurrency.13. To add another line item, click the Add Row button.14. You can modify your line items using the icons on the left side of each row.Delete: Delete the entire line item.Edit: This will open the Expense Detail dialog boxfor the row, allowing you to make changes.Insert Row: This will insert a new row before thecurrent row.Expense TrackerDocument Version 06.16.2017
Expense Tracker User Guide1315. To add attachments, such as scanned receipts, open the Attachments area andeither use Drag and Drop or click the paperclip icon.16. This will open a window for adding and removing attachments to the ExpenseReport form. Once you’ve attached files and closed the Manage Attachmentswindow, the files you’ve attached will appear in the Attachments section. Clickingon the file’s hyperlink will allow you to open or save the file.17. If the user attempts to submit an Expense Report that does not satisfy theconfigured rules for validation, the user will be notified and directed to makecorrections. To avoid this, the user can click the Validate button in the upper rightarea of the Expense Report form. If all fields in the Expense Report have notbeen correctly entered then a notification outlining the errors will appear.Once the Expense Report is complete, the user may save the Expense Report for futureediting by clicking the Save or Save and Exit button, or submit the Expense Report forapproval by clicking the Submit button.If the user submits the Expense Report for approval, an email notification will be sent tothe designated approver, and it will also appear in that individual’s Expense TrackerInbox as well. The user may review their submitted Expense Report and its status intheir own Outbox.Expense Tracker may be configured to alter its approvalworkflow if a line item exceeds the maximum dailyallotment for its account code. In such a case, thesubmitted Expense Report will be sent for specialapproval from a profiled user, before continuing in theregular approval process. This is discussed in theTracker Suite Base Configuration Guide.Depending on the stage of workflow an Expense Reportis in, informative messages for each Expense Report arelisted in Inbox views in the Workflow Message column asto whose approvals are required and when to completeprocessing.Expense TrackerDocument Version 06.16.2017
14Expense Tracker BasicsCreating an Expense Report from a TemplateUsers also have the option to create a new Expense Report from a pre-configuredtemplate. This is a useful function if the user is routinely submitting similar ExpenseReports, for example, if their job responsibilities require travel on a regular basis.To create an Expense Report based on a template, the user clicks the Select Templatebutton. A dialog boxes will appear, asking the user to select the template to use (forexample, our travelling user might utilize a Per Diem or Per Diem Internationaltemplate), the period of the activity, and the cost center to charge it to. After selectingthe appropriate option, the Expense Report will be auto-populated based on thetemplate, with the amount fields left for the user to fill in.The configuration of these templates is discussed in the Tracker Suite BaseConfiguration Guide.Updating a Personal Expense ReportUsers can update their saved or disapproved Expense Reports by just clicking the linkprovided in the Inbox view, which will open the Expense Report form for editing. Aftermaking changes, the user can save, validate or submit the updated Expense Report.SummaryIn this chapter, we learned how users can manage their personal Expense Reportsusing Expense Tracker’s intuitive Inbox / Outbox interface. The Inbox makes it easy tosave and update Expense Reports prior to submission, and the Outbox simplifies thetracking of recently submitted Expense Reports and their status, as well as the review ofprevious, approved reports.We walked through the creation of an Expense Report, including how to use anInternational form if the Expense Report includes charges accrued in a foreign currency,and how the user can validate an Expense Report prior to submitting it.This chapter covered an activity that all Expense Tracker users participate in, creatingpersonal Expense Reports. The next chapter will cover the experience of Managers andAccounting in managing and processing Expense Reports.Expense TrackerDocument Version 06.16.2017
Expense Tracker User Guide153. Advanced Expense TrackerThis chapter will study the tools that users with Supervisor, Manager and/or Accountingroles may utilize to better manage the expense reporting process. We will learn how tocreate an Expense Report for another employee, how to track and review ExpenseReports in the system, and how the Expense Report approval process works inExpense Tracker.In Tracker Suite, there is usually more than one way toaccomplish any single action. The activities described inthis chapter may only illustrate one workflow from aparticular view, but the activity may be available in otherviews as well, depending on the user’s role in TrackerSuite.Creating an Expense Report for another UserUsers may be profiled in the Expense Tracker Database Setup Document to have theability to create Expense Reports for others, a useful feature when an employee isabsent on vacation or extended travel. The Database Setup Document is discussed inmore detail the Tracker Suite Base Configuration Guide.Users with this ability may create an Expense Report for another employee from theAdministration Dashboard view by clicking New Create Expense Report for Othersfrom the top menu. A dialog box will
Expense Tracker interacts with Personnel Tracker, Project Tracker, and Customer Tracker as shown in below. Personnel Tracker: Personnel Tracker provides the list of people who can submit an Expense Report as well provides other person related information like Business Unit, Manager etc. The user's Person Document also includes the