Transcription
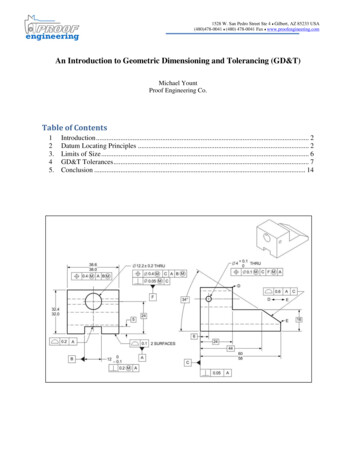
1528 W. San Pedro Street Ste 4 Gilbert, AZ 85233 USA(480)478-0041 (480) 478-0041 Fax www.proofengineering.comAn Introduction to Geometric Dimensioning and Tolerancing (GD&T)Michael YountProof Engineering Co.Table of Contents123.45.Introduction . 2Datum Locating Principles . 2Limits of Size . 6GD&T Tolerances . 7Conclusion . 14
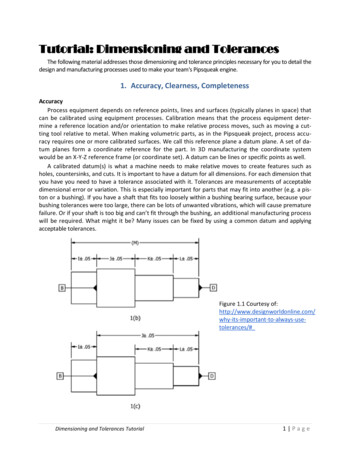
1IntroductionSince the first engineering drawing existed, so have manufacturing tolerances. Tolerances allow parts todeviate from perfection, but only within defined limits. The amount of tolerance allowed is usuallybased on part function. The limits allow the part to deviate, but a properly applied tolerance will ensurethat parts fit properly and function as intended. The goal is to achieve a balance between high cost,narrow tolerances and lower cost, wide tolerances.When tolerances were first introduced, they were simple; every dimension had a /- tolerance. If thedrawing dimension stated: 2.00" /-.010" then an acceptable part would measure between 1.990" to2.010" for that dimension. As engineering progressed and parts became more complicated, a newmethod of implementing tolerances was created; Geometric Dimensioning and Tolerancing, or GD&T.GD&T allows for comprehensive and consistent tolerances with the use of relatively simple tools. A partdrawing may include a single GD&T callout, or the drawing may be fully defined using GD&T dependingon part requirements. As with all new systems, there is a learning curve with GD&T. For this reasonmany fabricators and machine shops may not be familiar with GD&T specifics. Therefore it isrecommended that you work with your vendors to determine their level of expertise with GD&T prior toadding it to a drawing.2Datum Locating PrinciplesIn order to provide a foundation for repeatedly locating parts in the most consistent way, a basicunderstanding of GD&T locating datums is helpful. Here are some of the advantages gained by usingGD&T over conventional dimensions/tolerances: Provides a concise way to describe a reference coordinate system (datums) of a component orassembly to be used throughout the manufacturing and inspection processes.Reduces the amount of notes, dimensions, and tolerances on a drawing; quickly convey design,manufacturing and inspection intent.With features like maximum material condition (MMC), more manufacturing tolerance can beallowed while still ensuring proper component function.2
Figure 1 - Datums are used to create areference coordinate system forrepeatable part locatorsConventionally, datum A is the primary, B is the secondary, and C is the tertiary datum. In this picture itappears that each datum is a planer surface, but this is not always the case. Technically, it is never thecase. This is because a perfectly planer surface is theoretical and can never be achieved in practice.Once this premise is accepted, a deeper understanding of locating principles can be achieved.Three points define a plane, two points define a line. After the primary datum is located using threepoints, the secondary datum will typically use two points to define a line. The only degree of freedomremaining can be constrained by a single point on the tertiary (third) datum. Therefore in a standarddatuming scheme, 6 points fully locate a part or assembly; 3 for the primary, 2 for the secondary, and 1for the tertiary datums.DATUM A - Take a look at the primary locating datum which is shown as a plane. Let's imagine thisplane as a nice flat granite surface. Once the part is placed on the granite surface, only three points of itwill be actually contacting the granite. Remembering that no surface can be perfectly flat (the granitenor the part), means only the lowest three points of the part will be touching the highest three points ofthe granite where these intersect. Since no two parts are identical these three exact points that touchthe granite, and therefore locate the part, will not be the same from part to part.If necessary, there are ways to control what locations on the parts surface are used to create thereference coordinate system. Instead of using a planer surface as the locating feature, three distinctlocators can be used. By using three 'point' locators, the same three areas of every part are used tolocate it. This can reduce the amount of locating tolerance, and improve down-stream fit-up or functiondepending on where the point locators are placed. Three 'point' locating targets are used to create theprimary datum for a component Fig.2 & 3.3
Figure 2 Datum A; Three point locators shownFigure 3 .with part shownFigure 4 Datum B; Two point locators shownFigure 5 .with part shownFigure 6 Datum C; One point locator shownFigure 7 .with part shownThe locators are considered points because the top of the green locators are spherically shaped, so thecenter is the highest point. Once the B and C datums are added, the primary datum plane formed bythis fixture will repeatedly locate off the same three points on the parts. Instead of relying on the4
lowest three points of a part, wherever they may be, this configuration dictates the location of thesethree points. Notice how far apart the locators are. If the three points are moved to be very close toeach other then you can imagine the part would become unstable, therefore not as repeatable. Thisprinciple applies to all part locators; farther apart is betterDATUM B - Similar principles apply to datum B. A planer surface can be used to locate datum B, whichmeans two undefined points will be touching the planer surface. In some cases this may work fine.When more control is needed, two distinct point locators may be used.DATUM C - Similar principles apply to datum C.Once a reference coordinate system is created with Datums, the dimensioning scheme should takeadvantage of this new coordinate system. Without extenuating circumstances, dimensions should go toa Datum's edge, which produce more consistent parts for no additional cost.Figure 8 - Drawing with GD&T that represents the three Datums in the preceding example5
3.Limits of SizeFigure 9 - GD&T Limits of SizeMany different GD&T tolerances may be used to control a feature's position or location; these willinclude a reference to a Datum in the feature control frame. Limits of size however do not relate thefeature's size in question to a location or position, so no Datum reference is needed. This is how GD&Tcan be used minimally on a drawing. With only limit of size feature control frames on a drawing, noDatums would be required. But having even one positional GD&T tolerance on a drawing willnecessitate Datums. Control dimensions in GD&T are slightly different; a rectangular box around thedimension means it is a basic dimension. Basic dimensions do not have conventional tolerances,instead they use feature control frames (fig.12) to control the tolerance. The box around the basicdimension serves as a visual cue to search for the tolerance in a feature control frame.FEATURE CONTROL FRAMESA feature control frame (FCF) is the name of a GD&T tolerance symbol used on a drawing. A sampledrawing that includes two feature control frames is shown in the figure below. The upper FCF denotes aflatness tolerance of .005". Since it is a limit of size, the FCF does not refer to any Datums. Importantdistinction; all tolerance values shown in FCF's are a total tolerance, not a plus/minus value. So in thisexample, you could think of it as a /-.0025" tolerance of flatness. This tolerance only controls how flatthis surface is. Tolerances of Location must be used to control where it is located or how much it istilted relative to the rest of the part.Figure 10 Drawing showing GD&T Feature Control Frames (FCF) and basic dims6
4GD&T TolerancesUnlike limits of size, tolerances of location need to reference at least one Datum plane, usually three.An example of this can be seen in Figure 10. The lower FCF includes a reference to three separateDatums. The 'target circle' symbol is named position, and is usually used locating for holes. Figure 11shows a list of the tolerances of location:Figure 11 GD&T Tolerances of LocationRegarding the position tolerance shown in Fig 10, notice that the two linear dimensions that locate thehole have rectangular boxes around them and are therefore basic dimensions. Basic dimensions areconsidered theoretically exact dimensions; chained basic dimensions do not create tolerance stacks.Again, basic dimensions have their tolerances in a Feature Control Frame. Let's take a closer look at theposition FCF shown in Fig 10.() Feature Control FrameFigure 12 Position FCF withlabels - from Fig 10The first box in a Feature Control Frame contains an identifying symbol, position in this case. Thesecond box of a FCF contains the total tolerance value. Important distinction; all tolerance valuesshown in FCF's are a total tolerance, not a plus/minus value. The Datum callouts start with the third boxand continue until there are no more Datums to reference.Notice that Datum A references a plane that is perpendicular to the hole’s axis. This is standard practiceand this Datum reference controls the direction of the hole through the material, usually perpendicular.The next two Datum references provide tolerances to the two hole locating dimensions. So to verbalizethe Feature Control Frame shown in Fig 12: The hole's position must fall within a total tolerance zone of.005" relative to Datums A, B & C. The Datum order does matter, to inspect properly the part must belocated on Datum A first, then Datum B, and finally Datum C.7
TOLERANCE ZONE SHAPEAnother difference between standard /- tolerances and GD&T is the shape of the tolerance zone. Inconventional tolerances with a /- tolerance in two right-angle dimensions (two dimensions to a hole forinstance), the tolerance zone is rectangular shaped. This is shown below in Fig 13. If both hole locationtolerances are equal, then the zone will be square shaped. The phantom line rectangular box in Fig 13represents the area that the circle's center may fall, and still remain in tolerance.Figure 13 Rectangular shapedtolerance zone for conventionaltoleranceUnlike conventional tolerances with rectangular or square shaped zones, GD&T tolerance zones arecircular in shape. When the tolerance value is .005" in a Feature Control Frame, the circle's center maymove within a circular area with a diameter equal to .005". And the tolerance circle's center is at theintersection of the basic dimensions. This is a subtle difference but it should be acknowledged, becausethe same part that fails with conventional tolerances may pass with GD&T tolerances. The figure belowillustrates this issue.Figure 14 Tolerance zones;Conventional is solid & squarevs. GD&T is phantom & roundNotice that a square tolerance zone of /-.500" will allow a hole center location .707" away from thecenter if it is located in the squares' corner (diagonally). Remembering that a GD&T tolerance value istotal, using a GD&T tolerance value of 1.414" in this case will allow all hole center locations to pass that8
pass the conventional test. But using this GD&T callout will allow some hole center locations to passthat did not pass the conventional test. Below is an illustration of this effect.Figure 15 Pass/Fail; Hole center locationsthat pass GD&T but not conventionalTo correct this tolerance discrepancy it is better to err on the side of caution. To convert a /- toleranceto a GD&T tolerance; multiply the /- tolerance by 2. But to convert a GD&T tolerance to a /tolerance; divide the GD&T tolerance by 2 then multiply by .707. Most holes, pins, bolts, etc. are round,therefore the round tolerance zone of GD&T is a more logical shape.MODIFYING SYMBOLSAs a reminder; the first FCF box is a symbol, the second contains the tolerance value, and the thirdthrough fifth usually contain the Datum callouts. The second box of a Feature Control Frame may alsocontain a modifying symbol directly after the tolerance value. These are special symbols that can existin any FCF box except the first. The first FCF box is reserved for control symbols already listed in eitherFig 9 or Fig 11. Some of the modifying symbols are listed here:M MMC - or Maximum Material ConditionLLMC - or Least Material ConditionSRFS - or Regardless of Feature SizePProjected Tolerance ZoneMMC and Projected Tolerance Zone will be covered briefly because they are two of the more usefulmodifying symbols. MMC is valuable for allowing more part variance during fabrication while ensuringthat the parts will always assemble properly. Projected Tolerance Zone is used to control the location ofa hole beyond the parts' physical edges.9
MAX MATERIAL CONDITION (MMC) DEFINITION, PRACTICEManufacturing tolerances are used when individual parts are made. When multiple parts must fittogether to make an assembly, these individual part tolerances must be properly controlled. If they arenot, then the part may not fit into the assembly and will need to be reworked or discarded. In order tomaximize the allowable manufacturing variability while ensuring proper fit up, MMC may be used.Maximum Material Condition, or MMC, is as it sounds - the most material. Consider a bolt goingthrough a hole. The MMC bolt is the largest diameter it can be within its tolerance. However, a MMChole is the smallest hole, which also represents the most material. By including the MMC modif
GD&T allows for comprehensive and consistent tolerances with the use of relatively simple tools. A part drawing may include a single GD&T callout, or the drawing may be fully defined using GD&T depending on part requirements. As with all new systems, there is a learning curve with GD&T. For this reason many fabricators and machine shops may not be familiar with GD&T specifics. Therefore it is .File Size: 1MBPage Count: 14