Transcription
Full HD Extreme WDRBox Network CameraNBF232PUser ManualVersion 1.3
http://www.diviotec.comTable of Contents1.2.Overview . 21.1Features . 21.2Package Contents . 31.3Dimensions . 31.4Connectors . 4Camera Cabling . 52.1Power Connection . 52.2Ethernet Cable Connection . 52.3Lens Mounting . 62.4Alarm I/O Connection . 62.5RS485 Connection (for DC12V/AC24V/PoE Model) . 63.System Requirements. 84.Access Camera . 95.Setup Video Resolution . 12Appendix A: Technical Specifications. 14Appendix B: Delete the Existing DC Viewer . 16Appendix C: Setup Internet Security . 17Appendix D: Back Focus Adjustment (Non-ABF) . 181
http://www.diviotec.com1.OverviewThe Full HD Multiple Streams Ultra-WDR Box IP Camera supports H.264 andMJPEG standard. The performance of the H.264 encoder is up to 1080P 60fps.Also, the camera supports Dual Full HD 1080P real-time streaming. With morecomputing power, the camera can provide more flexibility for users and systemmanagers. In addition, the camera is equipped with Shutter WDR function,which can provide better image quality under extreme light contrast scenarios orchanging lighting environments.1.1Features Sony Progressive Scan CCD/CMOS Sensor720P / 1.3M / 2M Resolution*C/CS Mount LensQuad Streams supportDual Streams, Full HD 1080P Real-time Full HD 1080P Real-timeQuad Stream Compression- H.264 Baseline / Main / High Profile MJPEGMulti-language SupportTampering AlarmUltra Dynamic RangeMotion DetectionPrivacy Masks3D Noise Reduction / 2D Noise ReductionNetwork Failure DetectionDay / Night (ICR)Digital Image Stabilization (DIS)Auto Iris Lens SupportMicro SD SupportBNC Analog OutputRS-485 Support*ONVIF Support(*) Optional2
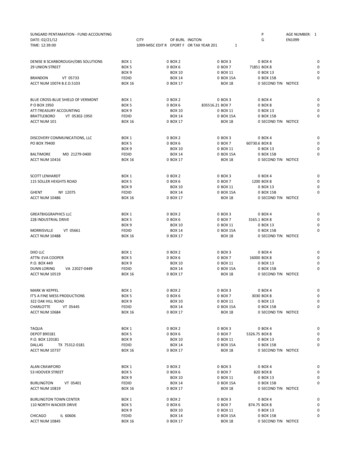
http://www.diviotec.com1.2Package ContentsPlease check the package contains the following items listed below.Full HD Multiple StreamsUltra-WDR Box IP CameraBack focus adjusterCDQuick Guide(bundled software anddocumentation)1.3DimensionsThe IP camera’s dimensions are shown below.3
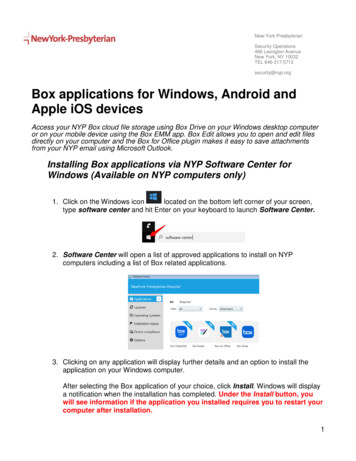
http://www.diviotec.com1.4ConnectorsThe diagram below shows the IP Camera’s reset button and various connectors.Definition for each connector will be given as follows.DC 12V / PoENo.12ConnectorsAudio I/OPower LED3Default Button456Auto IrisRJ-45Network LEDs7Alarm I/O8BNC9microSD Card Slot10Power (DC12V / AC 24V)(AC 24V Model)DC 12V / AC 24V / PoEDefinitionTwo-way audio transmissionFor power connection indication (green light)Press the button with a proper tool for at least 20seconds to restore the system.For auto iris lens connectionFor network and PoE connectionsFor network connection and activity indication1Output 5GND2Output6D3Input 7D 4InputFor analogue video outputInsert the microSD card into the card slot to storevideos and snapshots. Do not remove themicroSD card when the camera is powered on.DC 12VAC 24V 1 DC 12V ReservedAC 24V GNDDC 12V GNDAC 24V 2-NOTE: It is not recommended to record with the microSD card for 24/7continuously, as it may not be able to support long term continuous dataread/write. Please contact the manufacturer of the microSD card forinformation regarding the reliability and the life expectancy.4
http://www.diviotec.com2.Camera CablingPlease follow the instructions below to complete IP camera installation.2.1Power ConnectionPlease refer to section Connectors. Alternatively, users can power up thecamera by PoE if a Power Sourcing Equipment (PSE) switch is available. Referto the section below for Ethernet cable connection.NOTE: If PoE is used, make sure PSE is in used in the network.2.2Ethernet Cable ConnectionTo have best transmission quality, cable length shall not exceed 100 meters.Connect one end of the Ethernet cable to the RJ-45 connector of the camera,and the other end of the cable to the network switch or PC. The RJ-45 portnetworks without routing to the outside plant.NOTE: In some cases Ethernet crossover cable might be needed whenconnecting the camera directly to the PC.Check the status of the link indicator and the activity indicator LEDs. If the LEDsare unlit, please check the LAN connection.Green Link Light indicates good network connection.Orange Activity Light flashes for network activity indication.5
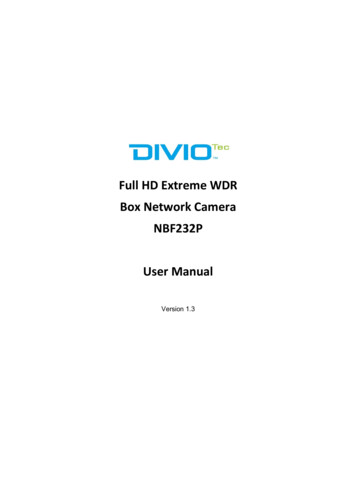
http://www.diviotec.com2.3Lens MountingIf use C-Mount lens, after removing the camera’s plastic cover, users need tomount the C/CS Mount adapter to the camera. Then attach the lens onto theC/CS Mount adapter, as the illustrations shown below.C/CS Mount Adapter2.4CompletionAlarm I/O ConnectionThe camera equips one alarm input and one relay output for alarm application.Refer to alarm pin definition below to connect alarm devices to the IP camera ifneeded.DC 12V / PoEPIN 1: Output PIN 2: OutputPIN 3: Input PIN 4: Input-DC 12V / AC 24V / PoE2.5RS485 Connection (for DC12V/AC24V/PoE Model)The RS-485 connector is the interface for connecting with the pan & tiltpositioning system.6
http://www.diviotec.comPIN 6: DPIN 7: D 7
http://www.diviotec.com3.System RequirementsTo perform the IP Camera via web browser, please ensure the PC is in goodnetwork connection, and meet system requirements as described below.ItemsSystem Requirement1. Intel Pentium M, 2.16 GHz orPersonal ComputerIntel CoreTM2 Duo, 2.0 GHz2. 2 GB RAM or moreOperating SystemWindows VISTA / Windows XP / Windows 7Web BrowserMicrosoft Internet Explorer 6.0 or laterFirefoxChromeSafariNetwork Card10Base-T (10 Mbps) or 100Base-TX (100 Mbps) operationViewerActiveX control plug-in for Microsoft IE8
http://www.diviotec.com4.Access CameraFor initial access to the IP camera, users can search the camera through theinstaller program: DeviceSearch.exe, which can be found in “DeviceSearch”folder in the supplied CD.Accessing the Camera by Device Search SoftwareStep 1: Double click on the program Device Search.exe.Step 2: After its window appears, click on the Device Search button on thetop. All the finding IP devices will be listed in the page.Step 3: Find the camera in the list by its IP address and click on it. The defaultIP address of the camera is: 192.168.0.250.Step 4: The default IP address of the camera may not be in the same LAN asthe IP address of the PC. If so, the IP address of the camera needs tobe changed. Right click on the camera and click Network Setup .Meanwhile, record the MAC address of the camera, for futureidentification.Step 5: The Network Setup page will come out. Select DHCP and click Apply down the page. The camera will be assigned with a new IPaddress.Step 6: Click OK on the Note of setting change. Wait for one minute tore-search the camera.Step 7: Click on the Device Search button to re-search all the devices. Findthe camera in the list by its MAC address. Then double click or rightclick and select Browse to access the camera directly via a webbrowser.9
http://www.diviotec.comStep 8: A prompt window requesting for default username and password willappear. Enter the default username and password shown below tologin to the camera.Login IDPasswordAdmin1234NOTE: ID and password are case sensitive.NOTE: It is strongly advised that administrator’s password bealtered for the security concerns. Refer to the Full HD MultipleStreams Ultra-WDR IP Camera Menu Tree in the supplied CDfor further details.Installing DC Viewer Software OnlineFor the initial access to the IP Camera, a client program, DC Viewer, will beautomatically installed to your PC when connecting to the IP Camera.If the web browser doesn’t allow DC Viewer installation, please check theInternet security settings or ActiveX controls and plug-ins settings (refer toAppendix C: Setup Internet Security) to continue the process.The Information Bar (just below the URL bar) may come out and ask forpermission to install the ActiveX Control for displaying video in browser.Right click on the Information Bar and select Install ActiveX Control to allowthe installation.The download procedure of DC Viewer software is specified as follows.Step 1:In the DC Viewer installation window, click on Next to startinstallation.Step 2:The status bar will show the installation progress. After the installationis completed, click on Finish to exit the installation process.Step 3:Click on Finish to close the DC Viewer installation page.10
http://www.diviotec.comOnce the DC Viewer is successfully installed, the IP camera’s Home page willbe able to correctly display as the figure below.Note: Please refer to the Full HD Multiple Streams Ultra-WDR IPCamera Menu Tree in the supplied CD for more details about thefunction buttons.11
http://www.diviotec.com5.Setup Video ResolutionUsers can setup video resolution on Video Format page of the user-friendlybrowser-based configuration interface.Video Format can be found under this path: Streaming Video Format.Thedefaultvaluesofvideo resolution are as below.2M1920 x 1080 (25 fps) 720 x 480 (25 fps)1920 x 1080 (30 fps) 640 x 480 (30 fps)For more details about the combinations of video resolution, please refer to theFull HD Multiple Streams Ultra-WDR IP Camera Menu Tree in the supplied CD.12
http://www.diviotec.com6. Configuration File Export / ImportTo export / import configuration files, users can access the Maintenance pageon the user-friendly browser-based configuration interface.The Maintenance setting can be found under this path: System Maintenance.Users can export configuration files to a specified location and retrieve data byuploading an existing configuration file to the camera. It is especially convenientto make multiple cameras having the same configuration.ExportUsers can save the system settings by exporting the configuration file (.bin) to aspecified location for future use. Click on the Export button, and the popupFile Download window will come out Click on Save and specify a desiredlocation for saving the configuration file.UploadTo copy a configuration file to the camera, click on Browse to select theconfiguration file, and then click on the Upload button for uploading.13
http://www.diviotec.comAppendix A: Technical SpecificationsCamera: NBF232PImage Sensor1/2.8" Progressive CMOSEffective Pixels1920(H) x 1080(V)Minimum IlluminationColor: 0.01 Lux @F 1.2 ; B/W: 0.001 Lux @F1.2Shutter Speed1/1 1/100,000 sec.LensLens MountC / CS MountIris auto adjustmentYesZoom Ratio16x Digital ZoomIntelligent Auto Back FocusPush Auto / Manual : Near / Far /Near Steps / Far Steps : up to 128 StepsImage SettingBacklightCompensationOn/OffWhite BalanceAuto /ATW/Indoor /Outdoor /ManualNoise Reduction3DNR 2DNR : Off / 3 Level SensitivityWide Dynamic RangeMulti ShuttersWDR (96dB)Exposure ModeAuto/Manual/Flicker less /Shutter Priority /Auto IrisShutter ModeAuto/ManualGain ControlAuto / Manual Max Gain 72 dBPicture /HueRegion of Interest (ROI)4 zonesConfigurable frame rate and bitrate independentPrivacy MaskOn / Off ; 5 Zones , 5 ColorsSmart IR LightOn / OffDay / Night FunctionAuto / Day / Night / Smart ICRSmart Schedule Profile10 Profiles / 10 Schedule 24 x 7 /SelectableDay Night SensorOn / Off / By schedule, 10 Zones,Motion Level DisplayMotion DetectionDetectionLevel 1-100, Sensitivity level1-100Sampling pixel interval 1-10Tampering AlarmOn / Off / By ScheduleNetwork Failure DetectionOn / Off / By SchedulePeriodical eventOn / OffDigital Image StabilizationOn / OffCamera SystemSelectable : 60 fps /Auto Iris 60 fps / WDR Auto Iris 30 fps / WDR 30 fpsAudioCompressionG.711 / G.726Audio ModeTwo-way Audio: Line-in x 1 / Line-out x 114
http://www.diviotec.comVideoVideo CompressionMulti SteamingH.264: Baseline / Main / High Profile , MJPEGQuad Streams: H.264 H.264 H.264 H.264/MJPEG Configurable frame rate and bitrateRegions ofInterest (ROI)Image ResolutionFull HD 1080P / SXGA / HD 720P / XGA / SVGA / D1 / VGA / CIF / QCIFMaximum Frame RateH.264 / MJPEG Full HD 1080P @60 fpsNetworkInterfaceRJ-45,10/100/1000 Mbps Ethernet (Giga Ethernet)ProtocolIPv4/v6, TCP/IP, UDP, RTP, RTSP, HTTP, HTTPS, ICMP, FTP, SMTP, DHCP, PPPoE, UPnP, IGMP, SNMP, QoSSecurityHTTPS / IP Filter/ IEEE 802.1x;20 user account / 2 level: user/administratorLocal storageMicro SDHC 32GBBit Rate64 - 8192 k bit/sSupport Web BrowserInternet Explorer (6.0 ) / Chrome / Firefox / SafariEvent NotificationHTTP / FTP / SMTPConnectivityONVIF Profile SGeneralLED IndicatorPower / Link / ACTAlarm in/outYes; 1 Input , 1 OutputTV outYes; BNC 1.0 Vp-p / 75 Ω, BNCMultiple LanguagesEnglish / French / German / Italian / Korean / Simplified Chinese / Traditional Chinese /Russian / Spanish / ThaiOperating Temperature-10 C 50 C (14 122 F)Humidity10% 90%, No CondensationDimension125 x 82 x 52mmWeight330gPower SourcePoE (IEEE 802.3 af) / DC12VPower Consumption5.5WRegulatoryCE / FCC / RoHS15
http://www.diviotec.comAppendix B: Delete the Existing DC ViewerFor users who have installed the DC Viewer in the PC previously, please first remove theexisting DC Viewer from the PC before accessing to the IP camera.Deleting the DC ViewerIn the Windows Start Menu , activate Control Panel , and then double click on Add orRemove Programs . In the Currently installed programs list, select DCViewer andclick on the button Remove to uninstall the existing DC Viewer.Deleting Temporary Internet FilesTo improve browser performance, it is suggested to clean up the all the files in theTemporary Internet Files.The procedure is as follows:Step 1: Click on the Tools tab on the menu bar and select Internet Options .Step 2: Click on the Delete button under Browsing history section. Then click on the Delete Files button under the Temporary Internet files section.Step 3: A confirmation window will pop up. Click on Yes to start deleting the files.16
http://www.diviotec.comAppendix C: Setup Internet SecurityIf ActiveX control installation is blocked, please either set Internet security level to default orchange ActiveX controls and plug-ins settings.Internet Security Level: DefaultStep 1:Step 2:Step 3:Step 4:Start the Internet Explorer (IE).Click on the Tools tab on the menu bar and select Internet Options .Click on the Security tab, and select Internet zone.Down the page, click on the Default Level button and click on OK to confirmthe setting. Close the browser window, and restart a new one later to access thecamera.ActiveX Controls and Plug-ins SettingsStep 1: Repeat Step 1 to Step 3 of the previous section above.Step 2: Down the page, click on the Custom Level button to change ActiveX controlsand plug-ins settings. The Security Settings window will pop up.Step 3: Under ActiveX controls and plug-ins , set ALL items (as listed below) to Enable or Prompt . Please note that the items vary by IE version.ActiveX controls and plug-ins settings:1. Binary and script behaviors.2. Download signed ActiveX controls.3. Download unsigned ActiveX controls.4. Allow previously unused ActiveX controls to run without prompt.5. Allow Scriptlets.6. Automatic prompting for ActiveX controls.7. Initialize and script ActiveX controls not marked as safe for scripting.8. Run ActiveX controls and plug-ins.9. Only allow approved domains to use ActiveX without prompt.10. Script ActiveX controls marked safe for scripting*.11. Display video and animation on a webpage that does not use external media player.Step 4: Click on OK to accept the settings. A prompt window will appear for confirmingthe setting changes, click Yes(Y) to close the Security Setting window.Step 5: Click on OK to close the Internet Options screen.Step 6: Close the browser window, and restart a new one later to access the IP camera.17
http://www.diviotec.comAppendix D: Back Focus Adjustment (Non-ABF)This section is for Non-ABF models only. Follow the instructions below to adjust the backfocus of the camera.When to adjust back focusBack Focus refers to the distance from the rear lens element to the camera focal plane. Inmost cases, it is required to adjust back focus only when the camera’s lens cannot holdfocus throughout its zoom range.Tools RequiredTools required when carrying out back focus adjustment include:1. Back focus adjuster (in the IP Camera’s package)2. Test chart / contrasting objectHow to adjust back focusStep 1: Set the camera on a stable mount, with the test chart or the contrasting object atleast 75 feet (23 meters) away (or as far as possible).Step 2: Make sure the iris is wide open. Therefore, it is suggested to keep the environmentin low light condition.Step 3: Adjust the focus to infinite far ( ).Step 4: Turn the zoom ring to the extreme telephoto position, and then focus on the testchart or the contrasting object.Step 5: Set the zoom ring to wide-angle position.Step 6: Loosen the back focus ring’s retaining screw with the supplied adjuster, andadjust the back focus ring for sharp picture.Step 7: Repeat Step 3 to Step 5 and adjust the back focus ring until focus can be heldthroughout the zoom range.18
http://www.diviotec.comStep 8: Tighten the retaining screw to fasten the back focus ring.19
The Full HD Multiple Streams Ultra-WDR Box IP Camera supports H.264 and MJPEG standard. The performance of the H.264 encoder is up to 1080P 60fps. Also, the camera supports Dual Full HD 1080P real-time streaming. With more computing power, the camera can provide more flexibility for users and system managers.