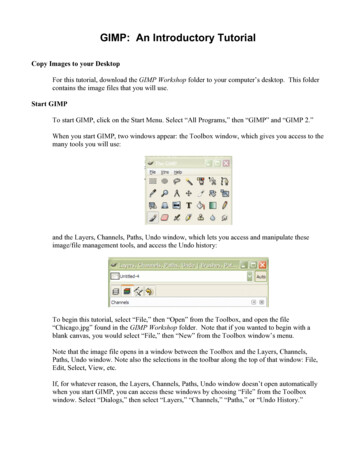
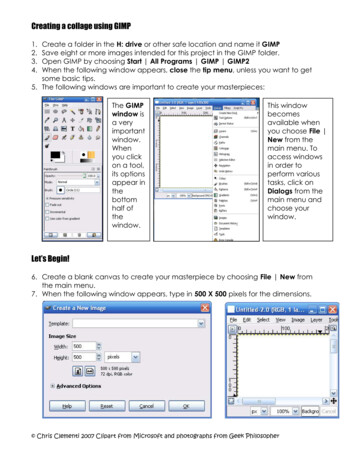
Transcription
GIMP BasicsHere's How You Can Design and Create YourOwn Graphics Without Photoshop, Quickly &Easily with These Step-By-Step Video Tutorialsfor a free editor named GIMP,For more info please click hereYour Friend MosbahWelcome to the GIMPKind of like a free Photoshop, theGIMP (which stands for GNU ImageManipulation Program) allows you to dopretty much anything with images. 1. ToolBox2. Tip of the Day (or the startup)3. Layers and history panel.Although the GIMP can do manythings, this tutorial is designed to showyou how to crop an image, recolor animage black and white, slice and movean object and how to save an image.GIMP Basics - 1
Opening an image1.We open an image by clickingonFile-- Open in Panel 1 (Tool Box panel).2.The image appears in Panel 2,theworkspace (you can think of it as adigital pasteboard where you are looking atthe photo in the middle of your work areawhich is flanked by tools and informationpertaining to the object you are workingon).3.Here you can see the layers inthefile. In this case I pasted this image intothe GIMPCropping an imageThe cropping tool is located in the toolbox(circled in red). Select it and draw a boxaround the area you want to keep.GIMP Basics - 2
Results of the Cropped ImageHere are the results of the cropped image.GIMP Basics - 3
Scale Image1. To resize an image, click on ScaleImageScale Image Dialogue box1. In the Scale Image Dialog box, youcanresize the image by adjusting the widthand height.2. Click on "Scale" to scale the image.GIMP Basics - 4
Saving an ImageTo Save an image, select File-- Save asfrom the main work area where the imageis shown.Save the image we scaled as a JPEGHere is the scaled picture being saved as aJPEG1. Name the file2. Location (in our case it is on thedesktop)3. Select the File Type (the GIMP hastonsof these, but we want JPEG)4. Click Save to save the file.GIMP Basics - 5
To Recolor an image Black & WhiteClick on Image-- Mode-- Black & WhiteYou can also work with other colors here(B&W is just a common request)GIMP Basics - 6
Results of the Mode Transformation to Black & WhiteThe transformation applied in one click.GIMP Basics - 7
Moving Wilbur's head.Wilbur is the mascot of GIMP. In thisexample we will move Wilbur head into thewhite space on our main image.1. First we will take a screen shot and cropit so that all we can see is his head.Moving Wilbur's Head (continued)1.OK we have Wilbur and we havethemain image. We are going to use theselection tool (circled in red) and draw abox around Wilbur.2.We will Edit-- Copy the selectedarea(Wilbur)3.We will edit paste into theotherwindow where the dialog box is.Select WilburWilbur is now ready to move into position.GIMP Basics - 8
1.Wilbur is now pasted as a newlayerin the window containing the screenshot.2.We can now click on him andmovehim into position for our next screenshot.GIMP Basics - 9
Wilbur finds a perfect positionNote, when you clickaway from him, themarching ants (or thefence around Wilbur willdisappear.GIMP ResourcesFor More on the GIMP:Download it at home:http://www.gimp.org/Help and Tutorials:GIMP Basics - 10
http://www.gimp.org/tutorials/Here's How You Can Design and CreateYour Own Graphics Without Photoshop,Quickly & Easily with These Step-By-StepVideo Tutorials for a free editor named GIMP,For more info, please click hereYour Friend MosbahGIMP Basics - 11
Welcome to the GIMP Kind of like a free Photoshop, the GIMP (which stands for GNU Image Manipulation Program) allows you to do pretty much anything with images. 1. Tool Box 2. Tip of the Day (or the startup) 3. Layers and history panel. Although the GIMP can do many things, this tutorial is designed to show you how to crop an image, recolor an