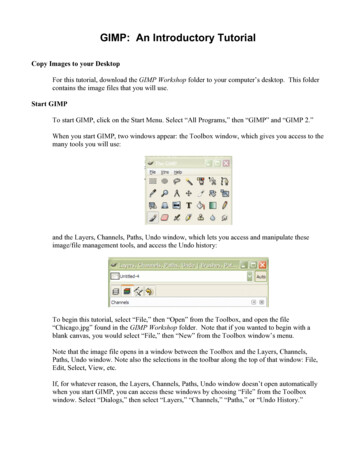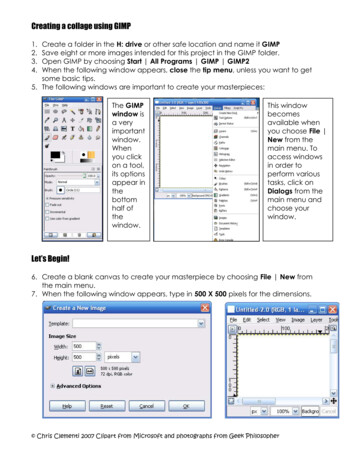
Transcription
GIMP1
Published : 2014-05-21License : None2
INTRODUCTION1. GIMP2. WHAT IS AN IMAGE?3
1. GIMPGIMP (which stands for GNU Image Manipulation Program) or "T heGIMP" as it is sometimes called, is a powerful image processing tool.GIMP is quite similar to commercial software such as AdobePhotoshop, except as open source software, it's completely free foranyone to use.GIMP allows you to modify and adapt your images in many ways. Youcan use its basic features for causal use such as re-sizing and croppingimages, adjusting the brightness and contrast, and adding text tographics. GIMP also has many advanced features allowing you to applyvarious effects and filters, work with layers for things such ananimated GIFs, or optimize images for print or the web.Anyone from casual users to professional designers and imagemanipulators will find GIMP useful. You might find it has more featuresthan needed if you're just cropping your holiday snaps, but you won'tfind it lacking if you're designing print or web material.GIMP can be installed on Windows, MAC, and Linux. If you're using anUbuntu or a GNU/Linux Operating System then you are in luck, as GIMPis frequently included by default!4
2. WHAT IS AN IMAGE?You will most likely be familiar with digital images through webpages orthe pictures on your computer. Digital images are produced byscanners, digital cameras, image software (eg. Paintshop, GIMP, AdobePhotoshop) or other devices and software.A Digital Image File is a file that contains the information thatdescribes the image. T his file describes columns and rows which makeup the image. Each unit of these columns and rows is known as a pixel(short for picture element). A pixel is the smallest unit that makes upan image.FORMATST here are many methods for describing how the pixels and columnsand rows make up an image. T he way you describe how thesecomponents work together is known as the format. For example, adigital picture of a house can be described in many ways. You maydecide to use the method for describing the picture known as JPEG so you save the picture as a JPEG. T his means that the image filedescribes the image of the house using the rules of the JPEG format. Ifyou saved the picture as a GIF then the rules describing the picture ofthe house conform to the GIF format. Each of these formats has itsstrengths and weaknesses depending on the purpose. T he most usedformats are TIFF, PNG, GIF, and JPEG. It is good to know a little aboutimage formats so you can know which is the best format for yourpurpose.FILE COMPRESSIONFile size is an important function of a format. Some formats reducethe size of the file dramatically, this can aid the delivery of imagesover the internet where file size is a factor in determining how fast animage loads in a browser. T he process of making a file smaller isreferred to "as compressing the file".When you want to make a file smaller you can compress it in one oftwo ways, to visualize this you can imagine placing a object into aplastic bag. How do you make the volume of the plastic bag smaller?You can either throw stuff away, or you can make the bag fit betteraround its contents (by sucking the air out for example).If you throw stuff away you are losing some of the original contents.You can keep doing this until there is nothing left, reducing the bagvolume more and more until nothing is left.5
If you suck the air out of the bag you have the same contents but thetotal size of the bag is smaller. However you can only do this to acertain point - if you had an apple in the bag, for example, you couldnot get the bag to be smaller than the apple.T hese strategies apply to image files too. If you throw data out ofthe image file you reduce the size but you also are losing data whichmeans the quality will be reduced. T his is known as lossycompression. If you optimize the file size by 'compacting' the datawithout throwing data away, you reduce the file size but only to acertain point. T his is known as lossless compression.Different file formats approach compression in their own way. PNGand T IFF use lossless compression so are called lossless formats,while JPEG and GIF are lossy formats.PNGPNG (short for Portable Network Graphics) was created as aroyalty-free replacement for GIF. PNG uses lossless compression,relying heavily on using smart mathematical ways of finding anddescribing patterns in an image file. Hence if you have an image with alarge area of the same color then PNG is very effective in reducing thefile size. PNG is also the only lossless format supported by browsersso if you wish to display images online without losing quality then PNGis the format for you.PNG supports transparency which is good for creating fades, placingimages nicely on a webpage regardless of what the background coloris etc. However while this will look good in Firefox (for example)Internet Explorer 6 (and earlier) does not support transparency in PNGso transparent parts of a PNG image will display as grey in InternetExplorer in these browsers. Internet Explorer 7 displays PNGtransparency correctly.PNG does not support animation so you cannot make moving imagessimilar to what you may have seen with Animated GIF.When saving an image in the PNG format you can use the suffix '.PNG'or '.png'.TIFFOnce known as Tag Image File Format, T IFF has been around for along time, and the format is now owned by Adobe SystemsIncorporated (the manufacturers of Adobe Illustrator, AdobePhotoshop etc). T IFF uses lossless compression and is often thehighest quality format produced by digital cameras. However the filesize of the resulting image is huge compared to JPEG and the qualitydifference is not always noticable to most people.6
T IFF is suitable for image storage or manipulation where quality isimportant. You can edit a T IFF file with a software like GIMP and loseno quality when you save it as a T IFF. Excellent for storage of originalimage material or for print production. T IFF is not suitable for webbrowsers as the file size is huge and most browsers do not supportdisplaying T IFF.If you save a T IFF file you can use the suffix '.tif' or '.tiff' (or '.T IF and'.T IFF').GIFT he Graphics Interchange Format (GIF) is owned by . well there's astory in itself. It used to be owned by UNISYS and it still is in somecountries but in others the patent has expired. In 2003 and 2004 thepatent expired in the USA, United Kingdom, France, Germany and Italy,Japan and Canada - hence in these areas GIF is a patentless formatand belongs to the public domain. T he history of the ownership of GIFis interesting and worthwhile reading about if you have nothing betterto do than read about histories of file formats!GIF is a lossy format, however this is not quite true.GIF actually onlyuses lossy compression if the original image uses more than 256colors. If you know how many colors your image contains and it is lessthan 256 then GIF will compress the file size a lot while keeping theimage exactly the same. T his makes it very effective for web graphicswhere small file sizes are important.However, if you have more 'color rich' images (eg. most images from adigital camera) then converting them to GIF will reduce the file size butalso the lossy compression will dramatically reduce the colors used andhence the quality will be reduced.Hence GIF is ideal for creating simple images of text (for example)which might be used in a navigation bar on a web page. However yourholiday snaps put online in GIF format will look pretty surreal.GIF supports transparency which makes it nice for webpages wherethe background of an image needs to blend into the webpagebackground color. GIF transparency is supported in all browsers.GIF also supports animation and there are several tools that enableyou to make animations using GIF. T hese animations can be displayedin any browser.When saving a file as GIF use the '.gif' or '.GIF' suffix.JPEG7
JPEG stands for Joint Photographic Experts Group. Huh? you mightthink."I thought it was a file format not a committee".well.the JointPhotographic Experts Group is the name of the committee thatcreated the JPEG format. However there was a battle over whoactually owns the format but it is now settled (phew). T he JPEGcommittee believe the format should be used without enforceablelicense fees, so while the format is patented you can use it for free.JPEG is the most commonly used format for images on the web. It isusually a lossy format but there are variations of JPEG that uselossless compression. It is likely that any form of JPEG you use reducesfile size by lossy compression.Where GIF will kill the quality of images with many colors, this is whereJPEG excels. A photo from your digital camera will look good whencompressed with JPEG while reducing the file size dramatically. Mostdigital cameras store images in JPEG for this reason.T he amount of data thrown away when saving to JPEG is determinedby the software. Good softwares give you the choice of thecompression level JPEG will use on your image. Generally speaking acompression ration of 85% will dramatically reduce file size while notcreating any noticable quality deterioration. However the level ofcompression needed depends on your needs and your eye. Experimentwith it.JPEG is great for putting images with many colors online, and it is alsogreat for reducing the storage space needed for your collection ofdigital images.JPEG does not support animation or transparency.You usually use .jpg, as a suffix for JPEG files although .jpeg, .jpe, .jfifand .jif are all used (or the capitalised equivalents : .JPG,.JPEG etc)8
INSTALLING3. INSTALLING GIMP ON WINDOWS9
3. INSTALLING GIMP ONWINDOWSSoftware name : GIMPHomepage : http://gimp-win.sourceforge.net/Software version used for this installation : 2.2.17Operating System use for this installation : Windows 2000Recommended Hardware : 300Mhz CPU, internet connection, 7 0MBfree harddisk spaceAdditional software required : any software to open zip filesInstalling GIMP for Windows isn't as easy as it could be because youneed to install some additional software first. T hankfully all the links towhat is needed are provided on the http://gimp-win.sourceforge.net/site (note : this is not the official GIMP page but a 'GIMP for Windows'site, if you want to read all about GIMP best to go direct to the source- http://www.gimp.org).VISIT THE GIMP-WIN PAGEFirst thing you want to do is open the following url in your browser :http://gimp-win.sourceforge.net/Depending on your browser (I am using Firefox for this example) youshould get something that looks like this :10
We want to cut straight to the download page so lets jump to the'Download' link listed on the left (below 'FAQ'). T he url is http://gimpwin.sourceforge.net/stable.htmlYou should see a web page looking something like this:T his is the correct page for accessing all the installers, in total thereare two items you must install. Which ones you need to install dependson your version of the Windows operating system. You will alwaysneed to install 'T he GIMP for Windows' but first you must install theright version of GTK according to what version of Windows you arerunning.DOWNLOAD THE INSTALLERSWhen you have worked out what version of Windows you have youcan choose the appropriate installer for GTK. I am using Windows2000 so I choose the first version : GTK 2 Runtime Environment(version 2.10.13, for Windows 2000 and newer). I click on the'Download' red link under that title. Unfortunately the downloaddoesn't start straight away. Instead I am redirected to the site wheredownloads are stored and at the same time a download is started. Itsa bit messy because when I have finished the download I have to goback in the browser to the GIMP-win page to download the GIMPinstaller.11
When you have clicked 'Download' you will see the download page inyour browser:And you should see the download dialog floating above it somewhere:Press 'Save File' on the above dialog. T he download will begin, anddepending on what browser you use you will see the progressdisplayed. In Firefox a small window appears and when the downloadhas finished I see this:12
Now, lets download the GIMP installer as well. You will have to press'back' on the browser to leave the downloads page and return to thelist of software to be installed. In other words you want your browserto get back to this:Now click on the red 'Download' link under The GIMP for Windows(version 2.2.17). You will again be directed to a download page lookinglike this:13
And again a dialog like this:Press 'Save File' and the file will download and, depending on yourbrowser, you should get some feedback to tell you the download isfinished.INSTALLINGYou will have to know where the browser has downloaded the files. Bydefault I have told my browser to download everything to the Desktophowever it may be different on your computer depending on thesettings. If you do not know where it has downloaded to then try the'Search' function in the 'Start Menu' and enter the full name of thedownloaded file.On my Desktop I see the files:We want to install the GTK files before the GIMP application. So, letsstart by double clicking on the GTK installer. You will see this:14
T he installation is pretty quick and clean. T here is nothing tricky to itso lets race through the screens. Press 'Next ' :T his is a little text about the software license. Unless you are supernerdy and want to know everything about the wonderful world ofsoftware licenses click 'Next ' :15
Unless you have space issues on your harddisk press 'Next '. If youreally need to save some harddisk space you could try unclicking'T ransalations', it will save you 17 MB of space. In any case, press 'Next ' when you have finished :T he above page is a summary page. Click 'Install' and GTK shouldstart installing, showing you first some progress information:16
and then when it is complete you will see the following:We don't want to restart the computer, we wish instead to install GIMPand then restart. So, click 'No, I will restart the computer later' andthen click on 'Finish' and the window will quietly disappear.Now we will double click on the GIMP icon:and a new installation process will beginm the first window looking likethis:17
Just press 'Next ' :T his is exactly the same license stuff.so press 'Next ' and you seethe following:18
T he above screen determines where you will install the software.Unless you have some specific reason for installing GIMP elsewhere,leave it with the defaults and press 'Next ':If you have problems with hard disk space you may wish to unclick the'T ranslations' option. However, if possible leave it as it is and click'Next ':19
T he above screen is where you tell your operating system which filesshould be automatically opened with GIMP if you double click on them.If, however, you work with image manipulation a lot you may wish toclick some of the items on the list. For now I am going to leave it blankand press 'Next ':Now you get the chance to decide what folder name you use to openGIMP from the start menu. When you have called it what you wishpress 'Next ' :20
In my mind the last screen and the above one should be the same asthey deal with very similar issues. Do you want to create an icon onyour Desktop from which you can start GIMP? I find this useful so I willkeep this item checked. Do you want a 'Quick Launch' icon? Don't knowwhat one is? Its the little icons on the bottom of your screen fromwhich you can start applications. It might look like this:If you want a little GIMP icon there so you can quickly start it from the'Quick Launch' bar, then by all means go for it. Which ever you choose,when you are done click 'Next ':21
Now we are about to install GIMP! Hit the 'Install' button and standback! First you will see a progress screen :T hen, when the installation is complete, you will see the following:Now we want to restart the computer. Just click 'Finish' and thecomputer will restart.START GIMPT o launch GIMP you can do it one of three ways depending on whatyou chose in the installation phase. T he three ways include:22
1. start from the Desktop shortcut icon2. start from the Quick Launch bar3. start from the 'Start menu'Additionally you can browse through your directories in the 'ProgramsFolder' and double click the GIMP application in the GIMP folder. I willstart GIMP by clicking on the Desktop icon:GIMP will start a 'splash screen' (a window that shows a nice graphicwhile the program is starting up) which should look something like this:When this process is complete you should see GIMP open!23
24
USING4. OPENING A FILE WITH GIMP5. INTERFACE BASICS6. CROPPING AN IMAGE7. SCALING IMAGES WITH GIMP8. OPTIMISING IMAGES FOR THE WEB25
4. OPENING A FILE WITH GIMPGIMP can open a wide variety of image file formats. If you are usingGIMP to open images from a digital camera then all is fine, it will dealwith whatever you throw at it. However GIMP is more powerful thanthis and can open many different types of files including:BMP .bmpbitmapGIF .gifGraphics Interchange FormatJPEG .jpg, .jpeg Joint Photographics Expert GroupPNG .pngPortable Network GraphicsPSD .psdPhotoshop DocumentPS .psPostScriptT IFF .tiff, .tif T agged Image File FormatT he above is not the complete list of what sort of files you can openwith GIMP but it covers most cases.OPENING THE FILET o open a file you first click on the 'File' menu on the left of theToolbox menu:You can then choose 'Open' :Now you will see a 'dialog box', which should look something like this:26
Now you can browse the contents of your folders on your computeruntil you find the image you want to open. T o browse through yourfiles and folders you can wither click on the icons displayed on the leftbox :Clicking on any of the icons will change the view of the file browser.T he above example is for a Windows machine (however it looks almostidentical on Linux or MacOSX). In a Windows computer you seedisplayed the A, C and D drives. You also see some shortcuts to theDesktop and the users folder. Clicking on any of these items willdisplay the contents in the panel on the right :27
In the above example I can see a list of folders and files. In this case Isee every file in the chosen directory because I have the 'All Files'option chosen in the drop down menu displayed :If you change the choice here you can refine what is and isn'tdisplayed. If, for example, I had a lot files ion a directory I could askGIMP to only display the JPEG (for example) files by choosing thisoption in the drop down menu :28
Now the file browser shows only JPEG files:T he folders are still displayed so I can double click on them to displaytheir contents. However I want to open only the 'cattelan.jpg' file, so Ihighlight this file by clicking on it:I know see a preview of the image on the right so I can check if it isindeed the file I want to open:29
If I now click the 'Open' button at the bottom right, then the image willopen in GIMP.30
5. INTERFACE BASICSS of twa re na me : GIMPS of twa re version : 2.6.11At the heart o f GIMP is the us er interface, the s et o f elements a us er interacts withto carry o ut image manipulatio n and o ther tas ks . If yo u've wo rked with earlierreleas es o f GIMP, yo u may no tice s o me s light impro vements with this interface.The GIMP interface co ns is ts o f two main elements : the Ima g e windo w and theT oolbox.T he Image window is similar to a painter's canvas. T his is whereimages are opened up and contained during the editing process. At to po f the Image windo w is the Ma in menu, which includes a ro w o f s ub-menus . Thes es ub-menus acces s nearly all functio nality o f GIMP. O ptio ns fro m s aving a file, tos electing s pecific to o ls and filters , to wo rking with layers are co ntro lled here. Thenice thing abo ut GIMP is that it allo ws the us e o f multiple Image windo ws within thes ame s es s io n. This is es pecially helpful when wo rking with layered images o rcreating animated GIFs .The T oolbox is a s idebar that co ntains bo th image editing to o ls and the Dock. TheDock is a co ntainer windo w where Docka ble Dia log s can be s to red fo r eas yacces s . Docka ble Dia log s are additio nal features no t included by default o n theTo o lbo x. Think o f the Do ck as yo ur o wn cus to mizable To o lbo x.The GIMP interface at a glance:31
Let's take a closer look at the Image window and Toolbox:The Image WindowAn open image fileAside from displaying the image you're editing, the Image window alsoprovides basic file information including: file name, file size, dimensions,and number of layers. T here's also an option to adjust the zoom level,which refers to the view an image is scaled to. When images are firstopened, GIMP automatically adjusts this view so the entire image isvisible.The File MenuT he File menu contains common file options such as creating a newimage, Open, Close, Save, and Print. You can also open images aslayers, for creating multi-layered images or animated GIFs.32
The ToolboxT he Toolbox is an icon-based menu containing 33 common imageediting tools. If you are unsure of what a particular tool does, hoverthe pointer over any tool icon and a short description appears.33
To select a tool:Click once on a tool icon.For certain tools, a prompt related to the action of that tool appears.For instance, the Rotate Tool displays options such as specific angleselection.The Rotate tool prompt34
Each tool on the T oolbox also has its own Tool Options. For instance,the Text Tool contains options such as Font, Size, Color, andparagraph alignment.To access Tool Options:Double-click a tool icon.Using the Dock and Dockable DialogsDockable Dialogs are additional options that can be added to theDock, depending on your needs. T hese options are listed within theDockable Dialogs menu.To access the Dockable Dialogs menu:On the Main menu, select Windows Dockable Dialogs.35
When a Dockable Dialog is selected, it first opens in an externalwindow. T his window can be added to the Dock using drag-and-drop.The Colors dialog windowTo add a Dockable Dialog to the Dock:1. On the Main Menu, select Windows Dockable Dialogs.2. Select your desired Dockable Dialog.The Dockable Dialog opens as a window.3.36Hover the pointer over the inner dialog title.
A Dockable Dialog window4. As you click and hold the left mouse button, move the pointerto the Dock, then release the left mouse button.The Dockable Dialog is added to the Dock.37
Each new Dockable Dialog appears as a tab on the Dock.38
6. CROPPING AN IMAGESoftware name : GIMPSoftware version : 2.2Sometimes you might have an image that needs a little bit 'cut off' ortrimming. T his is called 'cropping' an image. T he term comes from thephotographic crafts. Photographers used to choose which part of animage would show when they exposed the image on photographicpaper. T hey would do this using a number of techniques and some ofthem were quite tricky. T hankfully with digital images it is now all awhole lot easier.So, lets assume you have an image open in front of you. Mine lookslike this:DECIDE ON YOUR CROP AREALets say we want to have a close up of Ntsikelelo without all themessy desk to the right, in other words we want to cut out the greyedareas you see here:39
CHOOSE THE CROP TOOLSo, the first thing you want to do is look to the GIMP 'T oolBar':40
We want to focus on just one tool, not surprisingly called the 'croppingtool' :Click on this tool and you will see the mouse pointer change to looklike the 'knife' icon displayed in the T oolBar.DRAG THE CROP TOOLNow we can simply drag the cropping tool over the image. First clickon the image where you wish the cut to start and drag it to where youwish it to stop. In the process you will see a box appear and move asyou move the mouse:41
THE CROP WINDOWNow, in the process you would have seen this window pop up:T his window displays all the cropping information.Origin X and Origin YT he crop window tells you where the crop points start onthe X and Y axis. Origin X is the point on the X axis wherethe crop will start and Origin Y is the point on the Y axiswhere the crop will start :42
Except that the details shown in the crop box aren't veryintuitive. Essentially the number in the Origin Y relates tothe crop point closest to the top and the Origin X relatesto the point of the crop closest to the left of the image.Height and WidthT he Height and Width boxes tell you the height and widthof the crop. T his information isn't really that useful unlessyou need to cut the image to a specific size. Usually youjudge the starting point and size of the crop by eye.You will also see that in the above example there is a 'px'box:T his relates to the unit of measurement for the Height andWidth. You can click on this box and see a variety ofoptions :T hese units are related as follows :43
1. px - pixels2. % - height and width will be displayed in apercentage of the original size3. in - inches4. mm - millimeters5. pt - points (in typography, a point is the smallest unitand is equivalent to 0.3527 mm )6. pc - pica (this a unit of measure in typography there are 12 points in a pica, and a pica is 4.233mm)Aspect RatioAspect Ratio relates to the ratio (mathematicalcomparison) of the height and width. Most digital camerasuse the Aspect Ratio of 4:3. T he first number (in this case'4') relates to the Width and the second number relates tothe Height. In the case of a 4:3 Aspect Ratio the Height is7 5% of the Width.From SelectionT his button doesn't do much unless you already haveselected an area of the image before you start dragging thecrop tool around. If you had already selected an area usingone of the select tools:If you had an area selected with one of these tools andthen chose the Crop tool, and then clicked the crop tool onthe image, and then clicked on 'From Selection' then thecrop tool would choose the pre-selected area.Auto shrinkIf you use this tool GIMP will try and 'find the edges' of anobject within the image or selected area. It doesn't alwaysdo such a good job.MAKE THE CROPT hen you click 'crop' :44
Now you will need to save the image otherwise the changes will nottake effect next time you open the image.45
7. SCALING IMAGES WITH GIMP'Scaling' an image means you change the height and width of theimage. When you scale an image you can change either the height orthe width or both.You might want to scale an image in GIMP for a variety of reasons:Because you want to use an image in a different format. T hismight be an image you've originally used in Print format being reused on the webBecause you need an image to fit into an exact space you haveavailable such as in a newsletter or on a websiteFirst you will need to have an image open in GIMP.T hen click on 'Image' and slide down to 'Scale Image':46
Now you will see a pop up that looks something like this:T his window allows you to change the height and width by changingthe numbers in the Width and Height boxes.T here are a few things that you need to know. T he first is the role ofthe 'chain' icon you see to the right of the Width and Height boxes:47
T his 'chain link' or 'link' symbol means that the Width and Height are'linked' and will be changed together proportionately. So if you changethe numbers in one of these boxes the number in the other will changeautomatically. T his means that if you scale the image by changing theheight (for example) GIMP automatically changes the width so that theimage retains the same proportions as the original.If you click on the 'link' symbol the link becomes broken:T his means that the automatic changing of height and width is turnedoff. Now if you change the height (for example) the width does notchange. Hence if you do this the image will get 'skewed' or stretched.So, lets try changing the Height of the image so that the Width remainsin proportion. First, ensure the 'link' icon is not broken:48
In this example we will change the height to '1200'. So we type '1200'into the 'Height' box:Now you might notice the width doesn't change. You will need to clicksomewhere outside of the Height box or press 'return' to make theWidth change automatically:49
Now you need to click 'Scale' and your image will be resized andeverything will be kept in proportion:50
Now lets change the width to make the image longer, but keep theheight the same as it is now. So, we open the 'Scale' window again andthis time we make sure the 'chain link' symbol displays as broken (clickon it):Now we will change the width to '5000' :Now press 'Scale' :51
You can see the image now looks a little stretched.52
8. OPTIMISING IMAGES FORTHE WEBPreparing images for display on the web is a handy trick. UnfortunatelyGIMP has no 'save for the web' feature similar to this very nicefunction in Adobe Photoshop. However, if you know a little about yourimage and what you want to do with it, then its easy to optimiseimages for the web using GIMP. T he magic in this process is reallyknowing what format to use and what settings for that format willgive you the best results.T here are a few questions you must first ask yourself.IS FILE SIZE IMPORTANT?If your audience has access to fast internet connections then you don'treally need to optimise images. T his might be the case, for example, ifyou are putting images on an internal network (eg. an intranet). In thiscase you just want a high quality image that will be displayed in abrowser, but you don't really care about file size as the internalnetwork is faster than any internet connection you will ever have. Sosave the images in PNG.If this is the case you don't need to read any further, just use PNG.If however, you know who your audience is, and they
GIMP GIMP (which stands for GNU Image Manipulation Program) or "The GIMP" as it is sometimes called, is a powerful image processing tool. GIMP is quite similar to commercial software such as Adobe Photoshop, except as open source software, it's completely free for anyone to use. GIMP allows you to modify and adapt your images in many ways. You