Transcription
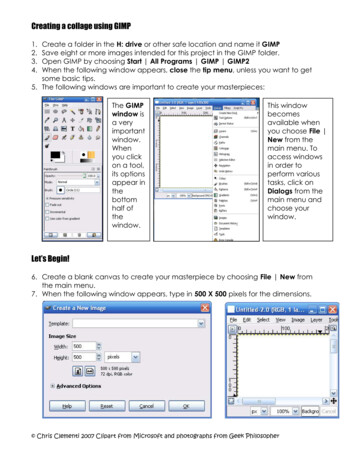
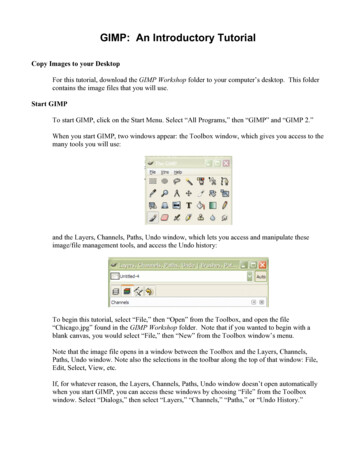
GIMP: An Introductory TutorialCopy Images to your DesktopFor this tutorial, download the GIMP Workshop folder to your computer’s desktop. This foldercontains the image files that you will use.Start GIMPTo start GIMP, click on the Start Menu. Select “All Programs,” then “GIMP” and “GIMP 2.”When you start GIMP, two windows appear: the Toolbox window, which gives you access to themany tools you will use:and the Layers, Channels, Paths, Undo window, which lets you access and manipulate theseimage/file management tools, and access the Undo history:To begin this tutorial, select “File,” then “Open” from the Toolbox, and open the file“Chicago.jpg” found in the GIMP Workshop folder. Note that if you wanted to begin with ablank canvas, you would select “File,” then “New” from the Toolbox window’s menu.Note that the image file opens in a window between the Toolbox and the Layers, Channels,Paths, Undo window. Note also the selections in the toolbar along the top of that window: File,Edit, Select, View, etc.If, for whatever reason, the Layers, Channels, Paths, Undo window doesn’t open automaticallywhen you start GIMP, you can access these windows by choosing “File” from the Toolboxwindow. Select “Dialogs,” then select “Layers,” “Channels,” “Paths,” or “Undo History.”
GIMP Tutorial - 2Transform the ImageSelect “Image” from the image window’s toolbar. Note the many options available; you canscale the image size or crop the image, for example. First, flip the image of the Chicago skyline.Select “Transform” from the drop-down menu, and then “Flip Horizontally.”Save Your Work in the .XCF FormatGIMP allows you to save your work in many popular image file formats, such as .jpg or .gif.GIMP also has its own file format, .xcf, which allows you to save information about layers,channels or paths, so you can work with your file later (the .xcf format in GIMP is similar to the.psd format in Adobe’s Photoshop). When you begin a project, you should save your work in this.xcf format.From the “File” menu, select “Save As” from the dropdown menu in the toolbar. Select a namefor the file (“Tutorial”), and choose where you would like to save the file on your computer (forthis tutorial, you can save to the desktop).Click “ Select File Type (By Extension)” at the bottom of the “Save Image” window.
GIMP Tutorial - 3Select “GIMP XCF Image” from the menu, then “Save.”Use FiltersUsing filters in GIMP can be fun and effective. To practice, add a flare to the Chicago skyline.Select “Filters” from the image window toolbar. Note how very many options you have at thispoint. In order to take full advantage of the filters, you should spend plenty of time playing withthem. To add the flare, select “Light Effects,” then “FlareFX.”Choose where along the Chicago skyline you’d like the flare and click “OK.” Continue toexperiment. Save your work.Undo HistoryOne advantage to working with GIMP is the ability to “undo” what you’ve tried but don’t like.Note the icons available in the Layers, Channels, Paths, Undo window:Click on the fourth icon, the yellow arrow, to get the Undo History (you can also access theUndo History by selecting “File” from the Toolbox menu, then “Dialogs” and “Undo History”).So far, you have opened your image, flipped it horizontally, and added a flare. In order toremove the flare (the last step you completed), click the left-facing yellow arrow underneath theUndo History. This removes the flare from the Chicago skyline.
GIMP Tutorial - 4Remember: as you experiment with GIMP, you can always undo what you’ve done.Adding LayersYou can use the layers function in GIMP to overlay images on top of each other. There are a fewdifferent ways to select which parts of an image you want to copy.Open the file “Crowd.jpg” from the GIMP Workshop folder.In the Toolbox, select the scissors icon on the first row, to “select shapes from image”:This tool allows you to use your mouse clicks to trace around a selection which you will thencopy and move. Use your mouse to carefully click along the edge of the crowd. Note that as youclick, the selection automatically snaps along the line of contrast.When you get to the far edge of the crowd, click 1) in the lower right corner, then 2) the lowerleft corner, and then 3) on the dot representing the first mouse click you made, in order to selectthe entire crowd.When you are finished, click once inside the selection, which will be surrounded by a moving,dotted line (referred to as “marching ants”).
GIMP Tutorial - 5From the image window toolbar, select “Edit,” then “Copy” to copy the selection to theclipboard. Switch to the Tutorial.xcf window, and select “Edit,” then “Paste.”The crowd image now floats over the top of the Chicago skyline. Select the Move tool in theToolbox (the four-way arrow icon), then click and drag the selected area of the crowd image tothe bottom half of the image window, but do not click the unselected area yet.Working with LayersIf you were to click on the Chicago skyline, you would merge the crowd and the skyline into onelayer. Remember, GIMP allows you to work with different layers in your project. This functioncan prove useful because layers allow you to apply changes to only one portion of an image,leaving the others untouched.To put the crowd image into its own layer, select the “Layers” icon from the menu in the Layers,Channels, Paths, Undo window. Note that the crowd is a “Floating Selection,” over the“Background.” Select the “New Layer” icon at the bottom of the window.Note that the boundaries of a layer don’t necessary match the boundaries of the image. Whenyou cut and paste a new layer, that new layer is sized just large enough to contain the pastedimage. The main reason this matters is because you can’t do anything to a layer outside itsboundaries; you can’t act on what doesn’t exist.
GIMP Tutorial - 6To extend the boundaries of the crowd layer, make sure that layer is selected in the Layers,Channels, Paths, Undo window. In the image window, select “Layer” from the toolbar, thenselect “Layer to Image Size” in the dropdown menu.Rename this layer something descriptive, like “Crowd Scene,” by double-clicking on the nameof the layer. As you work with GIMP, you will find it easier to manage complex files if youmake it a habit to name your layers. Save your work.Scaling the Size of LayersSometimes, you will need to change the size or scale of an image you have imported into a newlayer. Select “Layers” from the toolbar in the Tutorial.xcf window. Make certain that the“Crowd Scene” layer is selected, then choose “Scale Layer” from the dropdown menu.Note that the original image (Chicago.jpg) was 640 pixels by 480 pixels. If you want the “CrowdScene” layer to completely cover the Chicago skyline in the Tutorial.xcf file, you must increasethe width of the crowd to over 640 pixels. Change the number in the “Width” window to 670.Note the image of a chain-link next to the two windows; this indicates that the ratios of the imageare constrained. Click “Scale.” The crowd scene expands to fit beyond the width of the image.Changing OpacityIn the Layers window, note the sliding scale for opacity. Be sure that the “Crowd Scene” layer isselected, and slide the mouse along the Opacity scale.Choose a level of opacity you like for the crowd. Save your work.
GIMP Tutorial - 7Brightness, Contrast and ColorYou can also use GIMP to manipulate color levels and brightness/contrast/hue of either layers orthe whole image. To change the contrast levels of the crowd scene, choose the “Layer” from theimage window toolbar and select “Colors.”Note the many options here. You might experiment with the changes you can make in colorbalance or hue saturation. Remember, you can always undo any changes you don’t like.Select “Brightness/Contrast” from the dropdown menu.Use your mouse to change the levels. If you like the changes you make, select “OK.” If not,select “Cancel” and try some other changes from the dropdown menu. Save your work.Selecting Contiguous RegionsAnother way to select parts of an image to paste into your project is to use the “SelectContiguous Regions” tool.Open the file Superman.jpg.Select the icon that looks like a magic wand from the Toolbox. As you hold down your “Shift”key, click your mouse on all the white and green areas of the background behind Superman.Keep clicking (with the shift key down) on the background behind Superman. As you click,more of the background will be selected. Be sure to click the white area between his legs. After
GIMP Tutorial - 8you have selected everything but Superman, Choose “Select” from the image window toolbar,then choose “Invert.”After you have inverted the selection, select “Edit” from the image window toolbar, then “Copy”the Superman image to the clipboard.Click the Tutorial.xcf window to bring it to the forefront. Select “Edit” from the image windowtoolbar, then “Paste” the Superman image.Be sure to select a new layer for Superman in the Layers, Channels, Paths, Undo window, andname that layer “Superman.”Move the Superman selection to the right of the image. Note that the Superman layer is still infront of the Crowd layer.Make sure the Superman layer is selected in the Layers, Channels, Paths, Undo window. In theimage window, select “Layer” from the toolbar, then select “Layer to Image Size” in thedropdown menu.Clean Up Pasted Images Using ToolsYou might be able to see random pixels of green background that were pasted into your imagewhen you used the Select Contiguous Regions tool to cut and paste the Superman image. Youcan use the tools in the Toolbox to touch up images.First, make sure the Superman layer is selected in the Layers, Channels, Paths, Undo window. Inthe Toolbox window, select the eraser icon.
GIMP Tutorial - 9Using your mouse, carefully erase the green pixels from the image. Be careful not to erase any ofSuperman. Notice that using the eraser tool only affects the selected layer; neither the crowdlayer nor the background is altered.If you have trouble seeing the green pixels on the Superman layer, you can make the other layersinvisible by clicking the eyeball icon next to them in the Layers, Channels, Paths, Undo window.You can also zoom in on the image by clicking the magnifying glass icon in the Toolbox.Note, too, the chain icon next to the eyeball icon. If you select this icon, it will lock the layer andnot allow you to make any changes to it. If you have trouble using the tools in the Toolbox toedit your image, make sure the layer you are working with isn’t locked in the Layers menu.Note the other tools in the Toolbox, such as the bucket, the pencil, and the gradient fill tool,which allow you to work with individual pixels in your image. Be sure to experiment. Save yourwork.Changing the Order of LayersBecause you have added Superman to the image after you added the crowd, the Superman layersits above the crowd in the image. To move the Superman layer back (so that people in thecrowd appear to be looking at Superman), select the “Layers” tab in the Layers, Channels, Paths,Undo window.Pick up the Superman layer in the window. Drag it down and drop it between the background(Chicago skyline) and the crowd. Save your work.Adding Text to ImagesYou can add text to any image created with GIMP. To do so, click the “Text” icon in theToolbox. Note that the bottom half of the Toolbox window displays various text editing options.Click your mouse in the upper-left corner of the image window. The Text Editor windowappears. Type, “Superman Rocks!” into the Text Editor window. Note that the text appears overSuperman’s shoulder, in the Image window.
GIMP Tutorial - 10Using your mouse, highlight the text in the Text Editor window. You can now use the textediting tools in the bottom half of the Toolbox to change the font, color, and size of the text.Select the four-way arrow icon in the Toolbox, which allows you to move layers and selections.Make sure the text layer is selected in the Layers, Channels, Paths, Undo window. When thehand appears over the text, click and move the mouse to move the text.You can also use filters to transform text. Make sure the text layer is selected in theLayers/Channels/Paths/Undo window. Experiment. Save your work.Saving Files in Formats Other Than .XCFAs you work on your projects in GIMP, remember it is important to save your work (often) inthe .xcf format. When you are completely finished manipulating your image however, you willwant to save your project as a JPEG file to turn it into your instructor or share it with others.When you save your project as a JPEG, you remove information concerning the different layersand channels; you “flatten” the image, which makes it much smaller and compatible with otherprograms and platforms. Note that saving a JPEG does not replace or remove your original .xcffile. Should you want to revise your work, you can open and edit the .xcf file and save anotherJPEG when you have finished making changes.To save your file as a JPEG, select “Save As” from the “File” menu in the image windowtoolbar.Name your image and choose where on your computer you will save it.Choose “Select File Type (By Extension)” at the bottom of the window and select JPEG image.Click save.A dialog box appears that tells you your image must be exported because the JPEG file formatcan’t handle transparency. Click “Export.”Another dialog box allows you to choose the quality. Accept the default (85) and click “OK.”
GIMP Tutorial - 11Downloading & Installing GIMP on Your ComputerGIMP (acronym for GNU’s Image Manipulation Program—seehttp://en.wikipedia.org/wiki/GNU for more information) is a software program very much likeAdobe’s Photoshop. You can download and compile GIMP on your home computer byfollowing directions lNote that you must run the GTK 2 Runtime Environment before you install GIMP. You shouldalso download and install the help files.There are many GIMP resources on the web; if you have questions, Google “GIMP help” fortutorials and help files.
For this tutorial, download the GIMP Workshop folder to your computer's desktop. This folder contains the image files that you will use. Start GIMP To start GIMP, click on the Start Menu. Select "All Programs," then "GIMP" and "GIMP 2." When you start GIMP, two windows appear: the Toolbox window, which gives you access to the