Transcription
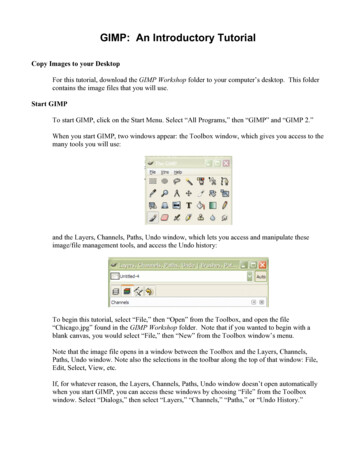
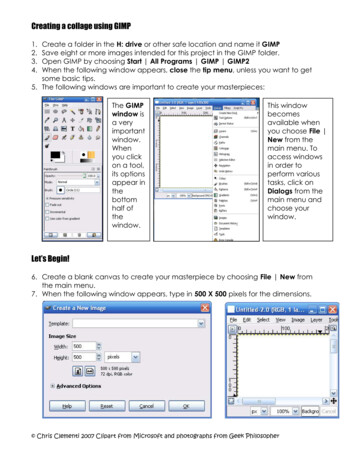
Creating a collage using GIMP1.2.3.4.Create a folder in the H: drive or other safe location and name it GIMPSave eight or more images intended for this project in the GIMP folder.Open GIMP by choosing Start All Programs GIMP GIMP2When the following window appears, close the tip menu, unless you want to getsome basic tips.5. The following windows are important to create your masterpieces:The GIMPwindow isa veryimportantwindow.Whenyou clickon a tool,its optionsappear inthebottomhalf ofthewindow.This windowbecomesavailable whenyou choose File New from themain menu. Toaccess windowsin order toperform varioustasks, click onDialogs from themain menu andchoose yourwindow.Let’s Begin!6. Create a blank canvas to create your masterpiece by choosing File New fromthe main menu.7. When the following window appears, type in 500 X 500 pixels for the dimensions. Chris Clementi 2007 Clipart from Microsoft and photographs from Geek Philosopher
8. Save the new window by choosing File Save As from the main menu.9. When the following window appears, type in collage in the Name section asshown below.10. To place the collage in the gimp folder, click on the Browse for other folders optionand locate the gimp folder. In order to open and edit this collage in GIMP, save itas collage.xdf. Note that the file chosen was GIMP XCF image (*.xdf) If saved withthe xdf extension, you will be able to open it in GIMP. Without an extension, youwon’t be able to save.Tip:You will be able to insert yourfinal image production intoword documents, websites,etc. when you save it as aJPEG or GIF. To continueediting the image with layersin GIMP, continue to save itwith an xdf extension.Examples:collage.xdf; pic.xdf; dog.xdf11. Once the blank canvas is saved, you can open up the images you previouslysaved in the gimp folder.12. You might want to temporarily paint the background since apainted background helps determine the boundaries on thecanvas.13. Click on Tools Paint Tools Bucket Fill or click on the Paint Bucketicon in the GIMP window.14. Pick a solid temporary color by clicking on the FG color fill under FillType and double clicking on the Foreground & background colorsicon to access colors.15. Once you have a solid color, click on the canvas and it will be painted. Chris Clementi 2007 Clipart from Microsoft and photographs from Geek Philosopher
16. To open images, choose File Open from the canvas menu.Navigate to the gimp folder and select the images. To select more than oneimage, hold down the control key. Once the images are selected, click on theOpen button.Now, that isa lovelycreature!Let’s put images on the collage!17. To select part of the image in order to copy it and paste it on the collage, chooseTools Selection Tools (Select from the tool that will best suit your needs )Selectionchoices1The following example used theIntelligent Scissors. (1) using themouse, click and move around theimage continuously until the entireimage is selected. (2) Clickanywhere after the selection tomake the selection complete. (3)Provide a feather effect by choosingSelect Feather and click OK23The feathercould be setbefore theselection. Chris Clementi 2007 Clipart from Microsoft and photographs from Geek Philosopher
tipIf the selection doesn’t occur, select the layer in the Layer’s window andhit the Enter key on the keyboard. If the Layer’s window isn’t showing,choose Dialogue Layers in the menu of the image you are selecting.18. Once the selection is made, you can choose Edit Copy in order to copy theselection.19. Open or access the collage canvas and choose Edit Paste from the menu.20. Since the image pasted is taking up the majority of the collage canvas, it needs tobe resized to roughly 200 pixels wide. See number 19.21. Choose Layer Scale Layer from the menu. Click on the drop down arrow of theWidth option and set it to roughly 200 pixels. The Height should adjust accordingly,so don’t worry about adjusting it if it changes as you adjust the Width.22. The following is an example of before and after resizing the layer.BeforeAfter23. To move the image, make sure you are on the correct layer. Select the Move toolfrom the GIMP window and move your image.24. Continue getting the other images by using the selection tool of your choice. Youcan click on the selection tools in the Tools window (known as The GIMP) or chooseTools Selection Tools (selection)Top half oftools windowshows thetools.Bottom halfof toolswindowshowsoptionsassociatedwith thattool. Chris Clementi 2007 Clipart from Microsoft and photographs from Geek Philosopher
25. Before copying and pasting a selection, make sure your Layer’s Window is showing.If the Layers window isn’t showing, choose Dialogue Layers from the menu of thecollage. (1) The window will look something like the following example. (2) Whenyou choose Edit Paste, the Layers window will have added a layer that says,“Floating Selection (Pasted Layer) (3) When you hit the Enter Key on the keyboarda couple of times while on the Floating Layer, it will show the Walrus. (4) Renamethe layer, by double clicking on the layer and typing in an appropriate name.123426. You can resize the recently copied image by repeating steps 18 and 19. The widthand height will vary depending on the image being resized. In the walrus example,the width was set to roughly 400 pixels wide. It all depends on what effects youwant.Examples of different selection tools: Tip, set the feather edgesbeforeusing the following selection tools. This becomes available in the GIMP window whenyou click on the selection tool. Setting the feather gives softer edges around theselected image. Drag the selection tools around the part of the image you want tocopy. Once it is selected, choose Edit Copy from the main menu or Ctrl CRec SelectEllipse SelectFree SelectChoose Tools Selection Tools RectSelect from the mainmenu. You can alsoclick on the on the iconof the GIMP window.Choose Tools Selection Tools EllipseSelect from the mainmenu. You can alsoclick on the on the iconof the GIMP window.Choose Tools Selection Tools FreeSelect from the mainmenu. You can alsoclick on the on the iconof the GIMP window.IconStepsResults Chris Clementi 2007 Clipart from Microsoft and photographs from Geek Philosopher
Adding a Background with Gradient Effects27. The following steps show how to use the Gradient tool to create a background. (1)Make sure you have selected the background layer. If the Layer’s window isn’tshowing, choose Dialog Layers from the menu. (2) Select the Gradient tool in theTools Window (3) Click on the gradient options to get a variety of choices. (4)Change the shape of the gradient if you choose.Background LayerGradients ToolGradient Options312Possible GradientsPossible GradientsExample of GradientUsing the Shape optionExample of Gradient with ashapeExample of Gradient with ashape4 Chris Clementi 2007 Clipart from Microsoft and photographs from Geek Philosopher
Adding a Background with Paint Bucket Fill28. The following steps show how to use the Paint Bucket tool to create a background.(1) Make sure you have selected the background layer. If the Layer’s window isn’tshowing, choose Dialog Layers from the menu. (2) Select the Paint Bucket tool inthe GIMP Window (3) Click on the Foreground & Background options in the GIMPwindow to get a solid color or (4) Click on the Pattern fill option to get a variety ofpatterns to fill the background. The bubble of the Pattern fill needs to be selectedor you won’t be able to access patterns.Background LayerPaint Bucket ToolPaint Bucket Options2134Possible FillsPossible FillsExample of FillExample of FillExample of FillExample of Fill Chris Clementi 2007 Clipart from Microsoft and photographs from Geek Philosopher
Adding Text29. To add text, (1) select the Text tool in the GIMP window. (2) Change the Font Style,(3) Font Size, (4) and Font Color231430. Click down on your canvas and (1) a window will appear for you to type in the text.(2) As you type in the window, you will be able to see if you like the font size, styleand color. (3) You can make changes before accepting the text, by changing thecolor, font style and font size in the GIMP window.13231. If the text is beneath other layers, simply drag it and drop it on top of the otherlayers in the Layer’s window. Chris Clementi 2007 Clipart from Microsoft and photographs from Geek Philosopher
32. If you want to apply unique effects to the text, make sure you are on the Text Layerthat you want to modify. Click on the drop down arrow of the Mode option in theLayer’s window and experiment with your choices. The default is Normal.Normal isover-rated!33. If you want to apply filter effects to the text, make sure you are on the Text Layerthat you want to modify. Right click on the text of your collage and select Filters.Tip!There are several filtersto choose from.Experiment! If you don’tlike the results, simplychoose Edit Undo orclick on the Ctrl Z keys.Keep in mind that youcan apply the filtereffect to images as well.That is probably morecommon.34. The following example used Filter Distort Wind. It is important to experiment withthe options in these windows to get the desired results.I needprotection! Chris Clementi 2007 Clipart from Microsoft and photographs from Geek Philosopher
Fading images by changing the opacity of a layer.35. Choose a layer to fade. In this case, the Layer’s window was accessed and thetiger layer was selected.100%36. Locate Opacity and move the leverage until you are satisfied with the results of thetransformation. In the example, the opacity was changed to 50%.50%More on Filter Effects37. Click on the layer you want to apply a filter effect.38. Right click on the image on the collage window and choose Filter (Choose froma wide range of choices)Filter Artistic CartoonFilter Map Paper TileFilter Distorts WindFilter Artistic PhotocopyFilter Artistic OilifyFilter Distorts Emboss Chris Clementi 2007 Clipart from Microsoft and photographs from Geek Philosopher
Saving Image for other applications, such as a website39. Make sure you save your collage with the layers before preparing it for otherapplications.40. Choose File Save As from the collage window.41. Locate the folder you want to save the image42. Select the File Type. In this case, since it is a photo intended for a website or worddocument, choose JPEG image which will add the .jpg extension to your collage.Clipart is usually saved as a GIFI’m aGIFI’m aJPEG43. If the following window pops up, choose Export, since your image needs to beflattened.I’m intoExport!44. When the following window pops up, unless you understand the specifications ofquality, leave the default settings and choose OK.Quality isimportant! Chris Clementi 2007 Clipart from Microsoft and photographs from Geek Philosopher
All Images on collage are from Geek Philosopher, a Public Domain site Chris Clementi 2007 Clipart from Microsoft and photographs from Geek Philosopher
10. To place the collage in the gimp folder, click on the Browse for other folders option and locate the gimp folder. In order to open and edit this collage in GIMP , save it as collage.xdf . Note that the file chosen was GIMP XCF image (*.x df) If saved with the xdf extension, you will be able to open it in GIMP .