Transcription
title:GNU Image Manipulation Programsubtitle:User Manualrevhistory:copyright:legalnotice:G e n e r a t e db yd o c b o o k 2 o d fPermission is granted to copy, distribute and/or modify this document under theterms of the GNU Free Documentation License, Version 1.2 or any later versionpublished by the Free Software Foundation; with no Invariant Sections, no FrontCover Texts, and no Back-Cover Texts. A copy of the license is included in thesection enphrased GNU Free Documentation License.GNU Image Manipulation ProgramGenerated by docbook2odfPage 1 of 421
G e n e r a t e db yd o c b o o k 2 o d fGIMP User Manual Authors and ContributorsGNU Image Manipulation ProgramGenerated by docbook2odfPage 2 of 421
ChapterG e n e r a t e db yd o c b o o k 2 o d fIntroductionGNU Image Manipulation ProgramGenerated by docbook2odfPage 3 of 421
Welcome to The GIMPThe GIMP is a multiplatform photo manipulation tool. GIMP is an acronym for GNU ImageManipulation Program. The GIMP is suitable for a variety of image manipulation tasks,including photo retouching, image composition, and image construction.It has many capabilities. It can be used as a simple paint program, an expert qualityphoto retouching program, an online batch processing system, a mass production imagerenderer, an image format converter, etc.GIMP is expandable and extensible. It is designed to be augmented with plug-ins andextensions to do just about anything. The advanced scripting interface allows everythingfrom the simplest task to the most complex image manipulation procedures to be easilyscripted.One of The GIMP's strengths is its free availability from many sources for many operatingsystems. Most GNU/Linux distributions include The GIMP as a standard application. TheGIMP is also available for other operating systems such as Microsoft Windows or Apple'sMac OS X (Darwin). The GIMP is not freeware. It is a Free Software application covered bythe General Public License (GPL license). The GPL provides users with the freedom toaccess and alter the source code that makes up computer programs.AuthorsThe first version of the GIMP was written by Peter Mattis and Spencer Kimball. Many otherdevelopers have contributed more recently, and thousands have provided support andtesting. GIMP releases are currently being orchestrated by Sven Neumann and MitchNatterer and many other people called the GIMP-Team.The GIMP-Help systemThe GIMP-Help system provides you with the information necessary to understand how touse The GIMP. You can get context sensitive help while using GIMP by pressing the F1 key.Help on specific menu items can be accessed by pressing the F1 key while the mousefocuses the menu item. Read on to begin your GIMP journey.Features and CapabilitiesThe following list is a short overview of some of the features and capabilities which GIMPoffers you: Full Alpha channel support for working with transparency Layers and channels A procedural database for calling internal GIMP functions from external programs,such as Script-Fu Advanced scripting capabilities Multiple undo/redo (limited only by disk space) Transformation tools including rotate, scale, shear and flip File formats supported include GIF, JPEG, PNG, XPM, TIFF, TGA, MPEG, PS, PDF, PCX,GNU Image Manipulation ProgramGenerated by docbook2odfPage 4 of 421b y Sub-pixel sampling for all paint tools for high-quality anti-aliasingG e n e r a t e d Tile-based memory management so image size is limited only by available diskspaced o c b o o k 2 o d f A full suite of painting tools including brushes, a pencil, an airbrush, cloning, etc.
BMP and many others Selection tools including rectangle, ellipse, free, fuzzy, bezier and intelligentG e n e r a t e db yd o c b o o k 2 o d f Plug-ins that allow for the easy addition of new file formats and new effect filtersGNU Image Manipulation ProgramGenerated by docbook2odfPage 5 of 421
What's New in The GIMP?GIMP 1.0 evolved gradually into the very stable and widely used 1.2 release. Three yearslater, as the GIMP development came closer to the next stable release, they decided thatthe level of fundamental change to the inner workings of the program justified calling thenew stable version 2.0. GIMP 2.0.0 was released on March 23, 2004. For GIMP 2.2, thedevelopers aimed at a short cycle, adding a number of important features that did notrequire instability-inducing low level changes. GIMP 2.2.0 was released on December 19,2004. This section briefly describes the new features that were added in GIMP 2.2, as wellas the features that were introduced in GIMP 2.0.Here is a brief summary of some of the most important new features introduced in GIMP2.2. There are many other smaller changes that long-time users will notice and appreciate(or complain about!). There are also important changes at the level of pluginprogramming and script-fu creating that are not covered here.Interoperability and standards support You can drag-and-drop or copy-and-paste image data from the GIMP to anyapplication which supports image/png drops (currently Abiword and Kword at least)and image/xml svg drops ( Inkscape supports this one). So you can copy-and-pastecurves into the GIMP from Inkscape, and then drag a selection into Abiword toinclude it inline in your document. Patterns can now be any supported GtkPixbuf format, including png, jpeg, xbm andothers. GIMP can load gradients from SVG files, and palettes from ACT and RIFF files. Drag-and-drop support has been extended. You can now drop files and URIs onto animage window, where they will be opened in the existing image as new layers.Shortcut editorYou can now edit your shortcuts in a dedicated dialog, as well as continue to use the littleknown dynamic shortcuts feature (which has been there since 1.2).Plug-in previewsReal-time previews of transform operationsThe transform tools (shear, scale, perspective and rotate) can now show a real-timepreview of the result of the operation when the tool is in "Traditional" mode. Previously,only a transforming grid was shown.A lot of work has been done on making the GIMP's interface simpler and more usable fornewcomers. Most dialogs now follows the GNOME HIG to the best of our knowledge. Inaddition, dialogs have separated out or removed many "Advanced" options, and replacedthem with sane defaults or hidden them in an expander.GNU Image Manipulation ProgramGenerated by docbook2odfPage 6 of 421G e n e r a t e db yGNOME Human Interface Guide conformanced o c b o o k 2 o d fWe have provided a standard preview widget for plug-in authors which greatly reducesthe amount of code required to support previews. David Odin has integrated this widgetinto all the current filters, so that now many more filters in the GIMP include a previewwhich updates in real time, and the various previews behave much more consistently.
GTK 2.4 migration Menus use the GtkUIManager to generate menu structure dynamically from XMLdata files. A completely revamped File Chooser is used everywhere in the GIMP for opening orsaving files. The best thing about it is that it lets you create a set of "bookmarks",making it possible to navigate quickly and easily to commonly used directories. GIMP now Supports fancy ARGB cursors when they are available on the system.Basic vector supportUsing the GFig plug-in, the GIMP now supports the basic functionality of vector layers. TheGFig plug-in supports a number of vector graphics features such as gradient fills, Beziercurves and curve stroking. It is also the easiest way to create regular or irregularpolygons in the GIMP. In the GIMP 2.2, you can create GFig layers, and re-edit these layersin GFig afterwards. This level of vector support is still quite primitive, however, incomparison to dedicated vector-graphics programs such as Inkscape.Also . . .There are many other smaller user-visible features. A rapid-fire list of some of thosefeatures is below. It is now possible to run the GIMP in batch mode without an X server. We have a GIMP binary (GIMP-console) which is not linked to GTK at all. Improved interface for extended input devices Editable toolbox: You can now decide which tools should be shown in the Toolbox,and their order. In particular, you can add any or all of the Color Tools to the Toolboxif you wish to. Histogram overlays R, G and B histograms on the Value histogram, and calculatesthe histogram only for the contents of the selection.G e n e r a t e db yd o c b o o k 2 o d f Shortcuts are now shared across all GIMP windows.GNU Image Manipulation ProgramGenerated by docbook2odfPage 7 of 421
Running GIMPMost often, you start GIMP either by clicking on an icon (if your system is set up toprovide you with one), or by typing gimp on a command line. If you have multipleversions of the GIMP installed, you may need to type gimp-2.2 to get the latest version.You can, if you want, give a list of image files on the command line after the programname, and they will automatically be opened by GIMP as it starts. It is also possible,though, to open files from within GIMP once it is running.In most operating systems, you can set things up so that various types of image files are"associated" with GIMP, and cause it to start automatically when icons for them aredouble-clicked.If you want to cause a certain file type to automatically open in GIMP, you shouldassociate it with "gimp-remote" ("gimp-win-remote" under Windows) rather than with"gimp". The gimp-remote program is an auxiliary that comes with gimp. If gimp is notalready running on the system when gimp-remote is executed, it is started and the imagegiven as argument to gimp-remote is loaded. If gimp is already running, though, theimage is simply loaded into the already-running program.Command Line ArgumentsOrdinarily you don't need to give any arguments when starting GIMP, but here is a list ofsome that may at one time or anther be useful. This is not a complete list; on Unixsystems you can get a complete list by running man gimp in a terminal window.Known platformsThe GIMP is the most widely supported image manipulation available today. The platformsthat The GIMP is known to work on include GNU/Linux, Apple Mac OS X (Darwin), MicrosoftWindows 95, 98, Me, XP, NT4, and 2000, OpenBSD, NetBSD, FreeBSD, Solaris, SunOS, AIX,HP-UX, Tru64, Digital UNIX, OSF/1, IRIX, OS/2, and BeOS.The GIMP can easily be ported to other operating systems because of its source codeavailability.LanguageAll being well, GIMP detects the system language. This may fail on some machines andyou may want use another language. It is possible to change the language:Start/Programs/ Accessories/System Tools/System Informations/Tools/SystemConfiguration Utility/"Environment" tab/"New" button: Enter LANG for Name and fr or de.for Value.Under Window 95 and Windows 98, add the line set lang fr in the "C:\autoexec.bat" file.Go to System Preferences, click on the International icon, and in the Language tab, theGNU Image Manipulation ProgramGenerated by docbook2odfPage 8 of 421b yIf you often change language, you can create a batch file. Open NotePad. Type thefollowing commands (for french for instance): set lang fr cd c:\Program Files\GIMP-2.0\binGIMP-2.2.exe Save this file as GIMP-FR.BAT (or another name, but always with a .BATextension. Create shortcut and drag it to your desktop.G e n e r a t e dIn WINDOWS XP: Control Panel/System/ Advanced/"Environment" button/ In "SystemVariables" area: "Add" button: Enter LANG for Name and fr or de. for Value. Watch out!You have to click on three successive "OK" to validate your choice.d o c b o o k 2 o d fIn LINUX: in console mode, type LANGUAGE en GIMP or LANG en GIMP replacing en byfr, de, . according to the language you want.
G e n e r a t e db yd o c b o o k 2 o d fdesired language should be the first in the list.GNU Image Manipulation ProgramGenerated by docbook2odfPage 9 of 421
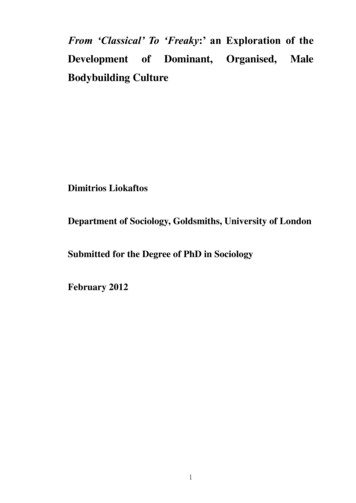
Starting GIMP the first timeThe first time you run GIMP, it goes through a series of steps to set up options anddirectories. This process creates a subdirectory of your home directory called .gimp 2.2.All of the information about the choices you make here goes into that directory. If youlater remove that directory, or rename it as something like .gimp 2.2.bak, then the nexttime you start GIMP, it will go through the whole setup sequence again, creating a new.gimp 2.2 directory. You can exploit this if you want to explore the effect of differentchoices without destroying your existing installation, or if you have screwed things up sobadly that your existing installation needs to be nuked.For the most part, setting up GIMP is very easy, and you can just accept the defaults ateach step, and possibly adjust things later using the Preferences dialog. The main thingyou might want to give a little thought to at the start is the amount of memory to allocatefor GIMP's tile cache.Here is a walk-through of the setup process:GNU Image Manipulation ProgramGenerated by docbook2odfPage 10 of 421b yG e n e r a t e d2. The purpose of this screen is only to make the user aware of the GIMP personalsettings directory, subdirectories and files creation process, before it begins. You justhave to have a look and click to proceed.d o c b o o k 2 o d f1. Since this window mentions the GNU General Public License you know it is truly aWelcome dialog you are entering into. Also, note the "Continue" button. The GIMP doesnot even ask that you agree to it, merely whether you want to continue. Feel free topress the continue button.
G e n e r a t e db yd o c b o o k 2 o d f3. This window shows you the files that GIMP will create. It will have some complaintsif you told it to install some place that it don't have permission to be. There is a scrollbar to see all the things GIMP has created for you.GNU Image Manipulation ProgramGenerated by docbook2odfPage 11 of 421
4. Setting your memory usage is not an easy thing. So much depends on what yourneeds are for the GIMP and what hardware you have to work with. You have twooptions at this point. Go with the default value the developers have set here, ordetermine the best value. A brief tile-cache explanation. might help you determine thisvalue. The tile-cache information might also be helpful to you if you are encounteringmemory problems when using the GIMP.G e n e r a t e db yd o c b o o k 2 o d fOn a Unix system, /tmp might be a good place for the swap.GNU Image Manipulation ProgramGenerated by docbook2odfPage 12 of 421
ChapterG e n e r a t e db yd o c b o o k 2 o d fGIMP ConceptsGNU Image Manipulation ProgramGenerated by docbook2odfPage 13 of 421
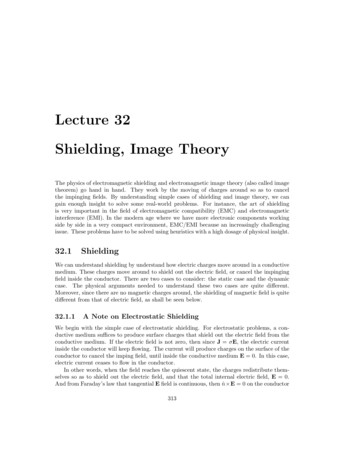
Main Windows in GIMPThe screenshot above shows the most basic arrangement of GIMP windows that can beused effectively. Three windows are shown:The Main Toolbox: This is the heart of the GIMP. It contains the highest level menu, plus aset of icon buttons that can be used to select tools, and more.Tool options: Docked below the main Toolbox is a Tool Options dialog, showing options forthe currently selected tool (in this case, the Rectangle Select tool).An image window: Each image open in GIMP is displayed in a separate window. Manyimages can be open at the same time: the limit is set only by the amount of systemresources. It is possible to run GIMP without having any images open, but there are notvery many useful things to do then.Layers Dialog: This dialog window shows the layer structure of the currently active image,and allows it to be manipulated in a variety of ways. It is possible to do a few very basicthings without using the Layers dialog, but even moderately sophisticated GIMP users findit indispensible to have the Layers dialog available at all times.Brushs/Patterns/Gradients: The docked dialog below the layer dialog shows the dialogs formanaging brushes, patterns and gradients.This is a minimal setup. There are over a dozen other types of dialogs used by GIMP forvarious purposes, but users typically create them when they are needed and close themwhen they are not. Knowledgeable users generally keep the Toolbox (with Tool Options)and Layers dialog around at all times. The Toolbox is essential to many GIMP operations;in fact, if you close it, GIMP will exit. (You are asked to confirm that you want to do this,though.) The Tool Options are actually a separate dialog, shown docked to the MainToolbox in the screenshot. Knowledgeable users almost always have them set up thisway: it is very difficult to use tools effectively without being able to see how their optionsare set. The Layers dialog comes into play whenever you work with an image that hasmultiple layers: once you advance beyond the very most basic stages of GIMP expertise,this means almost always. And finally, of course, the necessity of having imagesdisplayed in order to work with them is perhaps obvious.GNU Image Manipulation ProgramGenerated by docbook2odfPage 14 of 421b yEarlier versions of the GIMP (up to GIMP 1.2.5) were very profligate with dialogs:advanced users often had half a dozen or more dialogs open at once, scattered all overthe screen and very difficult to keep track of. GIMP 2.0 is much better in this respect,because it allows dialogs to be docked together in a flexible way. (The Layers dialog in thescreenshot actually contains four dialogs, represented by tabs: Layers, Channels, Paths,and Undo.) The system takes a little while to learn, but once you learn it, we hope thatyou will like it.G e n e r a t e dUnlike some other programs, GIMP does not give you the option of putting everything—controls and image displays—all into a single comprehensive window. The GIMPdevelopers have always felt that this is a poor way of working, because it forces theprogram to perform a wide range of functions that are much better done by a dedicatedwindow manager. Not only would this waste a lot of programmer time, it is almostimpossible to do in a way that works correctly across all of the operating systems GIMP isintended to run on.d o c b o o k 2 o d fIf your GIMP layout gets trashed, fortunately the arrangement shown in the screenshot ispretty easy to recover. In the File menu from the Main Toolbox, selecting File DialogsCreate New Dock Layers, Channels, and Paths will give you a Layers dialog just like theone shown. In the same menu, selecting File Dialogs Tool Options gives you a new ToolOptions dialog, which you can then dock below the Main Toolbox. (The section on Dialogsand Docking explains how to dock dialogs.) There is no need to be able to create a newMain Toolbox, because you cannot get rid of the one you have without causing GIMP toexit.
The following sections will walk you through the components of each of the windowsshown in the screenshot, explaining what they are and how they work. Once you haveread them, plus the section describing the basic structure of GIMP images, you shouldhave learned enough to use GIMP for a wide variety of basic image manipulations. Youcan then look through the rest of the manual at your leisure (or just experiment) to learnthe almost limitless number of more subtle and specialized things that are possible. Havefun!The Main ToolboxThe Main Toolbox is the heart of the GIMP. It is the only part of the application that youcannot duplicate or close. Here is a quick tour of what you will find there.In the Toolbox, as in most parts of GIMP, moving the mouse on top of something andletting it rest for a moment will usually bring up a "tooltip" message that may help youunderstand what the thing is or what you can do with it. Also, in many cases you canpress the F1 key to get help about the thing that is underneath the mouse.Toolbox Menu: This menu is special: it contains some commands that cannot be found inthe menus that are attached to images. (Also some that can.) These include commandsfor setting preferences, creating certain types of dialogs, etc. The contents are describedsystematically in the Toolbox Menu section.Tool icons: These icons are buttons that activate tools for a wide variety of purposes:selecting parts of images, painting on them, transforming them, etc. The ToolboxIntroduction section gives an overview of how to work with tools, and each tool isdescribed systematically in the Tools chapter.Foreground/Background colors: The color areas here show you GIMP's current foregroundand background colors, which come into play in many operations. Clicking on either oneof them brings up a color selector dialog that allow you to change to a different color.Clicking on the double-headed arrow swaps the two colors, and clicking on the smallsymbol in the lower left corner resets them to black and white.Active Image: (This is a new feature in GIMP 2.2) In GIMP, you can work with many imagesat once, but at any given moment, one of them is the "active image". Here you find asmall iconic representation of the active image. Clicking on it brings up a dialog with a listof all the currently open images, allowing you to make a different one active if you wantto. (Clicking on the window where the image is displayed will accomplish the same thing,though.)The "Active Image" preview is disabled by default. If you want it, you can enable it in theToolbox Preferences tab.Image WindowIn GIMP, each image that you have open is displayed in its own separate window. (Insome cases, multiple windows may all display the same image, but this is unusual.) Wewill begin with a brief description of the components that are present by default in anGNU Image Manipulation ProgramGenerated by docbook2odfPage 15 of 421G e n e r a t e db yAt every start, GIMP selects a tool (the brush), a color, a brush and a pattern by default,always the same. If you want GIMP to select the last tool, color, brush and pattern youused when quitting your previous session, check the "Set input device settings on exit" inPreferences/Input Devices.d o c b o o k 2 o d fBrush/Pattern/Gradient The symbols here show you GIMP's current selections for: thePaintbrush, used by all tools that allow you to paint on the image ("painting" includesoperations like erasing and smudging, by the way); for the Pattern, which is used in fillingselected areas of an image; and for the Gradient, which comes into play whenever anoperation requires a smoothly varying range of colors. Clicking on any of these symbolsbrings up a dialog window that allows you to change it.
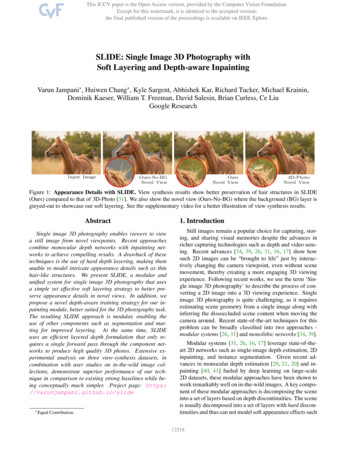
ordinary image window. Some of these, in fact, can be made to disappear usingcommands in the View menu; but you will probably find that you don't want to do that.Title Bar: At the top of the image window you will probably see a emphasis bar, showingthe name of the image and some basic information about it. The emphasis bar is actuallyprovided by the windowing system, not by GIMP itself, so its appearance may vary withdifferent operating systems, window managers, and/or themes. In the Preferences dialogyou can customize the information that appears here, if you want to.Image Menu: Directly below the emphasis bar appears the Image Menu (unless it hasbeen suppressed). This menu gives you access to nearly every operation you can performon an image. (There are some "global" actions that can only be accessed via the Toolboxmenu.) You can also get the Image Menu by right-clicking inside the image , or by leftclicking on the little "arrow" symbol in the upper left corner, if for some reason you findone of these more convenient. More: most menu operations can also be activated fromthe keyboard, using Alt plus an "accelerator" key underlined in the menu emphasis. More:you can define your own custom shortcuts for menu actions, if you enable Use DynamicKeyboard Shortcuts in the Preferences dialog.Menu Button: Clicking on this little button gives you the Image Menu, except in a columninstead of a row. Mnemonics users who don't want the menu bar visible can acces to thismenu by pressing the Shift F10 key.Ruler: In the default layout, rulers are shown above and to the left of the image,indicating coordinates within the image. You can control what type of coordinates areshown if you want to. By default, pixels are used, but you can change to other units, usingthe Units setting described below.One of the most important uses of rulers is to create guides. If you click on a ruler anddrag into the image display, a guideline will be created, which you can use to help youposition things accurately. Guides can be moved by clicking on them and dragging, ordeleted by dragging them out of the image display.QuickMask Toggle: At the lower left corner of the image display is a small button thattoggles on or off the Quick Mask, which is an alternate, and often extremely useful, wayof viewing the selected area within the image. For more details see QuickMask.Pointer Coordinates: In the lower left corner of the window is a rectangular area used toshow the current pointer coordinates (that is, the mouse location, if you are using amouse), whenever the pointer is within the image boundaries. The units are the same asfor the rulers.Cancel Button: At the lower right corner of the window appears the Cancel button. If youstart a complex, time-consuming operation (most commonly a plug-in), and then decide,while it is being computed, that you didn't really want to do it after all, this button willcancel it immediately.There are a few plug-ins that respond badly to being canceled, possibly leaving corruptedGNU Image Manipulation ProgramGenerated by docbook2odfPage 16 of 421b yStatus Area: The Status Area appears below the image display. Most of the time, bydefault, it shows which part of the image is currently active, and the amount of systemmemory that the image is consuming. You can customize the information that appearshere, by changing your Preferences. When you perform time-consuming operations, thestatus area changes temporarily to show what operation is being performed, and its stateof progress.G e n e r a t e dZoom button: (This feature is new in GIMP 2.2; it does not appear in GIMP 2.0). There area number of ways to zoom the image in or out, but this menu is perhaps the simplest.d o c b o o k 2 o d fUnits menu: (This feature is new in GIMP 2.2; it does not appear in GIMP 2.0). By default,the units used for the rulers and several other purposes are pixels. You can change toinches, cm, or several other possibilities using this menu. (If you do, note that the settingof "Dot for dot" in the View menu affects how the display is scaled: see Dot for Dot formore information.
pieces of images behind.Navigation control: This is a small cross-shaped button at the lower right corner of theimage display. Clicking on it, and holding the left mouse button down, brings up a windowshowing a miniature view of the image, with the displayed area outlined. You can pan to adifferent part of the image by moving the mouse while keeping the button depressed. Forlarge images of which only a small part is displayed, the navigation window is often themost convenient way of getting to the part of the image you are looking for. (SeeNavigation Dialog for other ways to access the Navigation Window). (If your mouse has amiddle-button, click-drag with it to span across the image).Inactive Padding Area: This padding area seperates the active image display and theinactive padding area, so you're able to distinguish between them. You cannot apply anyFilters or Operations in generall on the inactive area.Image Display: The most important part of the image window is, of course, the imagedisplay or canvas. It occupies the central area of the window, surrounded by a yellowdotted line showing the image boundary, against a neutral gray background. You canchange the zoom level of the image display in a variety of ways, including the Zoomsetting described below.Image Window Resize Toggle: If this button is pressed, the image itself will be resized ifthe image window is resized.Dialogs and DockingDocking BarsEach dock has a set of docking bars, as highlighted in the adjoining figure. These are thingray bars, very unobtrusive and easy not to notice: most people don't realize that theyGNU Image Manipulation ProgramGenerated by docbook2odfPage 17 of 421G e n e r a t e db yd o c b o o k 2 o d fIn GIMP 2.0 and 2.2, you have a lot of flexibility about the arrangement of dialog windowson your screen. Instead of placing each dialog in its own window, you can group themtogether using docks. A "dock" is a container window that can hold a collection ofpersistent dialogs, such as the Tool Options dialog, Brushes dialog, Palette dialog, etc.Docks cannot, however, hold image windows: each image always has its own separatewindow. They also can't hold non-persistent dialogs, such as the Preferences dialog or theNew Image dialog.
exist until they are specifically pointed out.Docking Drag HandlesEach dockable dialog has a drag handle area, as highlighted in the figure on the right. Youcan recognize this by the fact that the cursor changes to a hand shape when the pointeris over the drag handle area. To dock a dialog, you simply click on its drag handle area,and drag it onto one of the docking bars in a dock.You can drag more than one dialog onto the same docking bar. If you do, they will turninto tabs, represented by iconic symbols at the top. Clicking on the tab handle will bring atab to the front, so that you can interact with it.Image MenuG e n e r a t e db yd o c b o o k 2 o d fSome docks contain an Image Menu: a menu listing all of the images open in GIMP, anddisplaying the name of the image whose information is shown in the dock. You can usethe Image Menu to select a different image (don't confuse this menu for the Image Menuthat is the Menu of the active image on your screen). If the Auto button is depressed,then the menu always shows the name of GIMP's currently active image, that is, theimage you are currently working on.GNU Image Manipulation ProgramGenerated by docbook2odfPage 18 of 421
By default, a "Layers, Channels, and P
The GIMP is the most widely supported image manipulation available today. The platforms that The GIMP is known to work on include GNU/Linux, Apple Mac OS X (Darwin), Microsoft Windows 95, 98, Me, XP, NT4, and 2000, OpenBSD, NetBSD, FreeBSD, Solaris, SunOS, AIX,