Transcription
The Photo Hobbyist’s Guide toGetting Started with GIMP 2.8
GETTING STARTED WITH GIMP 2.8Table of ContentsIntroduction . 3Installing GIMP 2.8 . . 4Learning the Basics . 8Creating a new file . 8Opening an existing image . 8Using layers . .10Recognizing Familiar Functions . .12Saving a GIMP project . .13Exporting a GIMP project 14Additional Tips .15Manipulating Images .16Rotating . .16Selecting . .18Cropping 21Adjusting Brightness/Contrast . .22Changing Saturation . .23Using Other Color Functions . .241
GETTING STARTED WITH GIMP 2.8Photo Retouching . 25Using the Clone Stamp and Healing Tools .25Using the Dodge/Burn Tool . 27Sharpening/Blurring . 28Special Effects .29Applying Filters .32Changing Lighting . .32Making GIFs .33Credits .382
GETTING STARTED WITH GIMP 2.8IntroductionAs a beginning artist, photographer, or even a casual onlooker seeking toimprove family photos, you may have sought out methods by which to edit yourdigital photos. Several solutions exist on the market, such as Corel and AdobePhotoshop, but they can be pricey. GIMP 2.8, GNU Image Manipulation Program,is a free alternative for hobbyists looking to get started with editing their ownimages.In this tutorial, you will learn how to download the software, as well as how tobegin using the basic features included in the program. These features includecropping, creating GIFs, and changing color settings, among several other actions.This tutorial assumes familiarity with Microsoft Paint.exe.3
GETTING STARTED WITH GIMP 2.8Installing GIMP 2.8To install GIMP on your computer, go to www.gimp.org and click on the Downloadbutton.GIMP relies on donations to exist, so be sure to donate via PayPal or Bitcoin if youcan.4
GETTING STARTED WITH GIMP 2.8GIMP runs on most standard versions of Windows, as is listed above. Click theDownload GIMP 2.8.14 link, or 2.8.xx as the version might be updated, to downloadthe Setup file.5
GETTING STARTED WITH GIMP 2.8If upon saving this file and attempting to run the program it does not prompt youto install, instead choose the Click Here link shown on the Download page.Once you have saved a working setup file, open it to run. It should be in yourDownloads folder on your computer or browser toolbar.6
GETTING STARTED WITH GIMP 2.8Click Install and go through the installation process. When that completes, GIMP2.8 should be installed on your machine.7
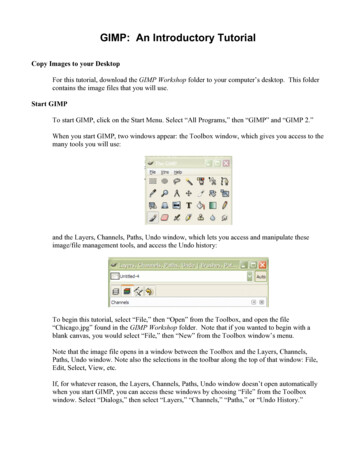
GETTING STARTED WITH GIMP 2.8Learning the BasicsNow that you have installed GIMP on your computer, it is time to get started. Openthe program by clicking on the icon on your desktop or Start menu bar.Creating a New FileTo create a new image, go to the menu bar – click on File and select New.8
GETTING STARTED WITH GIMP 2.8The screen that opens will prompt you to enter the desired size for your new image.The Template drop down box has a list of standard sizes, or you can manually setthe width and height settings yourself to pixels, inches, or one of the other units ofmeasure provided. Click OK to create the new image.Opening an Existing ImageGo to the menu bar – click on File and select Open.This window will allow you to open a variety of image files from your computer’sdocuments. Select the image you wish to open, verify that it is correct in thepreview window, and click Open. The image will then be available for editing.9
GETTING STARTED WITH GIMP 2.8Using LayersWhen editing an image, you sometimes might want to create layers for each stepin the process to avoid having to re-do a step if you decide to undo one that camebefore it. Layers are also useful for collaging and creating GIFs, which will betouched upon later. To create a layer, go to the Layers-Gradients window.Click on the blank page icon shown above to create a new layer. Again, size can beadjusted, as well as the name of the Layer for your reference. Layer fill typespecifies what color, if any, the new layer will have.10
GETTING STARTED WITH GIMP 2.8Layers will be shown in the Layers-Gradients window, which has a few key features: Opacity adjusts the level that a layer is shown in relation to other layers The eye icon signifies whether the layer is visible. By turning it off, you canmore easily work on another layer without distractions The arrows allow you to move from layer to layer The anchor icon merges a floating layer down, locking changes to theanchored layer down The trash can icon to the right of the anchor deletes the selected layer Locking a layer by clicking the square to the right of the eye icon or the “Lock”prompt prevents you from making any changes to that layer11
GETTING STARTED WITH GIMP 2.8Recognizing Familiar FunctionsThe most basic drawing actions are available within GIMP. The can be found withinthe Toolbox window, which is similar to that of Microsoft Paint.exe. However, ithas a few added features and can be relocated on your screen.12
GETTING STARTED WITH GIMP 2.8Saving a GIMP ProjectTo save a GIMP project, go to the menu bar – click on File and select Save. This willnot overwrite the original image if you opened an existing image.xcf is the file extension for GIMP projects. Saving in this format will allow you toopen the image again in GIMP, as well as any layers.13
GETTING STARTED WITH GIMP 2.8Exporting a GIMP ProjectTo Export a GIMP project, go to the menu bar – click on File and select Export As.You can save your image in a variety of file formats here. Alternatively, if you donot want to keep the original image, you can choose Overwrite instead to skip afew steps. Click Export to save your image for use outside of GIMP.14
GETTING STARTED WITH GIMP 2.8Additional TipsListed below are a few additional functional features of GIMP that are useful toknow. Multiple files can be open within GIMP 2.8 at a time. These are eachcontained within their own windows and can be minimized and maximizedwhen you are working with them. Images can be opened directly from file as layers within the project you areworking on. Presets exist within the file menu for creating images and buttons specificallyfor web page themes, making GIMP a useful tool for designing internetapplications. Under the menu bar, the View option allows you to toggle grids, bars, andboxes on or off, as well as reposition them depending on how you would likearrange your workspace.15
GETTING STARTED WITH GIMP 2.8Manipulating ImagesNow that you know how to Create, Open, Save, and Export images, you are readyto begin with simple editing tasks.RotatingTo rotate an image, go to the menu bar – choose Image - Transform to view a listof options for transforming the image.16
GETTING STARTED WITH GIMP 2.8This option will allow you to rotate the image, as well as the canvas it is on.Alternatively, if you wish to rotate the image within the canvas at an angle, choosethe Rotate Tool from the Toolbox.By clicking and dragging, you can turn the image at a central point. Portions thatare not in the canvas area will be cropped and canvas that the image does not coverwill be reduced to transparency.17
GETTING STARTED WITH GIMP 2.8SelectingTo select part of an image, you must first decide what area to select. There are fivemethods available: Rectangle Select, Ellipse Select, Freeform Select, Fuzzy Select,or Select by Color. These are shown from left to right in the image below.To use the Rectangle Select Tool, click the rectangle button in the Toolbox, thenclick and drag on the image where you want the selection to be. You can adjust therectangle’s dimensions after selecting.To use the Ellipse Select Tool, the same method as the Rectangle Select Tool appliesafter clicking on the ellipse button in the Toolbox, and the selection will be in anadjustable ellipse.To use the Freeform Select Tool, click on the lasso button in the Toolbox. Clickanywhere on the image that you wish to use as the starting point for your freeformselection. Click a second point to create a straight line, or click and drag to make afreeform line. The selection shape is only complete when the final point and theinitial point meet, as is shown by the yellow circle on the image in the next page.18
GETTING STARTED WITH GIMP 2.8If you change your mind on one of the selection lines that you make, pressing theBackspace key will return your selection to the previous point.To use the Fuzzy Select tool, click on the wand button and then click on the area ofthe photo that you wish to select. This tool will choose contiguous sections of thephoto that are similar. An example of the selection of the asphalt in the image isshown below.19
GETTING STARTED WITH GIMP 2.8To use the Select by Color tool, click on the last icon in the selection row of theToolbox. This tool will select all areas of the image with the same color. An exampleof a Select by Color operation, in which the gray of the pole was selected, is shownbelow.20
GETTING STARTED WITH GIMP 2.8CroppingTo crop an image, you must first make a selection. If your selection is a freeformshape, GIMP will still crop the image to rectangular dimensions to a best fit on theedges of your shape.Once you have made your selection, go to the menu bar – choose Image - Crop toSelection. This will crop the image to the selection’s dimensions.21
GETTING STARTED WITH GIMP 2.8Adjusting Brightness/ContrastTo adjust brightness/contrast, go to the menu bar – click on Colors and then chooseBrightness-Contrast to view the adjustment window. Here, you can drag thesliders right or left to increase or decrease the brightness and contrast of the photo.22
GETTING STARTED WITH GIMP 2.8Changing Hue-SaturationTo change the saturation of the image, go to the menu bar – choose Colors - HueSaturation and use the window to adjust color levels in the image.You can also use this window to adjust the lightness of the image, as changing thehue and saturation may call for it.23
GETTING STARTED WITH GIMP 2.8Using Other Color FunctionsSeveral other color functions exist under the Colors tab on the menu bar. Here is abrief outline of their functions: Color Balance – adjusts color levels in shadows, midtones, and highlights Colorize – replaces all colors with one hue and allows you to adjust that hue’ssaturation and brightness Threshold – increases contrast so the image is in the foreground andbackground color on the color palette; which levels are expressed is adjustedthrough the slider Levels – adjusts color levels of the image as a whole using a slider Curves – adjusts color levels using a curve or freehand deviation from theexisting levels in the image Posterize – reduces the number of colors in the image Desaturate – removes all colors from the image, reducing to grayscale Invert – inverts colors so they are the opposite in hue and brightness24
GETTING STARTED WITH GIMP 2.8Photo RetouchingThis section will deal with some of the more involved image manipulation actionswithin GIMP. These include adjusting highlights and shadows to improve digitalphoto lighting, using tools to remove imperfections, and sharpening or blurringsections to alter texture.Using the Clone Stamp and Healing ToolsThe two tools covered in this section are found in the Toolbox and shown below.The Clone Stamp is on the left and the Healing tool is on the right.The clone stamp is a paint brush that uses a section of the image as a source ratherthan a color. To use the Clone Stamp, press the CTRL key on your keyboard andclick anywhere on the image that you want to clone. Then click and drag to paintthe cloned section onto the other area of the image. This clone source will followthe path of the Clone Stamp as you drag. An example is shown below, with theimage on the left and the cloned fencing on the right.25
GETTING STARTED WITH GIMP 2.8The Healing tool is similar to the Clone Stamp, but is best utilized for repairing minorinconsistencies within the photo. The same process applies. Press CTRL and clickon a section of the image that is similar to the area you wish to heal. Then click anddrag over the imperfection or blemish to remove it. In the example shown below,the Healing tool was used to remove sidewalk cracks and litter.26
GETTING STARTED WITH GIMP 2.8Using the Dodge/Burn ToolShown in the Toolbox below from left to right are the Sharpen/Blur Tool, theSmudge Tool (which blurs and shifts portions of an image away from the point ofclicking), and the Dodge/Blur Tool.The Dodge/Burn Tool is used to lighten (Dodge) or darken (Burn) the image alonga selected path, similar to a paintbrush.In order to Dodge, click and drag along the area you wish to lighten.To Burn, hold down the CTRL key as you click and drag along the area you wish toburn.An example of these functions is shown below. The picture on the right has lightareas of the sign emphasized using the Dodge Tool and dark areas emphasizedusing the Burn Tool.27
GETTING STARTED WITH GIMP 2.8Sharpening/BlurringThe Sharpen/Blur Tool is utilized in the same manner as the Dodge/Burn tool.To sharpen along a path, hold the CTRL key and then click and drag along the areaof the image that you wish to sharpen.To blur, do not hold down a key and instead click and drag along the area of theimage that you wish to blur.An example of these functions is shown below, with the background emphasizedusing the Sharpen/Blur Tool.28
GETTING STARTED WITH GIMP 2.8Special EffectsApplying FiltersFilters are plug-ins within GIMP that contain preset actions to create an overalleffect on an image. These plug-ins perform multiple image manipulationoperations at a time to create an overall effect.29
GETTING STARTED WITH GIMP 2.8To apply a filter to an image, choose the Filters option under the Menu Bar, findthe filter category, and then choose the filter you wish to apply. Often, these plugins will prompt you to set parameters to control the levels at which the image willbe manipulated. Once those are set to your preferences, click OK to apply them.To apply the last filter used with the exact same settings, click the Repeat Lastoption under Filters.To apply the last filter used, but with new parameters, click the Re-Show last optionunder Filters. This will display the settings window again for the selected filter. Theparameters will already be set to those used previously and will be adjusted fromthose points.GIMP saves parameters that you set within filters. To restore to default filtersettings, click on the Reset all Filters option under the Filters menu.The next page offers examples of a few of the filters available within GIMP.30
GETTING STARTED WITH GIMP 2.8From left to right: Blur - Gaussian Blur, Distorts - Newsprint, Edge-Detect - NeonFrom left to right: Render - Pattern - Jigsaw, Decor - Old Photo, Artistic - Cartoon31
GETTING STARTED WITH GIMP 2.8Changing LightingTo alter the lighting in the image, GIMP offers tools within Filters to apply effectsafter the digital photo has been taken. These create variances in brightness alonga set path to create the illusion of a different light source.To access Lighting Effects, go to the Filters tab on the Menu Bar and hover overthe Light and Shadow option to select it. A window will open, and from here youwill be able to adjust lighting position, source, type, color, size, and a variety ofother factors.Up to six lights can be set to either Directional, with intensity moving along a path,or Point, with a set intensity moving along a radius from the point.32
GETTING STARTED WITH GIMP 2.8Making GIFsCreating a GIF is a simple task that is less known amongst most users of imagemanipulation programs. The type of GIF that you can create within GIMP is at itsbasis a slideshow, but can be made complex enough to create cartoons or actioneffects within photos.To create a GIF, first outline the steps that will occur within the GIF. Think in frames.These frames will become your layers.The GIF created in this tutorial will be the image with a marquee that will load themessage “gifs are fun” letter by letter. Therefore, the first layer will be the baseimage.Go to Filters on the menu bar. Under Animation, select Optimize (for GIF) toconvert colors to the GIF protocol. Now the image layers should be smaller.The next layer is the image with the letter “g”. In order to create the next image,right-click the original layer and select the Duplicate Layer option. This is shown inthe image on the next page.33
GETTING STARTED WITH GIMP 2.8We will repeat this function as we add more layers, stacking onto the set of lettersdisplayed.34
GETTING STARTED WITH GIMP 2.8Above, the message is shown being typed out. Each layer for each letter is shownon the right. For this example, a few transition layers with blur and contrastchanges were added.35
GETTING STARTED WITH GIMP 2.8Go under Filters, Animations again and select Playback. Here, you will be able topreview your GIF, changing fps (frames per second) and the playback speed. Thehigher the playback speed, the faster the GIF will play. The more frames persecond, the greater the smoothness and quality of the image.36
GETTING STARTED WITH GIMP 2.8Finally, go under File and select Export As. Save your file as a GIF and select theAs animation option to make sure that it plays as a GIF. Set milliseconds aspreferred to change the rate at which the frames change.Your GIF should be ready for playback. To view the GIF created in this tutorial, goto http://young-allison-wonderland.tumblr.com/gif example .37
GETTING STARTED WITH GIMP 2.8CreditsThanks to the GIMP Team at www.gimp.org for creatingand actively patching their image manipulation software.Formatting and style influence taken from Janice Redish’sLetting Go of the Words: Writing Web Content That Works.2nd ed. Waltham: Morgan Kaufmann, 2014. Print.Images used in this tutorial are the sole property of theauthor, Allison Young, and are not intended forredistribution or commercial use.38
GETTING STARTED WITH GIMP 2.8 13 Saving a GIMP Project To save a GIMP project, go to the menu bar - click on File and select Save. This will not overwrite the original image if you opened an existing image. .xcf is the file extension for GIMP projects. Saving in this format will allow you to open the image again in GIMP, as well as any layers.