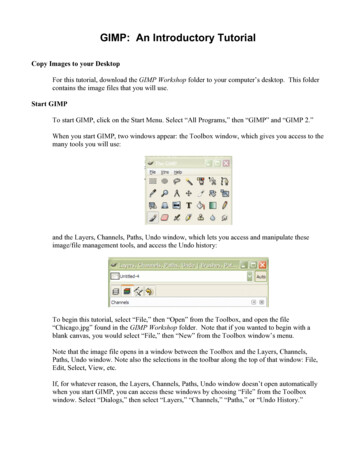
Transcription
Digital Backgrounds using GIMPGIMP is a free image editing program that rivals the functions of the basic versions of industryleaders such as Adobe Photoshop and Corel Paint Shop Pro. For information on which imageediting program is best for your needs, please refer to our website, digital-photobackgrounds.com in the FAQ section.This tutorial was created to teach you, step-by-step, how to remove a subject (person or item)from its original background and place it onto a Foto*Fun Digital Background. Upon completingthis tutorial, you will have the skills to create realistic portraits plus photographic collages andother useful functions. If you have any difficulties with any particular step in the process, feel freeto contact us anytime at digital-photo-backgrounds.com.How to read this tutorialIt is recommended that you use your own image when following the instructions. However, onehas been provided for you in the folder entitled "Tutorial Images".This tutorial uses screenshots to visually show you each step of the process. Each step will benumbered which refers to a number within the screenshot image to indicate the location of thefunction or tool being described in that particular step.Written instructions are first and refer to the following screenshot image.Keyboard shortcuts are shown after most of the described functions and are in parentheses as inthe following example (ctrl T); which would indicate that the "ctrl" key and the letter "T" keyshould be pressed at the same time. These are keyboard shortcuts and can be used in place ofthe described procedure; not in addition to the described procedure.This tutorial uses the PC keyboard shortcuts for its examples. Mac users should substitute the"Command" key for the "ctrl" key and likewise should substitute the "Apple" key for the "alt" key.GIMP Installation ProceduresThe following installation procedures are for PC computer desktops and laptops running WindowsXP or later versions. If you are using Linux OS, or an Apple computer, or have not received a discyet; go to gimp.org for download and installation procedures, then return to this ebook whenfinished.To install GIMP on your PC computer, insert purchased disc into the dvd-rom drive on yourcomputer. Go to the file on the disc entitled "GIMP Program" and double-click to open the file. Ifyou are viewing this tutorial from the purchased disc, then you are in the proper folder already.Click on the exe file entitled "gimp-2.6.8-i686-setup" and you will be prompted on how to proceedfor installation.If you encounter any installation problems, contact us at digital-photo-backgrounds.com.
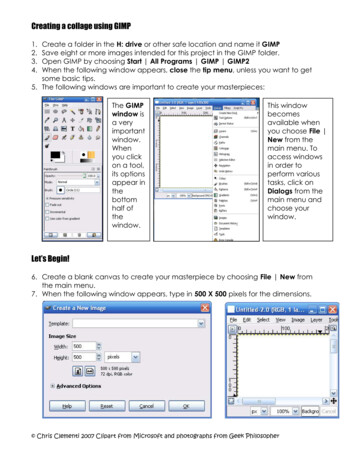
Digital Backgrounds ProceduresOpening Files, Creating Selections, Copying and Pasting1. Open your subject image by going File Open (ctrl O) .2. Direct the dialog box to the desired subject image file.3. Click the “Open” ----------------------------------4. Go to Select All (ctrl A) to create a selection around your entire subject image.5. When the dotted line around the image starts to move, commonly called “marching ants”, thenthe image has been selected.
--------------------------6. Go to Edit Copy (ctrl C) to copy the selection -------------------------------7. Open your background file by going to File Open (ctrl O) and directing the dialog box to thedesired background file image.8. For this example, we have used the file entitled "Neutral" within the folder entitled "Full-LengthHorizontal Backgrounds"9. You can also see a thumbnail picture to the right in the Preview Window.10. Then click on the “Open” ----------------------------------
11. Go to Edit Paste (ctrl V) to paste your subject file onto the digital background file.
Turning a Floating Layer into a Pasted LayerWhen you pasted your subject file onto the background file, you created a layer of your subjectthat was placed over the top of the background layer. To view the layers, GIMP has a LayerWindow from which you can see each layer of your image.1. To view the Layers Window, go to Windows Layers, Channels, Paths, Undo, Brushes,Patterns, Gradients.2. The "layers" portion of this window should appear first. If not, select the tab from the windowthat appears to be transparent pieces of paper stacked on top of each other.3. When the subject is pasted to the digital background, it is classified as a “floating selection“. Toenable further editing of the subject layer you must reclassify it as a “pasted layer”.4. To turn the floating layer into a pasted layer, click on the New Layer button at the bottom-left ofthe Layers ----------------------------------
Moving the subject1. Make sure the subject’s layer is selected within the Layers Window.2. Select the Move Tool (M) from the Tools Window3. Make sure the “Move active layer” is selected in the Move Tool at the bottom of the ToolsWindow.4. Place your cursor over the subject, left-click and hold, then drag the subject to the desiredlocation.
Resizing Subject and/or Digital BackgroundThe subject image and the digital background image will most likely be different sizes; thebackground being likely the larger of the two. It is important for the purposes of image clarity toreduce the size of the largest of the two elements (subject and background) to the smaller of thetwo. Upsizing an image will make it blurry and pixelated. However, you can get away with a veryslight enlargement if absolutely necessary.If the digital background needs to be smaller 1. Make sure the background layer is selected within the Layers Window.2. Choose the Scale Tool (Shift T)3. Place your cursor over any corner of the background image. Left-click and hold to drag theimage to the center to create a smaller size.4. Click Scale in the dialog box to finalize the resizing.Note: If you need to maintain scale ratios of height and width, press and hold the ctrl key whileperforming this step.
If the subject layer needs to be smaller 1. Make sure the subject layer is selected within the Layers Window.2. Choose the Scale Tool (Shift T).3. Place your cursor over any corner of the subject image. Left-click and hold to drag the image tothe center to create a smaller size. It is essential when resizing the subject that you maintainthe scale ratio by pressing and holding the ctrl key while performing this step.4. Click Scale in the dialog box to finalize the resizing.
Removing Original Subject’s Background1. To remove the background from the subject, make sure the subject layer is selected within theLayers Window.2. Select the Eraser Tool (Shift E) from the Tools Window. You can change the size and othercharacteristics of the Eraser Tool at the bottom of the Tools Window.3. Left-click and hold to drag your cursor over the original background to remove it. Get as closeas you can to the subject as possible, without getting too detailed.In the next step, we are going to get closer to the subject to make it easier to get the finerremnants of the old background.
4. Go to the Navigation Window (Windows Dockable Dialogs Navigation).5. Click on the far-left tab to zoom in to at least 100%.6. Go over any remaining areas of the subject's original background.
Fine-Tuning Subject’s Edges1. Make sure the subject’s layer is selected within the Layers Window.2. Select the Blur Tool (Shift U).3. You can change the size and other characteristics of the Blur Tool at the bottom of the ToolsWindow. If needed, change Brush size to just enough to cover the edge of the subject.4. Left-click and hold, then drag cursor over the entire edge of the subject.5. You can easily move the viewable area within the image window by left-clicking and holdingover the small square within the Navigation Window and dragging it to the desired point on theimage.
Using Drop-Shadows to Add Realism.1. Make sure the subject’s layer is selected within the Layers Window.2. Go to Filters Light and Shadow Drop Shadow 3. Click OK in the Drop Shadow dialog box.
The resulting drop-shadow will be subtle. When more familiar with GIMP functions, you canadjust the variables within the Drop Shadow dialog box before clicking on OK. For now, it iseasier to adjust the shadow variables after the shadow effect has been applied.The following steps need only be done if not satisfied with the resulting drop-shadow.4. Click on the newly-created Drop Shadow Layer within the Layers Window.5. Click on the Move Tool (M).6. Left-click and hold over the shadow to drag it to the desired position.7. Within the Layers Window, you can adjust the opacity of the shadow by clicking on the sliderand moving it to the left or right.8. You can also make the shadow more fuzzy by using the Gaussian Blur filter atFilters Blur Gaussian Blur.
Creating a Perspective ShadowThere are several ways to create a perspective shadow in GIMP. This is the quickest and mostintuitive way to do it.The following instructions are a continuation of the previous Drop-Shadow tutorial.1. After creating the drop-shadow, click on the Perspective Tool (Shift P).2. Left-click and hold over the one of the top corner edit points and drag to the desired direction.Be sure to be consistent with the shadowing that already exists on the subject. As you can see,on our example subject. The light is coming from the observer’s left, so we want to drag theshadow to the right.3. Repeat clicking over the other edit points until you feel the perspective looks natural.4. Click Transform.You may want to adjust the position, opacity, and blurriness as you did during the drop-shadowprocedures.
Cropping Your Image1. Select the Crop Tool (Shift C).2. Left-click and hold over the top-left corner of where you want the image’s corner to start.3. Drag the cursor down and right until you reach the desired point of the bottom-right corner.4. Click again over the image or press Enter to finalize the crop.
Saving Your ImageThere are many types of image files. The most commonly known is the jpg which we will showhow to create and ready your image for print.First though, we will show you how to save your image in its current form with layers intact so thatyou can come back to it later and edit it. You can now change the digital background to anythingwithout removing the old subject’s background.1. Click on Save As (Shift Ctrl S).2. Click on the plus-sign next to the phrase “Select File Type (By Extension)”3. Choose from GIMP XCF Image or Photoshop Image (psd).If you plan to work with only GIMP, then xcf is the best choice. If you plan to use Photoshop in thefuture, psd may be best.4. Click Save.
Saving Your Image for Printing or Publishing on the Web1. Go to any layer on the Layers Window and right-click.2. Choose Flatten Image from the resulting drop-down menu.3. Repeat the previous Save As procedures, but select jpg.Note: You can print your image the way you would any image taken from your camera.That is the basics of transposing one image to another. With the skills learned in this tutorial, youcan do much of what is done in print and web advertising today including collages and more.
Digital Backgrounds using GIMP . GIMP is a free image editing program that rivals the functions of the basic versions of industry . backgrounds.com in the FAQ section. This tutorial was created to teach you, step-by-step, how to remove a subject (person or item) from its original background and place it onto a Foto*Fun Digital Background .