Transcription
MICROSOFT ACCESS 2019Tutorial and Lab ManualDavid Murray
Microsoft Access 2019Tutorial and Lab ManualDavid MurrayUniversity at Buffalo
Copyright 2020 by David J. MurrayThis work is licensed under a Creative Commons Attribution 4.0 International License. It isattributed to David J. Murray and the original work can be found at mgs351.com.To view a copy of this license, visit creativecommons.org/licenses/by/4.0/.Kendall Hunt Publishing Company previously published this book.Microsoft Access 2019 Tutorial and Lab Manual is an independent textbook and is not affiliated with,nor has been authorized, sponsored, or otherwise approved by Microsoft Corporation.Printed in the United States of AmericaFirst Printing, 2014ISBN 978-1-942163-02-2
This book is dedicated to my loving wife Amyand my precious daughter Giacinta.
Table of ContentsPreface .viChapter 1 – Overview of Microsoft Access Databases .1Chapter 2 – Design and Create Tables to Store Data .7Chapter 3 – Simplify Data Entry with Forms .19Chapter 4 – Obtain Valuable Information Using Queries .32Chapter 5 – Create Professional Quality Output with Reports .47Chapter 6 – Design and Implement Powerful Relational Databases . .58Chapter 7 – Build User-Friendly Database Systems .68Chapter 8 – Team Building and Group Work Exercises .83Chapter 9 – Supplemental Lab Exercises .94Appendix A: Relational Database Design Reference .113v
Are You Ready to Learn Microsoft Access?Many students find learning a brand new technology to be an overwhelming and often confusing andfrustrating experience. If you are intimidated by Microsoft Access, take heart! Let me assure you that nomatter how little experience you have or how much you hate computers (or they hate you), you CANlearn this software program with a little work, time, and dedication.This book is written so that you will learn the fundamentals of Microsoft Access in a step-by-step andhands-on fashion. The hands-on walkthrough and applied practice is what makes this textbook “work,”but that is only half of the formula to make your learning effective. There must also be a commitmentfrom you, the reader, to take an active and engaged role in the learning process. Specifically, while youare reading and working through this book, do so in a deliberate manner, paying careful attention to whatis being explained. Blindly pointing and clicking through the exercises without thinking about the materialbeing covered will not result in effective learning of the software.I hope that this book will provide you with the foundational knowledge to comfortably work withMicrosoft Access databases. There is so much you can do in Microsoft Access that is beyond the scope ofthis textbook, and this foundation will ultimately help you independently learn how to do advanced thingswith the software. As with most books, this book can provide only limited depth into the material. Yourtrue learning will begin after you have mastered the basics in this textbook and start attempting to usethe software in real-world applications.Good luck!vi
Chapter 1 Overview of Microsoft Access DatabasesIntroductionThis first introductory chapter will provide you with a broad overview of Microsoft Access and willintroduce you to some general database terminology used throughout the book. This is accomplished bylooking at Access databases from an end-user perspective so that you can familiarize yourself with whatdatabases are, what they contain, and in general how they are used. Subsequent chapters focus on thetechnical details of databases, and by the end of this book, the topics come full circle in an attempt to tietogether all of the concepts covered in this book.Each chapter begins with a brief textual overview of the material, followed by a Guided Exercise, whichtakes you step-by-step through a hands-on database example of the chapter contents. At the conclusionof most chapters, you have the opportunity to complete an Applied Exercise to check your knowledge andapplication of the material learned. Adhering to the chapter readings and paying attention to the “GuidedExercises” should prepare you to successfully complete the Applied Exercises, which are a true test of thematerial you have learned.Have You Ever Used a Database?If you are learning Microsoft Access for the first time, you may instinctively answer “no” to the questionof whether you have ever used a database. I’m absolutely positive, however, that you have interactedwith many databases, whether you realize it or not. To understand this, let’s examine what the termdatabase truly means by listing some basic characteristics of databases. Databases store all kinds of data. Databases are either low-tech (manual) or high-tech (electronic). Databases are highly structured and organized. Databases are somewhat analogous to multiple spreadsheets that are linked together. Databases are designed to allow easy extraction and use of the stored data.So, if you have ever used a phone book or a library card catalog, you have indeed used a database. Also,many online search engines and e-commerce websites rely on databases for their proper functioning, soyou likely have interacted with them. See, you may already be more familiar with databases than yourealize!Although the concept of a database may still seem foreign and new to you, it is helpful to relate thematerial in this book to examples of databases you are familiar with. Doing so will often help you todemystify and better understand these strange things called databases.Overview of Microsoft Access Databases1
What Will I Find in a Microsoft Access Database?There are five main things (objects) you will find in an Access database: tables, queries, forms, reports,and macros. Each of these topics will be covered in greater detail throughout the subsequent chapters.Take a minute to familiarize yourself with these terms. The Guided Exercise later in this chapter will showyou examples of each of these.1. Tables store the data in the database and are analogous to the foundation of the database. It iscritically important that the tables be designed properly; they provide the foundation forbuilding the remainder of the database.2. Queries enable you to extract data from your database tables and allow us to answer questionswe have about the data. Queries may combine data from multiple tables and manipulate dataoutput through the use of expressions, formulas, and functions.3. Forms are based on tables or queries, and they are used for entering data into the database in auser-friendly manner. They are also used for displaying data to the end user and can be used tocreate a menu system for the database.4. Reports use data from a table or query and format the output in a professional-looking manner.Reports provide you with the ability to summarize, sort, group, and display the data in manydifferent ways suited to the needs of the end user. Often, the purpose of a report is to provide aprinted output of some data in your database.5. Macros are small programs that you build into Microsoft Access; they perform some advancedoperations, making the database more user-friendly and/or functional.Where Can I Get Help?F1. Simply, press the F1 key in Microsoft Access to use the built-in help anytime you need it. You shouldalso use the numerous online resources that are available.Aside from the Applied Exercises at the conclusion of some chapters, nothing in this book is intended tobe extraordinarily difficult or challenging to complete. If you find yourself stuck on a step of a GuidedExercise, try re-reading a few steps back to see if you either missed something or misunderstood theinstructions. It is important to read each step carefully and follow the directions closely.2Chapter 1
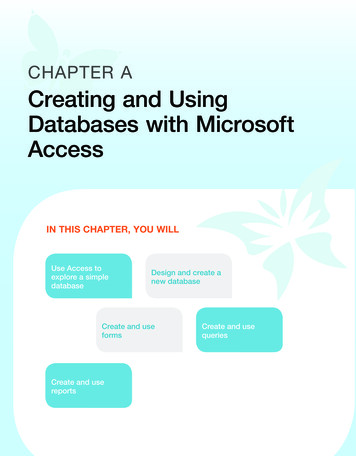
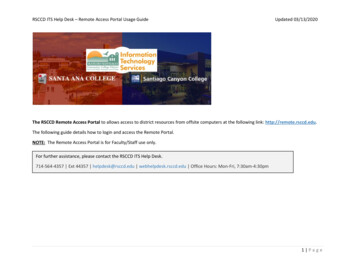
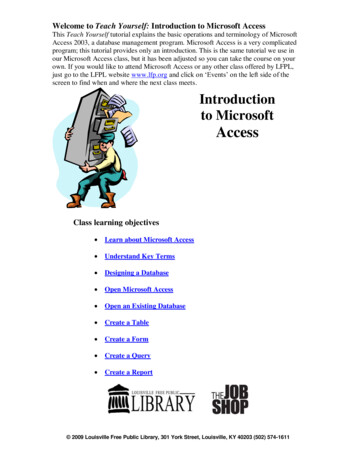
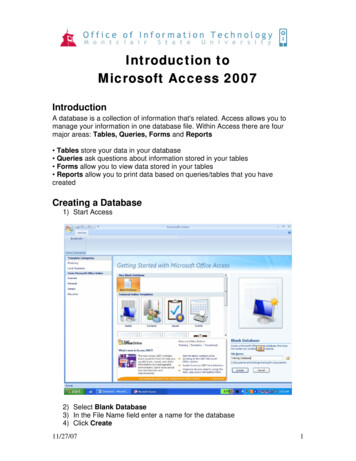
Chapter 1 Guided Exercise1. Download the textbook data files and double-click the StudentRoster.accdb file to open it inMicrosoft Access 2019. If you do not have the 2019 version of Microsoft Access installed, it may notopen the database file.2. Next, click the Enable Content button that appears toward the top of the database. The followingscreenshot illustrates what you should look for.You will have to click the Enable Content button the very first time you open a database file. It will alsodisplay the first time you open a file after it has been moved to another location or renamed.3. Once the database file opens, you will see a list of the database objects (Tables, Queries, Forms,Reports, Macros) in a panel called the Navigation Pane, which appears on the left side of the database.On the right side, you will see a menu system that was developed specifically for this database example.4. Click on the drop-down list shown in the following screenshot to ensure you have both theObject Type and All Access Objects options selected to display.Overview of Microsoft Access Databases3
5. To begin looking at examples of these database objects, double-click the table named Students toopen it. You should see a few records of data already in the table.6. Add a new record for yourself in the table. You can do this by entering your data below the last recordin the table. Make sure you add your name, person number, email, phone number, date of birth, class,major, second major (optional), grade, and performance. As you navigate from record to record, Accessautomatically saves any data entry changes that have been made.7. Find the record for Susan Ward and change her name from Ward, Susan to Ward, Sue. As you makethis edit, you will see that it is very simple to make changes to data in the database tables.8. Close the table by clicking on the LOWER X in the upper right-hand corner of the database. Clickingthe UPPER X will close the entire database instead of just the table. It is a common mistake, and you willlikely close the entire database accidentally at least a few times while working through this book.9. The Main Menu should be visible once again. Click on the first menu button named Student DataEntry Form (open normally) to see an example of a form used for data entry.10. View the various data records on the form using the navigation buttons at the bottom of the form.This form is built off of the Students table.11. Click on the Student Name control so it is selected and then click the Find Record button to see ifyou can find your record in the database. You may have to adjust the search options on the Find andReplace window in order to find your record.12. Click the Add Record button and add the following data.Student Name: Duffield, JohnPerson Number: 9999-8888Phone Number: (555) 867-5309Email: jduffield@email.comDate of Birth: 8/20/1994Class: FRMajor: MGSecond Major: CSGrade: BPerformance: Satisfactory13. Click the Close button on the form.14. Open the Students table and verify that a record has been added for Duffield, John. You have justseen how forms are connected to tables, which allow you to edit, add, and even delete data in the tablefrom the form. Close the table to return to the Main Menu.15. Click the Students by Class Grouped Report button on the menu to open an example of a report.This particular report is based directly on the data in the MGS table. You will notice that the reportprovides a way to format the database output in a professional manner. This particular report groupsthe report data by Class (FR, SO, JR, or SR). Click the Close button to close the report and return to theMain Menu.4Chapter 1
16. In the Navigation Pane to the left, double-click the Query named ClassParameter. Type JR and clickthe OK button when you are prompted to enter a particular Class. This is a special type of query called aparameterized query, which allows the user to enter in different criterion each time the query isexecuted.17. To see how the parameter works, close the query results (click the LOWER X), double-clickClassParameter again to reopen it, and enter FR. This time, different data results will be returned.Parameterized queries are powerful and quite easy to develop in Access, as you will learn later inChapter 4. Close the query results to return to the Main Menu.18. We will come back to the query in just a second, but first, open the Students table and switch theclass for Duffield, John from FR to SR. Next, close the table, and reopen the ClassParameter query. Thistime enter SR when prompted for a Class. You should see that the record for Duffield, John is nowincluded in this query result. This demonstrates an important point: each time a query is executed, it isconnecting to the table to get the most recent data. Close the query results to return to the MainMenu.19. Reports can be built from tables or queries. Click the Student Roster Report Parameterized by Classbutton on the Main Menu to display a report based on the ClassParameter query introduced previously.When prompted for a Class, enter SR.You are prompted to enter a Class, because every time the report is run, it also executes the query thereport is based on. This always results in the query retrieving the most up-to-date data from the tableand displaying those results in the report. Click the Close button to close the report and return to theMain Menu.20. The final database object for you to explore are macros. The Main Menu that automaticallyappeared when you first opened the database was controlled with a special macro named Autoexec.Any macro saved with this name will be automatically executed when the database is opened. Often,you will use this macro to open your Main Menu so that the database users have access to their formsand reports.21.
3. Once the database file opens, you will see a list of the database objects (Tables, Queries, Forms, Reports, Macros) in a panel called the Navigation Pane, which appears on the left side of the database. On the right side, you will see a menu system that was developed specifically for this database example. 4. Click on the drop-down list shown in the following screenshot to ensure you have both the