Transcription
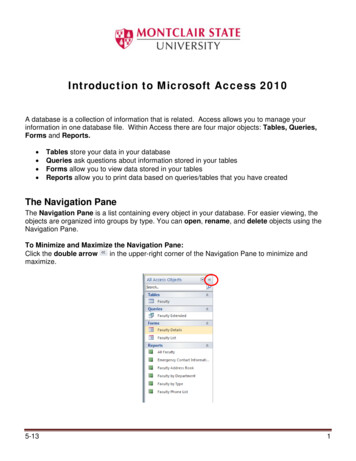
Introduction to Microsoft Access 2010A database is a collection of information that is related. Access allows you to manage yourinformation in one database file. Within Access there are four major objects: Tables, Queries,Forms and Reports. Tables store your data in your databaseQueries ask questions about information stored in your tablesForms allow you to view data stored in your tablesReports allow you to print data based on queries/tables that you have createdThe Navigation PaneThe Navigation Pane is a list containing every object in your database. For easier viewing, theobjects are organized into groups by type. You can open, rename, and delete objects using theNavigation Pane.To Minimize and Maximize the Navigation Pane:Click the double arrowin the upper-right corner of the Navigation Pane to minimize andmaximize.5-131
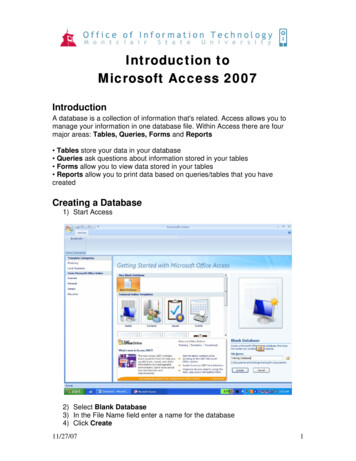
Sorting the Objects in the Navigation Pane:By default, objects are sorted by type, with the tables in one group, the forms in another, etc.However, you can change how the objects are sorted.Click the drop-down arrow to the right of the All Access Objects and click on a sort option fromthe list.Creating a Database1)2)3)4)5)Start AccessSelect Blank DatabaseUnder File Name type a name for the databaseTo change the location of where to store the database, click the folder icon and select a locationClick CreateAccess opens in a new table in Datasheet View.2
Understanding ViewsThere are multiple ways to view a database object. The two views for tables are Design View andDatasheet View. Design View is used to set the data types, insert or delete fields, and set the Primary KeyDatasheet View is used to enter and view the data for the recordsSwitching Between Design View and Datasheet View:Click the View arrow on the Home tab and click on either Datasheet View or Design ViewCreating a TableA table is a collection of data about a specific topic, such as employee information, products orcustomers. The first step in creating a table is entering the fields and data types. This can be donein either Datasheet View or Design View but it is recommended to set up the table in Design View.Understanding Fields and Their Data TypesField - an element of a table that contains a specific item of information, such as a last name.Field’s Data Type - determines what kind of data the field can berYes/NoOLE ObjectHyperlinkAttachmentCalculatedLookup WizardUse to displayShort, alphanumeric values, such as a last name or a street address.Long blocks of text. A typical use of a Memo field would be a detailed productdescription.Numeric values, such as distances. Note that there is a separate data type forcurrency.Date and time values for the years 100 through 9999.Monetary values.Unique value generated by Access for each new record.Yes and No values and fields that contain only one of two values.Pictures, graphs, or other ActiveX objects from another Windows-based application.Text or combinations of text and numbers stored as text and used as a hyperlinkaddress.Images, spreadsheet files, documents, charts, and other types of supported filesattached to the records in your database, similar to attaching files to e-mail messages.Results of a calculation. The calculation must refer to other fields in the same table.You would use the Expression Builder to create the calculation.Displays either a list of values that is retrieved from a table or query, or a set of valuesthat you specified when you created the field. The Lookup Wizard starts and you cancreate a Lookup field. The data type of a Lookup field is either text or number,depending on the choices that you make in the wizard.3
To Create a Table in Design View:1) Click on the Create tab2) Click on Table3) Switch over to Design View4) If prompted to save the table, enter a name and click on OK5) Type the field names and select the appropriate data type for each field6) Continue until all fields are insertedNote: The order that you enter the field names is the order the fields will appear in the table.Setting a Primary KeyThe Primary Key is the unique identifier for each record in a table. Access will not allow duplicateentries in a primary key field. When creating a new table, Access automatically creates a field “ID”with the autonumber data type, and assigns this as the Primary Key.To Set a Primary Key:1. In Design View, position your cursor in the field you wish to set as the Primary Key2. Click the Primary Key button on the toolbar3. Save the tableNote: To turn off the Primary Key simply click on the Primary Key button again.4
Input MasksAn input mask is used to pre-format a field to “look/act” a certain way when a user inputs data.Examples: Social Security Number input mask automatically inserts the dashes; phone numbersautomatically inserts the parentheses and dashes.The input mask data can either be stored in the table or simply displayed and not stored.To Create an Input Mask for a Field:1) In Design View, click in a field for which you’d like to apply an input mask2) In the Field Properties section at the bottom of the screen, click in the Input Mask line andnotice the Build button that appears at the right end of the line (see below):3) Click the Build button to start the Input Mask Wizard (shown below).4)5)6)7)Select the appropriate input maskClick NextClick Next for additional screens on which you can set options for the input maskClick Finish on the last screen of the input mask wizardTo Save the Table:1) Click the Save icon on the toolbar2) Enter a name for the table if you haven’t done so already3) Click OK5
Entering Data in a Table:1) In Datasheet View, start typing the data into the table by pressing the tab key to move to thenext cell2) When you have completed the record (row), press Enter3) You can also click on the New record icon on the Home tab in the Records group or at thebottom of the tableNavigating in a TableUse the arrows at the bottom of the table to navigate among records.To Sort Records in a Table:1) Position your cursor in the field that you wish to sort by clicking on any record in the table2) Click either the Sort Ascending or Sort Descending icon on the Home tab in the Sort & FiltergroupQueriesYou use queries to view, change, and analyze data in different ways. You can also use them as asource of records for forms and reports.To Create a Query:1) Click on the Create tab2) Click on Query Design in the Queries group3) Select the table that you would like to base your query on4) Click Add6
5) Close the Show Table windowThe table(s) will now be displayed in the upper part of the Query Design Screen by boxescontaining the tables’ fields.6) Double-click on the field names in the field list window which you would like to include in thequeryDefining Criteria in the QueryIn order to control which records are displayed, you must define criteria in a query. The mostcommon type of query is the Select Records query which will be discussed below.To Define Criteria for Your Query:1) Position your cursor in the criteria row in the field for which you wish to define the criteria for2) Type the criteriaExample: To find all Excel courses:3) Position your cursor in the criteria row of the Course ID fieldType Excel1 (Access adds the quote marks to the criteria automatically when you tab to thenext column)4) Click the Run Query buttonTo Save the Query:1) Click the Save icon2) Enter a name for the query3) Click OK7
Creating a FormA form is a database object that is used to enter or display data in a database.To Create a Form:1) Open the table or query on which you are basing the form2) Click on the Create tab3) Click on Form in the Forms groupA form is created and opens in layout view.Different Views:Form View – this view allows you to view, create and edit recordsLayout View - this view is similar to Design View but is more visually-oriented in that eachcontrol displays real data. As a result, this is a very useful view for setting the size of controls,or performing many other tasks that affect the visual appearance and usability of the form.Design View - this view gives you a more detailed view of the structure of the form. You cansee the header, detail, and footer sections for the form. You cannot see the underlying datawhile you are making design changes.ReportsReports can be based on tables or queries.To Create a Report:1) Open the table or query on which you are basing the form2) Click on the Create tab3) Click on Report in the Reports groupDifferent Views:Print Preview – allows you see what the report would look like on a printed piece of paperReport View – allows you to see the data without having to display it in Print PreviewLayout View – allows you make design changes while browsing your dataDesign View - gives you a more detailed view of the structure of your reportPrinting ReportsTo Print a Report:1) Switch to Print Preview2) Click the Print icon on the Print Preview tab3) Click on OK8
13.05.2010 · Click the drop-down arrow to the right of the All Access Objects and click on a sort option from the list. Creating a Database 1) Start Access 2) Select Blank Database 3) Under File Name type a name for the database 4) To change the location of where to store the database, click the folder icon and select a location 5) Click CreateFile Size: 422KBPage Count: 8