Transcription
HACKING YOUR LEGOMINDSTORMS EV3 KIT John Baichtal800 East 96th Street,Indianapolis, Indiana 46240 USA
iiHacking Your LEGO Mindstorms EV3 KitHacking Your LEGO Mindstorms EV3 KitEditor-in-ChiefCopyright 2016 by John BaichtalExecutive EditorAll rights reserved. No part of this book shall be reproduced, stored ina retrieval system, or transmitted by any means, electronic, mechanical,photocopying, recording, or otherwise, without written permission fromthe publisher. No patent liability is assumed with respect to the use ofthe information contained herein. Although every precaution has beentaken in the preparation of this book, the publisher and author assumeno responsibility for errors or omissions. Nor is any liability assumed fordamages resulting from the use of the information contained herein.Greg WiegandRick KughenDevelopment EditorSusan ArendtManaging EditorSandra SchroederProject EditorISBN-13: 978-0-7897-5538-4ISBN-10: 0-7897-5538-6Mandie FrankLibrary of Congress Control Number: 2015942445Geneil BreezePrinted in the United States of AmericaSenior IndexerFirst Printing: November 2015Cheryl LenserCopy EditorProofreaderTrademarksAll terms mentioned in this book that are known to be trademarks orservice marks have been appropriately capitalized. Que Publishing cannotattest to the accuracy of this information. Use of a term in this book shouldnot be regarded as affecting the validity of any trademark or service mark.LEGO and MINDSTORMS are registered trademarks of The LEGOGroup. This book is not authorized or endorsed by the LEGO Group.Jess DeGabrieleTechnical EditorJames Floyd KellyEditorial AssistantKristen WattersonDesignerWarning and DisclaimerEvery effort has been made to make this book as complete and as accurateas possible, but no warranty or fitness is implied. The information providedis on an “as is” basis. The author and the publisher shall have neitherliability nor responsibility to any person or entity with respect to any loss ordamages arising from the information contained in this book.Special SalesFor information about buying this title in bulk quantities, or for specialsales opportunities (which may include electronic versions; customcover designs; and content particular to your business, training goals,marketing focus, or branding interests), please contact our corporate salesdepartment at corpsales@pearsoned.com or (800) 382-3419.For government sales inquiries, please contact governmentsales@pearsoned.com.For questions about sales outside the U.S., please contact international@pearsoned.com.Mark ShirarCompositorStudio GaLou
iiiContents at a GlanceCHAPTER 1Introduction 1CHAPTER 2Project: Plotter BotCHAPTER 3Hacking LEGO I: ConnectionsCHAPTER 4Project: Remote-Controlled CraneCHAPTER 5Hacking LEGO II: Alternate ControllersCHAPTER 6Project: Robot FlowerCHAPTER 7Hacking LEGO III: Create Your Own LEGO PartsCHAPTER 8Project: Ball Contraption 177CHAPTER 9Hacking LEGO IV: Add-on ElectronicsCHAPTER 10Project: Flagpole ClimberGlossaryIndex30330775163105123259239157
ivHacking Your LEGO Mindstorms EV3 KitTable of ContentsChapter 1Introduction1Hacking MindstormsChapter Topics 6Chapter 2Project: Plotter Bot27Parts List 8Building the Plotter Bot 9Program the Plotter Bot 43Moving the Motors 44A Simple Program 45Resetting the X Axis 47Hacking Opportunities 49Summary 49Chapter 3Hacking LEGO I: Connections51Mindstorms Wires Explained 51Inside the Mindstorms Wire 52Hacking Mindstorms Wires 53Exploring Wireless Options 56Infrared Sensor and Beacon 56Bluetooth 57Hacking Wireless 58Summary 62Chapter 4Project: Remote-Controlled Crane63Parts List 64Building the Crane 65Programming the Crane 93Controlling the Crane with Infrared 98Using Your Phone’s Commander App 98Summary 104Chapter 5Hacking LEGO II: Alternate ControllersMicrocontrollers and MicrocomputersArduino 106Raspberry Pi 108BeagleBone Black 110But Why? 112Example Projects 114Book Reader 114Mini Tank 115Chocolate Milk Maker 116Ball Counting Robot 117Rolling Alarm Robot 118BeagleBone Black Robot 119Programing Environments 120106105
Table of ContentsLeJos 121RobotC 121Monobrick 121ev3dev 121Summary 122Chapter 6Project: Robot Flower123Robot Flower Mindstorms Build 124Parts List 124Steps 125Program the Robot Flower 146Substituting the Arduino 150Quick and Dirty Arduino 151Parts 152Steps 153Programming the Arduino 154Summary 155Chapter 7Hacking LEGO III: Create Your Own LEGO PartsDesigning Your Own Parts 158Check Your Dimensions 159Create the Design File 160Output and Iterate 161Finding Designs 161Thingiverse 162LDraw 163SketchUp Warehouse 163Outputting Your Own Parts 164CNC Mill 164Laser Cutter 1673D Printer 170Tip: Parametric 3D Models 175Summary 176Chapter 8Project: Ball Contraption177Building the Contraption 178Parts List 178Steps 179Program the Contraption 224Creating Your Own Parts 225The Baseplate 226The Gear 233Summary 237Chapter 9Hacking LEGO IV: Add-on ElectronicsMotors and Wheels 240Motor Driver 240Omni-Wheels 2408-Channel Servo Controller 241239157v
viHacking Your LEGO Mindstorms EV3 KitHub-ee Wheels 242Linear Actuator 242Servo-Actuated Pneumatic Valve 243Lighting Systems 244RGB LED Modules 244Light Strands 245Sensors 246Grove Sensor Adapter 246dGPS 246Proximity Sensor 247Pixy and Pixy Adapter 248Sensor Mux 249Absolute IMU-ACG 250dPressure Sensor 251Thermal Infrared Sensor 252NXT and Education Electronics 252Pneumatics Add-On Set 252NXT Light Sensor 253NXT Temperature Sensor 253NXT Sound Sensor 254NXT Ultrasonic 255Control Systems 255Relay Driver 256sBrick Control System 256PlayStation Controller Interface 257NXTBee Wireless Board 258Summary 258Chapter 10 Project: Flagpole Climber259Building the Flagpole Climber 260Parts List 260Building Steps 262Programming the Pole Climber 288Installing the Ultrasonic Sensor 289Programming the Sensor 290Swapping in the BrickPi 291Raspberry Pi Quick Start 292Adding the RPi and BrickPi 292Parts List 294Steps 294Tip: Troubleshooting 301Summary 302Glossary303Index307
About the AuthorAbout the AuthorJohn Baichtal has written or edited more than a dozen books, including the award-winningCult of Lego (2011, No Starch Press), Make: LEGO and Arduino Projects (2012, Maker Media)with Adam Wolf and Matthew Beckler, Robot Builder (2014, Que), and Basic Robot Buildingwith LEGO Mindstorms NXT 2.0 (2012, Que), as well as Building Your Own Drones (2015,Que). His most recent book is Maker Pro (2014, Maker Media), a collection of essays andinterviews describing life as a professional maker. John lives in Minneapolis, Minnesota withhis wife and three children.DedicationThis book is dedicated to my wife Elise, my kids Arden, Rosemary, and Jack, my mom Barbara, and to allthose who strive to make an item or platform work better for them by hacking it!AcknowledgmentsThanks for the inspiration and assistance (in no particular order) to Miguel Valenzuela,Pete McKenna, Steve Norris, Steven Anderson, MakerBeam, Jude Dornisch, SparkFunEngineering, Adam Wolf, Michael Freiert, Sophi Kravitz, Christina Zhang, Lenore Edman,Rick Kughen, Sean Michael Ragan, John Wilson, Susan Solarz, Akiba, Mark Frauenfelder,Chris Berger, Michael Krumpus, Alex Dyba, Brian Jepson, Becca Steffen, Dave Bryan,Actobotics, Mike Hord, Makeblock, Pat Arneson, Erin Kennedy, Mindsensors, Windell H.Oskay, Johngineer, Matthew Beckler, Riley Harrison, David Lang, Trammell Hudson, KristinaDurivage, AnnMarie Thomas, Pete Prodoehl, Bruce Shapiro, Alex Allmont, John Edgar Park,and Dexter Industries. Apologies to anyone I forgot!vii
viiiHacking Your LEGO Mindstorms EV3 KitWe Want to Hear from You!As the reader of this book, you are our most important critic and commentator. We valueyour opinion and want to know what we’re doing right, what we could do better, whatareas you’d like to see us publish in, and any other words of wisdom you’re willing to passour way.We welcome your comments. You can email or write to let us know what you did or didn’tlike about this book—as well as what we can do to make our books better.Please note that we cannot help you with technical problems related to the topic of this book.When you write, please be sure to include this book’s title and author as well as your nameand email address. We will carefully review your comments and share them with the authorand editors who worked on the book.Email:feedback@quepublishing.comMail:Que PublishingATTN: Reader Feedback800 East 96th StreetIndianapolis, IN 46240 USAReader ServicesVisit our website and register this book at quepublishing.com/register for convenient accessto any updates, downloads, or errata that might be available for this book.
This page intentionally left blank
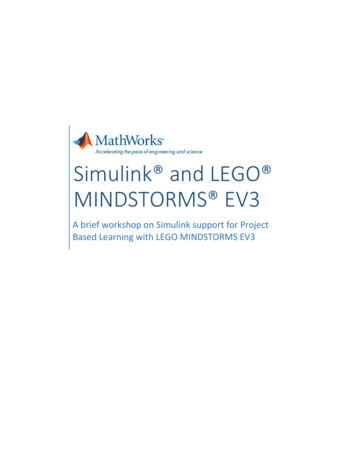
3Hacking LEGO I: ConnectionsMindstorms’ components consist of modules linked together. The motors connect to theIntelligent Brick but not directly—they use wires to link the power and data of both modulestogether. Those linkages are themselves fascinating. This chapter explores what’s up with thoseMindstorms wires and demonstrates how to hack them into different configurations. Then, Idescribe some of the common methods Mindstorms hackers employ to control and connectcomponents without using wires.Mindstorms Wires ExplainedLet’s begin by exploring all the nitty-gritty details of the standard Mindstorms wire. LEGO usessemiproprietary wires in its Mindstorms variants. I call them semiproprietary because they’rejust a standard configuration (known in the business as RJ12) but with the tab off to one side,as shown in Figure 3.1. You literally could use RJ12s if those tabs were off-center. Since LEGO hasseen fit to do it this way, however, we have to use our creativity to overcome this inconvenience.First, however, let’s check out what you get in the EV3 set: 0mm/20-inchSo to recap, the EV3 set includes four short cords, one long cord, and two in the middle. Thecords can be swapped end-to-end and can be used with everything from motors to sensors.They’re truly universal in the Mindstorms world, meaning you only have to worry about lengthwhen you grab a wire.
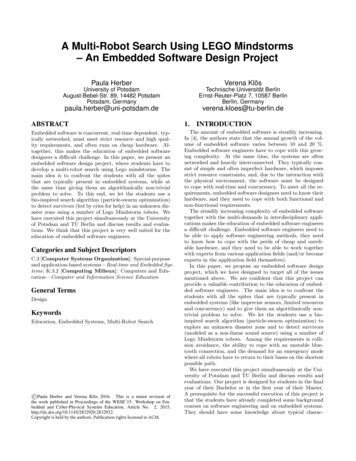
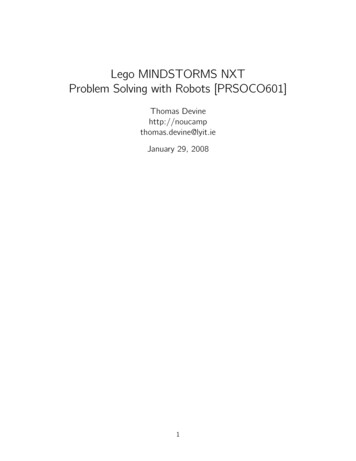
52CHAPTER 3: Hacking LEGO I: ConnectionsFIGURE 3.1 Mindstorms cables’ off-center tabs are all that differentiate themfrom RJ12s.Not surprisingly, these three sizes aren’t good for everyone, so some established suppliershave come up with different wire sets: HiTechnic’s NXT Extended Connector Cable Set (P/M NWS1000) includes six cables,ranging in length from 120mm (4.7-inch) to 900mm (35.4-inch). You can buy the setat hitechnic.com.Mindsensors’ Flexi-Cable pack (P/N FLEX-Nx) includes four cables: 200mm, 350mm,and 500mm just like regular LEGO cables. However, Mindsensors’ cables have thinnerand more flexible insulation, allowing them to move around and bend more readily thanLEGO’s stiffer wires. You can buy the Flexi-Cables at mindsensors.com.Inside the Mindstorms WireSo, what’s going on inside that black plastic insulation? It turns out there are six smallerwires inside, as shown in Figure 3.2.
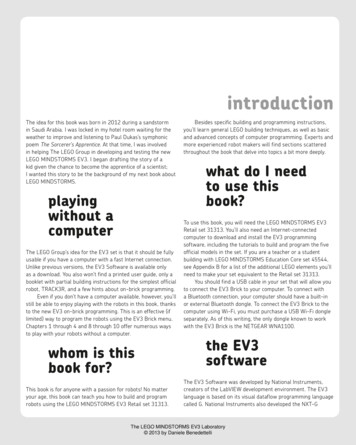
Mindstorms Wires Explained1. The blue wire is the SDA (serial data) wire, one-half of a two-wire data transfer protocolcalled I 2C. EV3 can transmit sensor data and commands through the I 2C bus.2. Yellow is the SCL (serial clock) wire, the other half of the protocol.3. Green is power, typically delivering either 3.3 or 5V from the EV3’s battery pack. You canuse this wire to power electronic circuitry and add-on modules.4. Red is ground. Creating a circuit with the power pin and this ground yields 5V.5. Black is also ground. A circuit with this ground and the power pin yields 3.3V.6. White is analog, transmitting analog sensor signals back to the EV3 Intelligent Brick.Knowing the purpose of each wire helps you hack them, and it never hurts to understandwhat’s going on under the insulation.I 2 C DataI 2 C ClockPowerGndGndAnalogFIGURE 3.2The Mindstorms wire actually consists of six smaller wires.Hacking Mindstorms WiresNot unexpectedly, LEGO hackers have explored the wires and created their own variantsto suit the needs of their projects. The following are a sampling of techniques you couldemploy.Changing the Length of a Mindstorms WireThis is an obvious one. How do you change the length of a Mindstorms wire? The followingtakes you through the steps, with Figure 3.3 guiding you along the process.1. Make a shorter wire: Cut the plug off one end, making sure to leave yourself a coupleof inches of wire, and trim the remaining length down to the size you want. To makea longer wire, cut an end off two wires, so that their combined length equals the sizeyou want.2. Carefully remove the outer black insulation and pull apart the six inner wires.3. Solder together each wire to its same-colored mate on the other side. (If you need topolish up your soldering skills, there’s a helpful how-to here: omic EN.pdf.)4. Insulate the individual wires with heat-shrink tubing, such as SparkFun P/N 9353. Thenthe combined wires should get a larger piece of tubing to keep them in check.53
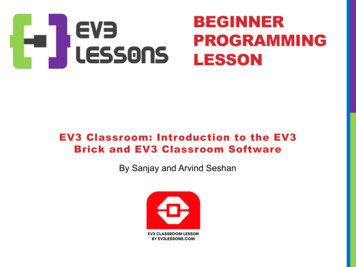
54CHAPTER 3: Hacking LEGO I: ConnectionsFIGURE 3.3together.To alter a Mindstorms wire, just cut it apart and solder it backUsing a Breakout BoardAnother way to access the inner workings of a Mindstorms wire is to use a breakout board.These are little circuit boards with Mindstorms-compatible plugs on them, allowing you tobreak out the six inner wires as separate pins.A couple of variants are floating around; I like the Bricktronics Breakout Board, selling foronly 4 from wayneandlayne.com. In Figure 3.4 I demonstrate how to light up an LED,connecting from the power pin to the red ground (5V) with a 470-ohm resistor protectingthe LED from too much voltage.FIGURE 3.4To access the inner wires individually, use a breakout board.
Mindstorms Wires ExplainedBreadboard-to-PF Hybrid WirePF refers to Power Functions, a mostly compatible motorized set put out by LEGO andmarketed alongside Mindstorms. In fact, the beams and other building elements in the EV3set are identical to the parts sold with PF sets, making the two remarkably compatible.Not completely, however, because there is no way to control PF’s awesome DC motorsusing your EV3 brick. Two of PF’s four wires are 9V and GND, and the other two controlthe speed of the motor.You still need a way to trigger the voltage—the 9V the Power Functions motors areexpecting is more than the EV3 brick can handle. In Chapter 5, “Hacking LEGO II: AlternateMicrocontrollers,” I show you how to use an Arduino microcontroller that not only cancontrol those great PF motors, but also Mindstorms servos as well.In the meantime, here’s how to make your own hybrid wire:1. Cut off one end of a Power Functions extension cable (LEGO P/N 8886). It has a maleend and a female end, with the male end looking like a regular 2x2 LEGO brick, and thefemale end looking like the underside of a similar brick, allowing you to attach themtogether just like they were regular bricks.2. Strip the four individual wires on the female end. They consist of Power, Control 1,Control 2, and Ground. Solder each wire to a male header pin (SparkFun P/N 12693) ora Molex plug like you see in Figure 3.5, which you can crimp on yourself, or buy a pigtailsuch as the SparkFun P/N 9920. Use heat shrink to cover all conductive surfaces.55
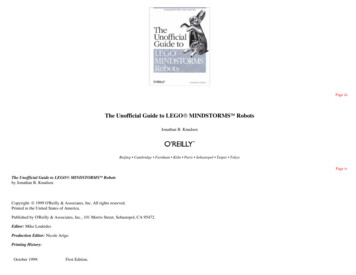
56CHAPTER 3: Hacking LEGO I: ConnectionsFIGURE 3.5 A cable that connects LEGO’s proprietary PF connector to abreadboard.Exploring Wireless OptionsMindstorms wires are a given—but what about wireless communication? The EV3 kit comeswith two ways to communicate wirelessly with your Intelligent Brick.Infrared Sensor and BeaconThe EV3 set includes a dirt-simple infrared remote (IR) control and receiver that allowyou to control two motors on your model, both forward and backward (see Figure 3.6).In addition, you can opt between two channels, so theoretically you could control fourmotors with two remotes and two receivers. Another option would be to have four motorsconnected to your robot—for instance, two for propulsion and two to control a robot arm—and you simply switch channels when you want to do one task or the other.
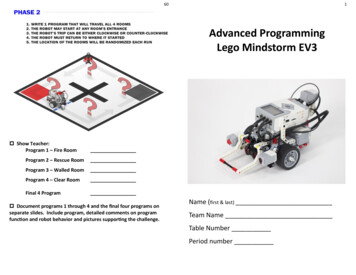
Exploring Wireless OptionsThe sensor has one added feature that most IR receivers lack: It can be used as a proximitysensor, beaming out infrared light and sensing as it bounces back. This feature has ashort range compared to other proximity sensors (for example, ultrasonic), and can detectproximity only within 50cm to 70cm, or around 2 to 3 inches.The beacon is what LEGO calls its remote control, and this is not just for fun: One of theprojects described in the EV3 set is an IR-homing robot that wanders around until it sensesthe infrared signal from the beacon and rolls toward it. The controller’s range is only about2 meters, unfortunately.FIGURE 3.6 The infrared sensor and beacon give you simple wireless control ofyour robot.BluetoothAnother intriguing option is the EV3 brick’s Bluetooth capabilities. The Intelligent Brickhas a Bluetooth chip on-board, allowing it to connect to other EV3 bricks as well as takecommands from smartphones using an application called the Commander, which includespreset control configurations for the five sample robots that are part of the EV3 set (seeFigure 3.7). You can also create an interface for a custom robot, pulling out sliders andbuttons from a library to match what you’re building.EV3’s Bluetooth capability also allows you to control the Intelligent Brick from your PC orMac wirelessly, just as if you had it plugged in with a Bluetooth cable.57
58CHAPTER 3: Hacking LEGO I: ConnectionsFinally, one cool aspect of the robot, both in terms of Bluetooth and regular wiring, is youcan link up to four EV3 bricks together if you want to build a gloriously complicated robot.FIGURE 3.7LEGO’s Bluetooth app allows you to control robots wirelessly.Hacking WirelessIt almost goes without saying that Mindstorms fans have figured out how to control theirrobots in ways not officially supported by LEGO. Here are just a few ways to wirelesslycontrol your Mindstorms robot.XBeeA common hobbyist and professional wireless specification is called Zigbee, and XBee is abrand of wireless modules built to that spec. Dexter Industries (dexterindustries.com) sells a
Exploring Wireless OptionsMindstorms-compatible XBee breakout called the NXTBee, though I’m not sure whether it’scompatible with EV3 yet. Another technique is to ditch the EV3 brick altogether and use anArduino: Check out the cool LEGO bracer shown in Figure 3.8. It has an Arduino, batterypack, XBee, and Wii nunchuk, allowing me to operate a robot with a wearable controller.SparkFun sells XBee radios (P/N 8665) as well as its own flavor of breakout board.FIGURE 3.8This wireless controller combines LEGO, Wii, and Arduino.Radio ControlNormal radio control (RC) technology doesn’t mesh well with Mindstorms, but it canbe made to work. RC flight electronics consist (in their most basic configuration) of aradio, shown in Figure 3.9, as well as a receiver. The receiver interprets the data from thetransmitter and triggers pins that tell the motors what to do. Not surprisingly, those samepins can trigger Arduino actions or could be used to bump Mindstorms touch sensors witha servo.59
60CHAPTER 3: Hacking LEGO I: ConnectionsFIGURE 3.9An RC transmitter and receiver can control Mindstorms models.PlayStation ControllerMindsensors.com and a couple of other places sell a wireless controller that consists ofa PlayStation 2 (PS2) interface card that plugs into the EV3 Intelligent Brick—onto whicha wired PS2 controller may connect (see Figure 3.10). Mindsensors also sells a 2.4Ghzwireless PS2 controller and a matching dongle that plugs into that interface card, allowingyou to wirelessly control your robot.
Exploring Wireless OptionsFIGURE 3.10controller.Mindsensors’ PS2 adapter lets you control your model with a gameWi-Fi Dongle in EV3There is no native Wi-Fi capability in EV3 bricks, but you can add it with a USB dongle,such as the NetGear WNA1100 shown in Figure 3.11. As a matter of fact, the WNA1100is currently the only wireless dongle that the EV3 works with out of the box. It may be thatother models can be made to work with the EV3, but so far just this one works.FIGURE 3.11the EV3.The NetGear WNA1100 is the only Wi-Fi dongle that works with61
62CHAPTER 3: Hacking LEGO I: ConnectionsBrickPi and a Wi-Fi ModuleHere’s another example of a Wi-Fi add-on module allowing wireless communication of aMindstorms robot. The BrickPi shield allows you to control Mindstorms by doing away withthe EV3 brick and using a Raspberry Pi minicomputer, with the BrickPi mounted on top (seeFigure 3.12). A Wi-Fi module from Adafruit (P/N 814) provides connectivity, though the Pi’sbuilt-in Ethernet port is always an option.FIGURE 3.12The BrickPi shield helps control Mindstorms robots.SummaryThis chapter is all about connections: hacking Mindstorms wires and playing aroundwith wireless options such as infrared, radio control, and Wi-Fi. In Chapter 4, “Project:Remote-Controlled Crane,” you put this knowledge to good use, making a rolling crane thatresponds to a variety of wireless control methods.
This page intentionally left blank
IndexSymbols3D printers, 170-1745x3 bricks, 157-1588-channel servo controller, 24180/20 interface, 173Aabsolute IMU-ACG (accelerometer), 250-251accelerometers, 250-251alternatives to EV3. See controllersaluminum bricks, 166-167ArduinoBall Counting Robot project,117-118Bricktronics shield, 107-108components of, 106-107Mini Tank project, 115-116resources for information,151-152Robot Flower project, 150-155building instructions, 153parts list, 152programming instructions,154-155Arduino-to-LEGO interface pieces,169Bbacklights, 239Ball Contraption project, 177building instructions, 179-223creating bricks, 225baseplate, 226-232gear, 233-237parts list, 178-179programming instructions,224-225Ball Counting Robot project,117-118baseplate, creating (BallContraption project), 226-232BeagleBone Black (BBB)components of, 110-111EVB cape, 112Gyro Boy project, 119-120beams, curved, 161-162black wires, 53blue wires, 53Bluetooth controlsexplained, 57-58Remote-Controlled Craneproject, 98-103Book Reader project, 114-115breadboard-to-PF hybrid wires,55-56breakout boards, 54BrickPiinstalling, 292-294, 297-301mounting plates, 169-170shield, 62, 110Book Reader project,114-115bricks, creating, 157-158Ball Contraption project, 225baseplate, 226-232gear, 233-237designing parts, 158dimensions, 159output and iteration stages,161software for design files,160finding designs, 161-164parametric 3D models, 175tools for output, 1643D printers, 170-174CNC mills, 164-167laser cutters, 167-170Brickstufflight strands, 245proximity sensor, 247-248Bricktronics, 240shield, 3, 107-108Mini Tank project, 115-116
308Budel, TristramBudel, Tristram, 166-167building instructionsBall Contraption project,179-223Flagpole Climber project,262-287Plotter Bot project, 9-43Raspberry Pi and BrickPiinstallation, 294-298Remote-Controlled Craneproject, 65-92Robot Flower project,125-146Arduino version, 153CC programming language,RobotC, 121cables. See wiresCailliau, Robert, 159cameras, Pixy, 248-249capes, 111Cartesian coordinates, 43-44changing wire length, 53-54Chocolate Milk Maker project,116-117Chronodot, 113-114CNC (computer-numericallycontrolled) mills, 164-167Commander app, 57Remote-Controlled Craneproject, 98-103connectionswirelessBluetooth controls,57-58BrickPi shield, 62IR (infrared) controls,56-57PlayStation controllers,60-61RC (radio control)technology, 59-60Wi-Fi dongles, 61XBee modules, 58-59wiresbreadboard-to-PF hybridwires, 55-56breakout boards, 54changing length of,53-54components of, 52-53length of, 51-52controllers, 105ArduinoBricktronics shield,107-108components of, 106-107resources for information, 151-152Robot Flower project,150-155Ball Counting Robotproject, 117-118BeagleBone Blackcomponents of, 110-111EVB cape, 112Book Reader project,114-115Chocolate Milk Makerproject, 116-117Gyro Boy project, 119-120Mini Tank project, 115-116PlayStation controllerinterface, 257programming environments, 120LeJos, 121Monobrick, 121RobotC, 121Raspberry Pi, 291BrickPi shield, 110components of, 108-109installing, 292-294,297-301instructional overview,292reasons for using EV3 alternatives, 112-114relay drivers, 256Rolling Alarm Robotproject, 118-119sBrick, 256-257XBee modules, 258crane project. See RemoteControlled Crane projectCreative Robotics, Hub-eewheels, 242curved beams, 161-162Customizable Technic Hub,175DdCompass module, 3-4designing bricks, 158dimensions, 159finding designs, 161-164output and iteration stages,161parametric 3D models, 175software for design files,160tools for output, 1643D printers, 170-174CNC mills, 164-167laser cutters, 167-170Dexter IndustriesBrickPi installation, 292dGPS, 246-247dLights, 244-245dPressure, 251NXTBee, 58thermal infrared sensor, 252XBee modules, 258dGPS sensor, 246-247dimensions, designing bricks,159dLights, 244-245
Makeblock ConstructordPressure sensor, 251drawing pens. See Plotter BotprojectEecosystems for hardware andcode, 113Education set. See LEGOEducationeducation usage, 113EV3, alternatives to.See controllersEVB cape, 112Gyro Boy project, 119-120Ffinding brick designs, 161-164Flagpole Climber project,259-260building instructions,262-287installing ultrasonic sensor,289parts list, 260-261programming instructions,288programming ultrasonicsensor, 290-291Raspberry Pi and BrickPiinstallation, 292-301troubleshooting, 301Flexi-Cables, 52Flower project. See RobotFlower projectGgear, creating (BallContraption project),233-237GoPro camera mount, 171-172green wires, 53Grove Sensor Adapter, 246Gyro Boy project, 119-120Hhacking suggestionsPlotter Bot project, 49wireless controlsBrickPi shield, 62PlayStation controllers,60-61RC (radio control) technology, 59-60Wi-Fi dongles, 61XBee wireless modules,58-59wiresbreadboard-to-PF hybridwires, 55-56breakout boards, 54changing length of,53-54HiTechnic NXT ExtendedConnector Cable Set, 52Hub-ee wheels, 242Iinfrared (IR) controlsRemote-Controlled Craneproject, 98sensors and beacons, 56-57Inkscape, 160installingBrickPi, 292-301Raspberry Pi, 292-301ultrasonic sensor (FlagpoleClimber project), 289interface pieces80/20 interface, 173Arduino-to-LEGO pieces,169PlayStation controller interface, 257Universal Connector Kit,172IR (infrared) controls.See infrared (IR)controlsiteration stage (designingbricks), 161J-LJanssen, Jorg, 157Java, LeJos programming environment, 121Klann linkage, 165-166laser cutters, 167-170LazerStorm mounting plates,168LDraw, 163LEGO bricks. See bricks,creatingLEGO Education, 252NXT temperature sensor,253-254pneumatics add-on set,252-253LeJos, 121length of wireschanging, 53-54standard lengths, 51-52libraries, 107lightingbacklights, 239Brickstuff light strands, 245NXT light sensor, 253RGB LED modules, 244-245linear actuators, 242-243Linux, 112MMakeblock building set, 4Makeblock Constructor, 170309
310McFarlan, StuartMcFarlan, Stuart, 169mechanum (omni) wheels,174, 240-241Medwin, Steve, 161-162, 175Meno, Joe, 239microcomputers. See controllersMindsensors8-channel servo controller,241absolute IMU-ACG (accelerometer), 250Flexi-Cables, 52Grove Sensor Adapter, 246mux (multiplexer), 249Pixy camera, 248PlayStation controller interface, 257relay driver, 256servo-actuated pneumaticvalve, 243Mini Tank project, 115-116Monobrick, 121Motor Driver, 240motors8-channel servo controller,241Hub-ee wheels, 242linear actuators, 242-243Motor Driver, 240moving (Plotter Bot project), 44-47pneumatics add-on set, 253servo-actuated pneumaticvalves, 243-244stepper motors, 7mounting platesBrickPi, 169-170LazerStorm, 168moving motors (Plotter Botproject), 44-47mux (multiplexer), 249-250NNetGear WNA1100 dongle, 61NXT, 252light sensor, 253sound sensor, 254temperature sensor, 253254ultrasonic sensor, 255Flagpole Climber project, 289-291NXT Extended ConnectorCable Set, 52NXTBee, 59Oomni wheels, 174, 240-241output stage (designingbricks), 161outputting bricks, tools for,1643D printers, 170-174CNC mills, 164-167laser cutters, 167-170P-Qparametric 3D models, 175parts, creating. See bricks, creatingparts listBall Contraption project,178-179Flagpole Climber project,260-261Plotter Bot project, 8-9Raspberry Pi and BrickPiinstallation, 294Remote-Controlled Craneproject, 64Robot Flower project, 124125Arduino version, 152pens, drawing. See Plotter BotprojectPF (Power Functions), breadboard-to-PF hybrid wires,55-56Pi. See Raspberry PiPixy camera, 248-249PlayStation controllers, 60-61interface for, 257Plotter Bot project, 7building instructions, 9-43parts list, 8-9programming instructions,43-44hacking suggestions, 49motor movement, 44-47resetting X axis, 47-48pneumaticsdPressure sensor, 251LEGO add-on set, 252-253servo-actuated pneumaticvalves,243-244printers, 3D, 170-174programming environments,120LeJos, 121Monobrick, 121RobotC, 121programming instructionsBall Contraption project,224-225Flagpole Climber project,288ultrasonic sensor, 290291Plotter Bot project, 43-44hacking suggestions, 49motor movement, 44-47resetting X axis, 47-48Raspberry Pi and BrickPiinstallation, 298-301
sensorsRemote-Controlled Craneproject, 93-98Robot Flower project,146-149Arduino version,154-155projectsBall Contraption, 177building instructions,179-223creating bricks, 225-237parts list, 178-179programming instructions, 224-225Ball Counting Robot,117-118Book Reader, 114-115Chocolate Milk Maker,116-117Flagpole Climber, 259-260building instructions,262-287installing ultrasonic sensor, 289parts list, 260-261programming instructions, 288programming ultrasonicsensor, 290-291Raspberry Pi and BrickPiinstallation, 292-301troubleshooting, 301Gyro Boy, 119-120Mini Tank, 115-116Plotter Bot, 7building instructions,9-43hacking suggestions, 49parts list, 8-9programming instructions, 43-48Remote-ControlledCrane, 63Bluetooth controls,98-103building instructions,65-92infrared (IR) controls, 98pa
EV3 can transmit sensor data and commands through the I 2C bus. 2. Yellow is the SCL (serial clock) wire, the other half of the protocol. 3. Green is power, typically delivering either 3.3 or 5V from the