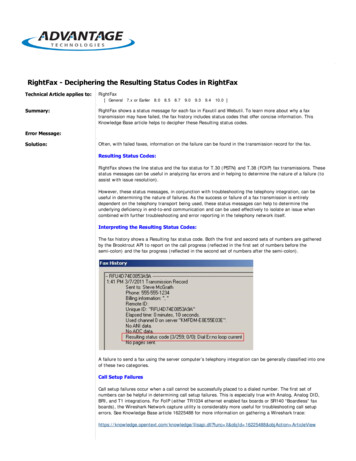
Transcription
RightFax FaxUtilQuick reference guide to getting startedContentsRightFax FaxUtil . 2Creating and Sending Faxes . 3Create a New Fax . 3Send a Fax via Email Address or SMS Number . 4Add a Cover Sheet . 5Attach Library Documents . 7Assign Billing Codes . 9Adding Entries to Your Phonebook . 10Create an Individual Phonebook Entry . 10Use Your Phonebook . 12Forward a Fax to other Users or Fax Numbers . 14Routing a Fax to Another User . 15Viewing A Fax’s History . 16
OpenText RightFax FaxUtil 2RightFax FaxUtilRightFax FaxUtil is a comprehensive desktop application for users of OpenTextRightFax.Within RightFax FaxUtil, users can create, view, edit, and print faxes, along with anumber of other useful features for managing fax traffic.The RightFax toolbar provides quick access to the most used features for RightFaxusers.Let’s get started and see how you can use RightFax FaxUtil to quickly and easily faxright from the desktop!
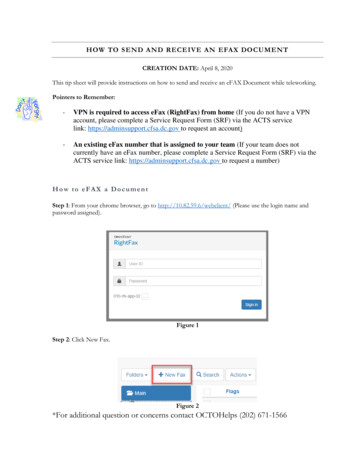
OpenText RightFax FaxUtil 3Creating and Sending FaxesCreate a New FaxRightFax FaxUtil can be used to create new faxes with a variety of attachments typesand destination options.1. Click the New Fax button.This opens the Fax Information dialog box.2. In the Fax Information dialog box, add one fax recipients. Specify your cover sheetnotes and options, add attachments, and specify other sending preferences.3. Click Send to send the fax.
OpenText RightFax FaxUtil 4Send a Fax via Email Address or SMS NumberFaxUtil will also allow sending faxes as emails or as text messages (SMS). With email,the entire fax will be sent as an attachment. With SMS, only the cover sheet noteswill be transmitted.1. In the Fax Information dialog box, go to the Main tab.2. Click the arrow next to the Fax Number field and select Email Address or SMSNumber.3. Enter the Email Address or SMS Number as well as any other required information(bold fields).4. For SMS messages, you must enter your message in the Cover Sheet Notes. Thismessage has a 160 byte limit.5. Click Send to send the fax.
OpenText RightFax FaxUtil 5Add a Cover SheetCover sheets are optional for every fax sent from RightFax. The cover sheet cancontain additional notes intended for the recipient.1. In the Fax Information dialog box, go to the Main tab. Under the Options sectionin the Main tab, select the Use cover sheet option.2. Fill out the recipient’s information and go to the Cover Sheet Notes tab.3. Type the cover sheet notes in to the Notes to be Placed on the Cover Sheet box(up to 21 lines).
OpenText RightFax FaxUtil 64. Note: You can also use the “Comments for your Records” field to includeinformation about the fax that will not appear on the cover sheet. This fieldbecomes searchable content, in the event that you want to reference the fax toan event, such as a case number, invoice number or account name.5. Go to the More Options tab and select a cover sheet from the Cover Sheet Filebox.6. Optional: Enter the sender’s contact information in the From section fields andclick Send to send the fax.
OpenText RightFax FaxUtil 7Attach Library DocumentsLibrary Documents are frequently used documents that can be added to faxes. Youradministrator can add these to the Attachments tab in the Available Attachmentssection.1. In the Fax Information dialog box, go to the Attachments tab.2. To add an attachment from the Available Attachments library, click each librarydocument required for this fax. The documents will be added to the end of thefax, in the order they are selected.TIP: Click on the Paperclip to search for files on your computer to attach. Click on theFile Folder icon to attached documents from a shared or personal file library. Clickon the Scanner icon to pull documents that have been scanned.
OpenText RightFax FaxUtil 8The attached document(s) will appear in the section with a description and locationof the document. You can view each attachment by double-clicking on the file. Youcan delete a Selected Attachment by highlighting the attachment and clicking thedelete button.
OpenText RightFax FaxUtil 9Assign Billing CodesBilling codes allow an administrator to identify a fax by the sender, the recipient orthe content of the fax for reporting purposes.1. In the Fax Information dialog box, go to the Main tab.2. Under Accounting, enter one or two billing codes, or click Lookup to select from alist of available billing codes which can be customized for your company.
OpenText RightFax FaxUtil 10Adding Entries to Your PhonebookFaxUtil lets you create a personal phonebook of fax contacts. You can add individualcontacts to your phonebook for frequently faxed numbers. You can also create groupcontacts that let you easily send one document to multiple members of the samegroup.Create an Individual Phonebook EntryEntries can be added to the phonebook individually for quick access to frequentlyused contacts.1. Click the Phonebook button2. Enter a contact name in the ID box.in the FaxUtil toolbar and click New Entry
OpenText RightFax FaxUtil 113. Enter the fax number in the Fax Number 1 box and fill in any other contactinformation you prefer to save for the contact.4. Click OK.
OpenText RightFax FaxUtil 12Use Your PhonebookIt is possible to easily add multiple recipients to one fax by using the RightFaxPhonebook.1. In the Fax Information dialog box, go to the Main tab.2. Click the Phonebook iconphonebook.to display all of the contacts in your RightFax
OpenText RightFax FaxUtil 133. Double-click each contact that needs to receive this document. Their name willappear in the Current Recipients list.4. Click OK on the Phonebook to return to the Fax Information dialog. Then fill outthe required (bold) fields, add any attachments, and click Send.
OpenText RightFax FaxUtil 14Forward a Fax to other Users or Fax NumbersYou can quickly and easily forward a fax to another RightFax user who is registeredon your RightFax server. This feature will place a copy of the fax in the inbox of thedestination user’s account and will be noted in the history of the fax.1. Click on the Forward to User buttonon the toolbar. You can selectthe user, group or application to forward a copy of the fax and Add them to theDestination Users section.2. Click OK to send a copy of the fax to one or multiple recipients.3. You can also click on the Forward to Fax buttonto another recipient.to send a fax as a fax
OpenText RightFax FaxUtil 15Routing a Fax to Another UserYou can quickly and easily forward a fax to another RightFax user who is registeredon your RightFax server. This feature will move the fax from its current location to thefax in the inbox of the destination user’s account and will be noted in the history ofthe fax.1. Click on the Route to User buttonon the toolbar. You can select theuser, group or application to forward a copy of the fax and Add them to theDestination Users section.2. Click OK to move the fax to one or multiple recipients.
OpenText RightFax FaxUtil 16Viewing A Fax’s HistoryYou can view a detailed audit trail of the history of a fax, which will include detailsuch as when it was delivered, viewed and by whom, if it was routed or forwardedand to whom, if it was edited/annotated, and other important details.1. Select the fax in your fax inbox for which you would like to view a detailed audittrail. Then select the History iconon the toolbar.
OpenText RightFax FaxUtil 9 Assign Billing Codes Billing codes allow an administrator to identify a fax by the sender, the recipient or the content of the fax for reporting purposes. 1. In the Fax Information dialog
