Transcription
Cerner Viewing PreferencesFor Physicians123456789Customizing the Results ViewAdjusting the Results Time Frame DefaultsTemporarily Adjusting the Results Time FrameViewing Order StatusesOrder Status GlossaryOrganizing Patient DocumentsSorting Documents by Reverse ChronologyAdjusting the Document Search RangeUsing Cerner on a Mac
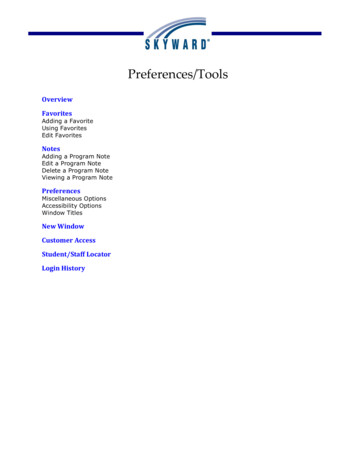
Customizing the Results ViewThe Recent Results, Lab, and Radiology tab views can be changed to suit your preference. Tochange your view of these tabs:1. Open a patient chart and click on the Recent Results, Lab or Radiology tab.2. Click on the Table, Group, or List radiobutton to change the view of the results.For explanations of these views, seebelow.Table ViewAdvantages Easy to read Clearly presentshistorical resultsGroup ViewAdvantages Condenses results Allows for easiertrendingList ViewAdvantages 1Displays referenceranges
Modifying the Results Time Frame DefaultsBy default, the Recent Results, Lab, and Radiology tabs display a two day range. This default can bechanged to a longer date range, or can list all results for the current encounter. To change the defaultsearch range for these tabs:1. Open a patient chart and click on the Recent Results tab.2. Click on the Options menu and select the Properties option.3. In the new window, click on the Defaults tab.4. Choose a search method such as Clinical Range or Admission Date to Current from the optionslisted in the Default Retrieval Type box.5. Depending on the search method you have chosen, your options will be different. Clinical or Posting Range: Use the options in the Default Range Offsets box to set up the range. Forexample, if you would like to look at a week’s worth of results, use the Units dropdown menu to select Days,and type a “0” in the Forward box and a “7” in the Back box. Result Count: Type the number of results you would like to display in the Results box. Admission Date to Current: This option does not require any additional settings.6. To make this option the default for all charts that you open, click the “Re-apply defaults for eachnew chart” checkbox.7. When finished, click the Save button.8. In the pop-up window, click the Yes button to save your changes.2
Temporarily Adjusting the ResultsTime FrameYou may need to adjust the results range of the Recent Results, Lab, or Radiology tab for a single patient’s chart without affecting the default search range. This allows you, for instance, to look up historical data for a single patient while still allowing these tabs to default to the settings you created on theprevious page of this document. To temporarily change the results time frame:1. Open the patient chart and click on the Recent Results, Lab, or Radiology tab.2. Right-click the blue Search Criteria bar, and selectfrom the menu the Change Search Criteria option.3. In the new window, use the options provided to set up the desired search range. For information onthese options, see the previous section, Modifying the Results Time Frame Defaults.4. When finished adjusting the results range, click the OK button to return to the chosen results tab,where your new filter is being applied.5. When you close this patient’s chart, your viewing preferences will return to their default.3
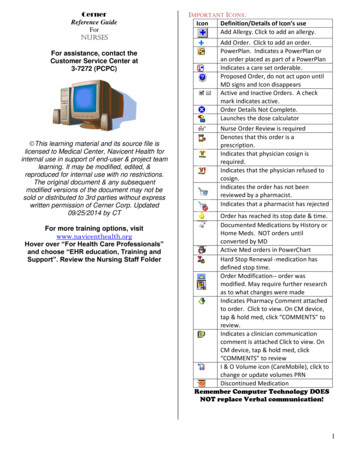
Viewing Order StatusesThe Orders tab of the Patient Chart can be used to check the status of orders, allowing you to see if atest has been ordered, if it is in process, or completed. To configure this tab’s settings to view all orderstatuses:1. Open the Patient Chart and click on the Orders tab.2. Click the Display dropdown menu and select the AllOrders (All Statuses) option.3. The new filter is applied to the Orders tab, and younow see all of the orders placed on the patient’schart.4. For an explanation of order statuses, see the next page, the Order Status Glossary.By using this same method (selecting a filter from the Display drop down menu), yourOrders tab can be configured to display only certain order statuses, such as active,pending, or completed orders.4
Order Status GlossaryOrdered An order has been placed. There is no specimen collection required (e.g. an Oxygen order).Ordered (Scheduled) An order has been placed and is scheduled for a collection list. No accession number has yetbeen assigned. Nursing should be able to cancel this order if necessary.Ordered (Dispatched) The order has been placed and a label with an accession number has been generated.Nursing can no longer cancel this order. If it needs to be cancelled, nursing must notify the labto cancel.Ordered (Collected) Specimen has been collected logged into the performing facility.Ordered (In Transit) Specimen has been collected and is in transit to another facility or reference lab.In Process Specimen has been collected and partially resulted. The results are not yet viewable in PowerChart.Canceled The order has been canceled. For orders with multiple instances, such as a blood cultureq15min for 3 times, this order status means that the order was canceled before any of thescheduled draws were completed.Discontinued This status occurs when an order with multiple instances, such as a blood culture q15min for3 times, has been canceled after one or more of the draws has taken place (e.g. after the firstdraw but before the second and third draws).Pending Complete This status indicates that an order has multiple instances (e.g. a blood culture q15min for 3times) and that at least once draw has been completed.Completed The order has been completed and, if it is a lab order, its results are viewable in Power Chart.5
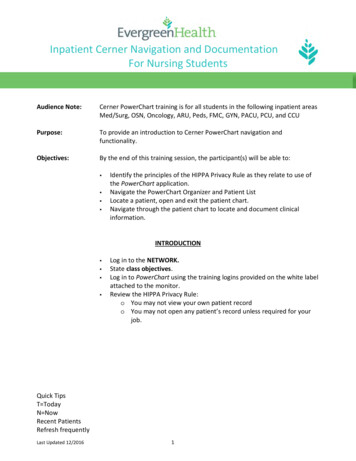
Organizing Patient DocumentsThe documents in the Documents tab can be organized in a number of ways, including by visit or bydate. Properly sorting documents makes it easier to find documentation from the current visit such asconsultation notes and EKG reports. To sort and organize the documents in the Documents tab:1. Open a patient chart and click on the Documents tab2. In the bottom-left hand corner of theDocuments tab, use one of the five radio buttons to organize the documents.Documents will be separated by their type, e.g. History and Physical Reports,Discharge Summaries, Consultation notes, etc.The “By Status” filter separates documents into four categories: Transcribed,Authorized (Verified), Anticipated, and Signed with Addendum.This filter groups documents by the day on which they were dictated.Documents sorted using this filter are organized by the dictating physician.This filter is most useful if you are trying to locate a document you have previously dictated.This last filter will group the patient’s documents byvisit, allowing you to easily locate historical documentation.6
Sorting Documents byReverse ChronologyWhen sorting patient documents by date or encounter, they can be filtered in reverse chronologicalorder, bringing the most recent documents to the top of the list. To sort documents in reversechronological order:1. Open the patient chart and click on the Documents tab.2. In the documents tab, click on the Documents menu and selectthe Options option.3. In the new window, click the Index Defaults tab.4. Find and check the checkbox that reads, “Reverse Chronological.”5. Click the OK button at the bottom of the window.6. To see your changes, you will need to close and reopen the current patient chart.7
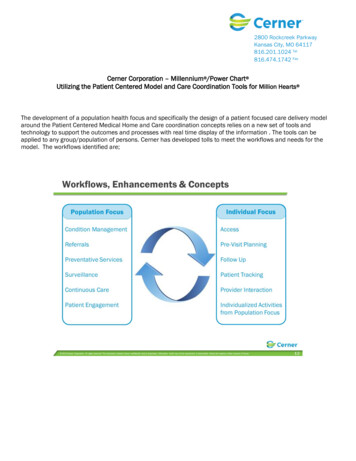
Adjusting the Documents Search RangeBy default, the Documents tab will display the patient’s last 100 documents, though this may be customized to show more or less, allowing you to either see more historical information or to hide unwanted documentation. To customize the search range for this tab:1. Open a patient chart and click on the Documents tab.2. Right-click the blue Search Criteria barand select the Change Search Criteriaoption.3. Use the options provided in the new window to set your viewing preferences.This checkbox willlimit the results to onlydocuments from thecurrent visitDepending on the searchmethod chosen, theseoptions allow you to seteither the number ofdocuments viewed or thedate range of documentsdisplayed.These buttons allowto sort documents bydate range, documentcount, or encounter.4. When finished, click the OK button.5. You are returned to the Documents tab, where your new preference is in effect.8
ACCESSING CERNERWORKS WITH YOUR MAC-(Using Mac OS X)Although Cerner does not officially support accessing Cernerworks with Macintoshcomputers, we will explain below how you can do this.1. If your Mac has an Intel processor you can use any of the following software to installthe needed software onto Windows on your Mac.Just follow the standard instructions listed here on the Physician Portal, with onemodification. When the instructions ask you to “Run” the installer after download,click “Save” instead and then navigate to your downloads folder and run the installerfrom there.a. Apple’s Boot Camp (http://www.apple.com/macosx/bootcamp/),b. SWSoft’s Parallels (http://www.parallels.com)c. VMWare’s Fusion (http://www.vmware.com/)2. There is client software available to access CernerWorks directly, using the Macoperating system. This is called the Citrix ICA Client.Minimum Requirements:a. Intel or PowerPC Mac running MacOS Xb. Any Internet browser other than Safari. At this time, Safari cannot accessCernerWorks. Other browsers that will work include:Firefox, Mozilla, Camino, OmniWeb, Opera. You can download any of thesebrowsers online and use them for no charge.c. Broadband internet connectionINSTALLING THE CITRIX ICA CLIENT ONTO YOUR MAC1. Using any browser listed above (except Safari), navigate to the Citrix Downloads page.9
1. Click the OS X link. Do NOT use the PowerPC link, as that page contains older clientsoftware.2. Select the “Download Here” link to the right of the PowerPC (7.00.411) Version.Until further notice, DO NOT select the Intel Version, as it has been disabled by Citrix.The PowerPC version will work with both Intel and PowerPC computers.10
3. Open the macICA OSX.dmg.zip file as below.4. The Citrix ICA Client virtual disk will appear on your Mac Desktop. Open this and runthe ICA Client.pkg installer.11
5. Follow the prompts and place the resulting Citrix ICA Client folder into yourApplications folder, which is the default location.INSTALLING MISSING CERTIFICATES ONTO YOUR MACMost likely your computer will not have a certificate that is required to access the secureCernerWorks site, so you will need to manually install this certificate.1. Click on the following link to download the Entrust Certificate.2. Check the “Personal Use” bullet. Click the “Download Certificates” button.12
3. Right Click or ctrl-click on the first certificate link: entrust ssl ca.cerIn the contextual menu that pops up, select “Save Link As ”.4. In the “Save As” dialog, navigate to the Applications/Citrix ICA Client folder, and thenthe keystore and cacerts folder. Click “Save” when the cacerts folder is highlighted.5. Once you have the certificate downloaded, open the Citrix ICA Client folder in yourApplications folder (see graphic above) and then the keystore and cacerts folder. Findthe Entrust certificate and double-click on it.13
This will open your Keychain Access software. Click OK to install the certificate.6. With your Keychain Access still open, click the Certificates category on the left.Find the Entrust certificate in the certificate list on the right , double-click it to openthe certificate.7. Scroll down to the bottom of the certificate.14
8. Click the arrow by Trust Settings. Scroll down a bit, then change “When using thiscertificate” to Always Trust. Do the same for the other Entrust certificate.Close the Keychain software.9. Return to your browser and the Physician Portal page (http://dr.carondelet.org).Remember NOT to use Safari in this next step.Click on the Compass CernerWorks icon. Enter your User Name and Password in theLogin fields, and click the Log In button.You will then see several icons. Click on the icon titled Powerchart PROD AHTU AZ.15
This will start the download of a small file titled “launch.ica”Your browser will initially ask you which software you wish to use to open this file.The default should be listed as Citrix ICA Client. Check the option to “Do thisautomatically for files like this from now on.”The Citrix ICA client should start and, if everything is in order, your should seeanother CernerWorks log-in screen. Enter the user name and password assignedduring your Cerner training session and you’re done!16
The order has been completed and, if it is a lab order, its results are viewable in Power Chart. Order Status Glossary. 6 The documents in the Documents tab can be organized in a number of ways, including b