Transcription
Cerner EMR Set Up and TipsTable of Contents1. Set Up Team Lists2. Documentationa. Create a list of your favorite document typesb. Create and find others provider’s auto textc. Saving photos into your documents3. Results View4. Ordersa. Saving your favorite ordersb. Finding other provider’s favorite order setsc. Power Plans5. Insulin Managementa. View CBG and insulin amountsb. Glucommander6. Changing the Setup of Your MAR7. Ad Hocs8. Multidisplinary Rounding9. Medication Reconciliation10. MUSE11. Discharge to Home12. Discharge to Facility13. Cache14. FirstNet Tracking15. Link to Cerner Access From Home: urn to Table of ContentsCreated by Ashley Trane, MD1
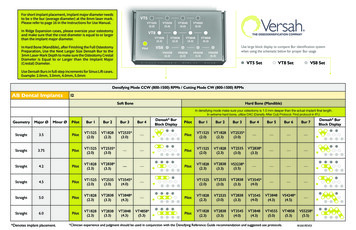
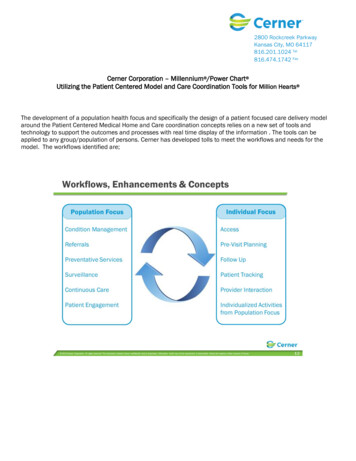
1. Set Up Team ListsSelect “Patient List”Click here to createyour lists- Select “Medical Services” for any ofyour primary teams (such asmedicine blue/cardiology).- Select “Care Teams” for any of yourconsult services (such as ERtriage/neurology consults).- Also click on “Encounter Types”then click “Inpatient” and “ShortStay”. This will remove the pre-admitpatients.- To create a personal list, select“Relationships”. Then you can createany list that you want (such as a listof patients you want to follow upafter discharge.)Click here toorganize your listsReturn to Table of ContentsCreated by Ashley Trane, MD2
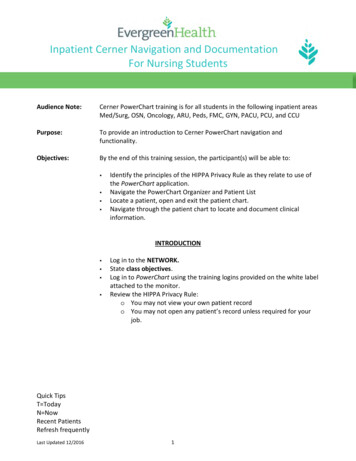
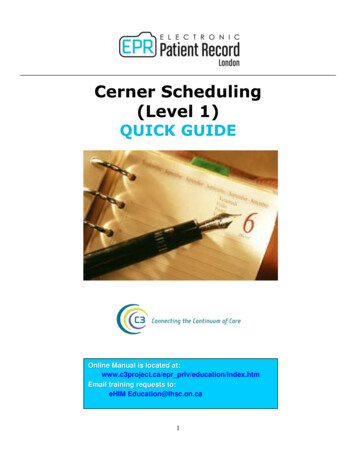
2. Documentationa. Create a list of your favorite document typesClick on “ClinicalNotes”Click on“Documents”Click on “Options”Search for yourcommonly useddocuments and addthem to the righthand column. You canalso add a defaultdocument type.Return to Table of ContentsCreated by Ashley Trane, MD3
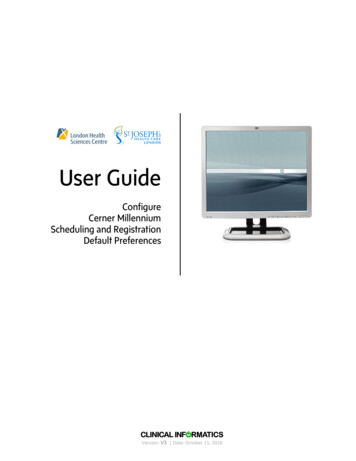
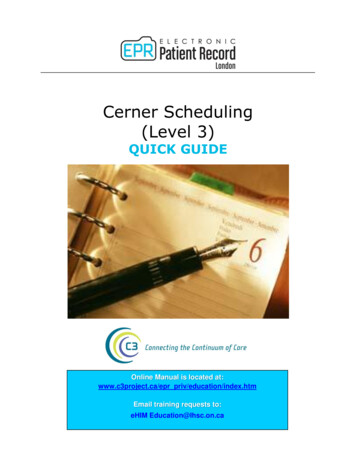
When creating yourdocument, you canfavorite your mostused templates byselecting the starnext to the title.b. Create and find others provider’s auto textYour abbreviation is whatyou will type to pull up yourtemplate; it is case sensitiveClick here to pull inspecific patient data,such as CBC resultsClick here to createdrop down list“ ” allows you to tabthrough the template and fillin the blanksReturn to Table of ContentsCreated by Ashley Trane, MD4
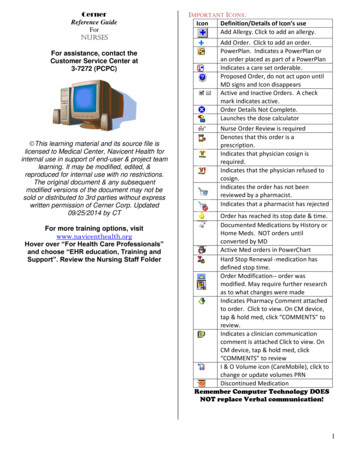
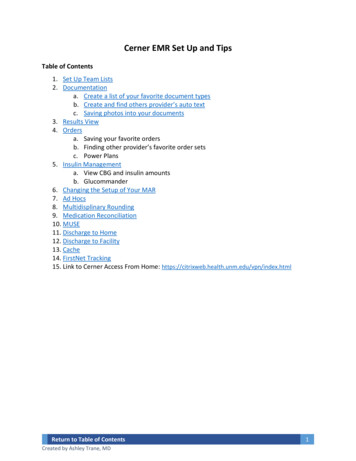
1 - Click “Autotext Copy Utility” toopen other provider’s autotext2 - Type provider’s nameto view their autotext3 – Click onthe autotextyou want tocopy4 - Click “Copy” to add itto your autotext libraryc. Saving photos into your documentsi. You can use the “Snipping Tool” to take a screen shot. You can also copya scanned in image.ii. Open Dragon’s Dictation Box and paste in image.iii. Within your Cerner document, click “transfer text” on dragon to pasteyour image.3. Results Viewa. Under “Results View”, click on “Multi-D Summary”. Here you can find nutrition,speech, PT, OT, wound care, and social work notes.Return to Table of ContentsCreated by Ashley Trane, MD5
4. Ordersa. Saving your favorite ordersWhenever you write an order,before signing it you can rightclick on it and “save to favorites”.Then once in your orders, clickhere to organize your favorites.Of note, you can right-click onany folder and set it as yourdefault home folder.b. Finding other provider’s favorite order sets1 - Under “Provider View”,go to the “New Order Entry”tab.2 - Type in the provider’sname of who you want tosearch his/her orders.3 - Click the star next to theorder to save it to yourfavorites.Return to Table of ContentsCreated by Ashley Trane, MD6
c. Power Plansi. There are a lot of power plans to simplify your ordersii. Example order sets that are commonly used1. Adult Medicine Admit Orders2. Adult MICU Admit3. Adult Acute Heart Failure4. Adult Acute Coronary Syndrome5. Adult Cardiac Monitoring6. Adult Delirium Prevention Protocol7. Adult GI Bleed8. Adult Hepatorenal Syndrome9. Adult Hyperkalemia Treatment10. Adult Nicotine Replacement Therapy11. Adult Neutropenic Fever12. Adult Sepsis or SIRS13. Adult Thoracentesis Lab Set/Adult Paracentesis Lab Set14. Adult ICU Analgesia, Sedation & Anxiety15. Adult Diabetic Ketoacidosis DKA16. All Glucommander power plansiii. Of note, a lot of power plans have plans built within them. You need to“initiate” them before signing them. For example, a common plan is toinitiate is the “SIRS without new sepsis” order. To do so, follow the belowsteps:Select the appropriateSIRS/Sepsis order setReturn to Table of ContentsCreated by Ashley Trane, MD7
After you select the above power plan, it will open up the subsequent power plan. Click on anyorders you want and when done, click on “return to [parent power plan]”.Click “Initiate Now”In some power plans, when youinitiate the plan, it will open one lastorder set. Click on the appropriateorder. Then click on the green checkmark. After this, you can click“Orders for Signature” to finalize thepower plan.Return to Table of ContentsCreated by Ashley Trane, MD8
5. Insulin Managementa. View CBG and insulin amounts.i. Click on “Custom Pt Views” to view the patient’s CBG and the insulinhe/she has receivedb. Glucommanderi. Click on the “Glucommander” tab to see what insulin glucommander isrecommending that patient receives. If you want to changeglucommander, do not adjust it within this section. You will need to ordera glucommander modifier power plan.Return to Table of ContentsCreated by Ashley Trane, MD9
6. Changing the Setup of Your MAR1 – Click here to pull upthe MAR’s properties2 – You can adjust whatdays are viewed andacross what timeintervals.7. Ad Hocsa. Click on “Ad Hoc” to place any outpatient consult.b. Click on “Ad Hoc” then “Provider Forms” to enter in the Death Packet8. Multidisplinary Roundinga. Click on “Multidisplinary Rounding” on the top tabb. You should edit the estimated discharge date in this tab to update your caremanagement team on the anticipated discharge dateReturn to Table of ContentsCreated by Ashley Trane, MD10
9. Medication ReconciliationClick “Document Medication by Hx” todocument home medications. This field willallow you to enter any medications includingsupplements. You can also add compliance.If home medications are documented,and medication reconciliation foradmission and discharge are complete,then a green check mark will appear.Click “Reconciliation” to reconcile home medications on admission,medications on transfer, and medications on discharge.Of note, we recommend whenordering medications on discharge,to add the indication under“special instructions”. This willprint on the prescription label forthe patient to read.10. MUSEa.b.c.d.e.To view EKGs, click on “UNMH Intranet”Click “Web Based Systems” then “Citrix Web Interface”Click “UNMH Citrix Applications” and log inThen click and log in to MUSEEnter in the patient’s MRN (needs nine digits; add “0” to the start of the MRN tomake a total of nine digits)Return to Table of ContentsCreated by Ashley Trane, MD11
11. Discharge to Homea. Do discharge medication reconciliation as aboveb. Write discharge summaryc. Write discharge instructions to patienti. Click “Depart” in title barClick the pencil next to “DC Instr./Follow up”Search here for any discharge education leafletsto send home with the patient. You can rightclick on any from and save it to your favorites.Some of myfavorites include:“Substance UseReferral Resources”,“Form-BloodPressure RecordSheet”, and “Form –Daily WeightRecord”Return to Table of ContentsCreated by Ashley Trane, MDEach patient either needs “Hospital MedicineDischarge Adult”, “Adult Hospitalization Summary”,or “Discharge Adult Hospital Medicine SPANISH”.Fill out any information for thepatient to take home. Of note, itis helpful to write a section inhere for the PCP of things tofollow up on in case they do notreceive the discharge summary.12
12. Discharge to Facilitya. Do discharge medication reconciliation as abovei. If discharging to a facility, make sure antibiotic/infusion end of treatmentdates are listedb. Write a “Transfer to Other Facility – Medicine” discharge summary as both thedischarge summary and depart paperwork13. CacheClick on the down arrow next to any column. Then click on “SHOW/HIDE Columns”. I recommendhiding most columns as this will allow your cache to upload faster.Click “View” to change your cacheview. We use Internal Medicine formost rotation; use Critical CareMedicine for the ICU; and useQuality/Safety for all rotations.14. FirstNet Trackinga. Click on “FirstNet Tracking” to see the Emergency Room listReturn to Table of ContentsCreated by Ashley Trane, MD13
Cerner EMR Set Up and Tips Table of Contents 1. Set Up Team Lists 2. Documentation a. Create a list of your favorite document types b. Create and find others provider’s auto text c. Saving photos into your documents 3. Results View 4. Orders a. Saving your favorite orders b. Finding other provider