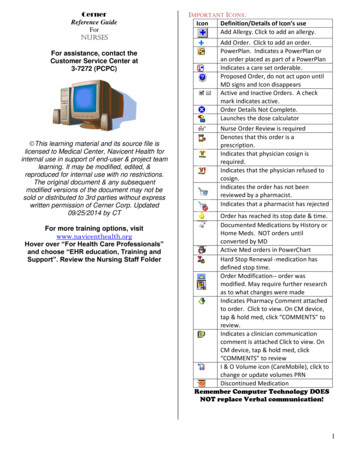
Transcription
Inpatient Cerner Navigation and DocumentationFor Nursing StudentsAudience Note:Cerner PowerChart training is for all students in the following inpatient areasMed/Surg, OSN, Oncology, ARU, Peds, FMC, GYN, PACU, PCU, and CCUPurpose:To provide an introduction to Cerner PowerChart navigation andfunctionality.Objectives:By the end of this training session, the participant(s) will be able to: Identify the principles of the HIPPA Privacy Rule as they relate to use ofthe PowerChart application.Navigate the PowerChart Organizer and Patient ListLocate a patient, open and exit the patient chart.Navigate through the patient chart to locate and document clinicalinformation.INTRODUCTION Log in to the NETWORK.State class objectives.Log in to PowerChart using the training logins provided on the white labelattached to the monitor.Review the HIPPA Privacy Rule:o You may not view your own patient recordo You may not open any patient’s record unless required for yourjob.Quick TipsT TodayN NowRecent PatientsRefresh frequentlyLast Updated 12/20161
Right click for additional informationTrends & GraphNavigation through PowerChart OrganizerNurses, HUCs and Unit Techs view will open to Care Compass, all other roles will open to thepatient list.Basic RN Workflow for Care Compass1. When you first log into PowerChart it will open to Care Compass2. The Patient Location List on CareCompass will appear3. To change lists use the drop down box near the top left corner4. To assign yourself to patientsa. Select the EstablishRelationship button.b. All patients will be selected, ①“Deselect All”and select your assigned patientsc. Select type of relationship from drop down boxat top, will default to ② “Assigned”d. Select ③Establish5. On the patient list dropdown select “Assigned”.6. To see more details on a patient:a. Hover over patient name to see generalinformation, diet, and code statusb. You can right click on patient name to select a section of their chart you would like toview (Orders, IVIEW, MAR, etc.).c. Select the arrow at the end of the patient name. Single patient view willappear with additional information on your patient. Three tabs will beLast Updated 1/20172
displayed.The first tab is Activities.① Patient name, MRN, and FIN #② Activity Tasks and medications that will be due over the next 2, 4 or 12 hours③Overdue task will be displayed in redThe next tab is PRN/Continuous④ PRN Medications⑤ Continuous MedicationsThe last tab is Patient Information⑥ High risk indicators for youpatient⑦ Allergies⑧ Care Team members and contactinformationLast Updated 1/20173
7. Completing Tasks: Click on the gray arrow next to the patients name to open single patient view todocument tasks.a. Select the taski. Select Done, if already completedii. Select Document to be taken to thepowerformiii. Select Not Done, then give reasoning8. Completing Tasks that are not applicable to your shift (Students should inform the primary RN):a. For tasks from previous shifts (Braden, Morse, PRN Pain Response, Medications):i. Select the taskii. Select Not Doneiii. Select Task Maintenance9. At the beginning of your shift complete/clear all pending/overdue tasks from your shift. There shouldbe no red bar in the activities column or on the left side of the Activity Timeline10. Throughout your day check Care Compass for new orders, results, and/or tasks.11. To review orders:a. Click on orange or red box around patient nameOrange Box around patient name with Orange Circle containing ‘!’ inside:‘New Orders’ or ‘Abnormal Lab Results’Click on the Orange Circle in the box to view/review these itemsRed Box around patient name with Red Circle containing ‘!!’ inside:‘STAT Orders’ or ‘CRITICAL Results’Click on the right end of the box to view/review these itemsb. Click on orange or red icon in top right corner of Care Compass.i. Click on the icon to see the breakdown of the detailsii. Click on specific patient to review resultsc. If the user put the order in themselves, the box will not appear, the system assumes you areaware of the order because you entered itd. PLEASE always try to document your tasks from Single Patient view instead of using Ad Hoce. Remember to clean up your task list regularly throughout your shift and also prior to shiftchange report.12. Name Alerts:a. Patients with similar names will be italicized.Symbols (Hover over these symbols to see further information):Biohazard symbol - Patient Isolation StatusWill appear if patient has any isolation status other than Standard PrecautionsRed Triangle - Patient High RisksIncludes: Skin Risk, Fall Risk, Restraints, CIWAA score greater than 10Activity TimelineLast Updated 1/20174
Red bar, on left end - Overdue tasksHover to see what type of tasks are overdue, enter patient information window todocumentHourly Green Bars - Visual cue of upcoming nursing tasks, (medications, patient care, charting)Hover on green bar to see a breakdown of type of task for specified hour.Review across the top of the patient chartTitle BarShows PATIENT NAME, MRN and NAME of who opened the chart.Menu BarTask Change User Reports – reports vary depending on location. Common reportsinclude: discharge instructions, active orders, medication lists, etc. Print – Medical Record Publish. Prints patient medical recordinformation Exit - enables user to gracefully exit the Powerchart system.View Patient List - this menu item is grayed out if patients have notbeen assigned, or a patient list has not been built. Patient Tracking – Tool to help track patients through theorganization.Patient Search – Locate patient by FIN # or 3 patient identifiers Recent – shows recent patient chartsPatient List - Find your patient on the Patient ListIcon Bar –CareCompass - Will be covered for nurses in Documentation and Orders class. HUCs and Unit Techs willview LMS video.Last Updated 1/20175
Tracking List – Shows an overview of all inpatient beds. Transfers should be completed from the trackingboard. The tracking list is used primarily by the House Supervisor, Charge Nurses, and Float nurses to seeempty beds, and general acuity of patients.Exit – closes all applications.Calculator – Clinical Calculator: a conversion tool that includes formulas that convert inches tocentimeters, IV fluid rate, CCs per hour etc.AdHoc Charting – available chartingblank forms categories are arranged in atree on the left. Available forms aredisplayed within selected categories onthe right side of the window.Medication Administration – displays patient medications after you have scanned the patient ormanually searched for the patient information.PM Conversations – Patient Management Conversations – provides access to formsrelating to transfers, discharging, nursing actions, etc. Transfer – receiving unit will process the patient transfer. Discharge – note: only discharge a patient once they have physically left thehospital. All active orders are discontinued from Cerner at that point Cancel Transfer - orders suspended because of a patient's temporary change oflocation can be given a Transfer/Cancel status. Cancel Discharge – the Physician will need to be contacted to reactivate orders in the system. Nursing – this form enables the Nurse to update patient information like the POLST or AdvancedDirective. Inpatient registration – this form is use during transfers. It is very important to select correctaccommodation.Patient Education – Allows nurses to add Educational material to the patient’s chart.Depart – Used by the nurses when discharging a patient from the hospital.Patient Education and Depart will be covered in the Documentation and Orders class.Explorer – enables end users to print census lists, RN worksheets, MD round lists, andother reports. To print a census list, double click on Main Menu and Select Census by Location Select the desired unit Census and click ExecuteLast Updated 1/20176
Documents – enables end users to print Patient information such as Face Sheets, arm bands, or ADTlabels.Collections Inquiry - view collections scheduled or collected through the current time, ability to reprintlabels for specimens as needed.Links – provides access to online applications: Up to Date, Micromedex, SafelinQ, Evergreen Lab TestDirectory, EvergreenHealth Medical Group Provider Directory, Lucidoc, Medical Staff Numbers, DI OrderingGuideline.Refresh Or ‘As Of’ – updates all information entered on your patient. Youmust remember to refresh after making any changes.Navigation Within the Patient’s ChartDemographic Bar – Displays information regarding the patient’scurrent visit1. Patient Name – (active link) double clicking on the patient namewill show some general patient information.2. MRN# (medical record number) & FIN # (unique financialnumber) – both are displayed.3. Other items found on the Banner Bar:a. Patient Age, Date of Birth, Sex, Admission Dateb. Encounter type, and Patient location (active link - shows General Information)c. No Information Patient (NIK)d. Isolation Statuse. Clinical AlertsNavigation down the Menu Bar in the Patient’s ChartThe menu bar is similar to the tabs in a hard chart.Orders – Lists all active orders. See the Orders training manual for specific information.Plan of Care Summary –Medication List – List of the patient’s current medications. This will be also covered with theOrdersLast Updated 1/20177
IVEW – Patient information is documented here.Entering Information into IVIEW1. Click on the IVEW tab to open the flowsheet for documentation. It will first open to the Vitals and showthe list of available flowsheet.2. Double click in the blue header above the section to activate the section toenable data entry.Or3. Double Click in the cell you wish to document in.4. The documentation will be purple until it is signed.5. Sign your documentation by clicking on the green check mark atthe upper left of the IVEW window. The documentation will nowbe black.6. Enter I/O in the I/O fields7. Enter Interventions - Click on the field next toInterventions to open the list.8. Enter Turned left, AM care, Bed alarm onIView DocumentationIsolation Status must be documented inIVIEW if the patient is under any type ofLast Updated 1/20178
special isolation precautions. Patient Isolation is located in the Vitals band directly below the Vital Signs.Documenting by Exception for the Routine Nursing AssessmentAssessment documentation in IVIEW is described ascharting by exception. If your assessment for aspecific system is Within Normal Limits (WNL), youcan just select WNL. A reference is available for youto see what the normal limits are for that system.2. If there are exceptions to the assessment the nurse would choose WNL Except and additionalassessment information will become available. Document only what is abnormal in that systemassessment.3. If the patient’s condition improves and the system assessment is now normal, at the time theassessment becomes normal the nurse will need to document to show how and when thepatient assessment is normal.4. After the documentation shows what the normal value is, WNL can now be documented. Fromthen on, as long as the assessment continues to be WNL, this may be documented.Documenting dynamic groups1. In Tubes and Drains, select DrainAssessment as an example.2. To add a drain, click on the gridand select Add a dynamic group3. Click in between the brackets for Drain Types and determineDrain Type, Drain # and Drain Location. Be sure to scroll all theway to the bottom to enter the Drain Insertion Date/Time.Last Updated 1/20179
4. Add a drain volume Double click in the Drain Output field, then enter the amount. Sign data, by clicking the green checkmark, the screen will refresh.5. Modify Patient Dataa. Right click in the field and select Modifyb. Enter the correct amount and sign. A delta sign willappear in the field indicating a change.MAROpen the MAR to review your scheduled, prn and IVmedications.Medication administration should be done using thehand held scanner. Click on the MedicationAdministration icon on the tool bar to open thescanner application.Correct all red entries before the end of yourshift why the med was not given or time it was given late-why.MAR SUMMARY- provides a summary of all medications scheduled for the patient in the 24 hour period—highlighted in yellow or the period of which the Search Criteria banner is set to.LAB – shows labs resultsAdjusting the Search Criteria - Several of the pages may require you change the date range to viewpreviously documented items.1. Right click on the gray bar and select Change Search Criteria.Last Updated 1/201710
2. There will be multiple ways for you to look up your results.DI – Diagnostic Imaging results will display here if you have access.Clinical Alerts - enter the reason a patient might need special care. Example: drug seeker or bulimic.Histories – Displays Social and Past Medical HistoryImmunizations – List of previous vaccinations.Forms - all Ad Hoc forms with charted information can be found here.Modifying Entries Made on FORMS – Go to forms tab and RIGHT CLICK the form that needs to bemodified or cancelled and enter the changed information.Documents - Consults, previous discharge instructions, history and physical, admission health historyreports.Results Review – Shows IVEW documentation on the Education & Plan of Care, Vitals, Last 48 hours, PatientCare, and Respiratory TherapyPatient Information - – lists patient information, such as Demographics, allergies, visit lists and growthchart.Schedule - contains any surgical schedules.Inpatient Summary (Mpages) – provides a summary on the most current medical information, Vital Signs,Measurements, Orders, Documents, Medication List, Allergies, and Patient InformationProblems and Diagnosis – List of Problems and Diagnoses for the patientKARDEX – ation – To queue meds (pre-select meds that you want to get for your patient)Nursing Hand-Off – Ten Critical Elements needed for Hand Off of a patient.Last Updated 1/201711
Blood Products Mpage – Shows the patient’s blood type, all blood products that have been administered tothe patient, blood product orders, and if there are any blood products available for the patient in the lab.Last Updated 1/201712
Last Updated 112/2016 Inpatient Cerner Navigation and Documentation For Nursing Students Audience Note: Cerner PowerChart training is for all students in the following inpatient areas Med/Surg, OSN, Oncology, ARU, Peds, FMC, GYN, PACU, PCU, and CCU