Transcription
HKBN SmartApp User Guide(iOS & Android)v.202109231
Table of contentsAbout HKBN Smart App . 3Download HKBN Smart App . 4Account Login . 5Forget Password . 6Homepage introduction . 7Edit Widgets. 8Add Device . 10Control Device . 13Room Management . 15Scene (Smart Action) . 20Automation (Smart Action) . 28Settings . 33User Account Settings . 33App Settings. 34Message Center . 35Other . 36FAQ . 372
About HKBN Smart AppHKBN Smart is a one-stop smart home platform to make your home a betterplace to live through the benefits of convenience, home security and energyefficiency by smart home living. With HKBN Smart App, you can manage andcontrol your smart home devices at anytime and anywhere. For examples, youcan watch the live view and get alert messages from your IP camera, control thepower of smart plug or use your phone as a smart remote control. No morefrustration and effort to manage and learn different App because all above canbe done by one App. Besides, HKBN Smart will be compatible with differentbrands of smart home platform to meet the diverse needs of your daily life suchas home security, lighting, power management, sensors and home appliances.Main features: Control smart home devices anytime, anywhere with one single AppSupport Cantonese voice control with Siri (iOS only)One tap for scene execution to control multiple devices at one goConnect and make devices react to conditions automatically by settingrules Compatible with different brands of smart home platforms to meet thediverse needs of home living3
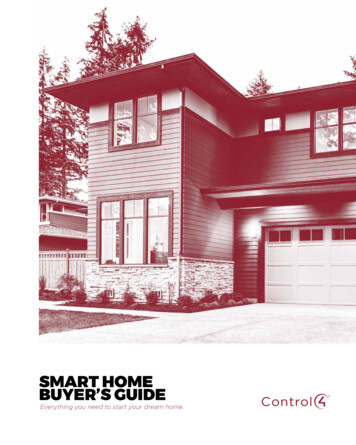
Download HKBN Smart AppSearch and download “HKBN Smart”App in Apple App Store OR GooglePlay StoreORScan the QR code below4
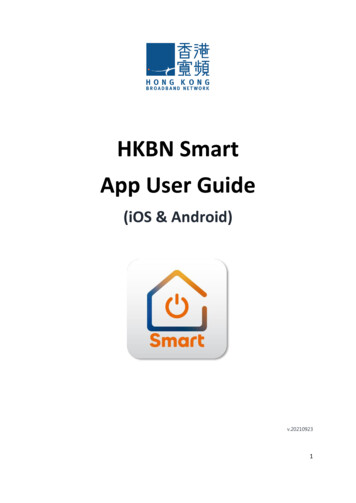
Account LoginFirst-time login1.2.3.4.(image 1)Enter your Email address and Password (image 1);(You can find your first-time login information in the activationemail.)Enter your user name and select profile picture. (image 2)Select or skip your home location* (image 3);(*Provide home location to get accurate weather information for theconditions in Automation smart action.)Enter new password (image 4).(image 2)(image 3)(image 4)Share a HKBN Smart account among users User can login to the same HKBN Smart account on multiple mobilephones to manage the same smart device.User will receive a push notification from their login mobile device whenthere is a new mobile device login to the same account.User can check what mobile devices already login to the account: in“Settings” “User Account Settings” “Device Management”.5
Forget PasswordIf you forget your password, you can create new password through the “ForgetPassword” function in the login page:1.2.3.4.(image 1)Tap “Forgot Password” (image 1);Enter your login email address and tap “Next” (image 2);Enter the verification code sent to your email (image 3);Reset new password (image 4).(image 2)(image 3)(image 4)6
Homepage introductionProduct News Push(Provide the latest smart deviceinformation)Profile picture and user name(It can be changed in “settings”)Home location (Tap to change)Weather information(Including temperature, humidity and UV index)Device information(Including numbers of online and offlinedevice, alert message)WidgetsYou can add widgets to homepage. (includingdevice on/off, battery level, motion detectioninformation, scene execution etc.) **Available widgets depend on paired devices.Edit widgets(Please read “Edit Widgets” page for detail)Main Menu7
Edit WidgetsWidgets are small apps in homepage that launch specific functions to provideinformation and convenient access on your Home screen. For examples, deviceon/off, battery level, last motion detection information.Add / Remove Widgets1.2.3.(image 1)Tap “Edit Widgets” in the homepage (image 1);Tap “Edit” button in the top right corner (image 2) ;In Add Widgets page, you can find all available widgets here:App Widget: Tap the circle next to the device to add a tick.Remove Widget: Tap the tick next to the device to remove the tick.Tap “Save” when you complete your editing (image 3).(image 2)(image 3)8
Edit WidgetsManage widgets order in homepage4.5.(image 1)You can manage the order of widgets by dragging up or down thewidgets (the top one will put in the home page top left corner.) (image1 and 2);Back to homepage, the new order will be applied (image 3).(image 2)(image 3)9
Add Device1.2.3.(image 1)Tap “Devices” on the bottom menu (image 1);Tap “Add Device” button OR “ ” icon at top right corner if you alreadyhave paired device (image 2);Select the category from the left menu and tap the device icon (image3);(image 2)(image 3)10
Add Device4.5.Follow the pairing instructions on screen (image1) (Pairing method isvaried from different smart device, please read the related productuser guide for detail pairing procedure.);Select 2.4GHz Wi-Fi Network and enter Wi-Fi password (image 2);Important tips: Wi-Fi requirement (image 1)Currently all smart devices are compatible to 2.4GHz network only.Please make sure your device and mobile are connected to 2.4GHzbut not 5GHz Wi-Fi network.If you have 5GHz network and it is using the same network name(SSID) as the 2.4GHz network, please turn off the 5GHz network firstbefore adding device.(image 2)11
Add Device6.After device added successfully, you can change the device name andassign it to the located room. (You can also change the device nameand room location later in device setting page and room managementpage.)Change devicenameRoommanagement12
Control Device1. After successfully added device, you can find the added device in the “Device”page. Tap on the name of the device, you can enter to the control panel ofthe device.13
Control DeviceAbout the Control Panel, Device Settings and Remove Device are varied fromindividual smart device, please read the related product user guide for details.Please visit (URL) for product user adband/#hkbn-home-userguide14
Room ManagementYou can assign your device to different room by Room Management function.For example, if you have a Smart Remote Control in your living room, you canassign this device into “Living room”. And you can find this device under thisroom. About room management: Each device can only be assigned to one room.You can move your device anytime to another room, a pop message will askfor your confirmation about removing it from the original room.You can rename room and its’ language will not be changed even if Applanguage is changed.1. Room MenuIn “Device” page, you can find the room selection menu on the top of screen.Tap the room name will show all the devices which are already assigned tothis room. “All Device” will show all your added devices.15
2. Add Device to RoomMethod 1:Assign device to room at the end of “Device Added Successfully” screen.Method 2:(1) In “Device” page, tapon the top right corner, and then tap “RoomManagement” (image 1);(2) Tap to select room. (image 2);(3) Tap the green icon to add device to this room (image 3).(image 1)(image 2)(image 3)16
3. Add Room1. In “Device” page, tapon the top right corner, and then tap “RoomManagement” (image 1);2. Tap “Add Room” (image 2);3. Enter room name or select from recommendations (image 3).(image 1)(image 2)(image 3)17
4. Delete Room1. In “Device” page, tapon the top right corner, and then tap “RoomManagement” (image 1);2. Tap “Edit” (image 2);3. Tap the red icon to delete room (image 3).(image 1)(image 2)(image 3)18
5. Manage the Room Menu order1. In “Device” page, tapon the top right corner, and then tap “RoomManagement” (image 1);2. Tap “Edit” in the top right corner (image 2);3. Drag the room up or down to relocate room location in menu (image 3).(image 1)(image 2)(image 3)19
Scene (Smart Action)What is Scene?The integration of different smart devices is the beauty of smart home livingwhich provides convenience and many possibilities of creating your preferredcontrol settings. By setting SCENE, you can execute different smart devices atthe same time by only one single tap. You can tailor make your unique scenesuch as movie time scene, welcome/back home scene, reading scene etc.Add Scene1.2.3.Tap “Smart Action” in the bottom menu.Tap “Add Scene” or “ ” in the top right corner.Tap “Customization” to create your own scene.(image 1)(image 2)(image 3)20
SceneLayout Introduction of Add SceneSave buttonEdit Scene Cover PhotoEdit Scene NameSelect Scene Room LocationAdd Action**Available action depends on paired devices.(Add Scene Widget to homepage21
SceneAdd Scene ActionsDelay Execution TimeIf you would like to delay execution, you can setdelay execution time here before adding smartaction.Enable or Disable AutomationTap to select an automation you would like toenable or disable as scene action.Add Action from Smart DevicesTap on the device name and select the actionyou want to execute in scene. (Available actionsare different from individual device.)22
SceneSave Scene SetupTap “Save” on the top right corner tosave your customized scene setup.User must enter Scene name beforesave.23
SceneExecution of SceneMethod 1: Add Scene Widget and tap “Execute”. (image 1)Method 2 : In the page of Smart Action under Scene category, tap “Execute” button.(image 2)(image 1)(image 2)24
SceneAdd Voice Command to Siri (only for iOS)1.2.3.4.You can add voice command to Siri to execute scene.In the page of Smart Action, under the Scene category, tap “Add to Siri”(image 1);Select the Scene you would like to add voice command (image 2);Enter the voice command you want and tap “Save Shortcut” tocomplete the setup (image 3).(image 1)(image 2)(image 3)25
SceneAdd scene to NFC tag1.2.3.4.5.You can add scene to NFC tag to execute scene;In the page of Smart Action, under the Scene category, tap “Add toNFC” (image 1);Tap “Add New NFC Tag” (image 2);Hold your device near the NFC Tag (image 3);Input name and select scene to complete.(image 1)(image 2)(image 3)26
Scene (Example)One tap/ Voice control to change TV channel1. First, you need to have Smart Remote Control and already paired the remotecontrol of your TV/TV Box;2. Tap “Smart Action” and create a customization scene;3. Tap “Add Action”, and then select the TV/TV box, enter the channel numberby correct order. For example, if you would like to setup channel number 321,you need to enter “Number 3” as first action, and then “Number 2” andfinally “Number 1”;*”Delay Execution Time”: The operation time need for TV to input channelnumber may be varied. We can add “Delay Execution Time” to ensure TV hasenough operation time to input remote command one by one. For example,after the scene action of TV power on, add 5 seconds of Delay Execution Timeand then input the channel number as next action.4. Once saved the scene, you can add voice control by Siri to change your TVchannel.27
Automation (Smart Action)What is Automation?AUTOMATION can carry out device actions automatically by pre-conditions like environmentfactors or smart device status. You can handover this complex and important daily works toHKBN Smart for a convenient and simple living.Example of Automation :1.If temperature is higher than 25 degree, then turn on the Fan*.。2.3.If humidity is higher than 90%, then turn on the dehumidifier*.If detected motion, then turn on smart plug (connected to lighting).*Device need to support infrared Remote Control.Add Automation1.2.3.Tap “Smart Action” in the bottom menu;Tap “Add Automation” or “ ” in the top right corner;Tap “Customization” to create your own automation.自動化設置28
AutomationLayout Introduction of Add AutomationSave ButtonEdit Automation Cover PhotoEdit Automation NameSelect Automation Room LocationAdd Conditions**Available conditions depend on the paired devices.Add Actions**Available actions depend on the paired devices.Setup Effective PeriodEnable/disable Execution notification29
AutomationAdd Condition1.2.Tap “Add Condition”.Enter add condition page, available conditions include: Temperature, Humidity, Weather from Hong Kong Observatoryand Schedule*. For example, you can set a temperature or time asthe automation trigger condition. (*At least 1-minute durationbetween schedule time and the time of automation saved.) Paired device support condition. (Available conditions are variedfrom individual device)30
AutomationAdd Action1.2.Tap “Add Action”.In add action page, you can add: Delay Execution Time Execute Scene Enable or Disable Automation Paired device available actions (Available actions are varied fromindividual device)Automation31
AutomationSave and Enable Automation1.2.Tap “Save” in the top right corner to save automation setup (image1);In Smart Action, under the page of Automation, you can tap on thebutton to enable or disable the automation (image 2).(image 1)(image 2)3.32
SettingsUser Account SettingsUnder setting page you can find below items: User Name Profile Picture Reset Account Password (After reset new password, all login mobiledevice will be logout automatically) Your Home Location Device Management: display all logged in device information. (Includeuser authorized technical support by HKBN on-site or remote customerservice.) Manage Family Members: add or delete family member profile (max. 10members)33
SettingsApp SettingsIn app settings you can find below items: Push Notification*: option for receiving push notification“Devices, Automation Push”: provide notification such as motiondetection, execution of automation, low battery alert.“Product News Push”: provide the latest smart device information.(*To enable this function, user need to enable the push notificationfunction for HKBN Smart App in mobile level first.) Language (Chinese or English)34
SettingsMessage Center Alarm: included motion detection alert*, execution of automation*,device login information, device removed message. (User need to enableit manually) History log: included device online and offline records, device paired andremoved records, scene execution record.35
SettingsOther User Guide: User can find HKBN Smart App and smart device user guide. Terms & Conditions Logout: tap to log out36
FAQ1.What should I do when a device firmware update fails?Check whether the network is stable. We recommend that you moveyour device to a more stable network environment.2.What should I do when my device fails to connect to the network oradd device?Step 1: Check Device PowerCheck whether your device is powered on and turned on.Step 2: Check Wi-Fi SignalEnsure that the network environment has strong and stable signals.Troubleshooting and Suggestion: Place your mobile phone, smartdevice and router close to each other, and connect mobile phone andsmart device to the same network. Open a web page to check whetherthe browsing is smooth and stable.Step 3: Check Router UsageIf the network is normal, but the device network connection still fails,check whether the router is overloaded. You can disable other device'sWi-Fi feature to reserve the channel for resource reallocation.Step 4: Check Wi-Fi PasswordCheck whether the router password you entered is correct. Check forspaces before and after the Wi-Fi account or password and casesensitivity issues.Step 5: Check Wi-Fi ChannelEnsure that your device was added to a Wi-Fi band of 2.4GHz. (1. Checkwhether the 2.4GHz band and 5GHz band share the same Wi-Fiaccount. If so, we recommend that you configure the two accounts andswitch to the 2.4GHz band during network connection. 2. Mobile andDevice must connect to same 2.4GHz Wi-Fi network in pairing.)(Remarks: (i) Ensure that the encryption method and authentication type are setto WPA2-PSK and AES, respectively, for the router's wireless settings, or both setto Auto. (ii) If wireless MAC address filtering is enabled for the router, remove yourdevice from the router's MAC address filtering list, to ensure that it can connect tothe network. You can also disable MAC address filtering. (iii) Ensure that the DHCPservice is enabled for the router. If not, the IP address will be occupied. If your37
device still fails to connect to the network after the preceding steps, provide uswith your app account. We will arrange for technical support engineers totroubleshoot this issue.)3.What should I do when my device goes offline?Step 1: Check whether the router is powered off or disconnected fromthe network. If so, the router will take some time to recover. Wait fortwo minutes and then check whether your device is online.Step 2: Check whether the router has been replaced, or the Wi-Fi nameor password has been changed. If so, remove your device and then addit to the network again.Step 3: Check whether the firmware is the latest version. To check thison the app, choose “Devices” “Select Device” “Settings” “Check for Firmware Upgrade”.If your device still fails to connect to the network after the precedingsteps, place your device in a network environment with strong andstable signals and connect it to the network again. If your device is stilloffline, provide us with your app account and device ID. We willarrange for technical support engineers to troubleshoot this issue.4.What should I do when Automation runs incorrectly?Step 1: Ensure that your device is powered on and turned on.Step 2: Ensure that your device is online in a stable and smoothnetwork environment during task execution.Step 3: If your device is online and started, but the task runs incorrectly,delete that task and add a new one.Step 4: If the issue persists, remove your device, add it again, and seta new smart task.Step 5: Check whether your device is online. If the issue persists,provide us with your device ID and the specific time when the taskfailed (the configured validity period, the time when the task failed torun, or time when the task ran but at an unexpected time). Pleasecontact our customer service hotline for help.5.What should I do when a timed task did not perform correctly?Step 1: Ensure that your device is powered on and turned on.38
Step 2: Ensure that your device has strong and stable Wi-Fi signals andis in the online state in the app.Step 3: Ensure that the validity period of the scheduled task is correct.Tap “Timing” and check whether “Repeat” covers the required validityperiod (Monday to Sunday available) of the task.Step 4: If the validity period is correct, delete the timed task and add anew one.Step 5: If the issue persists, remove your device, add it again, and thenset a new timed task.If the issue persists, provide us with your device ID and the specifictime when the task failed (the configured validity period, the timewhen the task failed to run, or time when the task ran but at anunexpected time). Please contact our customer service hotline for help.6.What should I do when my device fails to enter the network pairingmode?Step 1: Read the product manual or the instructions on the networkconnection page and strictly follow the steps.Step 2: If your device still fails to enter the network connection state,check whether your device is powered on and turned on and whetherthe indicator is on steady.If the issue persists, you may need guidance on troubleshootinghardware products. Please contact product supplier for assistance.Should you have any query, please email to HKBNBroadband@hkbn.net .39
conditions in Automation smart action.) 4. Enter new password (image 4). (image 1) (image 2) (image 3) (image 4) User can login to the same HKBN Smart account on multiple mobile phones to manage the same smart device. User will receive a push notification from their login mobile device when there is a new mobile device login to the same .