Transcription
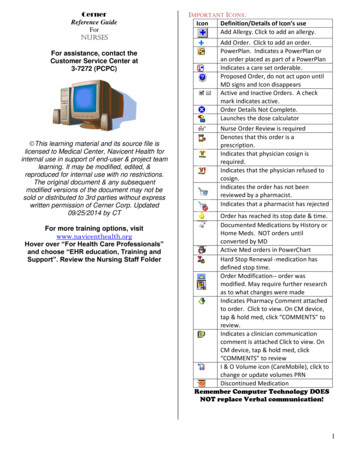
CernerReference GuideForNURSESFor assistance, contact theCustomer Service Center at3-7272 (PCPC)This learning material and its source file islicensed to Medical Center, Navicent Health forinternal use in support of end-user & project teamlearning. It may be modified, edited, &reproduced for internal use with no restrictions.The original document & any subsequentmodified versions of the document may not besold or distributed to 3rd parties without expresswritten permission of Cerner Corp. Updated09/25/2014 by CTFor more training options, visitwww.navicenthealth.orgHover over “For Health Care Professionals”and choose “EHR education, Training andSupport”. Review the Nursing Staff FolderIMPORTANT ICONS:IconDefinition/Details of Icon’s useAdd Allergy. Click to add an allergy.Add Order. Click to add an order.PowerPlan. Indicates a PowerPlan oran order placed as part of a PowerPlanIndicates a care set orderable.Proposed Order, do not act upon untilMD signs and Icon disappearsActive and Inactive Orders. A checkmark indicates active.Order Details Not Complete.Launches the dose calculatorNurse Order Review is requiredDenotes that this order is aprescription.Indicates that physician cosign isrequired.Indicates that the physician refused tocosign.Indicates the order has not beenreviewed by a pharmacist.Indicates that a pharmacist has rejectedOrder has reached its stop date & time.Documented Medications by History orHome Meds. NOT orders untilconverted by MDActive Med orders in PowerChartHard Stop Renewal -medication hasdefined stop time.Order Modification-- order wasmodified. May require further researchas to what changes were madeIndicates Pharmacy Comment attachedto order. Click to view. On CM device,tap & hold med, click “COMMENTS” toreview.Indicates a clinician communicationcomment is attached Click to view. OnCM device, tap & hold med, click“COMMENTS” to reviewI & O Volume icon (CareMobile), click tochange or update volumes PRNDiscontinued MedicationRemember Computer Technology DOESNOT replace Verbal communication!1
POWERCHART BASICS PATIENTAccess List (PAL) Used as “To Do” List for the day Click on Patient Access Button at anytime to return tothis viewPatient List View Click to select patients for your CUSTOM listAdd Existing Patients to Custom List Patient List Highlight patient Hold down CTRL onkeyboard Click additional pts Let go of CTRLButton RIGHT Click BLUE area Hover over “Add toa Patient List” Choose your Name Click OK Goback to Patient Access List Button Click “X minutesago” buttonManually Add Patient to Custom List In a “Custom” List Go to Add Patient Icon Enter FIN # Double Click encounter in lower box If did not work, is unit list displayed instead of list withyour name on it? If so, see “Changing Displayed List onthe PAL” below then repeat 1st stepRemove Patient from Custom List In Custom List Highlight patient Click RemovePatient IconChanging the Displayed List on the PAL RIGHT click on “Encounter Specific” Banner Choose“Change Patient List” Click desired unit list Click OK(may need to establish relationship)SBAR Use as Adjunct to Patient Handoff Report during shiftreportPatient Name Banner Viewable inside a Patient Chart If T-20 beside their name identifies a patients who has apersonal case manager to reduce visits & readmissionsReview Orders from PowerOrders Screen ALWAYS DO this process at beginning of shift!! Enter patient chart Go to PowerOrders/OrdersMenu click “Orders for Nurse Review” Button (bottomof screen) Non-CPOE orders: compare each order to paperorders, if correct, click Review. CPOE Orders:No written order exists, this is “noting” orders; alwaysuse nursing knowledge and skill to evaluate safety oforder. Notify pharmacy or MD if ever in question.NOTE: 1) If error noted, do not immediately review, afterItems are corrected THEN Review to clear them from thecolumn. 2) Column should be empty at the end of the shiftReview Orders from PAL Only use this process after reviewing in PowerOrders atbeginning of shift Double-Click eyeglass icon Review as instructedPowerOrder Screen Review section aboveComplete NON-Med Reminder on PALTo prevent opening tasks you do not wish to open, DO NOTclick “Quick Chart” or “Chart” buttons with all items checked To chart task as done:Double-Click Heart Icon Find specific task you wish tocomplete RIGHT-click it Choose CHARTDETAILS complete required items Sign If task is not performed:RIGHT-click task choose CHART NOT DONE enterreason (ex. duplicate, NPO, etc.) Sign To reschedule a task:RIGHT-click choose “RESCHEDULE THISTASK” enter future time enter reason for thereschedule SignNOTE: complete ALL tasks scheduled on your shiftBEFORE end of shift and heart will disappear (unless othersleft undone tasks)Change Displayed Dates on Tabs Where ever banner displayed, Right-Click Date/Time Choose Change Search Criteria Enterdesired date or other criteria Click OKAd Hoc Charting Inside Patient Chart, click Ad Hoc Icon Double clickdesired form Change performed asnecessary Complete details in EACH section shownon Left side of the form SignResults Review Used for reviewing Documented Data such as NursingDoc, Lab/Rad Results, Transcribed Docs, BloodCultures, and “other” Flow sheets Click Results Review Section Click Desired Tab forneeded results Double-click the result to view ALLdetails of the result.History Menu Used for reviewing previous charts and documents2
Using Navigator in Results Review Area In Results Review Menu click desired Flow sheetTab Locate Navigator View window Click Blue“Section” Button to bring desired items into viewChange Filters in Results Review Section Click on the Results Review section then desired Flowsheet Tab Click Table, Group, or ListTable Filter:Date & time across top, item to LEFT (best for one pointin time)Group Filter:Date & time down side, item across top (best for seeingtrends)List Filter:Reads like a book & shows reference ranges for labvaluesPrint Reports In chart, click Task (top LEFT of screen) ClickReports Click desired report(s), Enter PrinterName choose PrintView Orders or Quality Measure Plans PowerOrders Menu Click desired Plan/OrderCategory in View Window Orders on right side UseFilter pull down menu at top of section to sort activevs.DCd, completed, etc.Entering Allergy DataNOTE: Must always address Medication Allergies even ifhas another type of allergy To enter that there are no allergies of any kind, click theNKA button at top of Allergy Section enter infosource click OK To enter that the patient has no Medication allergies butis allergic to another substance, click NKMAbutton enter info source click OK then follow stepsbelow to enter allergy To enter any allergy: Select Allergies Menu RightClick in white box Chose add new-drug allergy (oradd new- other) Type drug/substance name intoSearch Field on left click Search Double-clicksubstance in lower left window Verify correct categoryon right (drug, food, etc.) On left side, Select reactiontype Type reaction into Search box ClickSearch Double-click reaction in window Completeother pertinent info Click OKMED RECONCILIATIONIMPORTANT: FOLLOW Step-by-Step: Data must becorrect; MD/Provider will use to write orders andprescriptions. In Non-CPOE Areas print Med SummaryAdmission report for MD to review &sign. Full Medication Reconciliation must be completed onAdmission, Transfer to different level of care, and atDischarge. In Medication List Menu, if Home Med List has beenupdated, a green check will display: If Not, a Blue exclamation will display:IMPORTANT: Before starting, please see importantnotes below: NOTE: DO ALL steps before doing AdmissionAssessment(STEP 1) Set up Patient Preferred Pharmacy: Click. If not visible click drop downarrow at end row where “AdHoc” Button is. Search screen displays-Preferred Pharmacy is not setup. Verify w/ patient where prescriptions should go. Enter city/state where they want to pick upprescriptions enter pharmacy name click search Right click pharmacy choose “add” Click Patient Preferred Tab, default pharmacy is at top If more than one pharmacy listed, to change defaultpharmacy, right-click choose “set as default”(STEP 2) Checking for Insurance Plans: In PowerOrders Menu, click onButton Click on Click OK refresh screen(STEP 3) Import Pharmacy History & UpdateHome Meds Already Listed: In PowerOrders Menu, click on click Import Clickif this displays. Adjust filter on External Historyto desiredtimeframe Left side-Pharmacy history of filled Rx (if their pharmacysubscribes to SureScripts) Right side-“Document Medications by Hx” screen. Review all data already listed on the right side of thescreen Pt still on med & details are unchanged: right clickmed choose “add/modify compliance” entercompliance info. ALWAYS document last dose DATEand TIME even if estimate. Patient no longer prescribed a med or the details ofthe RX have changed: right-click it choose“Complete”. If this option is not available choose“DC/Cancel” and enter a reason If a mistake was made when entering med: if not yetsigned (drug name displays black) right-click choose3
“Remove” ; if signed (drug name displays blue), rightclick it choose “void” Now review Rx Meds on the left side of the screen: Rx withwere filled but are not listed in theDocument Medications by History (on the right). Discuss with patient, to add click the scroll icon Highlight med underheader (on right) to complete details When finished with History, Uncheck thebox. Clickafter medication details andcompliance are entered on all medications. Complete compliance on Compliance tab. ALWAYS document DATE & TIME of last dose even ifestimate. Click the drop down arrow to return to listIVIEW DOCUMENTATION(STEP 4) Enter New Home Medications not oneither side This could include OTC or samples, or meds from apharmacy not subscribing to SureScripts such as VA orRAFB etc.When do I have to document? At assumption of care document a full assessment When patient status changes or new information isavailable Per unit protocol or as ordered by MD Per acuity re-assessment Policy using Review ofSystems section & any additional Bands necessary todescribe changes. Once per shift, review every section on the D.O.N.E.Band for required assessments or mandatorydocumentation Click(top left) Type drug name in “Search”field Choose appropriate med/dosage choose closestmatch if order sentences display (any fields can bechanged later) Don’t enter all details now; that will be done after allmed names are chosen. Continue to Search meds untilall have been entered (without hitting “DONE”button) When all med names are found, then click DONE Highlight first drug with a SINGLE click on the drug Update/add info by clicking in the boxes for Dose,Route, Frequency and PRN if applicable Click the next med and repeat from until allmedication information data is entered. NOTE: If unable to find medications, use MicroMedexfor spelling! If still cannot find, CONTACT Pharmacy at3-1435. Do not Free Text drug without first contactingpharmacy!! If patient does not know name of medication and not inPharmacy History, type “Misc Medication” into “Search”field Click, enter med description (ex.“little blue pill for BP”) Enter other available details, when entering compliance,in the first pull down menu choose “Investigating”, entercomment such as “husband to bring pill bottle” ALWAYS enter Compliance Info on all MEDS:Enter Status, Information Source & last dose date/time,estimate if necessary. Use CTRL key to enter likedetails: Example-If half of pills taken today at breakfast,hold down CTRL key and click each med taken atbreakfast enter today at 8:00amHelps: Icon Key- in IVIEW window: click Options click ShowLegend If item is Blue, reference material is available, click blueto seeInsert a performed on time Click insert Date and Time icon, or right click on a time,choose “insert Date and Time” Enter date/ time HitENTERTo document a lot of things Insert the “performed on time” column On the Left Menu, click each desired section Double-Click on the time at the top of the column Enter data; use “Tab” or “Enter” button on to skip itemsPRNActivate a specific section Double-click in the blue section header under timecolumnConditional Logic Look for conditional logic Iconswhich denoteprerequisite questions if something seems to bemissingCustomizing the View Items such as Ostomy data may be hidden, Click theicon. Place a check mark by section or individual item todisplay4
Sign documentation Sign documentation into chart with the checkmark icon.Associate a monitor (if available in your unit): Associate screen automatically displays on 1st sign-into chart. Or to manually launch, click Associate Monitoricon. Select the correct unit/room number to assignmonitor Click the Associate button and answer “YES”to warning question.necessary Click OK Document applicable data signInactivating a Dynamic Group item:Right Click the Labeled name of the item Choose“inactivate”INTAKE & OUTPUTAuto-entered Medication Volumes:NOTE: IVPB, IVP, NGT/GT/JT, and PO meds the volumewill automatically document into I&O Manually click Highlight patient’s name Choose“Disassociate” answer the warning question YESTo set a Default I&O Time Frame: Click Customize View Icon click preferencesTab Select Default Time Scale Pull DownMenu choose desired timeframe OKExpand and collapse a section: Choose the triangles next to the section headerActivation of a Field to enter totals: Double-click the individual white boxes under correcttime column to enter total SignDisassociate a patient from monitor:Adding Narrative Annotations/NotesNOTE: Only use narratives if no place exists in IVIEW todocument needed data Create time column single click on time ClickAction Icon (top left just below the IVIEWBanner) Click Add Annotation or FlagAnnotation Name note add Comment SIGNHow to read attached comments Hover iconComment”or right-click choose “ViewDocument critical values:NOTE: DO NOT utilize “add comment” function for thispurpose. QuickView Band click Critical Result/Other MDCommunication Section complete Critical ResultssectionModify documentation Right click incorrect item Choose Modify entercorrect data signFix errors (wrong patient documentation) Highlight and drag across 10-12 incorrect items Rightclick “BLACK” area Click Un-Chart enterreason SignCreating Dynamic Group item: SINGLE Click the icon Click in blue header justcreated Enter label data, scroll down ifEntering IV Drip Totals (after Begin Bag is done):NOTE: Document only Primary Infusion totals from thepump Clear IV Pump to obtain total In correct time columnon correct drug, double click white box entertotal SignEntering IV Drip Totals if drip was started in Non-eMARarea (ex. Surgery or Cath Lab): Check Pump for total In correct time column oncorrect drug, double click white box BEGIN BAGscreen displays, click on “Infuse” at top of screen Besure lower right of screen says “Infuse” Enteramount Fill in required information SignModifying, Un-charting, or Adding additional results Right Click item to Add Additional Result, Modify, Unchart, or Add Comment) Click SIGN DEPARTING HOME: Click Depart Button Click Pencil Icons of desired/ required sectionso Follow-up-Use to enter instructions for any apptsmade for patient or inform when they should maketheir own appts. Always check the MD DischargeForm/Orders to include all items the MD isrequesting. Every patient should have at least onefollow-up itemo Patient Education-Use to enter patient specificeducation r/t condition/diagnosis. At least 1 isrequired. Use “More” button for Patient SpecificEducation Resourceso Med Leaflet-Use to give medication instructions forany new medications the patient is going home on.5
o Discharge Instructions-Use to enter patient careitems such as diet, bathing, driving, CHF, updateHome Med List, etc. be sure all instructions desiredby MD are included.o Skip Discharge to another Facilityo Nursing Doc Discharge Disposition-Used to enterfinal nursing narrative note as well as any requireditems at discharge such as POLST.Click that the Patient Understands instructionsIf patient requests electronic discharge instructions youMUST do the PM Conversation (see next section).Select Print to print the first ½ of the D/C instructionsClick Save/CloseClick Tasks ReportsSelect these to print the other ½ of the instructionsalways print 2 copies of DC Meds, one for Pt, one forhard Chart Before taking to patient, verify Pt. Name and FINnumber on each sheet to avoid wrong patient receivingdata Have patient sign the Signature sheets, keep & place inthe hard chart with copy of the Discharge Pt Medsreport. Go over verbally and give all instructions topatient.DEPARTING TO ANOTHER FACILITY: Click Depart Button Click Pencil Iconon Depart to Another FacilitySection. The first 4 sections are not needed In special instructions, do not remove any information inthe field that was entered by another clinician unlessinformation is inappropriate to D/C situation. Add detailsof any non-assessment or non-medication informationthat the facility might need to know (include follow upappts they need to make). Complete all other applicable fields Sign Complete Nursing Doc Discharge Disposition-Usedto enter final nursing narrative note as well as anyrequired items at discharge such as POLST. Click Save/Close Click Tasks Reports Select these 3 reports, print 2 copies (one for chartand one to go with patient). A Chart copy is still required, HIM can print unlessmiddle of night when MR/Unit Sec. must print Send POLST with patient (RED clear folder in the hardchart)IQ HEALTH PATIENT PORTAL:NOTE: Patient MUST have email address to complete thisprocess Clickbutton Click IQ HealthRegistration Type Medical Center into FacilityName click ellipses Choose Medical Centerof Central GA (or other as applicable) ClickOK Enter Patient’s email Address & desired 4 digitPIN Click OKCAREMOBILE AND E MARNOTE: All Tasks MUST be documented as either done orNot Done/Not GivenCareMobile Device DocumentationTo reboot the HANDHELD DEVICE: Hold the CTRL key & SFT keys down together untilscreen goes blank Release both buttons, allow homescreen to loadCalibrate the HANDHELD DEVICE Tap Calibrate Tap Align Screen Tap in center of sign as it moves until Align Screen returns Tap OK inupper rightTo pick organization (Not necessary very often): Sign In Choose Tasks Menu Choose PickOrganization Scroll to Medical Center of CentralGeorgia Click “Select”To Set Location on the Handheld device: Choose Tasks Menu Choose List Maintenance Tap“edit” in upper box Click the “M” on the Hard Keysuntil the first MCCG is highlighted blue Click the “M”one more time, allow to load (may take aminute) Type first Letter of the Unit you are adding(ex: M for M4) Click small minus sign in box besidethe unit name Scroll to find unit name and click on itwith the stylus Choose SELECT button Hit OK, thenhit OK againTo display your Custom List: Choose the Task Menu Choose ListMaintenance Tap on “edit” in lower box Place acheck by your name, click OK, then OK again Fromthe unit list screen, click Mobile Locationbutton Check your name Click OKTo document Pain/Temp responses: On Handheld: Go to the Scheduled patient carefolder Select the Pain Response Task Scan patientarmband Complete appropriate fields signTo get additional information on any drug: Tap and hold the drug and choose Order Info6
To go back to Pt List after selecting a patient: Tap Patient List Icon in the upper Right corner ofscreenTo Mark medications as GIVENNOTE: DO NOT just bypass alerts. Read allcarefully. Click Patients Name Choose pull down arrow and tapcorrect folder Pull meds listed and take to patient’sroom Scan Patient Armband Scan each medbarcode and complete details of mandatory fields(highlighted pink) complete I&O information ifnecessary using /- ic
Sep 25, 2014 · 4 “Remove” ; if signed (drug name displays blue), right click it choose “void” Now review Rx Meds on the left side of the screen: Rx with were filled but are not listed in the Document Medications by History (on the right). Discuss with patient, to add click the scroll icon Highlight med under header (on right) to complete details