Transcription
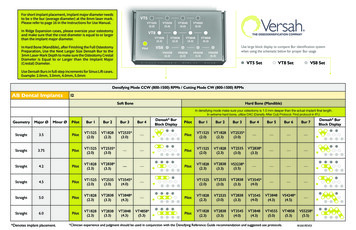
For short implant placement, implant major diameter needsto be the bur (average diameter) at the 8mm laser mark.Please refer to page 16 in the Instructions for Use Manual.In Ridge Expansion cases, please oversize your osteotomyand make sure that the crest diameter is equal to or largerthan the implant major diameter.Use large block display to compare Bur identification systemwhen using the schematic below for proper Bur usageIn Hard Bone (Mandible), after Finishing the Full OsteotomyPreparation, Use the Next Larger Size Densah Bur to the3mm Laser-Mark Depth to make sure the Osteotomy CrestalDiameter is Equal to or Larger than the Implant Major(Crestal) Diameter.VT5 SetVT8 SetVS8 SetUse Densah Burs in full-step increments for Sinus Lift cases.Example: 2.0mm, 3.0mm, 4.0mm, 5.0mmDensifying Mode CCW (800-1500) RPMs / Cutting Mode CW (800-1500) RPMsAB Dental ImplantsI2Soft BoneHard Bone (Mandible)In densifying mode make sure your osteotomy is 1.0 mm deeper than the actual implant final length.In extreme hard bone, utilize DAC (Densify After Cut) Protocol. Find protocol in IFU.GeometryMajor ØStraightMinor ØPilotBur 1Bur 2Bur 3Bur enotes implant placement.Densah BurBlock DisplayPilotBur 1Bur 2Bur 3Bur 4Bur 5Bur 6Bur 55(5.0)VT4858(5.3)VS5258*(5.5)*Clinician experience and judgment should be used in conjunction with the Densifying Reference Guide recommendation and suggested use protocols.W168 REV03Densah BurBlock Display
For short implant placement, implant major diameter needsto be the bur (average diameter) at the 8mm laser mark.Please refer to page 16 in the Instructions for Use Manual.In Ridge Expansion cases, please oversize your osteotomyand make sure that the crest diameter is equal to or largerthan the implant major diameter.Use large block display to compare Bur identification systemwhen using the schematic below for proper Bur usageIn Hard Bone (Mandible), after Finishing the Full OsteotomyPreparation, Use the Next Larger Size Densah Bur to the3mm Laser-Mark Depth to make sure the Osteotomy CrestalDiameter is Equal to or Larger than the Implant Major(Crestal) Diameter.VT5 SetVT8 SetVS8 SetUse Densah Burs in full-step increments for Sinus Lift cases.Example: 2.0mm, 3.0mm, 4.0mm, 5.0mmDensifying Mode CCW (800-1500) RPMs / Cutting Mode CW (800-1500) RPMsAB Dental ImplantsI22Soft BoneHard Bone (Mandible)In densifying mode make sure your osteotomy is 1.0 mm deeper than the actual implant final length.In extreme hard bone, utilize DAC (Densify After Cut) Protocol. Find protocol in IFU.GeometryMajor ØSlowTaperedMinor ØPilotBur 1Bur 2Bur 3Bur 25(2.0)SlowTapered5.0PilotVT1828(2.3)*Denotes implant placement.Densah BurBlock DisplayPilotBur 1Bur 2Bur 3Bur 4Bur 5Bur 6Bur ——VT2838(3.3)VT3848* an experience and judgment should be used in conjunction with the Densifying Reference Guide recommendation and suggested use protocols.W168 REV03Densah BurBlock Display
For short implant placement, implant major diameter needsto be the bur (average diameter) at the 8mm laser mark.Please refer to page 16 in the Instructions for Use Manual.In Ridge Expansion cases, please oversize your osteotomyand make sure that the crest diameter is equal to or largerthan the implant major diameter.Use large block display to compare Bur identification systemwhen using the schematic below for proper Bur usageIn Hard Bone (Mandible), after Finishing the Full OsteotomyPreparation, Use the Next Larger Size Densah Bur to the3mm Laser-Mark Depth to make sure the Osteotomy CrestalDiameter is Equal to or Larger than the Implant Major(Crestal) Diameter.VT5 SetVT8 SetVS8 SetUse Densah Burs in full-step increments for Sinus Lift cases.Example: 2.0mm, 3.0mm, 4.0mm, 5.0mmDensifying Mode CCW (800-1500) RPMs / Cutting Mode CW (800-1500) RPMsAB Dental ImplantsI5Soft BoneHard Bone (Mandible)In densifying mode make sure your osteotomy is 1.0 mm deeper than the actual implant final length.In extreme hard bone, utilize DAC (Densify After Cut) Protocol. Find protocol in IFU.GeometryMajor ØStraight3.0Straight3.3StraightMinor ØPilotBur 1Bur 2Bur 3Bur ight4.2StraightDensah BurBlock DisplayPilotBur 1Bur 2Bur 3Bur 4Bur 5Bur 6Bur otes implant placement.3.2*Clinician experience and judgment should be used in conjunction with the Densifying Reference Guide recommendation and suggested use protocols.Densah BurBlock DisplayW168 REV03
For short implant placement, implant major diameter needsto be the bur (average diameter) at the 8mm laser mark.Please refer to page 16 in the Instructions for Use Manual.In Ridge Expansion cases, please oversize your osteotomyand make sure that the crest diameter is equal to or largerthan the implant major diameter.Use large block display to compare Bur identification systemwhen using the schematic below for proper Bur usageIn Hard Bone (Mandible), after Finishing the Full OsteotomyPreparation, Use the Next Larger Size Densah Bur to the3mm Laser-Mark Depth to make sure the Osteotomy CrestalDiameter is Equal to or Larger than the Implant Major(Crestal) Diameter.VT5 SetVT8 SetVS8 SetUse Densah Burs in full-step increments for Sinus Lift cases.Example: 2.0mm, 3.0mm, 4.0mm, 5.0mmDensifying Mode CCW (800-1500) RPMs / Cutting Mode CW (800-1500) RPMsAB Dental ImplantsI55Soft BoneHard Bone (Mandible)In densifying mode make sure your osteotomy is 1.0 mm deeper than the actual implant final length.In extreme hard bone, utilize DAC (Densify After Cut) Protocol. Find protocol in IFU.GeometryMajor ØTaperedMinor ØPilotBur 1Bur 2Bur 3Bur Tapered4.2PilotTapered4.5Tapered5.0*Denotes implant placement.Densah BurBlock DisplayPilotBur 1Bur 2Bur 3Bur 4Bur 5Bur 6Bur ician experience and judgment should be used in conjunction with the Densifying Reference Guide recommendation and suggested use protocols.Densah BurBlock DisplayW168 REV03
For short implant placement, implant major diameter needsto be the bur (average diameter) at the 8mm laser mark.Please refer to page 16 in the Instructions for Use Manual.In Ridge Expansion cases, please oversize your osteotomyand make sure that the crest diameter is equal to or largerthan the implant major diameter.In Hard Bone (Mandible), after Finishing the Full OsteotomyPreparation, Use the Next Larger Size Densah Bur to the3mm Laser-Mark Depth to make sure the Osteotomy CrestalDiameter is Equal to or Larger than the Implant Major(Crestal) Diameter.Use large block display to compare Bur identification systemwhen using the schematic below for proper Bur usageVT5 SetVT8 SetVS8 SetUse Densah Burs in full-step increments for Sinus Lift cases.Example: 2.0mm, 3.0mm, 4.0mm, 5.0mmDensifying Mode CCW (800-1500) RPMs / Cutting Mode CW (800-1500) RPMsAB Dental ImplantsI10Soft BoneHard Bone (Mandible)In densifying mode make sure your osteotomy is 1.0 mm deeper than the actual implant final length.In extreme hard bone, utilize DAC (Densify After Cut) Protocol. Find protocol in IFU.GeometryMajor ØTaperedMinor ØPilotBur 1Bur 2Bur 3Bur VT2838(3.3)*Denotes implant placement.Densah BurBlock DisplayPilotBur 1Bur 2Bur 3Bur 4Bur 5Bur 6Bur .3)VS4248*(4.5)—*Clinician experience and judgment should be used in conjunction with the Densifying Reference Guide recommendation and suggested use protocols.W168 REV03Densah BurBlock Display
AB Dental Implants I2 Soft Bone Hard Bone (Mandible) In densifying mode make sure your osteotomy is 1.0 mm deeper than the actual implant final length. In extreme hard bone, utilize DAC (Densify After Cut) Protocol. Find protocol in IFU. Geometry Major Ø Minor Ø Pilot Bur 1

