Transcription
Dell KACE Hosted Integration GuideDell KACE Hosted Integration GuideFor customers of the Free Hosted License offer using KACE.BOMGAR.COMRevised: 6/1/2012
Dell KACE Hosted Integration GuideTable of ContentsIntroduction. 3Prerequisites . 3Getting Started . 4Section 1: Scripting . 6Creating the Script to Initiate a Bomgar Session . 6Section 2: Service Desk . 11Service Desk Integration with Bomgar . 11Conduct an End-To-End Test. 17Representative Initiated Request . 17End User Initiated Request. 18Dell KACE Corporate Background . 20Bomgar Corporate Background . 202Copyright 2012 Dell KACE and Bomgar . All rights reserved.
IntroductionThis document provides the configuration items and necessary steps to integrate Bomgar withthe service desk and scripting capabilities of the Dell KACE K1000 Management Appliance.Three primary use cases are detailed in this document, including:1. Representatives or technicians starting a Bomgar unattended remote support sessionusing Scripting from KACE.2. End users starting a chat or remote support session by clicking a link in the emailconfirmation from the KACE Appliance.3. Representatives or technicians sending an invitation for remote support to the end userdirectly from the KACE K1000 service desk ticket.Prerequisites This document is specifically written for KACE customers who are using the free hostedBomgar support site kace.bomgar.com. To complete the steps outlined in this document, your Dell KACE K1000 ManagementAppliance must be running version 5.2.38773 or greater and will need to be fullyconfigured and online. To use Bomgar for unattended access from your K1000, you will need to have the KACEagent deployed on the target machines you wish to access. These machines will needto be online with an active AMP connection to the server. To use Bomgar from Dell KACE Service Desk tickets, the K1000 Service Desk module needsto be fully configured and enabled for SMTP email capabilities. Make sure that you are able to access to the Bomgar Self Service Center athttp://www.bomgar.com/help. From the Bomgar Self Service Center, ensure you have the “Dell KACE Config” optionunder the Administration section.Important: Before proceeding with this integration document, it is recommended that you firsttest your Bomgar user account separately from the KACE K1000 integration. To do this,download the Bomgar Representative Console, log in with your new account, and click thebutton in the Bomgar Representative Console to conduct your first Bomgar session. Formore information about configuring Bomgar user accounts for your KACE appliance, see theinstructions in the Dell KACE Config section of the Bomgar Self Service Center athttp://bomgar.com/help.3Copyright 2012 Dell KACE and Bomgar . All rights reserved.
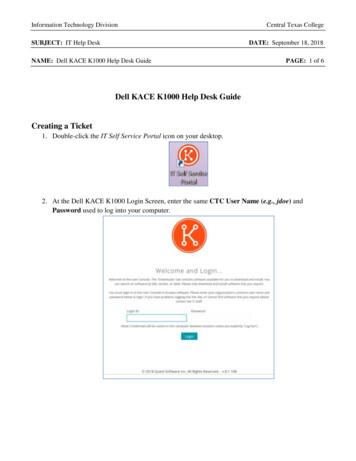
Getting Started 4Log into the Bomgar Self Service Center at http://bomgar.com/help using your emailaddress.Select the Dell KACE Config option on the left.If you have not done so already, follow the Configuration Step Details to Create BomgarUser Accounts. Scroll down to the “Configure Your KACE Integration” section.Supply the required information about your specific KACE environment and click theUpdate button. Locate the links to the required Bomgar resource files which will be used asdependencies in your KACE script for unattended access.Copyright 2012 Dell KACE and Bomgar . All rights reserved.
Save these files in a folder on your Desktop called “Bomgar Resource Files”. These will bereferenced later in Section 1. Next, locate the KACE Integration Required URLs in the section below. These URLs areunique to your company. Copy and paste this information to a useful location as it willbe referenced later in this integration guide.IMPORTANT: While configuring the Bomgar integration on your K1000, these URLs must beentered exactly as listed in the Bomgar Self Service Center. They are specific to yourintegration and your Bomgar licenses.5Copyright 2012 Dell KACE and Bomgar . All rights reserved.
Section 1: ScriptingCreating the Script to Initiate a Bomgar SessionIn this section, you will create a script which will allow a technician to automatically start aBomgar session with KACE-managed Windows or Mac nodes. This script will run in the SYSTEMcontext on Windows, so an end-user does not need to be logged in on the remote node. ForMac nodes, ensure that a user is logged in before starting a remote session.Note: If you require unattended access to Macs where users are not logged in, contact Bomgarfor information about our on-premise appliance with support for Jump Clients.1.2.3.4.6Log in to your K1000 as an administrator.Navigate to the Scripting module and click on the Scripts tabSelect Choose Action / Add New ItemCreate the Bomgar script using the following instructions:a. Configurationi. Script Type: Offline KScriptii. Name: Bomgar – Initiate Sessioniii. Description: Initiate a Bomgar support session with a remote Windows orMac system.iv. Enabled: Checkedb. Deployment:i. Important – Do NOT check Deploy to All Machinesc. Supported Operating Systems:i. Uncheck “Pick Specific OS Versions:ii. Select both Microsoft Windows and Mac OS Xd. Scheduling: Don’t Run on a Schedulee. Dependencies:i. Add new dependency:1. Browse to the Bomgar Resource Files folder you created on yourDesktop earlier.2. Select InitiateBomgarSession.sh and click Openii. Add new dependency:1. Select InitiateBomgarSession.vbs and click Openf. Policy or Job Rules: sectioni. Add Task Section (This creates Task 1)1. Attempts: 12. On Failure: Continue3. Verify –a. Add i. Select Verify a directory exists ii. Directory: C:\Program Files then click SaveChangesCopyright 2012 Dell KACE and Bomgar . All rights reserved.
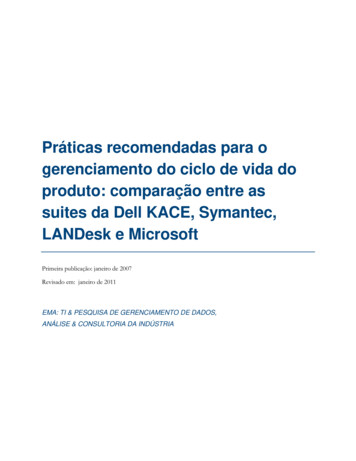
4. On Success –a. Add i. Select Log message ii. Type: statusiii. Message: Detecting operating system then clickSave Changes.b. Add i. Select Log message ii. Type: statusiii. Message: Verified C:\Program Files folder exists –this is a Windows system, then click Save Changesc. Add i.ii.iii.iv.v.Select Launch a program Directory: C:\Windows\System32File: wscript.exeWait for startup - Leave uncheckedParameters:“ (KACE DEPENDENCY DIR)\InitiateBomgarSession.vbs” Your K1000 Run Now Script URL NOTE: Enter the entire URL exactly as listed on yourBomgar Self Service Center and Save Changes. Seeexample below ii. Add Task Section (This creates Task 2)1. Attempts: 12. On Failure: Continue3. Verify –a. Add i. Select Verify a directory exists 7Copyright 2012 Dell KACE and Bomgar . All rights reserved.
ii. Directory: /usr/bin then click Save Changes4. On Success –a. Add i. Select Log message ii. Type: statusiii. Message: Detecting operating system then SaveChanges.b. Add i. Select Log message ii. Type: statusiii. Message: Verified /usr/bin folder exists – this is aMac system, then click Save Changesc. Add i.ii.iii.iv.v.Select Launch a program Directory: (KACE DEPENDENCY DIR)File: InitiateBomgarSession.shCheck Wait for startupParameters: Your K1000 Run Now Script URL NOTE: Enter the entire URL exactly as listed on yourBomgar Self Service Center and Save Changes. Seeexample below:g. Scroll to the bottom of the script and click Save.Important: Re-open your new script and verify that nothing was missed. Be sure to compareyour “K1000 Run Now Script URL” displayed in the Dell KACE Config section of the Bomgar SelfService Center with the URL listed in the “On Success” section for both Task 1 and Task 2.8Copyright 2012 Dell KACE and Bomgar . All rights reserved.
5. Test your new script on one of your managed nodes.a. First, make sure you have launched the Bomgar Representative Console and youhave successfully logged in. If you are not logged in, your attempt to start asession from the K1000 script will fail.b. Next, locate a remote computer from your Dell KACE appliance’s ComputerInventory page, or use the Global Search to lookup the machines assigned to agiven user. Make a note of the computer name.c. Click on the Scripting module.d. Click the Run Now tab.e. In the Scripts section, type-ahead “Bomgar” in the Script filter box until theBomgar – Initiate Session script is selected.f. In the Deployment section, type-ahead any part of the machine name in theFilter box until the machine is found.g. Click the box above the search field labeled “Select machine to add ” andselect the appropriate machine.h. Important: Make sure you do NOT click the “deploy to All Machines” checkbox.i. Click the Run Now button.9Copyright 2012 Dell KACE and Bomgar . All rights reserved.
j.Switch to your Bomgar Representative Console and wait for the session to begin(approx. 45 – 90 seconds depending on the speed at which the agent executesthe script).k.When the Bomgar session initiates, you will see a New Session notification window.Click this to open your Bomgar team queue where you will see the session listed.l.Double click on this session so that it opens in a new tab.m. Click the Screen Sharing toolbar icon to begin viewing / controlling the remotesystem.n. To end the session, click the Leave Session icon on the far right side of the Bomgartoolbar.10Copyright 2012 Dell KACE and Bomgar . All rights reserved.
Section 2: Service DeskService Desk Integration with BomgarIn this section, we will configure your K1000 Service Desk to support two specific use cases: Representatives offering support to end-users directly from a ticket, and End-users requesting support directly from the email confirmation received after openinga ticket.To support these scenarios, you must modify the Service Desk ticket form and configure theticket rules within the appropriate service desk queue as follows:1. From the KACE Management Center, navigate to the Service Desk Configuration tabthen click Queues from the listed options.2. Select your Service Desk queue by clicking its name (e.g. Bomgar IT Help Desk, in thisexample).11Copyright 2012 Dell KACE and Bomgar . All rights reserved.
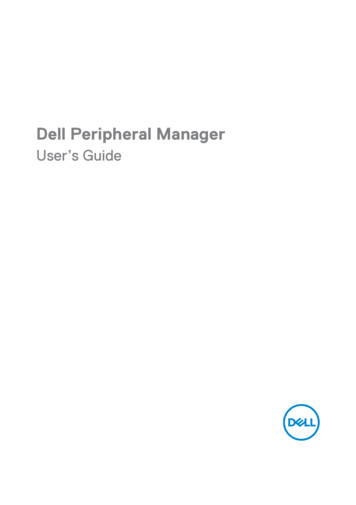
3. Select Customize Fields and Layout. This will allow you to add the Bomgar SessionRequest field to the Ticket Form.@desk.mynetwork.comhelpdesk@mysite.comScroll down to the Ticket Layout section and identify an appropriate CUSTOM # that isavailable in your environment. Click the edit icon on the far right and then label the newfield Bomgar Session. Set permissions to Owners Only - Hidden from Users.4. Next, scroll down on the same page to find the corresponding CUSTOM # Custom Field.Change the Field Type to Single Select, and change the Select Values option to SendRequest. Leave the Default option blank. Scroll to the bottom of the page and clickSave.5. Once your changes are saved, you will be directed back to the ServiceDesk Configuration page. From here, select Customize from the Custom Ticket Rules12Copyright 2012 Dell KACE and Bomgar . All rights reserved.
section.6. Click the Choose Action dropdown and select Add Ticket Rule.7. Define any criteria to create a temporary Ticket Rule and click Next. For now, you canuse Approval - contains – Approved as placeholders.8. Similar to step 7, define the next items required with by setting the Priority and Valuefields, and click Done. For now, you can use Priority – change value to – High asplaceholders.9. Once you complete step 8, you will be directed to the Edit Detail page where you shouldcustomize the queries and actions. In this example the custom ticket rule Bomgar SessionRequest is shown. Now you can customize the rule.a. First, change the Title to Bomgar Session Request. Next, change the Frequencydrop-down to on Ticket Save.b. Check the SQL query’s Enabled checkboxc. Check the Results are tickets, add a comment to each one checkbox.13Copyright 2012 Dell KACE and Bomgar . All rights reserved.
d. For the Comments text field, insert Bomgar session has been requested via email.e. Check the Owners Only checkbox.f.The Select Query area should contain the commands listed below:// ------------------------------------------ COPY BETWEEN THESE LINES --------------------------------selectHD TICKET.*,owner.EMAIL as OWNER EMAIL,if ((LENGTH(owner.FULL NAME) 0), owner.USER NAME,owner.FULL NAME) as OWNER NAME,submitter.EMAIL as SUBMITTER EMAILfromHD TICKETleft outer join USER owner on owner.ID HD TICKET.OWNER IDleft outer join USER submitter on submitter.ID HD TICKET.SUBMITTER IDwhereLENGTH(HD TICKET.CUSTOM FIELD VALUE3) 0// ------------------------------------------ COPY BETWEEN THESE LINES ---------------------------------14Copyright 2012 Dell KACE and Bomgar . All rights reserved.
IMPORTANT: in this example we have HD TICKET.CUSTOM FIELD VALUE3, where the 3 iscalculated from CUSTOM 4 – 1 3. Use this simple calculation to determine the value of yourHD TICKET.CUSTOM FIELD VALUEX, where X CUSTOM # – 1. This is due to the custom fields inthe ticket layout beginning at 1, while the query variables begin with 0.g. Within the Send an email for each result row section, make sure that:i. For the Subject insert Remote Support Invitation from Bomgar IT - [TICK: id]: titleii. For the Email Column insert SUBMITTER EMAILiii. The Email Body should contain something along the following:“ owner name would like to start a support session with you. To do so,please click on the link below and follow the online /api/start session.ns?customer id BOMGAR CUST ID&customer name submitter email&external key TICK: idBomgar enables a support representative to view your screen in order toassist you. Session traffic is fully encrypted to protect your system's data.Once a session has begun, you will be able to end it at any time.Important: You must use the “K1000 ServiceDesk Custom Ticket URL” specified in the BomgarSelf Service Center. Refer to the URLs you previously copied.h. Check the Run an update query, using the results from the one above checkbox.The update query should contain:update HD TICKET as Tset T.CUSTOM FIELD VALUE3 ''15Copyright 2012 Dell KACE and Bomgar . All rights reserved.
where(T.ID in ( TICKET IDS ))Note: Be sure to use the correct CUSTOM FIELD VALUE# identified in the earliersteps.i.Click Save when done.10. Now you need to customize the email notifications. Return to your queue’s configurationpage. Scroll down to the Email on Events: [Customize Emails] section from the queueedit page. The emails you need to customize are Ticket Closed and New Ticket via Email.11. Click the Customize Emails link. Scroll to the Ticket Closed Notification section andmodify it, as shown below. You can use verbiage that is appropriate for your helpdesk.Important: You must use the “K1000 ServiceDesk System Ticket URL” as specified in the BomgarSelf Service Center. Refer to the URLs you previously copied into Notepad.12. Also, change the Email Ticket Creation Acknowledgement. Again, change verbiage towhatever is appropriate for your helpdesk and save.Important: You must use the “K1000 ServiceDesk System Ticket URL” as specified in the BomgarSelf Service Center. Refer to the URLs you previously copied.16Copyright 2012 Dell KACE and Bomgar . All rights reserved.
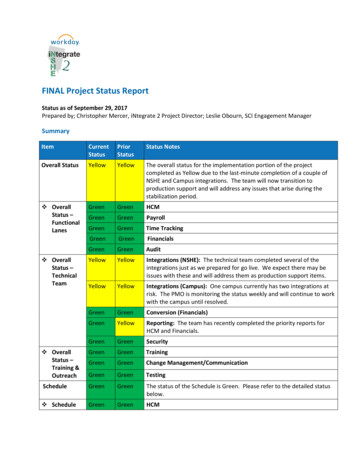
13. Finally, you need to create a special Service Desk User to support automatic ticketupdates after a Bomgar session has concluded.a. From the Service Desk module, click on the Users tab.b. Click Choose Action / Add New Item and enter the following i. User Name: Bomgar Auto-Updateii. Email: kace-integration@bomgar.comiii. Assign a password, then scroll to the bottomiv. Role: User, then click SaveConduct an End-To-End TestThis section shows you how to test out the session support request, including the testing of thesetwo use cases:1. Representative sends a Bomgar remote support session email invitation to the customer.2. Customer starts initial chat support session using Bomgar via Dell KACE Ticket initiationprocess, including sending an email.Representative Initiated Request1. Log into the Bomgar Representative Console.2. Open a new ticket in the Dell KACE service desk.3. Save the ticket first, without making any changes, and then select the option to send aBomgar Session Request email to the customer.Note: use an email account that YOU can access for this test. The following is anexample of the mail message.17Copyright 2012 Dell KACE and Bomgar . All rights reserved.
4. As the end user, click the link in the invitation email to start a Bomgar support session.Note that the external key field is used to automatically reference the Dell KACE TicketNumber. This is critical to maintaining the context of this support session, allowing forBomgar session details to be sent to or automatically included in the ticket after thesupport session has completed.5. As the Bomgar Representative, while in the session, select the Summary tab and verifythat the external key field was automatically populated with the ticket number.a. Compose a couple of interactive chat messages.b. Submit some Session Notes on the Summary tab.c. Click the Rep Custom Link iconon the toolbar if you want to reference thecorresponding ticket in KACE.d. End the session and close the tab from the Bomgar Representative Console toformally close out the session.6. Within the KACE Management Center, refresh the ticket view to see the updatedBomgar session information. Make sure your KACE email processor is set to process ticketupdate emails frequently.End User Initiated Request1. Ensure a representative is logged into the Bomgar Representative Console to receive theincoming Bomgar support session request.18Copyright 2012 Dell KACE and Bomgar . All rights reserved.
2. As the end user, send an email request to the address of your Dell KACE service desk(e.g. helpdesk@company.com).3. Look for the confirmation email indicating that your ticket has been created. Open thisemail, and select the link to start a Bomgar remote support session.4. Download and run the resulting Bomgar Customer Client executable.5. The representative will see the incoming support request in their team queue within theBomgar Representative Console. Double-click to accept the session.a. While in the session, click on the Summary tab and verify that the External Keyfield was automatically populated with the ticket number.b. Enter a couple chat messages.c. Submit some session notes on the Summary tab.d. Select the Custom Link iconon the tool bar, in the Representative Console, toreference the corresponding ticket in the service desk.e. End the session and close the tab from the Bomgar Representative Console toformally close out the session.19Copyright 2012 Dell KACE and Bomgar . All rights reserved.
6. Refresh the ticket view to see the updated Bomgar session information. Make sure youremail processor is set to process ticket update emails frequently.Dell KACE Corporate BackgroundDell (NASDAQ: DELL) creates, enhances and integrates technology and services customerscount on
Bomgar session with KACE-managed Windows or Mac nodes. This script will run in the SYSTEM context on Windows, so an end-user does not need to be logged in on the remote node. For Mac nodes, ensure that a user is logged in before starting a remote session. Note: If you require unattended access to Macs where