Transcription
SAP BusinessObjects BusinessIntelligence Workbook 2:Mobile BIDavid Duncan3/12/2012
Table of ContentsIntroduction .3Target Audience .3Learning Objectives .3Getting the Most from this Workbook .3STOP HERE: Prerequisites .4Documentation .4Overview of SAP BusinessObjects Mobile .5Setting up your BI Deployment and iPad for Mobile Access .5Activity 1 – Deploying a WAR file . 5Activity 2 – Creating Mobile Categories. 6Activity 3 – Installing SAP BusinessObjects Mobile and SAP BusinessObjects Explorer for iPad . 8Activity 4 – Import sample reports for SAP BusinessObjects Mobile . 9Activity 5 – Log in to SAP BusinessObjects Mobile . 9Activity 6 – Create a SAP BI URL . 11Activity 7 – Log in to SAP BusinessObjects Mobile . 12Activity 8 – Interact with tables and charts . 16Create BI Content for SAP BusinessObjects Mobile. 19Activity 9 – Save a Web Intelligence document for SAP BusinessObjects Mobile. 19Activity 10 – Create a Web Intelligence document with Line Charts . 20Activity 11 – Format traffic, arrow, and status icons . 23Activity 12 – Format Micro Charts called Sparklines . 29SAP BusinessObjects Explorer for iPad . 31Activity 13 - Connect manually connect . 31Activity 14 – Search and explore information spaces . 33Workbook Evaluation. 38BI Activity Workbook Training Questionnaire . 38Copyright . 41
Page 3IntroductionThis workbook has been designed to provide you with practical, hands-on, experience using SAPBusinessObjects Mobile BI solutions.While completing the activities in this workbook, you will set up and configure an SAP BusinessObjectssystem for mobile access, install SAP BusinessObjects Mobile for iPad and SAP BusinessObjects Explorerfor iPad, access and interact with BI content on an iPad, and develop BI content such as Explorerinformation spaces and Web Intelligence documents for mobile devices.As you work through the activities in this book, consider how the features and functionality can beapplied to solve business problems for your business or your clients.Target AudienceThis workbook is suitable for anyone new to the SAP BusinessObjects Mobile BI who will be involved inselling, demonstrating, or developing business intelligence solutions or content. Many end users willalso find these activities useful in learning the applications.Learning ObjectivesAfter completing this workbook you will be able to: Configure SAP BusinessObjects BI Platform for mobile accessInstall SAP BusinessObjects Mobile and SAP BusinessObjects Explorer for iPadAccess and interact with content on mobile devicesDesign Web Intelligence documents and Information spaces for mobile devices.Getting the Most from this WorkbookIt is strongly recommended that you do your best to complete the activities in the workbook withoutreferring to the solution guide whenever possible. The prerequisites and recommended tutorialsreferred to in the activities should provide you with the knowledge required to successfully completethe activities.If you get stuck completing any of the activities, step by step solutions are provided in the workbooksolutions guide. However, simply clicking through the step by step solution instructions in the softwarewill typically be inadequate to learn how to build effective business intelligence solutions. If you needthe step by step solutions to complete any activity, after following the solution instructions, try tocomplete the activity again, but without referring to the detailed solution steps.Note for instructors: The solution steps are provided in a separate solution guide, which can beprovided to students after specific activities have been assigned. This will ensure that students do notsimply click through the solutions, but try to complete the activities on their own or with their peers.
Page 4STOP HERE: PrerequisitesBefore beginning the workbook activities, you should have an understanding of the SAP BusinessObjects4.0 Business Intelligence Suite.1. Complete the exercises in SAP BusinessObjects Business Intelligence Workbook 1: The SportsWarehouse or have experience with the SAP BusinessObjects BI platform and applications.2. Business Intelligence Platform and client tools. To complete the activities in this workbook, you need access to a system with thefollowing software installed, including the latest service packs.This workbook has been designed using feature service pack 2 of the BI platform andclient tools patch 10.i. SQL Server 2008 or higher (or other supported database software)ii. SAP BusinessObjects Business Intelligence platformiii. SAP BusinessObjects Client Toolsiv. SAP BusinessObjects Explorer Instructions to install the required software are provided in the “SAP BusinessObjects B14.x Installation Job Aid”. Please note that valid license keys are required. If you are using this workbook as part of a course, or corporate training, your instructormay provide you with instructions to access a hosted system or customized VMwareimage. In this case usernames and passwords may vary from the solutions in the guide.DocumentationUser Guide:http://help.sap.com/businessobject/product guides/boexir4/en/403 mobiPad user tmAdmin Guide:http://help.sap.com/businessobject/product guides/boexir4/en/403 mobiPad admin en.pdfRelease Notes:http://help.sap.com/businessobject/product guides/boexir4/en/403 mobiPad rn en.pdf
Page 5Overview of SAP BusinessObjects MobileSetting up your BI Deployment and iPad for Mobile AccessActivity 1 – Deploying a WAR fileIn this activity, you will manually deploy the MobileBIService.war file, which is required to enable mobileaccess for SAP BusinessObjects Mobile for iPad 4.0.3. In future releases manually deploying the war filewill not be required.Documentation 4.2 Installing SAP BusinessObjects Mobile Server in the SAP BusinessObjects Mobile for iPad4.0.3 Installation, Configuration and Deployment GuideFor information about supported web application servers see: http://www.sdn.sap.com/irj/boc/articles?rid 11Instructions1. Stop the Tomcat Server2. Copy the MobileBIService.war file in the installation folder.[Install directory]\Mobile14\ClientNote: If you set up your system following instructions in the previous workbook you will findthe file here: C:\Program Files (x86)\SAP BusinessObjects\Mobile 14\Client3. Paste the file into the [Tomcat home directory]\webapps folder:Note: If you set up your system following instructions in the previous workbook you will findthe webapps folder here: C:\Program Files (x86)\SAP BusinessObjects\Tomcat6\webapps4. Restart the Tomcat Server5. To confirm that the War file is deployed correctly type this ndlerServlet?message GetVersionYou may substitute localhost:8080 with the IP address or name of the server.
Page 6If you see this XML then the war file is configured correctly. ?xml version "1.0" encoding "UTF-8" ? - Result status "success" version productVersion "14.0.2.565" internalVersion "1.0" / /Result Note: the productVersion indicates the version of the war file.Activity 2 – Creating Mobile CategoriesIn this activity, you will configure categories for mobile access. Only documents in a category that hasbeen configured for mobile access will be accessible on mobile devices.By default the BI platform is configured to allow documents assigned to a category named “Mobile” tobe made available for mobile devices. You can modify the configuration to allow documents in othercategories to be available for any mobile device, or a specific device type such as an iPad or iPhone.Instructions1. Open the Central Management Console(Click Start Programs SAP BusinessObjects Enterprise XI 4.0 SAP BusinessObjects Enterprise Central Management Console)2. Login as Administrator with the password Welcome1.3. Click Categories
Page 7a. Click Manage New Categoryb. Type Mobile and click OK.4. Click the Home button.5. Click Personal Categoriesa. Click Administratorb. Click Manage New Categoryc. Type Mobile and click OK.d. Click Manage New Categorye. Type Mobile Design and click OK.6. Close the Central Management Console7. Double-click the mobi.properties file located in the[Tomcat Home]\webapps\MobileBIService\WEB-INF\ folder, and edit it in Notepad or a similartext editor.
Page 8Note: If you set up your system following instructions in the previous workbook you will findthe file here: C:\Program Files (x86)\SAP BusinessObjects\Tomcat6\ MobileBIService\WEBINF\mobi.properties8. Edit the file by adding the highlighted text.defaultdefault.corporateCategory Mobile, Mobile Designdefault.personalCategory Mobile, Mobile Designipadipad.corporateCategory Mobile, Mobile Designipad.personalCategory Mobile, Mobile Design9. Save the file.Documentation 4.2.1 Configuring Categories for iPad in the SAP BusinessObjects Mobile for iPad 4.0.3Installation, Configuration and Deployment GuideActivity 3 – Installing SAP BusinessObjects Mobile and SAP BusinessObjects Explorer for iPadIn this activity, you will install the SAP BusinessObjects Mobile BI app on your iPad.The SAP BusinessObjects Mobile client is supported on iPad 1 and iPad 2. You can install SAPBusinessObjects Mobile client application on your iPad device in two ways. You can download the SAP BusinessObjects Mobile client application from the App Store via theiTunes software. Then synchronize the downloaded application with your iPad device.You can download the SAP BusinessObjects Mobile client application directly from the Appstore to your device.
Page 9Instructions1. Open the App Store on your iPad.2. Search for SAP BusinessObjects.3. Install the following applications:a. SAP BusinessObjects Mobileb. SAP BusinessObjects ExplorerActivity 4 – Import sample reports for SAP BusinessObjects MobileIn this activity, you will import a Web Intelligence document which includes multiple reports.1.2.3.4.Download the eFashion report.wid document.Open the report in the Web Intelligence Rich Client.Save the report in Public Folders in a new Mobile Reports subfolder.Assign the report to the Mobile category.Activity 5 – Log in to SAP BusinessObjects MobileIn this activity, you will test connectivity between your iPad and BI Server. In addition, you will create aconnection and log in to your SAPDEMO BI server.1. Open Safari on iPad2. Type http://server ip:8080/Replace server ip:8080 with the IP address of your image server and port. You can get the IPaddress by opening a command prompt and typing ipconfig.If you are connected you will see apache screen
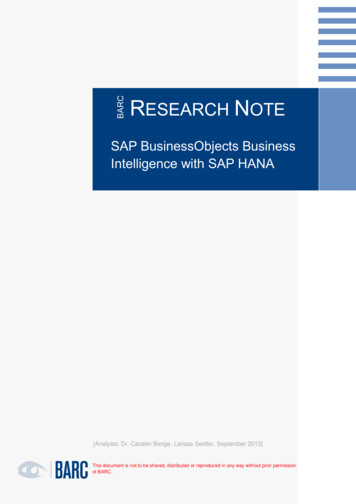
Page 103. Open the Mobile BI application.4. Create and configure a connection with these settings:a. Name:SAPDEMO (note the name can be anything you want)b. Server URL:http://server ip:8080/c. CMS:server ip (no port number)*d. Default:ONe. User Name:Administratorf. Password:Welcome1* Note: If you installed your CMS on a different machine, use the ipconfig on the CMSmachine to get the port
Page 115. Log in using the new connection6. The image below shows that you have successfully connected to your Mobile BI connection.There is one report available to download. You will interact with this report in the next activity.Activity 6 – Create a SAP BI URLIn this activity you will create an SAP BI URL. SAP BI URLS allow a BI administrator to create a link thatautomatically generates a connection for SAP BusinessObjects Mobile end users.Instructions1. Copy and paste the text below into a text editor such as notepad.sapbi://addconnection?name ConnectionName&server url Server IP:Port&cms Server IP:Port&authType AuthenticationType&default yes/no&user User Name&password UserPassword&save password yes/no2. Modify each of the parameters to match the text belowsapbi://addconnection?name SAPDEMO&server url http://server ip:port&cms server ip&authType secEnterprise&default yes&user Administrator&password Welcome1&save password noexample:examplehttp://10.0.1.15:808010.0.1.15
Page 12This table explains each of these parameters.ParameterConnection NameValuesEnter a name for the connectionserver urlEnter the IP address and port number of the BI server. For examplehttp://10.0.1.15:8080cmsEnter the IP address of the CMS server. For example 10.0.1.15authTypeThe authType can be one of the following: secEnterprise for Enterprise secLDAP for LDAP secWinAD for Windows AD secSAPR/3 for SAPdefaultEnter yes to make this the default connectionuserEnter the username for the connectionpasswordEnter the user’s passwordsave passwordEnter no to require the user enter the password each time they log on(recommended)Enter yes to save the password.3. Delete all carriage returns to create a valid hyperlink.sapbi://addconnection?name SAPDEMO&server url http://10.0.1.15:8080&cms 10.0.1.15&authType secEnterprise&default yes&user Administrator&password Welcome1&save password noActivity 7 – Log in to SAP BusinessObjects MobileIn this activity, you will login to SAP BusinessObjects Mobile.1. Copy and paste the SAP BI URL you created in the previous activity into an email to an accessibleaddress on your iPad.2. Open the email on your iPad and tap the link.3. Tap Save4. Tape the new SAPDEMO (Default) connection.5. Type the password Welcome1 and tap Connect.
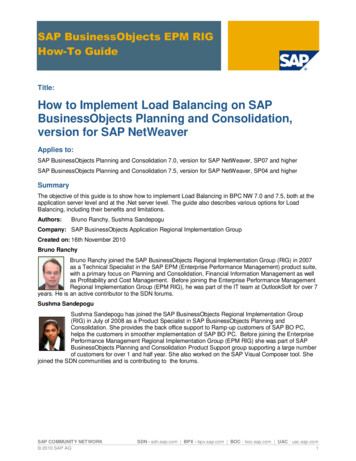
Page 13If you have a connection error, ensure that you have given the BI platform enough time to load.You may want to restart your image, and try again once you can log into the BI platform and theCMC.6. Tap Download.7. Tap eFashion report.8. Swipe up and down to view additional rows in the table.9. Tilt the device to view the report in portrait and landscape view.
Page 1410. Tap reports in the top right corner and tap Sparklines.11. Tap reports and choose Trends.
Page 1512. Tap reports and choose Status.13. Tap reports and choose Charts.Note that not all chart types are supported in Mobile BI. The initial release of Mobile BIsupports standard chart types including Bar, Pie, and Line charts.14. Tap Home.15. Tap SAPDEMO and choose LOGOUT.16. Tap Yes.
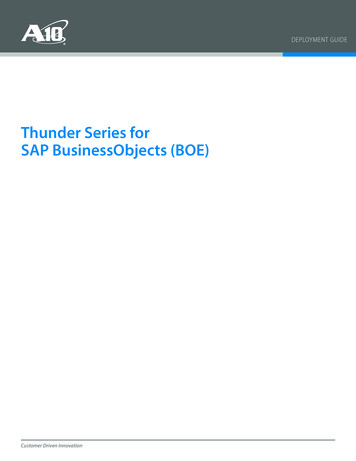
Page 16Activity 8 – Interact with tables and chartsIn this activity, you will open and view and interact with the sample reports that are included with SAPBusinessObjects Mobile. You will open the different reports, retrieve data values in charts, and hide,unhide, and reorganize columns.1. Open the SAP BI app if it is not already open and tap Cancel.Note: If you are already logged into Mobile, tap the SAPDemo connection and choose Logout.2. Tap the Sales Analysis report.3. Double-tab the column chart.
Page 174. Tap a few of the columns.5.6.7.8.9.10.11.Tap Back.Tap Home.Tap the Daily Sales Report.Tap each of the column headers to select them.Double-tap the Qty Sold column and choose Hide Column.Double tap the Discount column and choose Unhide.Tap and drag the Quantity sold column header over the Discount column header.
Page 1812. Tap Reports and choose Sales Revenue – Region.The default report shows sales by product category.The document also includes a report which displays sales by region.13. Tap Back.14. Tap Performance Dashboard.The performance dashboard is a great example of the dashboard style content that can beshared with Mobile BI.
Page 19Create BI Content for SAP BusinessObjects MobileTutorial SimulationsCheck for the latest Mobile BI official product tutorials for SAP BusinessObjects Business Intelligence 4.0mobile applications. Save a Web Intelligence document for access on SAP BusinessObjects MobileDisplay trend or status iconsDisplay sparklines (micro charts)Format blank cells and images for display in SAP BusinessObjects MobileActivity 9 – Save a Web Intelligence document for SAP BusinessObjects MobileIn this activity, you will create a web intelligence document with a table and a column chart and view iton an iPad.Part 1 – Create the document1. Open the Web Intelligence Rich Client.2. Create a Web Intelligence Document based on the Sports Warehouse universe includingCategory, Quarter, Net Sales, and Gross Sales, and a 2010 Year filter.3. Change the title of the report to Quarterly Sales By Category.4. Copy and paste a duplicate of the default table.5. Change the duplicate table into a Column chart.6. Move the legend to the bottom of the chart.7. Save the report to the SAPDemo system as Quarterly Sales By Category.8. Assign the report to the Personal Mobile category.Part 2 – View the document1. Open SAP BI on your iPad and connect to SAPDemo.Note: If you are continuing from the previous activity, you can tap Not Connected and chooseSAPDemo to Log On.2. Tap Download to download the new Quarterly Sales report.3. Tap Quarterly Sales By Category.
Page 204. Double-tap the chart.5. Use the sliders below the chart to zoom in on different categories.Activity 10 – Create a Web Intelligence document with Line ChartsIn this activity, you will create a Web Intelligence document with 4 line charts and view it on an iPad.Part 1 – Create the document1. Open the Web Intelligence Rich Client.2. Create a Web Intelligence Document based on the Sports Warehouse universe includingCategory, Quarter, and Net Revenue.3. Add a Query Filter to prompt for the year.4. Add a Query Filter to show the Bikes category.5. Add a second query based on the Sports Warehouse universe including Category, Quarter, andNet Sales.6. Add a query filter to prompt for the year.7. Add a query filter to the show Golf category.8. Click Run queries and click OK.
Page 219. Click Insert a table in the current report and click OK.10. Drag Category (Query 2) over the Category column in the new table.11.12.13.14.15.R
4.2.1 Configuring Categories for iPad in the SAP BusinessObjects Mobile for iPad 4.0.3 Installation, Configuration and Deployment Guide Activity 3 – Installing SAP BusinessObjects Mobile and SAP BusinessObjects E