Transcription
Page 1 of 7Bead Embroidered PendantDesigned by Gail DeLucaLearn basic embroidery stitches and techniques while makinga small backed pendant.Materials List Size 11 seed beads in three or more colors (about a grameach)Size 15 seed beads in one or two colors (less than a grameach)Glass cabochon, 25mm roundBeading thread such as KO, Nymo or One G to match your color palette. You can alsouse several colors to match the beads.Size 10, 11 and/or 12 beading needles - as neededUltra suede fabric for the backing - 2” square pieceBeading Foundation - 2” square pieceScissorsBead blanket or other work surface.Glue - E6000, Gem Tac or Crafter’s Pick (we will be capturing the cab - you justneed to glue so it holds while you bead.)1. Glue a 25mm round cabochon to the center of the 2” square beadingfoundation, and let dry at least an hour or so, preferably overnight. Youdon’t want the cabochon to be moving around as you stitch.2. Use a 2’ length of thread, thread your needle and knot the end. Holdboth ends of the thread and tug to pre-stretch it a little. Stitch up throughthe foundation where you want to begin stitching.Add thread as needed: Stitch old thread intofoundation, knot to secure. Start a newlength as in step 2.Gail DeLuca www.whitefoxbeads.com White Fox BeadsCopyright 2019. This project is an original design, and these instructions were carefully and thoughtfully written for your learning and enjoymentof the techniques presented. While we encourage sharing of techniques, copying or distribution of this document or any portion of it is notplaying nice and just happens to also be against the law without written permission of White Fox Beads. You may download this from JewelryTelevision or White Fox Beads for your personal use only and may not use this tutorial for teaching or reselling in any way.
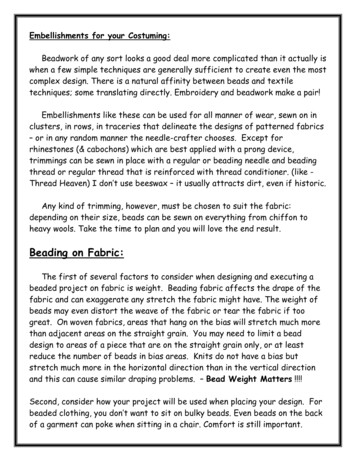
Page 2 of 73. Stitch a row of size 11 seed beads around the3.cabochon, staying close to the edge of the cabochon,using the backstitch (figure 2 in the stitch guide at theend of these instructions) to sew beads. (68 beadswillfit nicely around these 25mm cabs.) Use an evennumber of beads and if you find the last bead doesn’t fit,add it anyway and the next step will help it align. Or,leave one out to make it an even number4. Stitch through all the beads again, and this will help them all line up ifyour line isn’t perfect.5. Stitch a row of Peyote stitch, using the same5.color size 11 bead as the row in step 3.(String a bead, locate where your thread isexiting the bead, skip the next bead, thenstitch through the next bead. Repeat aroundthe circle and step up through the first bead5.added in this row.). Don’t worry if this rowlooks wonky - it will straighten out fine instep 6.6. Stitch another row of Peyote stitch, usinganother color size 11 bead. As you stitch,pull on the thread to tighten your stitchesand the beads will tighten up around the6.6.cabochon. Step up into the first bead addedin this step.7. Stitch a row of peyote stitch, using size 15 seed beads, and7.step up into the first size 15 bead added in this row.8. Add another row of size 15 seed beads as follows, only addingfor every other stitch as follows: String a size 15, stitch throughthe next 15, the next 11 and the next 15. Repeat around thecircle, pulling the thread tight as you go to drawup the beads around the cabochon. If you see8.8.thread showing between beads, try playing withhow many 15s you add in each stitch - you cancreate many pretty patterns in this step to hidethe thread and embellish the capture.Gail DeLuca www.whitefoxbeads.com White Fox BeadsCopyright 2019. This project is an original design, and these instructions were carefully and thoughtfully written for your learning and enjoymentof the techniques presented. While we encourage sharing of techniques, copying or distribution of this document or any portion of it is notplaying nice and just happens to also be against the law without written permission of White Fox Beads. You may download this from JewelryTelevision or White Fox Beads for your personal use only and may not use this tutorial for teaching or reselling in any way.
Page 3 of 79. Weave the thread through the beads back down to the first row, stitchdown through the foundation, then back up right next to the beads toprepare to continue with the embroidery.10.Use backstitch to stitch a row of size 11 seed beads around the first rowof beads, staying close to the beads.You don’t have to count these, butdo stitch them nice and close together. Use the same color as in step 3.11.Stitch another row of size 11 beads around the beads added in step 10,using another color.12.Stitch another row of size 11 beads around the beads added in step 11,using another color.11.10.12.13.To create the bail, use size 11 seed beads to work 16 rows of peyotestitch 8 beads wide off the edge row. You will know you have 16 rowswhen you can count 8 beads along each edge of peyote stitch.13.This creates a small diameter bail for a chain, leather orstrand of seed beads. If you want to make a larger bailfor something like a kumihimo braid, add more rows ofpeyote stitch.Gail DeLuca www.whitefoxbeads.com White Fox BeadsCopyright 2019. This project is an original design, and these instructions were carefully and thoughtfully written for your learning and enjoymentof the techniques presented. While we encourage sharing of techniques, copying or distribution of this document or any portion of it is notplaying nice and just happens to also be against the law without written permission of White Fox Beads. You may download this from JewelryTelevision or White Fox Beads for your personal use only and may not use this tutorial for teaching or reselling in any way.
Page 4 of 714.Add size 15 beads to the edge of the bail as followsA. String 3 size 15 beads, stitch through the next size 11 bead,B. Stitch through the next size 11 bead toward the edge.C. Repeat steps A-B three more timesD. Stitch through the beadwork so that your thread is exiting the next tolast size 11 bead nearest where you left off in step A, and stitchthrough the closest 15.E. String a 15, then stitch through the next 15, stitching toward thecenter (away from the edge), and stitch through the 11 below it.F. Stitch through the next 11, stitching toward the edge, and stitchthrough the closest 15.G. Repeat steps E and F three more timesH. Stitch over to the other edge of the peyote stitching so that yourneedle is exiting the last size 11 along the edge.I. Repeat Steps A-G to complete the decorative edge on the other side.A.B.E.Gail DeLuca www.whitefoxbeads.com White Fox BeadsCopyright 2019. This project is an original design, and these instructions were carefully and thoughtfully written for your learning and enjoymentof the techniques presented. While we encourage sharing of techniques, copying or distribution of this document or any portion of it is notplaying nice and just happens to also be against the law without written permission of White Fox Beads. You may download this from JewelryTelevision or White Fox Beads for your personal use only and may not use this tutorial for teaching or reselling in any way.
Page 5 of 715. Zip the edges of the Peyote stitch together as shown to complete thebail. Weave thread into foundation, secure and trim.15.16.Use Crafters Pick glue to glue the beadwork to apiece of ultra suede backing. Take care to not useso much glue that it soaks through the ultra suede just a nice thin coating on the back of the beadwork.You can spread it around with your finger - it’s watersoluble! Let dry and trim the beading foundation andbacking close to the beads, taking care not to cutthrough any threads on the back. (If you do, you canthread a needle and carefully reinforce the stitchingwhere the cut threads are. Been there, done that!)16.Gail DeLuca www.whitefoxbeads.com White Fox BeadsCopyright 2019. This project is an original design, and these instructions were carefully and thoughtfully written for your learning and enjoymentof the techniques presented. While we encourage sharing of techniques, copying or distribution of this document or any portion of it is notplaying nice and just happens to also be against the law without written permission of White Fox Beads. You may download this from JewelryTelevision or White Fox Beads for your personal use only and may not use this tutorial for teaching or reselling in any way.
Page 6 of 717.Edge stitch a row of beads as follows:a. Start with a new thread, about 3’ long, with a knot at the end.Stitch from the center of the foundation toward the edge, exitingthrough the foundation between the outer row of seed beads andthe very edge of the foundation.b. Holding the piece of ultra suede backing to the back of thebeadwork, string a size 11 bead and stitch through the backingand the foundation, exiting through the foundation between theouter row of seed beads and the very edge of the foundation as inthe previous step.c. Stitch through the size 11 bead, exiting toward the direction youwill be adding more beads.d. Repeat steps 17b and 17c, taking care to keep the backing inposition as you go.e. When you complete the edge beading all the way around, stitchthrough all the size 11 beads. This will help them align.f. Stitch the thread into backing to secure and trim.b.c.d.This finishes your pendant! I hope you will take what you have learned and design andstitch some wonderful pendants of your own. These basic techniques can be used forall sorts of cabochons and with other kinds of beads.Gail DeLuca www.whitefoxbeads.com White Fox BeadsCopyright 2019. This project is an original design, and these instructions were carefully and thoughtfully written for your learning and enjoymentof the techniques presented. While we encourage sharing of techniques, copying or distribution of this document or any portion of it is notplaying nice and just happens to also be against the law without written permission of White Fox Beads. You may download this from JewelryTelevision or White Fox Beads for your personal use only and may not use this tutorial for teaching or reselling in any way.
Page 7 of 7Stitch Guide for Basic Bead EmbroideryWith all stitches, it is important to remember to place the needle perpendicular to thebead, and not at an angle. This way the thread is going down through the backingdirectly next to the bead which will help the bead sit straight.When you are adding several beads at a time, hold the thread taut with one hand andtap the line of beads into place and then run the needle through the backing. This willtake the guesswork out of knowing where to put your needle in.!Figure 1: Seed stitch (orsingle stitch) You willuse this to fill in with abead in a small space,or to add a single largerbead securely.!Figure 2: Backstitch.You will use this stitchmost often to lay downthree beads at a time(or as many as 5)Figure 5: Sewing on thefirst edge bead. Aftercapturing the bead, sewthe needle through thebead, pointing the needlein the direction of the nextbead you will add.!Figure 3: Couching.Use this to lay down along line of beads.String the number ofbeads in the line, thencome back fromunderneath and bringyour needle up andaround the originalthread every other beadto secure the line to thebacking. You will needto estimate the amountof slack to leave, butthis will come withpractice. You can alsouse this technique to goback and tighten downbeads that may look alittle loose.!Figure 4: Stacked. Usethis stitch to addembellishments like arondelle. You can alsostack several seedbeads to create textureswith more height.!Figure 6: Adding additionaledge beads, pick up abead, sew through bothlayers (ultrasuede first, stiffstuff last).!Figure 7: Sew the needlethrough the bead you justadded, pointing yourneedle in the direction ofthe next bead you will add.!Tip: you can paint white foundationin a color to match your beads as follows:Use thinned acrylic paint to add color to the stiff stuff sothat gaps between stitched beads are less noticeable.Mix one dab of paint with about two teaspoons ofwater. You just want a thin wash to add color, not ahard layer of paint you might have trouble beadingthrough later. Brush onto stiff stuff and let dry beforebeading. Don’t worry about getting an exact match orcovering the surface evenly with color - your beads willhide most of the backing. The idea is to add a littlecolor to knock the harshness off the white.Gail DeLuca www.whitefoxbeads.com White Fox BeadsCopyright 2019. This project is an original design, and these instructions were carefully and thoughtfully written for your learning and enjoymentof the techniques presented. While we encourage sharing of techniques, copying or distribution of this document or any portion of it is notplaying nice and just happens to also be against the law without written permission of White Fox Beads. You may download this from JewelryTelevision or White Fox Beads for your personal use only and may not use this tutorial for teaching or reselling in any way.
another color size 11 bead. As you stitch, pull on the thread to tighten your stitches and the beads will tighten up around the cabochon. Step up into the first bead added in this step. 7. Stitch a row of peyote stitch, using size 15 seed beads, and step up into the first size 15 bead added in this row. 8.