Transcription
Adobe Premiere ProVideo Editing BasicsCourse objectives: Understand the workspaceManage project contentEditing techniquesAdd titles and graphicsWork with AudioExport a completed projectStudent Training and SupportPhone:Email:Web:(07) 334 .edu.au/library-services/training/Service PointsSt Lucia:Hospitals:Gatton:Main desk of the Central, ARMUS and DHESL librariesMain desk of the PACE, Herston and Mater librariesLevel 2, UQ Gatton LibraryStaff Training (Bookings)PhoneEmailWeb(07) 3365 velopmentStaff may contact their trainer with enquiries and feedback related to training content. Please contact Staff Development for bookingenquiries or your local I.T. support for general technical enquiries.Reproduced or adapted from original content provided under Creative Commons license byThe University of Queensland Library
Table of ContentsAdobe Premiere Pro . 3Access the application. 3Getting Started. 3Create a new project . 3Manage project content. 4Import Content . 4Create project structure . 5Create a Sequence . 5Editing Techniques . 6Perform Basic Editing . 6Transitions . 8Add Titles and Graphics . 8Add a Title . 8Add a Graphic . 10Animation Effects . 10Work with Audio . 12Add a sound file . 12Final Preview . 13Export a completed project . 13Final Version. 1320190225MovieEditingManual PremierePro.docx2 of 13Premiere Pro - Basics
Adobe Premiere ProPrior to creating a project in Premiere Pro it is important to plan, storyboard and script your contentto make to process much easier. Working with editing software can be difficult if you do not knowwhat you want to achieve. Premiere Pro tends to be used for video editing and another Adobeproduct, After Effects is used for video compositing. There are 5 steps to create a successfulmedia clip with Premiere Pro.1. Create a new project2. Import Content3. Sequence sources4. Edit and configure5. Export to outputAccess the application1. Click windows button2. Click All Apps3. Go to Adobe Premiere ProGetting StartedCreate a new project1. Open Premiere Pro2. Click New Project 3. Add new project name – UQL Training Project4. Enter a location5. Click on OKNOTES3 of 13Premier Pro – Basics
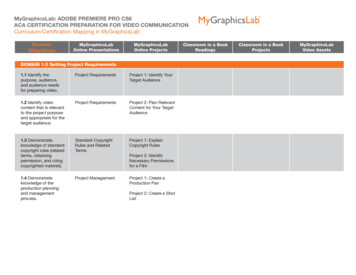
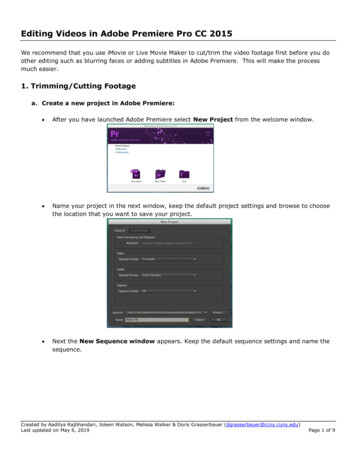
The Premier Pro interfaceThe Premiere Pro screen comprises of several panels, which perform separate functions, and canbe resized on screen to simplify working.Source PanelProject PanelProgram Panel (Preview)ToolboxTimeline PanelManage project contentImport Content1. Double click inside the project panel2. Select the video files (mp4) to import3. Click on Open4. Open File explorer5. Click and drag an Audio file (mp3) into the projectpanelNOTES4 of 13Premier Pro – Basics
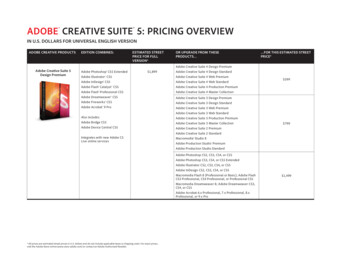
6. Change the display of content footage by selectingeither list view or Icon viewCreate project structure1. Click new bin icon in project panelA bin in Premiere Pro is a folder2. Enter a folder name – Original FootageCreate a Sequence1. Go to the project panel2. Click and drag a source file (Planet Earth) on to theNew Item icon at the bottom of the project panel.This automatically create a new sequence with settings to match theoriginal source Click on the Link icon, if requiredIf both layers are selected they need to be separated using the linkbutton. It is active if it is blue. It needs to be white to be inactive andseparate the layersYour sequence may have more than one layer available. One is thevideo footage (V1)and the other is the audio (A1)3. Select the Audio track only4. Press deleteThis will remove the sound file but not the video.This is only necessary if the sequence is in the Footage folder1. Click the sequence icon2. Drag and drop over a parent folderNOTES5 of 13Premier Pro – Basics
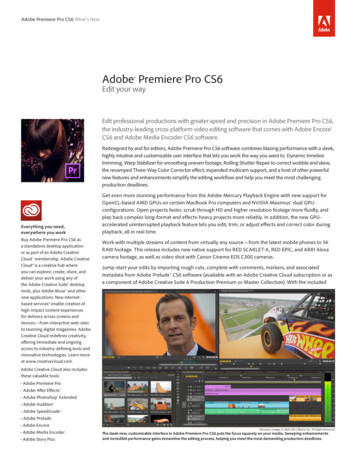
The sequence is now separate from the original footage3. Click and drag another footage file to the sequenceV1 layer. (Sun)This is appropriate if the clips do not overlap in any way. Drag toanother layer to allow overlapping.1. Click on a sequence clip2. Go to the Program panel to preview3. Click on the play button.Alternatively4. Press use the space bar to play and stopEditing TechniquesPerform Basic Editing1. Click and drag the timeline marker to the point in theclip you want to cut (Planet Earth, at approx. 16 secs)This technique is known as scrubbing2. Go to the razor tool in the toolboxIf your original source has sound this will be linked to the video clip andwill be edited simultaneously3. Click on the video layer at the point you want to cut thevideo4. Play video or move timeline marker to the point youwant to keep the clip5. Select the razor tool, if necessary6. Click on the sequence layer (at approx. 21 secs)7. Click the selection tool from the toolbox8. Click the first cut section9. Press delete10. Click the last cut section11. Press deleteNOTES6 of 13Premier Pro – Basics
1. Hover at the end of a clip (Sun)An edit icon will appear2. Click and drag to reduce the clip lengthThere are two cut tools available. One will reduce the clipand the other will extend the clip. A clip cannot be extended beyond itsoriginal length.1. Double click the footage icon alongside a clip in theproject panel (Atoms)This will add it to the source panel for editing before adding into thesequence.2. Click the play icon to start the clip3. Drag the timeline arrow to a starting point4. Click the mark in icon to define a new starting point5. Drag the timeline arrow to an end point6. Click the mark out icon to define a new ending point7. Click and drag the video icon into the source panel8. Drop into the V1 layer in the sequence panelNotice only the marked in edit is carried across1. Right click on the gap between clips2. Click on Ripple DeleteAlternatively3. Make the snap tool activeThe active snap icon should display as a blue magnet. If it is white it isinactive. Simply click on it to toggle.4. Click and drag a clip to snap to its predecessorBe careful not to overlay another clip as it can be overwritten and will beremoved.NOTES7 of 13Premier Pro – Basics
1. Click on an empty layer and drag across all clips toselect.This will temporarily group the selected items for editing2. Drag right to add space at the beginning of thesequence3. Click and drag to change the order of clips to:Atoms, Sun then Planet Earth4. Re-position to snap clips in timelineTransitions1. Go to the Effects tab in the Project Panel2. Expand the Video Transitions section3. Click and drag the additive dissolve transitionbetween the clips Atoms and Sun4. Click and drag the morph cut transition between theclips Sun and Planet Earth1. Drag the timeline marker to the starting point2. Click on the play button or press the spacebar keyto play and pauseAdd Titles and GraphicsAdd a Title1. Click on a layer and drag across all clips to select.2. Drag right to make space at beginning of sequenceNOTES8 of 13Premier Pro – Basics
3. Right click in the project panel4. Hover over New Item5. Select Title6. Add a Title name, if required7. Click on OKA new window will open to create a new title for the clip.8. Click anywhere in the title window9. Enter title text – Big Bang Theory in Action10. Select the text11. Change the Font from styles below sample12. Use VA button to adjust character spacingClick and drag left and right to adjust kerning spacing13. Click the Selection tool to re-position the title.14. Click the cross icon to close windowThis will automatically add the title to the source panel only1. Drag the Title to the timeline to the same layer asthe other clips – V12. Right click on the title clip3. Select Apply Default TransitionThis will add a transition to the title clip – usually cross dissolve4. Drag the timeline marker to the start of the project5. Press spacebar to previewNOTES9 of 13Premier Pro – Basics
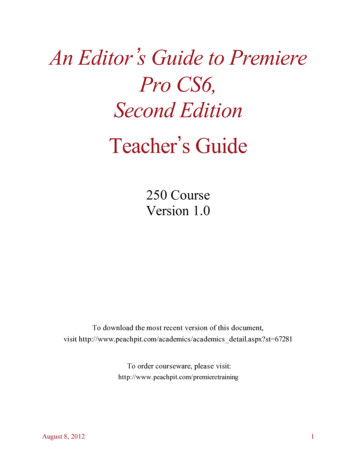
Add a Graphic1. Right click on the Footage bin in the project panel2. Select Import 3. Choose an image from your files (Earth.jpg)4. Click on Open5. Drag the image to a new sequence layer - V26. Extend in layer to overlap the title and first clipAs an image is static, it can be extended to appear for any durationAnimation EffectsWe want this image to zoom in whilst it is displayed on screen.We need to set the image to appear larger and magnify.1502001. Click on the image to apply effects2. Go to the Effect Controls tab in Source panel forKey framesTo open, click Window Effect Control in the menu bar3. Expand the motion section4. Drag the timeline marker to the beginning of theeffects control timeline5. Change the scale value to 150 – starting view6. Click the timer icon to set the first key frameThis will be added as a diamond in the source timeline. This shoulddisplay blue to indicate key frames are active7. Drag timeline marker to end of the source timeline8. Change scale value to 200 - to zoom in9. Press enter10. This will automatically set another key frameThe image will grow from 150% at the start to 200% by the end of theclip duration.11. Move the timeline marker to the beginning12. Click play icon to previewNOTES10 of 13Premier Pro – Basics
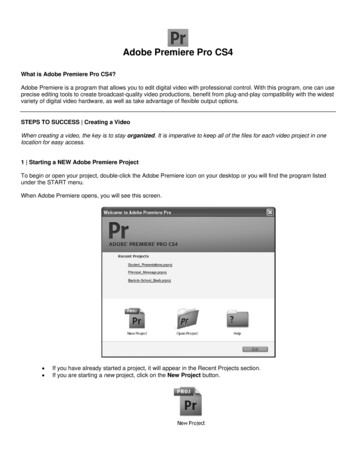
We need to set the image to fade in, display full and then fade out.1. Click on the image to apply effects010010002. Drag the timeline marker over the selected imageclip in the timeline panel3. Go to Effect Controls tab in the source panel4. Expand the Opacity section5. Set opacity to 0% for beginning of image (to fade in)6. Click the timer to activate key framesThis will drop a key frame marker on the timeline in the source panel.Be aware – if you click the timer to de-activate key frames, allexisting markers will be removed7. Drag the key frame marker to the beginning of thesource timeline8. Click the key frame marker to add another 0%marker on the timeline9. Drag this to the end of the image clip (to fade out)10. Drag the source timeline marker to the end of theTitle clipThis is where the image should be fully opaque11. Change the opacity to 100 for the image at thedesired timeline positionA key frame should automatically be added.12. Drag the source timeline marker to the end of theopaque image clip13. Click on the Add Key frame button14. Drag the timeline to the beginning and play the clipto view.NOTES11 of 13Premier Pro – Basics
Work with AudioAdd a sound fileAdd a file to a sequence1. Right click in the project area2. Select Import3. Select an audio file (Spring in my Step)4. Click on Open5. Drag audio file to an audio layer in the timeline – A16. Move play marker and press spacebar to preview1. Click and drag between layer names A1 / A2This will expand the layer height2. CTRL click to create 2 key points to allow volumeto fade out.This should be on the white audio line separating the L and Rsoundtracks3. Click and drag second marker down to reduce thevolume4. Use the razor in the toolbox to cut the end of the clip5. Use the selection tool to select the extras audio6. Press delete on the keyboardAlternatively7. Click and drag the end of the audio to the end of thevideo to reduce the sound length.This may prove difficult if the audio file is much longer than the videoclipNOTES12 of 13Premier Pro – Basics
Final Preview1. Move the timeline marker to the start2. Press the spacebar to play3. Change the quality of playback by selecting full fromthe playback resolution menu in the Program panelAny changes won’t apply during playExport a completed project1. Click File in the menu bar2. Select Export3. Select MediaThis opens a new window to set the format4. Select the Format: H.2645. Select the Bitrate Preset: Match Source – Highbitrate6. Click on the output name7. Change if necessary8. Click on ExportThe project will be downloaded and encodedFinal Version1. Locate final version and playNOTES13 of 13Premier Pro – Basics
Prior to creating a project in Premiere Pro it is important to plan, storyboard and script your content to make to process much easier. Working with editing software can be difficult if you do not know what you want to achieve. Premiere Pro tends to be used for video editing and another Adobe product, After Effects is used for video compositing.