Transcription
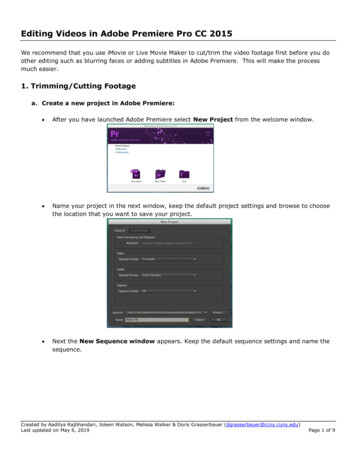
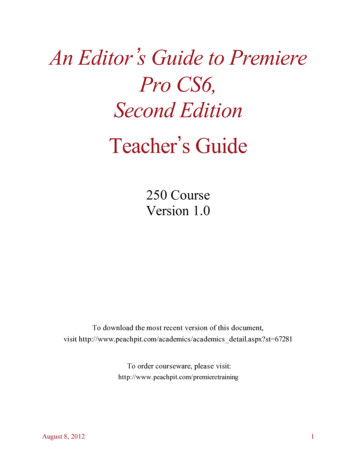
Adobe Premiere Pro CS4What is Adobe Premiere Pro CS4?Adobe Premiere is a program that allows you to edit digital video with professional control. With this program, one can useprecise editing tools to create broadcast-quality video productions, benefit from plug-and-play compatibility with the widestvariety of digital video hardware, as well as take advantage of flexible output options.STEPS TO SUCCESS Creating a VideoWhen creating a video, the key is to stay organized. It is imperative to keep all of the files for each video project in onelocation for easy access.1 Starting a NEW Adobe Premiere ProjectTo begin or open your project, double-click the Adobe Premiere icon on your desktop or you will find the program listedunder the START menu.When Adobe Premiere opens, you will see this screen. If you have already started a project, it will appear in the Recent Projects section.If you are starting a new project, click on the New Project button.
1. The New Project window will appear – keep the default settings in the General and Scratch Disks tabs.2. Now, set the location for your video project – this is located at the bottom of the New Project window. Click BROWSE Select LOCAL DISK (C:)Browse for and select the VIDEO folder – make sure you have selected this folder (shown below).
Click MAKE NEW FOLDER - give folder a unique name for each project you create. Select the folder you just created – and click OK.**Notice the location information has changed – check the location and make sure it is correct. Give your project a name (same as folder you created) – DO NOT leave project name as Untitled. Click OK.The NEW SEQUENCE window will appear.
NOTES Under Available Presets – make sure Standard 32kHz is selected from the DV-NTSC folder – ifyour video is in widescreen, select Widescreen 32kHz from the DV-NTSC folder.Leave all other settings as default.Give the sequence a name (same as project name you created) – DO NOT leave sequencename as Untitled. Click OK.
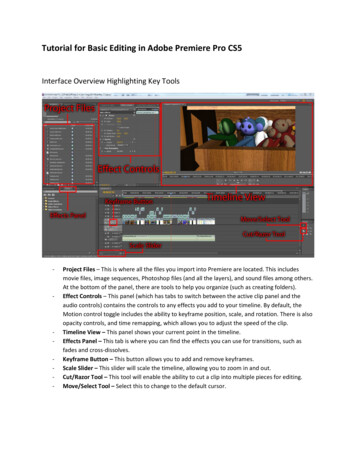
2 Adobe Premiere Pro - Screen Layout2 Monitor1 Project BinA SourceB Program4 Timeline3 Video Effects5 Tools5 ToolsYou will mainly use two tools –- Selection Tool- Razor1 Project Bin2 MonitorsThe Project window is where you import, organize andstore references to clips.The Monitor window includes SOURCE and PROGRAMviews of your project.Here you have access to the video captured/imported,titles created, music imported, as well as picturesimported used in your video project.A – Source Monitor (allows you to see individual clips)B – Program Monitor (allows you to see the current stateof the video being edited in the timeline)3 Video Effects4 TimelineThe Video Effects window is where you accessvideo/audio effects and transitions. Each folder containssubfolders to better organize effects.The Timeline provides a schematic view of the videoproject that is being edited. Here you can organize thevideo, music, titles, pictures, etc. while adding transitionsfor your final video production. The changes you make inthe timeline will appear in the program monitor.
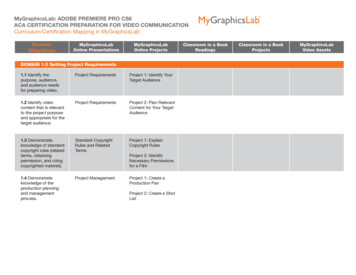
3 Capturing VideoFirst things first, capture video. To do this click on FILE and select CAPTURE – you may also press F5 on your keyboard. Make sure your capture device is properly connected to your computer – if device is off or not connected properly, thestatus bar will say ‘Capture Device Offline’ or ‘Can’t Activate Recorder. Try Resetting Camera’. When you are ready to capture click the record button first, then immediately click the play button – you will not haveto worry about pressing any buttons on your capture device; the computer has control of it.Second, click PLAY.First, click RECORD.When finished, click STOP. When you have captured the clips that you want, click the stop button.The Save Captured File window will appear – you should save your clip or it will be deleted. If you are recording multiple clips, Adobe Premiere will automatically name your captured video adding an incrementalvalue to the end of the file name.
4 Importing FilesTo import video clips, still images, audio files, or other media that already exist on your hard drive– Click FILE and select IMPORT. Browse for the media file and click OPEN. To import a single clip – locate and select the file, and click OPEN. To import multiple clips – hold down the CTRL (control) button as you select each file you want to import.Imported files will appear in the Project Window. NOTES
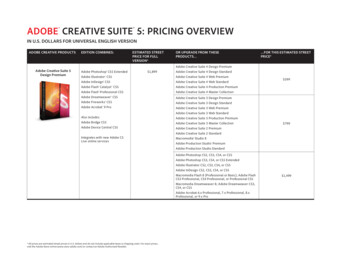
5 EditingThe Timeline is where you create and edit your video program. After you capture or import your clips, the next step isadding them to and arranging them in the Timeline.}}Video TracksAudio TracksZoom ControlsZoom OutZoom InZoom SliderThe Tools panel contains a number of tools for editing sequences in a Timeline panel.Selection ToolThe standard tool for selecting clips, menu items, andother objects in the user interface. It’s generally a goodpractice to select the Selection Tool as soon as you aredone using any of the other, more specialized, tools.Razor ToolSelect this tool to make one or more incisions in clips ina Timeline. Click a point in a clip to split it at thatprecise location. To split clips in all tracks at thatlocation, Shift-click the spot in any of the clips.
To add video clips, audio clips, or titles to the Timeline, click on the media file in the Project Window and drag to theTimeline.To edit clips in the timeline:1. Select the Razor tool2. Click the point in the Timeline where you want to split the clip – you will perform this step twice (x2) – unless atthe beginning or ending of a video or audio clip.Additional Tips To split only the audio or video portion of linked clips, Alt click with the Razor tool. To split clips on all except locked tracks, lock any track containing a clip that you don’t want to split.Shift click with the Razor tool to split all tracks at the same point in a Timeline panel.Split #1NOTESSplit #2
3. Right-click on split-clip and select Ripple Delete – this will delete the selected clip and shift video clips together.To apply transitions to edited video clips:1. Select Window from the menu bar and click on Effects.
2. The Effects panel will appear in the bottom-left corner of the Adobe Premiere window.3. Select the Video Transitions folder.4. To apply transition, click on the desired transition from the Effects panel and drag to the Timeline betweenmedia clips.NOTES
6 TitlesTo create a new title, click on File from the menu bar select New click on Title.1. You will be prompted to save the new title.}Default (DO NOT CHANGE)Give title UNIQUE name.2. Click OK.Using the Title Window –TitleTools{TextAlignmentTools}{}PresetTitle StylesNOTESTitleProperties(font, size,color, etc.)
Using the Title Window Menu Panels –{Additional Text PropertiesCreate aNEW TITLEbased oncurrent titleRoll / ty – text automatically appearsat full (100.0%) opacity, the lower theopacity the more transparent the textwill be.}Aspect – should always be 100.0%Leading – the space between linesof text in the same text boxKerning – the space betweencharactersTracking - the space between allletters in a block of textStrokes – allows you toadd an outline to your textAngle– the angle of the shadow inrelation to the object}Distance – the number of pixels thatthe shadow is offset from the objectSize – the size of the shadowSpread – the blur of the shadow (isuseful on small, thin objects)
Selection ToolType ToolVertical AreaType ToolHorizontal AreaType ToolPath Type ToolShape & DrawingToolsNOTESVertical TypeToolRotation ToolPath Type Tool{}Pen Tools
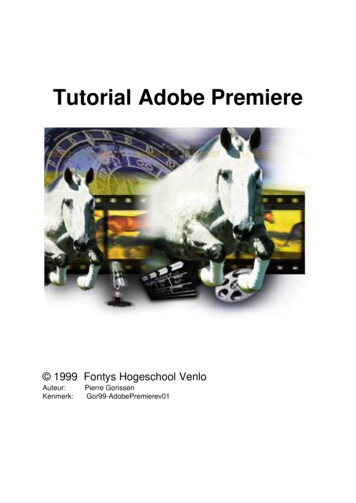
7 AudioTo adjust the audio for your project:1. Select Window from the menu bar, click on Audio Mixer, and then choose the sequence for which you wantto adjust the audio.2. The Audio Mixer will appear in the Source Monitor window.3. Select the fader for the audio track you would like to adjust.Audio TracksProject VolumeVU Meters &Faders{
You can also set the gain (volume level) to make levels more consistent among tracks or clips, or adjust the audiosignal of a track when it is too high or too low. Keep in mind that if the level of an audio clip was set too low when it isdigitized, increasing the gain or volume might simply amplify noise.1. Right-click on the audio clip in Timeline.2. Select Audio Gain.3. Select Normalize All Peaks to: 0dB and click OK.NOTES
8 Exporting ProjectYour Adobe Premiere Project is not available as an independent video file until you export it. Before you export yourproject, make sure that your project meets all of the requirements for video segments.To export your project to a video file:1. Select the Timeline window.2. Click File on the menu bar, click Export, and select Media.3. Select the format for your video file.Video FileFORMATSettings
4. Select the location to save video file – click on the hyperlinked text next to Output Name. You should select the Video folder on your C: drive, then select the Finished Videos folder.5. Give the video file a unique file name.6. Click SAVE.7. Adobe Premiere will export your video data and open Media Encoder.NOTES
8. Click Start Queue.Start QueueNOTES
1 Starting a NEW Adobe Premiere Project To begin or open your project, double-click the Adobe Premiere icon on your desktop or you will find the program listed under the START menu. When Adobe Premiere opens, you will see this screen. If you have already started a project, it will appear in the Recent Projects section.