Transcription
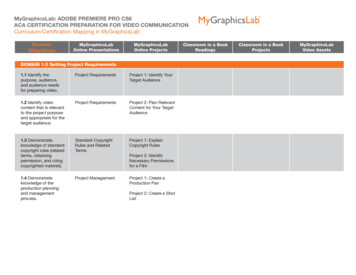
MyGraphicsLab: ADOBE PREMIERE PRO CS6ACA CERTIFICATION PREPARATION FOR VIDEO COMMUNICATIONCurriculum/Certification Mapping in MyGraphicsLabDomainObjectivesMyGraphicsLabOnline PresentationsMyGraphicsLabOnline ProjectsDOMAIN 1.0 Setting Project Requirements1.1 Identify thepurpose, audience,and audience needsfor preparing video.Project RequirementsProject 1: Identify YourTarget Audience1.2 Identify videocontent that is relevantto the project purposeand appropriate for thetarget audience.Project RequirementsProject 2: Plan RelevantContent for Your TargetAudience1.3 Demonstrateknowledge of standardcopyright rules (relatedterms, obtainingpermission, and citingcopyrighted material).Standard CopyrightRules and RelatedTermsProject 1: ExplainCopyright Rules1.4 Demonstrateknowledge of theproduction planningand managementprocess.Project ManagementProject 2: IdentifyNecessary Permissionsfor a FilmProject 1: Create aProduction PanProject 2: Create a ShotListClassroom in a BookReadingsClassroom in a BookProjectsMyGraphicsLabVideo Assets
DomainObjectivesMyGraphicsLabOnline PresentationsMyGraphicsLabOnline ProjectsDOMAIN 2.0 Identifying Design Elements When Preparing Video2.1 Demonstrateknowledge of how toorganize and plan avideo sequence.Organizing and DesignPrinciples for VideoProject 1: Create aScript2.2 Identify generalprinciples for videoshooting.Organizing and DesignPrinciples for VideoProject 2: Create aStoryboard2.3 Demonstrateknowledge of visualtechniques forenhancing videocontent.Visual and AudioTechniques forEnhancing VideoContent2.4 Demonstrateknowledge of usingaudio to enhancevideo content.Visual and AudioTechniques forEnhancing VideoContentProject 2: DesignElements for Video2.5 Demonstrateknowledge of usingstill images to enhancevideo contentVisual and AudioTechniques forEnhancing VideoContentProject 1: VisualTechniques forEnhancing VideoContent2.6 Communicate withothers (such as peersand clients) aboutdesign and contentplans.Project Managementand ProductionPlanningClassroom in a BookReadingsClassroom in a BookProjectsMyGraphicsLabVideo Assets
DomainObjectivesMyGraphicsLabOnline PresentationsMyGraphicsLabOnline ProjectsClassroom in a BookReadingsClassroom in a BookProjectsMyGraphicsLabVideo AssetsSetting Up a ProjectLesson 2, pages 24–45Touring the AdobePremiere Pro InterfaceLesson 1, pages 16–22 What Is AdobePremiere Pro? Important GeneralPreferences General ProjectSettingsDOMAIN 3.0 Understanding the Adobe Premiere Pro CS6 Interface3.1 Identify elementsof the Adobe PremierePro interface.The Premiere Pro CS6Interface (Part 1)Project 1: IdentifyInterface ElementsProject 2: Set UpSequences That MatchSource Clips3.2 Identify thefunctions of AdobePremiere Pro interfaceelements.The Premiere Pro CS6Interface (Part 2)Project 2: Use theSource Monitor andProgram MonitorThe workspace layoutLesson 1, pages 17–19 An Overview of theInterface3.3 Organize andcustomize theAdobe Premiere Proworkspace.The Premiere Pro CS6Interface (Part 2)Project 1: Customize theWorkspaceThe workspace layoutLesson 1, pages 17–19 Workspaces
DomainObjectivesMyGraphicsLabOnline PresentationsMyGraphicsLabOnline ProjectsClassroom in a BookReadingsClassroom in a BookProjectsMyGraphicsLabVideo AssetsProject 1: ImportingVideo into Premiere ProCS6Importing from AdobePreludeLesson 3, page 53Importing AssetsLesson 3, pages 50–54Project 2: ImportingPhotoshop Files intoPremiere Pro CS6Capturing fromvideotapeLesson 3, pages 66–72 Importing Projectsfrom Final Cut Pro andAvid Importing Media Filesand Images Importing Media fromFile-Based CamerasProject 1: Adding Clipsto a SequenceTargeting tracksLesson 5, page 113Using the Source MonitorLesson 5, pages 102–107Project 2: StoryboardEditingExtracting and deletingsegmentsLesson 6, pages146–147Nesting SequencesLesson 8, pages 185–187 Storyboard Editing Introducing theProject Panel Adding Clips to aSequence Introducing theTimeline Panel Rearranging Clips in aSequence Lifting and ExtractingProject 1: TrimmingClips on the TimelineTrimming in the ProgramMonitor panelLesson 8, pages196–202Advanced TrimmingLesson 8, pages 189–195DOMAIN 4.0 Editing a Video Sequence with Adobe Premiere Pro CS64.1 Import mediaassets (video, image,and audio files).4.2 Organize andmanage video clips ina sequence.4.3 Trim clips.Importing MediaAssetsOrganize and ManageVideo ClipsTrimming ClipsProject 2: Editing aVideo Sequence withPremiere Pro CS6 JKL Trimming Selecting Part of aClip Deleting and RippleDeleting Trimming in theSource Monitor Trimming on theTimeline Timeline TrimmingTools Trimming KeyboardShortcuts The Trim Monitor
DomainObjectives4.4 Manage sound in avideo sequence.MyGraphicsLabOnline PresentationsManaging SoundMyGraphicsLabOnline ProjectsClassroom in a BookReadingsClassroom in a BookProjectsProject 1: Use a J Cutand L CutVideo rendering andplayback settingsLesson 2, pages 28–31Adjusting Audio GainLesson 11, pages256–257Targeting tracksLesson 5, page 113Creating a Split EditLesson 11, pages259–260Project 2: Add AudioTransitions and AudioKeyframesAdjusting audio volumeLesson 11, pages254–255MyGraphicsLabVideo Assets Overview of the AudioMixer Keyframing VolumeChanges in the Timeline Creating an AudioCrossfadeAdding Audio TransitionsLesson 7, pages 166–168Adjusting audio levels ina sequence, Keyframingvolume changesLesson 11, pages260–2614.5 Managesuperimposed textand shapes in a videosequence.Text and ShapesProject 1: Create a TitleSequenceProject 2: Create aCredit SequenceAn overview of the TitlerwindowLesson 16, pages382–386Video typographyessentialsLesson 16, pages387–392Adding Point TextLesson 16, pages393–395Working with Shapes andLogosLesson 16, pages402–407Making Text Roll andCrawlLesson 16, pages408–409 Introducing the TitleTool
DomainObjectivesMyGraphicsLabOnline PresentationsMyGraphicsLabOnline Projects4.6 Add and manageeffects and transitionsin a video sequence.Effects and TransitionsClassroom in a BookReadingsClassroom in a BookProjectsProject 1: Apply andManage Effects andTransitionsWhat are transitions?Lesson 7, pages152–154Effects PresetsLesson 13, pages315–317Project 2: AdjustKeyframe Parametersfor Smoother KeyframeChangesChanging speed andduration with timeremappingLesson 8, pages177–180Retiming ClipsLesson 8, pages 174–180Working with keyframeInterpolationLesson 9, pages218–219Adding Video EffectsLesson 13, pages294–323Using the Ultra Key EffectLesson 15, pages369–371MyGraphicsLabVideo Assets The Warp Stabilizerand Rolling ShutterCorrection Nesting a Sequence Introducing theEffects Fixed Effects forVideo and Audio Clips Animating with FixedEffects Working withAdjustment Layers Applying a TransitionBetween Two Clips
DomainObjectivesMyGraphicsLabOnline PresentationsMyGraphicsLabOnline ProjectsClassroom in a BookReadingsClassroom in a BookProjectsMyGraphicsLabVideo AssetsDOMAIN 5.0 Exporting Video with Adobe Premiere Pro CS65.1 Demonstrateknowledge of exportoptions for video.Export Options forVideoProject 1: Output toDifferent FormatsProject 2: CustomizeExport Bitrate SettingsExchanging with otherediting applicationsLesson 18, pages443–444 Exporting YourSequence to a File Exporting Frames Outputting to DiscRecording to tapeLesson 18, pages446–4475.2 Demonstrateknowledge of howto export video fromAdobe Premiere Pro.Exporting Video fromAdobe Premiere ProProject 1: Outputting aRange of FramesProject 2: Batch Exporta Queue of Video ClipsChoosing a file formatfor exportLesson 18, pages 436437 Producing MultipleFile Types with AdobeMedia Encoder
functions of Adobe Premiere Pro interface elements. The Premiere Pro CS6 Interface (Part 2) Project 2: Use the Source Monitor and Program Monitor The workspace layout Lesson 1, pages 17-19 An Overview of the Interface 3.3 Organize and customize the Adobe Premiere Pro workspace. The Premiere Pro CS6 Interface (Part 2) Project 1: Customize .

