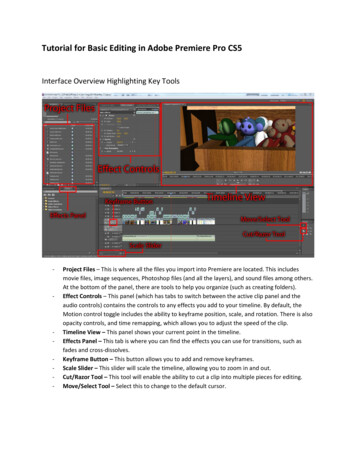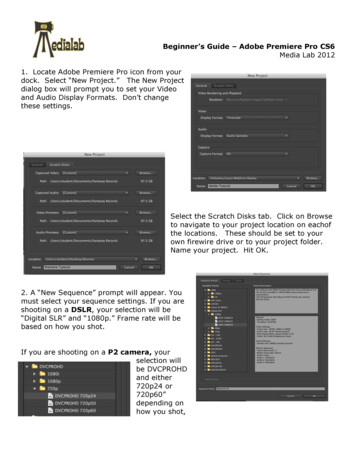
Transcription
Premiere Pro CC 2018 Essential SkillsAdobe Premiere Pro Creative Cloud 2018University Information Technology ServicesLearning Technologies, Training, Audiovisual, and Outreach
Copyright 2018 KSU Division of University Information Technology ServicesThis document may be downloaded, printed, or copied for educational use without further permissionof the University Information Technology Services Division (UITS), provided the content is not modifiedand this statement is not removed. Any use not stated above requires the written consent of the UITSDivision. The distribution of a copy of this document via the Internet or other electronic mediumwithout the written permission of the KSU - UITS Division is expressly prohibited.Published by Kennesaw State University – UITS 2018The publisher makes no warranties as to the accuracy of the material contained in this document andtherefore is not responsible for any damages or liabilities incurred from UITS use.
University Information Technology ServicesPremiere Pro CC Essential SkillsAdobe Premiere Pro Creative Cloud 2018Table of ContentsIntroduction . 5Learning Objectives. 5Preparing a New Project . 6Storing a Project on OneDrive . 6Project File Management . 6Interface Overview. 6The Start Screen . 6Create a New Project . 7The Workspace . 8Import and Organize Media . 9Importing Assets . 10Organizing Assets . 11The Source Monitor . 12Previewing Clips . 12Using the Timeline to Create a Sequence . 14The Timeline Panel . 14The Timecode Group . 14Track Options Group . 15Sequence Group. 16The Toolbar . 16Insert and Manipulate Media in the Timeline . 17Insert Clips to Create a Sequence . 17Make an Insert Edit . 17Make an Overwrite Edit . 18Copy and Paste Media Using Track Targeting . 18
Delete Media from a Sequence . 19How to Delete Media from a Sequence. 19How to Apply a Ripple Delete to a Sequence . 20Editing a Sequence . 20Trim and Edit Clips . 20Make a Regular Edit . 20Make a Ripple Edit . 21Split a Clip. 22Configure Audio In a Sequence . 22Track Linking . 22Link Audio to a Video Clip . 22Unlink Audio from a Video Clip . 23Adjust Volume Using Effect Controls . 23Text and Shapes . 24Add Text . 24Create Shapes . 25Apply Animations . 26Add Transitions and Effects . 27Apply a Transition . 28Apply an Effect . 29Save a Project . 30Export a Sequence . 30Additional Help . 32
IntroductionAdobe Premiere Pro CC is a powerful timeline-based video editing application. Using Premiere Pro, youcan edit video and audio clips into sequences, apply effects and transitions, export your sequences forsharing with others, and more. Premiere Pro also works hand-in-hand with other Adobe Creative Cloudapps, such as Audition, After Effects, and Photoshop.This booklet is the companion document to the Adobe Premiere Pro: Essential Skills workshop. Thebooklet demonstrates the basic skills needed to create, edit, and export a sequence in Premiere Pro.Learning ObjectivesAfter completing the instructions in this booklet, you will be able to: Navigate the Premiere Pro interface Create a project Import and organize media Compose a sequence Apply edits to video and audio clips Add text and shapes to a sequence Add transitions and effects to a sequence Export a sequence for upload to the webRevised: 5/15/2018Page 5 of 32
Preparing a New ProjectA project in Premiere Pro encompasses all the files you will use to create your final product. Thisincludes many different files, such as video, audio, graphics, music, and special effects. Beforebeginning a new project, it is important to create an organizational system for managing these assets.Maintaining this system streamlines the editing process, allows Premiere Pro to run smoothly, andprevents misplacement of files.It is best practice to keep all your project assets in the same location, whether it be a local hard disk,external hard drive, USB drive, network drive, or cloud storage. Always maintain a backup of your datain a secure location, especially if you are using an external drive, which can be misplaced or sufferphysical damage.Note: Data transfer rates from network drives and cloud storage is dependent upon networkconnectivity and speed. This may affect performance when working with large files.Storing a Project on OneDriveIf you plan to use OneDrive to house your project files, check that you have installed the desktop syncclient. This client will allow you to access files as if they are stored locally on your computer.Note: The OneDrive desktop sync client is not available in computer labs. If you are working in acomputer lab, you may save your project locally and upload it to OneDrive through the o365 webportal at o365.kennesaw.edu.Project File ManagementIt is up to you to decide how to organize your project files. Needs can vary between projects. Below isan example of a basic folder structure:1.2.3.4.5.6.Final Renders – Contains rendered sequences from the projectGraphics – Contains images and stillsProject Files – Houses the .prproj file created when you create a new project in Premiere ProVideo – Contains video clipsSound – Contains sound effects or audio tracks separate from video clipsMusic - Contains music tracksInterface OverviewThe Start ScreenWhen you launch Premiere Pro, the Start screen loads. From here, you can create a new project oropen a previous one. The Start screen is as follows:Page 6 of 32
1.2.3.4.5.Learn – Access Premiere Pro tutorials and guides (See Figure 1).Search – Search for previously opened projects (See Figure 1).Projects – Create a new project or open an existing one (See Figure 1).Recently Opened – Quickly access project files from previous sessions (See Figure 1).Sort and Filter – Sort and filter recently opened projects (See Figure 1).Figure 1 - The Start ScreenCreate a New ProjectThe file you will create in Premiere Pro is called a project. Projects contain all the assets you will use tocreate and edit your videos, such as video clips, audio files, and graphics. The following steps describehow to create a new project:1. From the Premiere Pro Start screen, click New Project.Figure 2 - New ProjectPage 7 of 32
2. The New Project dialogue box launches (See Figure 3).a. Name – Set the name of your project file (See Figure 3).b. Location – Determine where the project file will be stored (See Figure 3).Note: If you followed the suggested folder template above, select the Project Files folder.3. If needed, determine advanced settings, such as timecode, scratch disks, and ingesting. For thepurpose of this guide, we will leave these settings set to default (See Figure 3).4. Click OK to create your project (See Figure 3).Figure 3 - New Project WindowThe WorkspaceThe Premiere Pro interface is made up of panels. Each panel contains a tool or feature, such as theTimeline. Panels can be opened, closed, grouped, and rearranged within Premiere Pro to createworkspaces.There are seven default workspaces: Assembly, Editing, Color, Effects, Audio, Graphics and Libraries.These can be customized to your personal workflow. The workspaces are accessed from theWorkspace Control Bar, located at the top of the Premiere Pro application window.Page 8 of 32
Figure 4 - Workspace Control BarIn this Essential Skills guide, we will work in the Assembly, Editing, and Graphics workspace layouts.Note that some panels, such as the Timeline panel, are shared across workspaces.Import and Organize MediaThe Assembly workspace is optimized for importing, previewing, marking and subclipping media, aswell as assembling rough cuts of sequences.The Assembly workspace is as follows:1. Project Panel Group – Import, access and annotate assets (See Figure 5).2. Source Monitoring Group – Preview and prepare clips before inserting them into a sequence(See Figure 5).3. Timeline – Arrange clips in a sequence that is played from left to right (See Figure 5).Figure 5 - Assembly WorkspacePage 9 of 32
Importing AssetsBefore you can begin editing your clips into a sequence, you must import them into your project. Whenyou import a clip, the clip points to the source file. Trimming and editing the clip does not affect thesource file. It is not recommended you move your source files after they have been imported into theproject, as Premiere Pro will be unable to find them.The following describes how to import assets into your project:1. Navigate to the Assembly workspace. Select the Project Panel from within the Project PanelGroup.Figure 6 - Project PanelNote: If you do not see the Project panel, click the drop-down arrow at the top right corner of thepanel to access all panels within the panel group.2. On the desktop, open the folder containing the assets you wish to import using the FileExplorer (Windows) or Finder (MacOS).3. Click and drag the files or folders you wish to import over Import Media to Start in theProject Panel.Figure 7 - Import MediaPage 10 of 32
4. The assets are imported into the project. You may now access these assets in the ProjectPanel.Figure 8 - Imported ClipsOrganizing AssetsAssets can be organized into bins, which are useful for keeping projects organized. The following stepsdescribe how to create a bin and move assets into it:1. From the Project panel, click the New Bin icon.Figure 9 - New Bin2. Enter the name of your new bin.Figure 10 - Name Bin3. Click and drag to select the asset(s) you would like to move into the bin (See Figure 11).4. Drag the asset(s) over the bin you created. When you release the click, the assets will drop intothe bin (See Figure 11).Figure 11 - Drag AssetsPage 11 of 32
Note: Shift click will allow you to select multiple clips at once.The Source MonitorYou may preview assets in the Source Monitor. The Source Monitor is located within the SourceMonitoring Group. The components of the Source Monitor are as follows:1. Source Monitor Panel – Preview and mark clips before inserting them into a sequence(See Figure 12).2. Clip Preview – Displays the active clip (See Figure 12).3. Playback Tools – These tools allow you to navigate through and review a clip (See Figure 12).Figure 12 - Source Monitor PanelPreviewing ClipsThe following steps describe how to preview clips:1. Navigate to the Project panel and navigate to the assets you wish to preview.Note: You may quickly preview video clips with hover scrubbing. To hover scrub, move your cursorover a clip preview thumbnail, then move the cursor from side to side. Hover scrubbing only applies tovideo clips.Page 12 of 32
2. Double click the clip preview thumbnail.Figure 13 - Clip Preview Thumbnail3. The clip opens in the Source Monitor. Using the playback tools, you can preview and mark yourclip.a. TimeCode – Uniquely identifies each frame using a time stamp. By default, Premiere Prouses the SMPTE code: hours, minutes, seconds, and frames (See Figure 14).b. Playhead – Shows the location of the current frame in the time ruler (See Figure 14).c. Time Ruler – Displays the duration of a clip. Tick marks indicate units of time(See Figure 14).d. Marker – Add comments or notes to a clip (See Figure 14).e. Mark In/Out – Select a portion of the clip (See Figure 14).f. Go to In/Out – Snaps the playhead to the clip’s In/Out point (See Figure 14).g. Step Back/Forward One Frame – Move between frames one at a time (See Figure 14).h. Play/Stop – Starts and stops the clip at the playhead (See Figure 14).i. Insert/Overwrite – Applies an insert or overwrite edit of the clip into the sequence(See Figure 14).j. Export Frame – Saves the frame at the location of the playhead as an image (See Figure 14).k. Button Editor – Customize the button layout (See Figure 14).Figure 14 - Playback ToolsPage 13 of 32
Using the Timeline to Create a SequenceOnce you have imported assets, you can begin arranging them into a sequence. Sequences are builtand refined in the Timeline panel. The Timeline panel can be accessed through most workspaces. In thesteps below, we will access the Timeline panel through the Editing workspace.The Timeline PanelThe Timeline Panel contains many tools. To simplify this panel, we will break the panel down into threegroups: the Timecode Group, the Track Options Group, and the Sequence Group. Each contains toolsand options for creating a sequence.The Timeline Panel1. The Timeline Panel (See Figure 15).a. The Timecode Group (See Figure 15).b. The Track Options Group (See Figure 15).c. The Sequence Group (See Figure 15).Figure 15 - The Timeline PanelThe Timecode Group1.2.3.4.Timecode – Indicates the current position of the playhead within the sequence (See Figure 16).Insert Sequences - Insert a sequence into the current one (See Figure 16).Snap – Eliminates gaps between clips in the Timeline (See Figure 16).Link Selection – When enabled, clicking a linked clip in the Timeline selects all linked tracks(See Figure 16).5. Marker – Add a marker to the Timeline at the playhead (See Figure 16).6. Timeline Display Settings – Adjust visible elements in the Timeline (See Figure 16).Figure 16 – The Timecode GroupPage 14 of 32
The Track Options Group1. Track Locking – When enabled, disables all edits and adjustments to a track (See Error!Reference source not found.).2. Track Number – Signifies the type of track and the track number. Video tracks (V) are locatedabove the Timeline midpoint, and audio tracks (A) are located below the Timeline midpoint(See Error! Reference source not found.).3. Track Visibility – Hide or view a video track (See Error! Reference source not found.).4. Source Indicators –When enabled, insert and overwrite edits are placed in the selected tracks(See Error! Reference source not found.).5. Track Targeting – Paste copied clips onto selected tracks (See Error! Reference source notfound.).6. Sync Lock – When enabled, locks tracks together so movement in the Timeline applies to each(See Error! Reference source not found.).7. Mute – Silences an audio track (See Error! Reference source not found.).8. Solo Track – Mutes all other audio tracks (See Error! Reference source not found.).9. Record – Record audio directly into the Timeline (See Error! Reference source not found.).Figure 17 - Track Options GroupPage 15 of 32
The Sequence Group1. Time Ruler – Shows the portion of the sequence in the current view (See Figure 18).2. Sequence Playhead – Use this playhead to navigate within a sequence (See Figure 18).3. Video Clips – Video clips are arranged back to back on a track to create a sequence(See Figure 18).4. Audio Clips – Audio clips show a waveform preview (See Figure 18).5. Scrollbars – Navigate horizontally and vertically between tracks (See Figure 18).Figure 18 - Sequence GroupThe ToolbarThough not part of the Timeline panel, the Toolbar contains the tools you will use to add andmanipulate content within the Timeline. In the Editing workspace, it is located next to the Timeline.1. Selection Tool – Select clips within the Timeline and perform standard edits (See Figure 19).2. Track Select Forward Tool – Selects a clip and all those following it in the Timeline(See Figure 19).3. Specialty Editing Tools – Apply edits that adjust the In and Out points of multiple clipssimultaneously (See Figure 19).4. Razor Tool – Split a clip into two (See Figure 19).5. Slip and Slide Tools – Adjust the timing of edits (See Figure 19).6. Pen and Shape Tools – Create shapes directly on the Timeline (See Figure 19).7. Hand Tool – Navigate horizontally through the Timeline (See Figure 19).8. Text Tool – Add text to the Timeline (See Figure 19).Figure 19 - The ToolbarPage 16 of 32
Insert and Manipulate Media in the TimelineInsert Clips to Create a SequenceYou can add media to your sequence with Insert and Overwrite edits. Insert edits shift subsequent clipsforward in the Timeline to accommodate the new clip. Overwrite edits replace another clip’s frames ina sequence. The following explains how to make an insert and overwrite edit from the Editingworkspace.Make an Insert Edit1. Open the clip you wish to insert in the Source Monitor.2. In the Timeline, move the playhead where you wish to insert the clip (See Figure 20).3. Click the Track Targeting button of the track you wish to insert the clip into (See Figure 20).Note: By default, track targeting is enabled for tracks V1 and A1.Figure 20 - Select Track and Position Playhead4. In the Source Monitor, click the Insert button.Figure 21 – Insert Button5. The clip is inserted into the Timeline.Figure 22 – Insert EditPage 17 of 32
Make an Overwrite Edit1. Open the clip you wish to insert in the Source Monitor.2. In the Timeline, move the playhead where you wish to overwrite the clip (See Figure 23).3. Locate the track you wish to insert the clip into. Click the Track Targeting button to select thetrack (See Figure 23).Note: By default, track targeting is enabled for tracks V1 and A1.Figure 23 - Select Track and Position Playhead4. In the Source Monitor, click the Overwrite button.Figure 24 - Overwrite Button5. The clip is inserted into the Timeline.Figure 25 - Overwrite EditCopy and Paste Media Using Track TargetingMedia can easily be copied and pasted onto a different track using track targeting. The followingexplains how to copy and paste a clip with audio onto a new track:Page 18 of 32
1. In the Timeline, click the track target button for the track media will be moved to.Note: If the clip has audio and video, enable track targeting for a video and audio track.Figure 26- Enable Track Targeting2. Position the playhead where you wish to insert the copied media.3. Using the selection tool, select the clip and press CTRL C (PC) or CMD C (Mac) to copy it.4. Press CTRL V (PC) or CMD V (Mac) to paste the clip onto the new track.Delete Media from a SequenceThere are two methods to remove media from a sequence. Deleting media removes the media fromthe Timeline, but leaves a gap the size the media previously occupied. A ripple delete removes mediaand gaps from the Timeline, reducing the length of the sequence.How to Delete Media from a SequenceThe following steps apply to any content in the Timeline, including clips, audio, titles and graphics.1. In the toolbar, click the selection tool.2. In the Timeline, click the media you wish to delete.Figure 27 - Select Media3. Press the delete key on your keyboard. Alternatively, you can right click the clip and select Clearfrom the drop-down menu that appears.4. The media is deleted and replaced with a gap.Figure 28 - Deleted MediaPage 19 of 32
How to Apply a Ripple Delete to a Sequence1. In the toolbar, click the selection tool.2. In the Timeline, right click the media or gap you wish to apply the ripple delete to. Click RippleDelete.Figure 29 - Ripple Delete3. The media or gap is deleted, and the length of the sequence is shortened.Editing a SequenceTrim and Edit ClipsTrimming is the process of adjusting a clip’s In and Out points once it has been placed in the Timeline.To trim a clip, you must first select an edit point within the Timeline. An edit point is the intersectionbetween a clip and the following element in a sequence.There are many edit tools available within Premiere Pro. In this guide, we will focus on two: theRegular Edit tool and the Ripple Edit tool. With the Regular Edit tool, you can adjust the In or Out pointof a single clip. Ripple edits can shorten or extend a clip, which in turn affects the overall length of thesequence.Note: Edits are constrained by the overall duration of the source clip.Make a Regular Edit1. From the Editing workspace, navigate to the Toolbar.2. Click the selection tool.Figure 30 - Selection ToolPage 20 of 32
3. Hover the cursor at the edit point, located at either end of the clip you wish to trim. TheRegular Edit cursor appears.Figure 31- Regular Edit Cursor4. Click and drag the cursor to the new edit point.5. Release the mouse. The clip is trimmed to the new edit point.Figure 32 - Trimmed ClipMake a Ripple Edit1. From the Editing workspace, navigate to the Toolbar.2. Click the Ripple Edit Tool.Figure 33 - Ripple Edit Tool3. Hover the cursor at the edit point, located at the intersection between the clip you wish to trimand the adjacent clip. The Ripple Edit tool cursor appears.Figure 34 - Ripple Edit Tool Cursor4. Click and drag the cursor to the new edit point.5. Release the mouse. The new edit point is created. Note that your sequence is shortened orextended by the number of frames you adjusted.Page 21 of 32
Split a ClipThe Razor Tool is used to create a new edit point within a clip, splitting it into two. The followingexplains how to split a clip using this tool:1. From the Editing workspace, navigate to the Toolbar.2. Click the Razor Tool.Figure 35 - Razor Tool3. Hover the cursor over the location on the clip where you wish to insert the new edit point.4. Click to create the new edit point.5. The clip is split into two.Figure 36 - New Edit PointConfigure Audio In a SequenceYou can insert audio into your sequence and apply edits to it just as you would a video clip. Thefollowing describes how to adjust unique audio settings in the Timeline and the Effect Controls panel.Track LinkingIf a video clip has audio, when it is imported the video and audio tracks are linked. When a video andaudio track are linked, when one track is clicked, both are selected. The steps below describe how tomanually link and unlink an audio clip to a video clip.Link Audio to a Video Clip1. With the Selection Tool selected, navigate to the Timeline. Press shift and click to select thevideo and audio track.Page 22 of 32
2. Right click one of the tracks and select Link.Figure 37 - Link Tracks3. The tracks are linked.Unlink Audio from a Video Clip1. In the Timeline, select the linked video or audio track.2. Right click one of the tracks and select Unlink.3. The tracks are unlinked and may be selected separately.Adjust Volume Using Effect ControlsThe Effect Controls panel allows you to adjust an audio track’s volume.Note: The following steps demonstrate accessing audio Effect Controls from the Editing workspace.1. Using the selection tool, select the desired audio track.2. Navigate to the Effect Controls panel (See Figure 38).3. Increase the volume of the clip by adjusting the Level (See Figure 38).Figure 38 - Audio EffectsPage 23 of 32
Text and ShapesYou can quickly add text and shapes to your sequences in Premiere Pro.Add TextThe following explains how to add text to a sequence:1. From the Graphics workspace, navigate to the toolbar.2. Select the text tool, or hold-click the text tool to select the Vertical Text Tool.Figure 39 - Text Tool3. Click the location on the Program Monitor where you want to add text. A single click creates atext point, whereas clicking and dragging creates a text box.4. Begin typing to add your text.Figure 40 - Text Box5. You may use the selection tool to reposition your text or resize the text box.6. To change the appearance of your text, use the Edit tab within the Essential Graphics panel.Figure 41 - Edit TabPage 24 of 32
7. To continue editing your text, select the text tool and click the text box.Create ShapesThe following explains how to add shapes to a sequence:1. From the Graphics workspace, navigate to the toolbar.2. Hold-click the Pen Tool to access the following options (See Figure 42):a. Rectangle Tool – Click and drag to create a square or rectangle (See Figure 42).b. Ellipse Tool – Click and drag to create a circle or ellipse (See Figure 42).Figure 42 - Pen Tool Options3. Click the location on the Program Monitor where you want to add your shape. In this example,we are using the rectangle tool. Click and drag to create your shape.4. You may use the selection tool to reposition, rotate and resize your shape.Figure 43 - Shape Behind Text5. To change the appearance of your shape, use the Edit tab within the Essential Graphics panel.Figure 44 - Edit ShapePage 25 of 32
Apply AnimationsYou can apply animations to text and shapes such as rotation, scale, positioning, and opacity in theEffect Controls panel.Text and shapes are animated using keyframes, which mark a specific parameter at a point in
Adobe Premiere Pro CC is a powerful timeline-based video editing application. Using Premiere Pro, you . After Effects, and Photoshop. This booklet is the companion document to the Adobe Premiere Pro: Essential Skills workshop. The booklet demonstrates the basic skills neede
