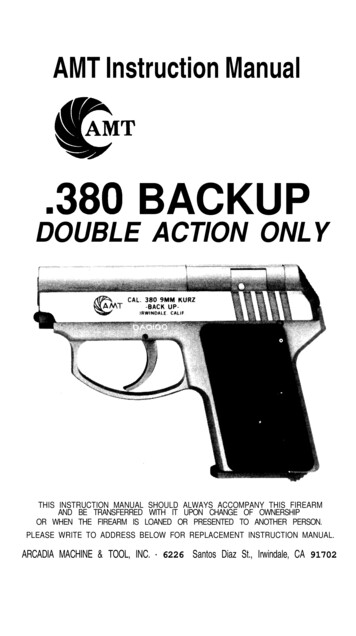
Transcription
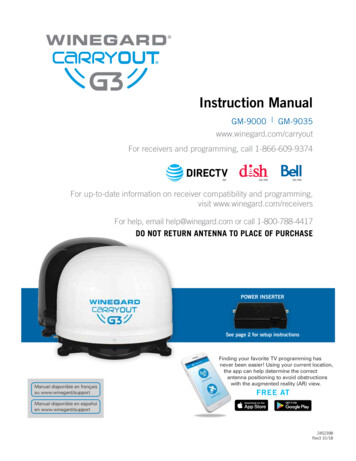
Instruction ManualGM-9000 GM-9035www.winegard.com/carryoutFor receivers and programming, call 1-866-609-9374SDSD/HDSD/HDFor up-to-date information on receiver compatibility and programming,visit www.winegard.com/receiversFor help, email help@winegard.com or call 1-800-788-4417DO NOT RETURN ANTENNA TO PLACE OF PURCHASEPOWER INSERTERSee page 2 for setup instructionsManuel disponible en françaisau www.winegard/supportFinding your favorite TV programming hasnever been easier! Using your current location,the app can help determine the correctantenna positioning to avoid obstructionswith the augmented reality (AR) view.FREE ATManual disponible en españolen www.winegard/support2452398Rev3 10 /18
SpecificationsCompatible with DIRECTV ,DISH , & Bell TV programming.Supports up to two receivers.For stationary use only.Includes 25’ coaxial cable,3’ coaxial cable,and power inserter110/120 vac power adapterUnit weight: 7.24 lbsUnit height (no feet): 13"Diameter: 16"GoodSignal StrengthDIRECTV Sat. 101 DomeBaseHandleElevation range: 18–65 Azimuth: 0–416 UV-protected plastic domeNOTE (-13 to 158 F)Operating temperature specifications: -25 to 70 CDIRECTV Sat. 119 WARNINGS! Do not place the unit in water, or areas where water maypool, as pooling water could damage the electronics.! Do not install or operate the antenna in winds of 35 mphor greater. The antenna will roll in winds 35 mph.! Care should be taken when transporting and setting upthe antenna. Do not toss or drop the antenna.! Do not paint the antenna. Painting the antenna maycause signal degradation and will void your warranty.DISH Sat. 110 ! Not for permanent installation on semi-trucks.Compatible ReceiversReceiver models change frequently. For an up-to-date list of compatiblereceivers, visit www.winegard.com/receivers.DIRECTV Receiver CompatibilityThe Carryout G3 antenna is not compatible with DIRECTV SWM-onlyreceivers (e.g. H25 or HR34). If you have a SWM-only technologyreceiver, Winegard Model SWM-840 kit is available. This SWM kitwill allow for proper SWM technology operation with Winegard mobilesatellite TV antennas. When using the SWM-840 kit, you will only beable to receive SD broadcasts off Satellite 101.DISH Sat. 119 DISH Receiver CompatibilityOperation may require an HD receiver. The antenna is not compatiblewith DISH Hopper or Joey receivers. Dual tuner receivers will requiretwo coax connections from the antenna. In order to simultaneously watch orrecord two different programs, each program must be broadcast from thesame satellite.Compatible SatellitesDIRECTV: 101 or 119 (will not receive HD on 110 or anyKA-band HD on 99 and 103 )DISH (Western Arc): 110 , 119 , 129 Bell TV: 91 or 82 Refer to maps* to determine coverage in areas of the U.S.*Source: www.satbeams.com. Coverage maps are approximate and do not guarantee coverage.1Carryout G3 Portable TV AntennaDISH Sat. 129 Best
Switch SettingsThe Carryout G3 antenna switch settings are located on the WinegardPower Inserter and are preset for DIRECTV programming.To set the antenna for DISH or Bell, locate the switcheson the Power Inserter and set according to the diagram at the right.Installing the Handle1) Locate the handle in the box. With “WINEGARD” on the handle facingupwards, align the handle in the base.2) Thread the two provided screws from hardware bag through the two alignedholes in the bottom of the handle.Power Inserter Switches3) Tighten the two screws using a Phillips screwdriver. Do not overtighten.Switch Settings — UpChoosing a Locationor DownDIRECTV1) Choose a location with a clear, unobstructed view of the southern sky. Avoidobstructions such as trees, hills, vehicles, or buildings—these can block thesignal from the satellite. See NOTE.1231231232) Make sure the antenna is not placed in the path of people or vehicles;otherwise, the antenna may be knocked off of the signal if run into, or cablesmay be disconnected from the unit.45678678678(preset)DISH3) Select a location that will enable the Carryout G3 antenna to sit within threedegrees of level. The antenna may take longer to lock onto signal if theantenna is not level.45Bell TV45Wiring the Antenna1) Ensure the power button on the Winegard Power Inserter is in the OFFposition (not pressed in). See NOTE.signal will not pass throughNOTE Satellitesolid objects. For this reason, it is vital to2) Connect the included 25’ coaxial cable between the primary port of theCarryout G3 and the ANTENNA port on the Power Inserter. Tighten coaxconnections until finger tight, and tighten a quarter turn more with a wrench.Do not overtighten.select a location with a clear, unobstructed viewof the southern sky.3) Connect the included 3’ coaxial cable between the “SAT IN” port of yoursatellite receiver and the RECEIVER port of the Winegard Power Inserter.Tighten coax connections until finger tight, and tighten a quarter turn morewith a wrench. Do not overtighten.25’ coaxial cable is included with theNOTE Aantenna.To ensure proper operation, useonly the included cable. Any alternate cables usedshould have a solid copper core and not exceeda total of 50’ between the antenna and powerinserter. Failure to follow this guideline couldhinder proper operation.4) Plug power adapter into 110/120 VAC outlet and connect to power port onPower Inserter (located next to RECEIVER coax port).5) Once system is fully connected, press the power button on the Power Inserter.6) Give the Carryout G3 antenna approximately 3-5 minutes to complete thesearch sequence. Once the Carryout G3 antenna has gone completely quiet,proceed to configure receiver for desired operation. For DIRECTV, see page 3.For DISH, page 4.Verify operation by running the coax cable directlybetween the power inserter and the antenna forthe initial setup.Hook up a second receiver and watchdifferent channels on two TVs!Wiring the 4V PowerSupplyCoaxReceiver required,sold separatelyCoaxPower InserterCarryout G3 Portable TV Antenna2
Connect the receiver to a power source, and complete receiversetup. Receiver setup for the primary receiver follows; if your receiverdiffers from the options shown, you may need to consult your receivermanual. The wording and display used in your receiver may differslightly.Figure 1Receiver SetupFor more information on receiver compatibility and programming,visit www.winegard.com/receivers.Figure 2Check out online receiver setup guides for your antenna er Setup2) Select “Satellite”. Figure 2.Figure 31) With power to the Carryout G3 off, press the Menu button on yourremote. Select “Settings”. Figure 1.4) Select “3-LNB” (18”x 20”) or “3 Satellites”. If given the optionof SWM or Multiswitch, select “Multiswitch”. Figure 4.5) Power on the antenna, and allow the antenna 3– 4 minutes toacquire satellites. Once the antenna has finished acquiring asignal, the antenna will be silent. Do not proceed to the next stepuntil this has happened.Figure 43) In your receiver menu, you will need to identify the Satellitemenu. Once there, find the option for Satellite Setup. Figure 3.7) Errors may be displayed on the screen. It is normal to see one ortwo boxes with an X instead of a . Select “Continue”. Figure 5.8) Select “Continue” again. The program guide will download.Figure 56) After the antenna has acquired signal, press “Continue”; thereceiver will automatically verify the setup.9) When the status bar reaches 100%, press “Continue”. Figure 6.11) When prompted to set up the remote, select “Setup RemoteLater” to do this at a later time.12) Select “Watch DIRECTV”. Receiver setup is now complete.3Carryout G3 Portable TV AntennaFigure 610) The receiver will run Data Feed and Guide Feed Tests for a fewmoments.
Figure 2Receiver SetupIf using a receiver that is currently active or has been usedpreviously, you will need to complete the setup by doing a CheckSwitch test. To access the receiver menu for running a Check Switchtest, follow the steps below.If you need to access the receiver menu after initial setup, followthe steps below to reach the receiver menu.Figure 3If using two DISH receivers with the Carryout G3 antenna, bothreceivers must be configured off of the primary port by following thesteps below.1) Press Home button twice on your remote. On the “Home” tab,select “Settings”. Figure 1.3) Within the “Diagnostics” menu, select “DISH” on the left side.Figure 3.Figure 42) Within the “Settings” menu, select “Diagnostics”. Figure 2.4) Press “Test Installation 5” to start the Check Switch test.Figure 4.6) When completed, the switch will show SW64. Figure 6.7) The receiver will acquire the signal. Figure 7.Figure 55) The “Check Switch Status” screen will show the progress.Figure 5.Figure 68) Lastly, the receiver will download the Program Guide. Figure 8.The instructions shown are for the DISH Wally . If using anyNOTE otherDISH receiver, instructions are available online at Figure 8Figure 7Figure t G3 Portable TV Antenna4
TroubleshootingIssuePossible CauseSolutionVin indicator unlit on powerinserter No DC power into power inserter Ensure supplied power adapter is plugged into outlet andthat outlet is providing AC power Ensure power adapter is connected to power inserterReceiver indicator unlit on powerinserter No communication betweenreceiver and power inserter Ensure 3’ coaxial cable between receiver and powerinserter’s RECEIVER port is properly connected For DIRECTV users, ensure receiver is compatible andconfigured correctly. See page 3 for configuration instructions If cable is connected and receiver is properly configured, trydifferent piece of RG6 coaxial cableReceiver indicator faintly lit orflickering on power inserter Intermittent communication Replace 3’ coaxial cable piece with a different piece RG6between receiver and power insertercoaxial cableAntenna indicator unlit on powerinserter No communication between powerinserter and Carryout G3 antenna Ensure included 25’ coaxial cable is being used and isproperly connected between power inserter’s ANTENNA portand Carryout G3 PRIMARY port Ensure power button on power inserter pushed in ON position Replace 25’ coaxial cable with different RG6 coaxial cable Connect the coax directly and do not use any interior/exteriorpre-wires.Antenna indicator faintly lit orflickering on power inserter Intermittent communicationbetween power inserter andCarryout G3 Ensure included 25’ cable is being used and is properlyconnected between power inserter ANTENNA port andCarryout G3 PRIMARY port Replace 25’ coaxial cable with a different RG6 coaxial cable Connect the coax directly and do not use any interior/exteriorpre-wires.The antenna continuouslysearches and eventually stopswithout ever acquiring anysatellites. Possible obstructions are blockingsignal from the satellite Check to see if the southern sky is clear. Trees, buildings,large signs, or an overpass can block the signal Rain, snow, or excessive dew on the dome can interrupt thesignal. Brush any snow or dew off of the dome. If heavy rainor snowfall is blocking the signal, it may be necessary to waituntil the weather clears.The antenna appears to lock ontosignal, but my receiver does notshow a picture or signal reading Receiver improperly configured forthe Carryout G3 antenna Verify the switch settings are set correctly for the desiredprovider. See switch settings on page 2 Reconfigure the receiver according to steps on page 3 or 4I have switched satellite serviceproviders, and the antenna is nolonger working properly Switches are not set for the correctprovider Set the switches to the correct programming provider. Seeswitch settings on page 2If a problem persists, contact Winegard Technical Services at help@winegard.com or 1-800-788-4417.5Carryout G3 Portable TV Antenna
Using Outside ReceptacleTransporting & MaintenanceIf your outside TV receptacle is wired for satellite, you’ll needto locate where that receptacle leads and connect that directlyto your satellite receiver.Before transporting the antenna, disconnect all coaxial cablingfrom antenna and power inserter. Unplug power adapter fromoutlet.If the outside TV receptacle is wired for cable, the wiring willhave to be modified for use with satellite. The coaxial cablecannot run through any other devices or switches before thesatellite receiver.The Carryout G3 antenna is designed to be maintenance free.However, it is a good idea to periodically clean the dome with asoft cloth, water, and dish soap.Typically, if wired for cable, the wiring will either run througha Winegard power supply or video switch. The easiest wayto fix this is to disconnect the cable from that device, use abarrel connector, and connect a new cable that runs directlyto the receiver, bypassing the power supply or video switch.Optional AccessoriesRK-4000 Roof Mount KitPermanently mount the CarryoutG3 antenna to your RV roof. Noneed to buy another antenna toreplace your portable.Not for permanent installationon semi-trucks.TR-1518 Tripod MountThe tripod mount has adjustableheight and leveling settings of14.5”– 22” and quickly disassemblesfor compact storage.For more information or to purchase accessoriescontact your local RV dealer or winegard.comFCC GuidelinesChanges or modifications not expressly approvedby Winegard could void your authority to operatethe equipment.NOTE comply with the limits for a Class B digital device,This equipment has been tested and found topursuant to part 15 of the FCC Rules. These limits are designedto provide reasonable protection against harmful interference ina residential installation. This equipment generates, uses andcan radiate radio frequency energy and, if not installed andused in accordance with the instructions, may cause harmfulinterference to radio communications.Carryout G3 Portable TV Antenna6
WINEGARD MOBILE PRODUCTS LIMITED WARRANTY(2 YEARS PARTS; 1 YEAR LABOR)Winegard Company warrants this product against defects in materials or workmanship for a period of two (2) years from thedate of original purchase. During year one (1) of such warranty, Winegard Company will also pay authorized labor costs toan authorized Winegard dealer to repair or replace defective products. No warranty claim will be honored unless at the timethe claim is made, Customer presents proof of purchase to an authorized Winegard dealer (to locate the nearest authorizedWinegard dealer, contact Winegard Company, 3000 Kirkwood Street, Burlington, Iowa 52601, Telephone 800-288-8094 or visitwww.winegard.com). Customer must provide proof of purchase with a dated sales receipt for the Winegard product to verifythe product is under warranty. If the date of purchase cannot be verified, the warranty period shall be considered to begin thirty(30) days after the date of manufacture.If a defect in material or workmanship is discovered, Customer may take the product to an authorized Winegard dealer forservice. Customer must provide proof of purchase to verify the product is under warranty. If the product is brought to anauthorized Winegard dealer for service prior to expiration of year one (1) of the warranty period and a defect in material orworkmanship is verified by Winegard Technical Services, Winegard Company will cover the Winegard dealer’s labor charges forwarranty service. The Winegard dealer must contact Winegard Technical Services in advance for pre-approval of the service.Approval of the service is at the sole discretion of Winegard Company.Alternatively, Customer may ship the product prepaid to Winegard Technical Services (located at 2736 Mt. Pleasant Street,Burlington, Iowa 52601, Telephone 800-788-4417). Customer must return the product along with a brief description of theproblem and provide Winegard Technical Services with Customer’s name, address, and phone number. Customer mustalso provide proof of purchase to verify the product is under warranty. If the product is returned before the expiration of thewarranty period, Winegard Company will (at its option) either repair or replace the product.This Limited Warranty does not apply if the product has been damaged, deteriorates, malfunctions or fails from: improperinstallation, misuse, abuse, neglect, accident, tampering, modification of the product as originally manufactured by Winegard inany manner whatsoever, removing or defacing any serial number, usage not in accordance with product instructions or acts ofnature such as damage caused by wind, lightning, ice or corrosive environments such as salt spray and acid rain. This LimitedWarranty also does not apply if the product becomes unable to perform its' intended function in any way as a result of thetelevision signal provider making any changes in technology or service.RETURN AUTHORIZATION POLICYA Return Material Authorization (RMA) is required prior to returning any product to Winegard Company or Winegard WarrantyServices under this warranty policy. Please call our Technical Services Department at 800-788-4417 or send an email towarranty@winegard.com to obtain the RMA number. Please furnish the date of purchase when requesting an RMA number.Enclose the product in a prepaid package and write the RMA number in large, clear letters on the outside of the package. Toavoid confusion or misunderstanding, a shipment(s) without an RMA number(s) or an unauthorized return(s) will be refused andreturned to Customer freight collect.WINEGARD COMPANY DOES NOT ASSUME ANY LIABILITIES FOR ANY OTHER WARRANTIES, EXPRESS OR IMPLIED, MADEBY ANY OTHER PERSON.ALL OTHER WARRANTIES WHETHER EXPRESS, IMPLIED OR STATUTORY INCLUDING WARRANTIES OF FITNESS FOR APARTICULAR PURPOSE AND MERCHANTABILITY ARE LIMITED TO THE TWO YEAR PERIOD OF THIS WARRANTY.In states that do not allow limitations on implied warranties, or the exclusion of limitation of incidental or consequentialdamages, the above limitations or exclusions do not apply.Some states do not allow limitations on how long an implied warranty lasts, or the exclusion of limitation of incidental orconsequential damages, so the above limitations or exclusions may not apply to you.This warranty gives Customer specific legal rights. Customer may also have other rights that may vary from state to state.SATELLITE RECEIVER WARRANTYSee manufacturer’s limited warranty policy.WS-MOBWARREV3Winegard and Carryout are registered trademarks of Winegard Company. DISH is a registered trademark of DISH Network L.L.C. DIRECTV is a registered trademark ofAT&T Intellectual Property and/or AT&T affiliated companies. Bell TV is a registered trademark of Bell Canada, Inc. Apple and the Apple logo are trademarks of AppleInc., registered in the U.S. and other countries. App Store is a service mark of Apple Inc., registered in the U.S. and other countries. Google Play and the Google Playlogo are trademarks of Google LLC.Disclaimer: Although every effort has been made to ensure that the information in this manual is correct and complete, no company shall be held liable for anyerrors or omissions in this manual. Information provided in this manual was accurate at time of printing. If the antenna does not function as expected, pleasecontact Winegard Company at help@winegard.com or 1-800-788-4417, or visit our website at www.winegard.com.Winegard Company 3000 Kirkwood Street Burlington, IA 52601 1-800-288-8094 Fax 319-754-0787 www.winegard.comPrinted in U.S.A. 2018 Winegard CompanyRev3 10/18 2452398
Issue Possible Cause Solution Vin indicator unlit on power inserter No DC power into power inserter Ensure supplied power adapter is plugged into outlet and that outlet is providing AC power Ensure power adapter is connected to power inserter Receiver indicator unlit on power inserter No communication between