Transcription
User ManualpDoc Annotator DuoVersion 1.5April 3, 2020Copyright 2020 Topaz Systems Inc. All rights reserved.For Topaz Systems, Inc. trademarks and patents, visit www.topazsystems.com/legal.
pDoc Annotator Duo User Manual2www.topazsystems.com
pDoc Annotator Duo User ManualTable of Contents1.0 – The pDoc Annotator Duo Software System Overview . 51.1 – System Description . 51.2 – System Components . 51.3 – System Operation . 62.0 – Installing/Uninstalling pDoc Annotator Duo Software . 82.1 – Before You Begin . 82.2 – Installing the Topaz GemView Tablet Display . 82.3 – Installing pDoc Annotator Duo Software . 82.4 – Uninstalling pDoc Annotator Duo Software . 93.0 – pDoc Annotator Duo Administrator . 103.1 – Specifying System Options. 103.1.1 – Specifying Document Options . 103.2 – File Naming Options . 113.3 – Operator Options . 133.4 – Specifying Signer Options . 153.4.1 – Pencil Options . 153.4.2 – Scroll Bar Width Options . 163.4.3 – Signing Session Timeout . 163.4.4 – Confirmation Message Options . 173.5 – Idle Display . 173.5.1 – Specifying the Idle Screen Display . 183.6 – About . 203www.topazsystems.com
pDoc Annotator Duo User ManualTable of Contents4.0 – pDoc Annotator Duo Manual Originator . 214.1 – Select Document for Signing . 224.2 – Enter Information for File Naming . 224.3 – Push PDF Documents . 234.4 – Receiving the Signed PDF Document from the Tablet Display . 234.5 – Documents Being Signed . 234.5.1 – Documents in process of being signed . 234.5.2 – Signed PDF Documents . 244.5.3 – Unsigned PDF Documents . 244.5.4 – Documents with other statuses. 244.6 – Terminate Signing Session. 244.7 – Removing the Entries in the “Documents Being Signed” List . 255.0 – pDoc Annotator Duo Automatic Originator . 265.1 – Signing Session Completion by the Signer. 275.2 – Signing Session Completion by the Operator . 285.3 – Enter Information for File Naming . 295.4 – Terminating pDoc Annotator Duo Automatic Originator . 296.0 – pDoc Annotator Duo TD . 306.1 – Basic Operations . 316.1.1 – Opening PDF Documents. 316.1.2 – Navigating and Viewing PDF Documents . 326.1.3 – Closing and Saving PDF Documents. 336.2 – Pencil Annotations . 346.2.1 – Adding Pencil Annotations. 346.2.2 – Clearing Pencil Annotations . 347.0 – pDoc Annotator Duo Idle Screen. 357.1 – Idle Screen Display . 354www.topazsystems.com
pDoc Annotator Duo User Manual1.0 – The pDoc Annotator Duo Software System Overview1.1 – System DescriptionThe pDoc Annotator Duo Software System provides a solution for environments where asystem operator pushes a document from their PC to a connected Topaz GemView TabletDisplay for annotating typically by another person. The pushed document can be a form,contract, or other document for a user to annotate using the GemView Tablet Display pen.When the user has finished and taps the Done button icon, the signing session on the TabletDisplay is completed and the annotated document is stored and available to the operator. ThepDoc Annotator Duo software then stamps the document by certifying it with a digital signatureand stores the document. Then the Tablet Display goes back to sleep, playing a video ordisplaying a sequence of images, until it receives another document for annotating.1.2 – System ComponentsThe pDoc Annotator Duo Software System comprises: A Windows PC with one or two attached Topaz GemView Tablet Displays (such as theTopaz GemView 7, GemView 10, or GemView 16) for displaying a document to beannotated The pDoc Annotator Duo Administrator Application The pDoc Annotator Duo Manual Originator Application The pDoc Annotator Duo Automatic Originator Application The pDoc Annotator Duo TD Application that is used to annotate the document on theGemView Tablet Display The pDoc Annotator Duo Idle Screen that runs on the Tablet Display when it is idle The pDoc Signer application that runs on the PC and displays the pushed and receivedPDF documents for originator review5www.topazsystems.com
pDoc Annotator Duo User Manual1.3 – System OperationA typical transaction using the pDoc Annotator Duo Software System consists of the followingsteps:1. Pushing a Blank Document Form from the PC to the GemView Tablet DisplayThere are two ways a document can be pushed to the GemView Tablet Display:a. Automatically:The pDoc Annotator Duo Automatic Originator is a program that runs inbackground monitoring a user specified folder, waiting for a PDF document tobe stored in it.i. When a document is stored in the folder, the Automatic Originatorpushes the document to the GemView and displays it.ii. A copy of the document on the Tablet Display is optionally displayed ina read-only instance of pDoc Signer on the PC for system operatorreviewiii. The Automatic Originator displays a window to the system operatorrequesting information to be used in naming the document after it issigned.b. Manually:i. Using the pDoc Annotator Duo Manual Originator software, the systemoperator selects a document for the customer to annotate.ii. The system operator clicks the “Push Document to GemView Display”button, which displays the selected document on the Tablet Displayconnected to the PC.iii. A copy of the document on the Tablet Display is optionally displayed ina read-only instance of pDoc Signer on the PC for system operatorreview.iv. The Manual Administrator window displays fields to the systemoperator requesting information to be used in naming the documentafter it is signed.2. Annotating the Document on the Tablet Displaya. The customer uses the pDoc Annotator Duo TD Software to annotate thedocument on the Tablet Displayb. The customer taps on the “DONE” button, which completes the signingsession.3. Saving the Signed Document on the PC6www.topazsystems.com
pDoc Annotator Duo User Manuala. The pDoc Annotator Duo Manual/Automatic Originator Software receives theannotated document from the Tablet Display, saves it automatically in aspecified folder, and indicates on the GUI that the completed document hasbeen received and savedb. The system operator uses the pDoc Annotator Duo Manual/AutomaticOriginator Software to confirm completion of the transaction. Before savingthe document, it is stamped by adding a certifying digital signature to thedocument.c. The received annotated document is optionally displayed in a read-onlyinstance of pDoc Signer for the system operator review.7www.topazsystems.com
pDoc Annotator Duo User Manual2.0 – Installing/Uninstalling pDoc Annotator Duo Software2.1 – Before You Begin pDoc Annotator Duo Software runs on Windows 7, 8, 8.1, and 10 (both tablets anddesktop PCs). Your PC should have a minimum of 75 MB free space on the hard drive in addition tothe free space requirements for Windows. Before installing a new version of pDoc Annotator Duo Software, uninstall any olderversions of pDoc Annotator Duo on your PC.2.2 – Installing the Topaz GemView Tablet DisplayThe device used for signature capture in pDoc Annotator Duo is the Topaz GemView TabletDisplay. The pDoc Annotator Duo TD software uses the GemView Tablet Display softwaredrivers that provide communication between the PC and Tablet Display, so the drivers must beinstalled on the PC before you can capture signatures from the Tablet Display. If you have aTablet Display device, its drivers need to be installed according to the instructions in the TabletDisplay User Manual before installing the pDoc Annotator Duo software.In many esigning applications, it is necessary for both the originator and the signer to view thedocument being signed on separate displays and see the updates the other person is makingto the document as they do it in real time. If you plan to use two Topaz GemView TabletDisplays configured in such a cloned configuration, see the separate document entitledGemView Tablet Displays Clone Operation.2.3 – Installing pDoc Annotator Duo SoftwareInstalling pDoc Annotator Duo software is accomplished by running the pDoc Annotator Duoinstallation file provided. During the installation you will be provided with an option to agree ordisagree to the license agreement, prompted to enter user information, and optionally set aspecial folder for installation. The sequence of screens displayed guide the user through theinstallation process. The pDoc Annotator Duo software installs shortcuts to the pDocAnnotator Duo Manual Originator, the pDoc Annotator Duo Automatic Originator, and the pDocDuo Idle Screen on the desktop.8www.topazsystems.com
pDoc Annotator Duo User Manual2.4 – Uninstalling pDoc Annotator Duo SoftwareTo uninstall pDoc Annotator Duo from your PC:1. Go to Control Panel Programs and Features2. Select pDoc Annotator Duo3. Click on the “Remove” button, and follow the instructions to uninstall the software.Uninstalling pDoc Annotator Duo Software does not affect documents that have already beenannotated; pencil annotations that have been placed into documents are not removed duringuninstallation.Note: Deleting the pDoc Annotator Duo installation folder directly will not uninstall the softwarecompletely.9www.topazsystems.com
pDoc Annotator Duo User Manual3.0 – pDoc Annotator Duo AdministratorThe pDoc Annotator Duo Administrator allows a system administrator to setup a system,define default values, and update them as required. The system administrator can configurethe idle screen of the attached Tablet Display and setup the defaults for the annotatingapplication on the Tablet Display. Typically, the Administrator is used to do initial systemsetup, and then is used only occasionally after that. All the other system components (seeSection 1.2) should be closed before updating system parameters in the Administrator.3.1 – Specifying System Options3.1.1 – Specifying Document OptionsThe signed or unsigned PDF documents transferred to the PC from the Tablet Display arestored in a specified storage path. This storage path can be changed by clicking on the“Browse” button and selecting the desired location. The default folder for selecting PDFdocuments in the Manual Originator to push from the PC to the Tablet Display can be specifiedhere. The path can be changed by clicking on the “Browse” button and selecting the desiredlocation. When the Originator clicks the “Browse” button in the Originator application to browsefor a PDF, the operator, by default, is prompted to select a PDF from the folder specified here.The folder for monitoring PDF documents for the Automatic Originator can be specified heretoo. The path can be changed by clicking on the “Browse” button and selecting the desiredlocation. The default PDF document to be used in Manual Originator can be configured here.The default PDF document can be changed by clicking on the “Browse” button and selectingthe desired PDF document. Select “Display full path of the document in the Manual Originator”to display the full path of the PDF document that is transferred from the PC to the TabletDisplay in the Manual Originator application. By default, only the document name is displayed.When the administrator selects “Automatic monitoring”, the PDF document will be picked upfrom the monitoring folder automatically, after a PDF document has been copied into themonitoring folder.When the administrator selects “Polling”, the Automatic Originator will poll the specified folderat the given time interval, if it finds a PDF document, it will pick it up and display it on theGemView. The default time interval for polling the folder is 3 seconds. The minimum andmaximum time interval allowed to poll the folder is 1 to 10 seconds.10www.topazsystems.com
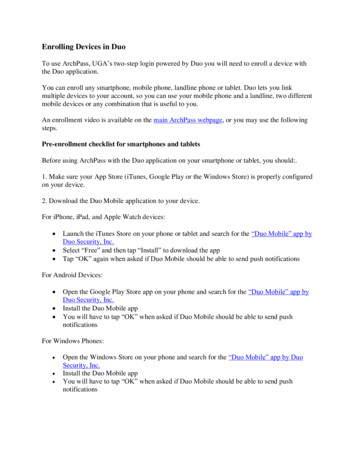
pDoc Annotator Duo User Manual3.2 – File Naming OptionsThe File Naming tab of the pDoc Annotator Duo Administrator allows the administrator tospecify the file naming convention for the signed documents when they are received from theGemView Tablet Display. The files can be named with the information provided by theoriginator during the signing session, the administrator can specify a standard name to beused for each client, or the original document name can be used. The administrator can eitherselect “Operator enters information for each client”, select the option “Use standard name foreach client”, or select the option “Use original document name”.11www.topazsystems.com
pDoc Annotator Duo User ManualWhen the administrator selects “Operator enters information for each client”, they can specifythe names for the fields of information to be collected during the signing session, e.g., “FirstName”, “Last Name”, and “Room Number”. When the administrator selects “Use standardname for each client”, they can specify the document name to be used in each file name, e.g.,“Guest Agreement”. For both the above options, the date and time of the completion of thesigning session is appended to the document name when saving the document in the storagefolder. After selecting one of the options for file naming, if the information required is notprovided, the original file name appended with the date and time will be used while saving thedocument in the storage folder.When the administrator selects “Use original document name”, the signed document is savedwith the original file name in the storage folder. If the document with the same name alreadyexists, then that existing document will be overwritten with the signed document in the storagefolder.12www.topazsystems.com
pDoc Annotator Duo User Manual3.3 – Operator OptionsThe first section of the Operator options screen provides options for the operator to vieworiginal and final versions of the PDF document pushed to the Tablet Display. Select “Displaypushed PDF in read-only pDoc Signer” to display the PDF document pushed to the TabletDisplay in a read-only instance of pDoc Signer for review by the system operator.Select “Display received PDF in read-only pDoc Signer” to display the PDF document receivedfrom the Tablet Display after the signer taps on the “DONE” button in a read-only instance ofpDoc Signer for review by the system operator.Another way for the originator to see the document pushed to the signer’s GemView TabletDisplay is to configure the system with cloned GemView Tablets. This configuration enablesboth the originator and the signer to see the changes the other person makes to the documentin real time as it is happening. To set up this cloned configuration, see the separate documententitled GemView Tablet Displays Clone Operation.13www.topazsystems.com
pDoc Annotator Duo User ManualIn the Document Printing section, select the printing options for the signed document. Thedefault is “Ask Operator about printing signed document”. This option specifies that theOperator should be prompted about printing the signed document when it is received from theGemView Tablet Display. Selecting “Always print signed document” proceeds to print thedocument without any confirmation prompt for the Operator; it displays the print options screendirectly so the operator can select the pages to print. Select “Never print signed document” tospecify that the signed document received from the GemView Tablet Display should not beprinted.To hide the print dialog before printing, unselect the option “Display print dialog beforeprinting”. When this option is unselected, all the pages of the document are printedautomatically without a prompt to select the pages. The print options specified here areapplicable to both the Manual Originator and the Automatic Originator.In the Operator Confirmation section, select the operator confirmation option for the AutomaticOriginator. The default is the manual operation “Display operator confirmation window, andrequire manual operator confirmation”. This option requires the operator to manually confirmthe completion of the annotating process.Selecting the “Display operator confirmation window, and confirm automatically” option willautomatically confirm the completion of the annotating process. The purpose of this feature isto automatically close the confirmation dialog that is displayed when the document is pushedto the GemView Tablet Display for annotating and the signer has completed the act-of-signing.This allows the system to act in unattended mode and everything happens seamlessly withoutany user intervention. If this automatic confirmation option is selected, the system will notdisplay the “Confirm Save” button and after the signer taps DONE on the GemView TabletDisplay; pDoc Annotator updates the window to say “User has tapped the DONE button.Document has been saved automatically.” The confirmation window closes automatically 2seconds after displaying the above message.Selecting the “Do not display operator confirmation window, and confirm automatically” optionwill cause the Automatic Originator to not display an operator confirmation window and toautomatically confirm the completion of the annotating process. The purpose of this feature isto avoid showing any information about the act-of-signing that is being conducted on theGemView Tablet Display. This allows the system to act in unattended mode where theoperator is not interested in seeing any status information.If an automatic confirmation option is selected, the document is automatically printed if either“Ask operator about printing signed document” or “Always print signed document” is selected.Select the option “Require manual operator confirmation of cancelled documents” to manuallyconfirm the documents that are cancelled during the signing session on the Tablet Display.This option requires operator action even when you have selected the “Display operatorconfirmation window, and confirm automatically” or the “Do not display operator confirmationwindow, and confirm automatically” option.14www.topazsystems.com
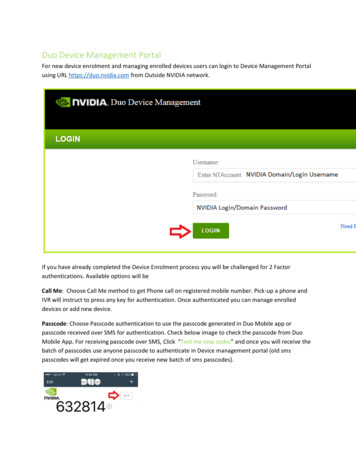
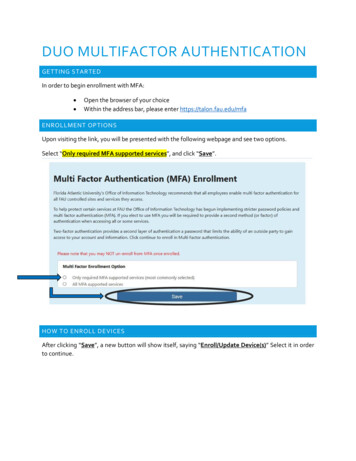
pDoc Annotator Duo User Manual3.4 – Specifying Signer OptionsA screenshot of the “Signer Options” tab is shown below.3.4.1 – Pencil OptionsThis section of the Signer tab allows the system administrator to specify the parameters to beused while adding pencil annotations in the pDoc Annotator Duo TD application.1. The Line Color to be used while writing the pencil annotation on the Tablet Display andin displaying the pencil annotation on the PDF document.2. The Line Thickness to be used while writing the pencil annotation on the Tablet Displayand in displaying the pencil annotation on the PDF document. The default LineThickness is 2. The value can range from 1 to 10.After specifying all the desired parameters, click on the “Apply” button to save the changes.15www.topazsystems.com
pDoc Annotator Duo User Manual3.4.2 – Scroll Bar Width OptionsThis section of the Signer tab allows the system administrator to specify the options for thedisplay of the scroll bar in the pDoc Annotator Duo TD application. Select “No scroll bar (usescroll icons only)” if the scroll bars should not appear in the pDoc Annotator Duo TDapplication while annotating the document. The signer needs to use the scroll icons availableon the top of the window to scroll the document up or down.Select “Default Width (17 pixels)” if the scroll bar of default width should be displayed. Thedefault width of the scroll bar in Windows is 17 pixels. If the scroll bar width had beenmanually set to some other number outside of the pDoc Annotator Duo Administrator, thenselecting this option requires a system restart to take effect.Select “Scroll bar width (in pixels)” to specify a custom width for the scroll bar. The default is 34pixels and the value can range from 17 – 85 pixels. The value specified here is applicable to allthe applications running in the PC and not just specific to pDoc Annotator Duo TD application;hence, selecting this option requires a system restart to take effect.Changing the selection from “Scroll bar width (in pixels)” to either the “No scroll bar (use scrollicons only)” or “Default Width (17 pixels) also requires a system restart to take effect. Bydefault, the “No scroll bar (use scroll icons only)” is selected and hence the signer will not seethe vertical scroll bar on the pDoc Annotator Duo TD application while annotating thedocument.3.4.3 – Signing Session TimeoutThe signing session timeout period for the GemView Tablet Display can be specified here. Thedefault value is 10 minutes. The value can range from 5 to 720 minutes. During the signingsession on the GemView Tablet Display, the signing session automatically times out after thenumber of minutes specified here if the signing session is not completed by that time.16www.topazsystems.com
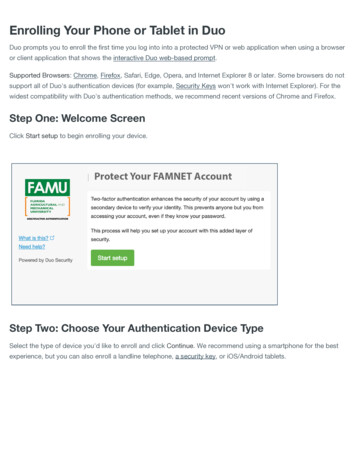
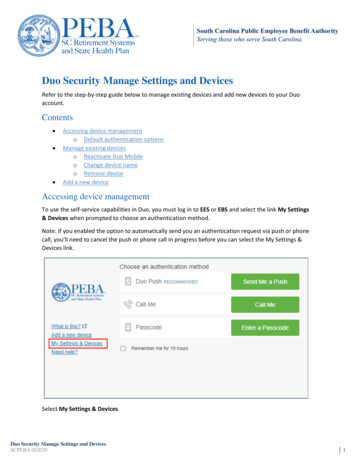
pDoc Annotator Duo User Manual3.4.4 – Confirmation Message OptionsThe confirmation message that is displayed on the GemView Tablet Display when the signercompletes the signing session and taps on the “DONE” button can be modified here. TheAdministrator can also turn off the display of the confirmation message. This setting is onlyapplicable when the signer taps on the “DONE” button. When the operator clicks on the “SaveSigned Document” button in the Automatic Originator, this setting (i.e., turning off theconfirmation message display) is not applicable. The confirmation message is alwaysdisplayed in this case.3.5 – Idle DisplayThe Idle Screen is the screen that is displayed on the Tablet Display when it is in the idle state,i.e., when it is not serving any PDF signing requests. To configure the Idle Screen for theTablet Display, select the tab “Idle Display” tab. A screenshot of the “Idle Display” tab is shownbelow.17www.topazsystems.com
pDoc Annotator Duo User Manual3.5.1 – Specifying the Idle Screen DisplayThe Idle Screen of the Tablet Display can display an information screen (showing the versioninformation), display images continuously, or run a video continuously. The Administrator canalso select whether the Idle Screen should be displayed or not. The Idle Screen display typecan be updated by the system administrator using this section.3.5.1.1 – None (Default Windows Background)Click the None (Default Windows Background) radio button to not display the idle screen onthe Tablet Display.3.5.1.2 – Information Screen OptionClick the Information Screen radio button to select the option to display the information screenon the Tablet Display.3.5.1.3 – Images OptionClick the Images radio button to select the option to continuously display a set of images onthe Tablet Display.The System Administrator can select the parent folder containing subfolders that have theimages to be displayed continuously on the Tablet Display for the different Tablet Displaydevices. The System Administrator can also specify the time period to display each image. Thedefault images are copied during installation into the “ProgramData\pDoc Annotator Duo\IdleDisplay\Images” folder. You can use your own images by putting them into the folder thatcorresponds to your Tablet Display. Alternatively, you can create another folder with the samestructure as under the “ProgramData\pDoc Annotator Duo\Idle Display\Images”, and thenselect the folder here.The folder can be selected by using the “Browse” button located next to the images option.After you click Browse, navigate to the folder you want to add and click on Open.3.5.1.4 – Time Period to Display ImageThe System Administrator can specify the time period each image should be displayed whenthe idle screen is displaying images continuously by entering the number of seconds to displayeach image in the specified box. The default time period for displaying the images on theTablet Display is 5 seconds. The minimum and maximum time periods for displaying imagesare 1 second and 300 seconds.18www.topazsystems.com
pDoc Annotator Duo User Manual3.5.1.5 – Video OptionThe System Administrator can specify that a selected video is to be run continuously on theTablet Display idle screen.A video can be selected by using the “Browse” button located next to the video path text box.After you click Browse, navigate to the video you want to use and click on Open. The selectedvideo is first copied to the “Video” folder in the pDoc Annotator Duo Data folder (typicallyC:\ProgramData\pDoc Annotator Duo\Idle Display\Video), and the video path will be updated inthe “Video” text box.The video formats that are supported for running on the idle screen on the Tablet Display are.mp4, .mpeg, .mpg, .3gp, .asf, .m4v, .mkv, .mov, and .wmv videos. The size of the selectedvideo cannot exceed 500 MB.3.5.1.6 – Display Video Player BarThe System Administrator can specify if the video player bar should be displayed or not whenrunning on the video in the idle screen of the Tablet Display. By default the “Display videoplayer bar” option is checked and it can be checked or unchecked only when the user selectsthe video option.19www.topazsystems.com
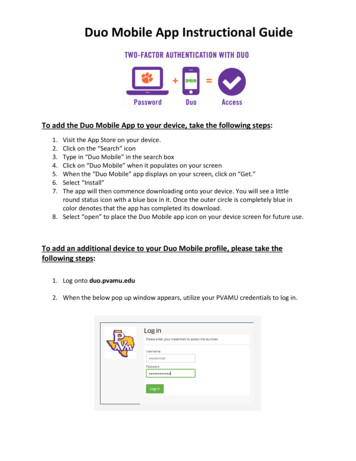
pDoc Annotator Duo User Manual3.6 – AboutThe “About” tab in the pDoc Annotator Duo Administrator displays the version details of thepDoc Annotator Duo software that is currently installed on the PC.20www.topazsystems.com
pDoc Annotator Duo User Manual4.0 – pDo
8 www.topazsystems.com pDoc Annotator Duo User Manual 2.0 - Installing/Uninstalling pDoc Annotator Duo Software 2.1 - Before You Begin pDoc Annotator Duo Software runs on Windows 7, 8, 8.1, and 10 (both tablets and desktop PCs). Your PC should have a minimum of 75 MB free space on the hard drive in addition to