Transcription
SURGICAL INSTRUMENTATION
[This page intentionally left blank.]
SurgicalInstrumentationInstrument Assembly and Preparation129
[This page intentionally left blank.]130
OBJECTIVESFollowing training, employees will be able to:1. Recognize the common use instrumentation.2. Identify instruments for different types of surgical uses.3. Identify the different parts of instruments.4. Distinguish the difference between hand-held and powered instruments and flexibleand rigid endoscopes.5. Explain the proper placement of instruments into trays, sets, and containers.6. Understand the proper stringing of string instruments and how to place instrumentson the stringer to assure easy access.7. Demonstrate testing procedures for all instruments and identify malfunctions.8. Define the different care and handling aspects for surgical instruments.9. Discuss recommended processing procedures for all surgical instruments.10 Demonstrate the proper placement of instrument trays and sets on the sterilizationcarts.11. Know the correct storage and transportation for both soiled and sterile instrumentsets and trays.12. Explain the difference between floor grade and surgical grade instruments.131
[This page intentionally left blank.]132
SURGICAL INSTRUMENTATION1. INTRODUCTIONa. As surgical technology continues to advance, so does the type and complexity ofsurgical instrumentation. Surgical instruments are a major investment in the hospitalsetting and require special care and handling to maintain proper function and longevity.This is dependent solely on how an instrument is used and cared for. The operatingroom staff, as well as the SPD technicians, are required to use, assemble, andrecognize thousands of different types of surgical instruments and devices.b. Not all facilities are involved in cleaning and sterilization of surgicalinstrumentation. However, they may be required to assemble special procedure traysfor clinics, dental, and special use areas. These areas may utilize surgical gradeinstruments, versus the ward or floor grade instruments, with the different types ofsurgical instruments available. Regardless of the type of support offered a medicalfacility, the SPD technician should be familiar with the different types of surgicalinstruments in the event the facility decides to include SPD in the care, handling, andassembly of surgical instrumentation.c. SPD is responsible for inspecting the instruments prior to sterilization to assurethe instruments have been cleaned properly, tested, and checked for proper functionand damage (cracked box locks, etc.), and assembled according to an accurate anddetailed procedure list, agreed upon by the operating room. A damaged i nstrumentshould be sent for repair and a replacement placed in the set.d. Instruments are divided into several classifications:(1) Hand held, which consist of general use, microsurgical, and laser.(2) Flexible and rigid endoscopes that require light carriers and fiberoptic cords,fiberoptic rigid telescopes used with bridges, sheaths, and obturators.(3) Powered equipment which can be electrical, pneumatic, or battery operated.2. HAND HELD SURGICAL INSTRUMENTSa. Hand held are the most common type of surgical instrumentation. Once thegeneral, most common types of instruments are identified, the technician will be able torecognize them regardless of the different patterns, designs, and sizes utilized forspecific surgeries. For example, tissue forceps used in eye surgery will resemble tissueforceps used in general surgery, the only difference being the size. The same holds133
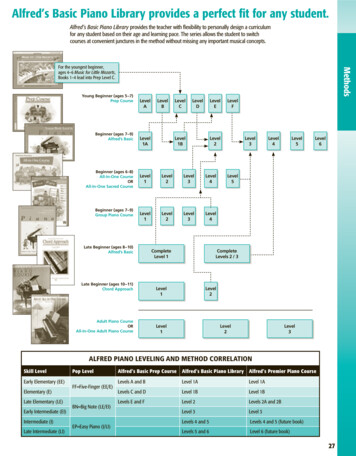
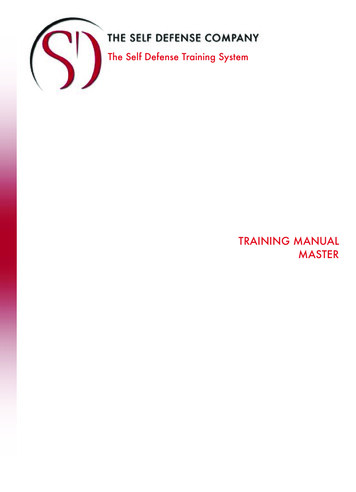
true for retractors, needle holders, etc. The exception to this would be the specializedinstruments used for orthopedic and dental procedures.b. The basic uses for these instruments fall into the following categories:(1) Hemostatic Forceps. These forceps can be called clamps, artery forceps, andhemostats. The main purpose of hemostats is to achieve hemostatis (control of bloodflow in the vessel). Most hemostats are available in different lengths, curved andstraight, with serrated jaws. Some also have toothed ends. Examples of hemostats:Mosquito, Kelly, Carmalt, Schnidt tonsil, and Kocher.Hemostatic Forceps(A) Mosquite, (B) Kelly, (C) Kocher, (D) Carmalt, (E) Schnidt Tonsil(2) Soft Tissue Forceps. Similar to hemostats, these forceps are used for holdingand retracting soft tissue for longer periods. Characteristics include fine teeth or ridgeson the jaws to provide a more delicate grip without trauma to tissue. They also consistof ring handles and box locks, as do the hemostatic forceps. Examples are: BackhausTowel, Allis Intestinal, Babcock Intestinal, Kocher Artery, Mixter Gall Duct, KantorwitzRight Angle, and Forester sponge forceps.(3) Other Soft Tissue Forceps (Thumb). Thumb forceps do not have box locks orring handles but rather have spring handles which are held closed by the134
Soft Tissue Forceps(A) Backhaus Towel, (B) Allis Intestinal, (C) Babcock Intestinal, (D) Lahey Goiter, (E)Mixter Gall Duct, (F) Doyen Intestinal, (G) Forrester Sponge, (H) Kantorwitz Right Angle,and (I) NonperforatingTowel ClampThumb Forceps(A) Adson, (B) Brown-Adson, (C) Thumb w/teeth, (D) Bonnie, (E) Russian,(F) Cushing, (G) DeBakey, and (I) Dressing135
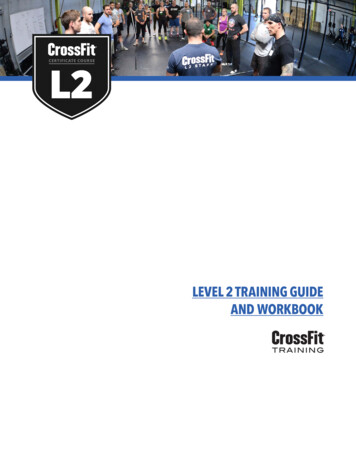
thumb and finger pressure. Sometimes this type of forceps is referred to as dressingforceps when the jaws are serrated and the instrument is used to grasp delicate tissueor wound dressing. A heavier version of this type of forceps is referred to as thumbtissue forceps used for grasping heavier tissue where the teeth will provide a moresecure grasp. Examples of thumb forceps: Adson, Brown-Adson, Hudson, Dressing,Tissue Forceps with Teeth, Russian, Cushing, and DeBakey.(4) Needle Holders. Sometimes referred to as needle drivers, this type ofinstrument is mainly ring handled, similar to hemostats but with smaller jaws which areshorter and thicker. Needle holders hold needles which are attached to sutures. Theseinstruments are also available in a variety of lengths and styles and may be curved orstraight. Needle holders have inserts in the jaw to prevent excessive wear of theinstrument. These inserts are mainly made from tungsten carbide granules in a cobaltor other metallic paste. Needle holders with tungsten carbide inserts are normallyidentified with gold plated handles. The inserts can be replaced as they wear down,which prolongs the life of the needle holder and defrays the replacement cost of anentire instrument. Examples of needle holders: Mayo-Hegar, Crile -wood, Olsen-Hegar,Collier, and Webster.Needle holders can also have spring handles which allow the user maximum resultswith minimum rotation of the wrist and hand. Most spring handled needleNeedle Holders(A) Mayo-Heagar, (B) Crile -Wood, (C) Olsen-Hegar, (D) Collier, (E) Webster, and(F) Castroviejo136
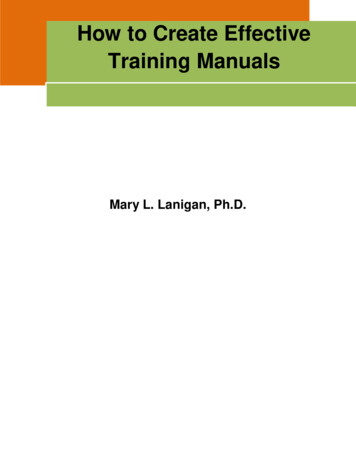
holders will have a lock or catch to secure the needle and are used in surgicalprocedures requiring delicate suturing in tight or poorly exposed areas. Spring handledneedle holders may also contain replaceable inserts. An example of a spring handledneedle holder is a Castroviejo, 7 or 9 inch.(5) Scissors. A large variety of scissors are utilized in the surgical suite to includemany lengths, styles, curved, straight, sharp, and blunt. In general, curved scissors areused to cut and dissect tissue, while straight scissors are used for cutting sutures andany tissue when a smooth, straight cut is desired, such as a damaged nerve or bloodvessel. Scissors can be used for probing, dissecting, and spreading tissue. Thesescissors should never be used to cut paper or tubing. Bandage scissors may be utilizedfor this purpose.Major types of scissors include Mayo scissors, identified by heavy curved or straightblades with rounded tips; Metzenbaum (Metz) scissors, similar to Mayo only lighter inpattern and more delicate; Iris (dissecting) scissors, resembling cuticle scissors butmore delicate in style. Operating or general use scissors can be used for cuttingsutures and gauze. The heavier types are used for cutting fine wire sutures and areidentified by angular blades with serrated edges with a grove for holding the wire as it isbeing cut. Scissors may also have tungsten carbide cutting edges which provide finercutting with longer lasting wear. Scissors with tungsten carbide inserts are identified bygold plated ring handles.Scissors(A) Mayo Dissecting Straight, (B) Mayo Dissecting Curved, (C) Metzenbaum, (D)Metzenbaum Delicate, (E) Potts-Smith, (F) Lister Bandage, (G) Iris Straight, and(H) Stevens Tenotomy137
(6) Retractors. Many varieties and sizes of retractors are available, and the use ofspecific retractors will largely depend on the type of surgical procedure beingperformed. Retractors are used for holding the incision open to provide exposure to thesurgical site. Smaller types held by the fingers or hand retract skin and subcutaneoustissue in shallow surgical areas. Larger, heavier models retract muscle tissue andorgans in deeper surgical sites. Some retractors are held in place by an assistant whilethe surgeon completes the procedure, while self-retaining retractors require no assistantto hold them. Self-retaining retractors are held open by their own action and may beused in conjunction with the hand held retractors. Examples of retractors: RichardsonEastman, Mayo, Jansen Mastoid, Weitlaner, Cerebellum, Gelpi, Volkman Rake, GreenGoiter, Army-Navy, Deaver.Retractors(A) Mayo, (B) Cerebellum, (C) Gelpi, (D) Janson Mastoid, (E) Spring Wire, (F) VolkmanRake-Sharp, (G) Green Goiter, (H) Army-Navy, (I) Richardson-Eastman, (J) Deaver, and(K) Sweetheart(7) Miscellaneous. Probes, biopsy needles, and suction tubes are a few of themiscellaneous instruments required for use in surgery or some clinical procedures.Probes may be used to explore the depth and direction of body ducts, sinuses, orcavities. They may also be used as an aid in dilating or irrigating an area of the body,such as a duct. Knife handles are available in several styles and require disposableblades that may be changed frequently during the surgical procedure. Example ofprobes and knife handles are probe with eye, optical probes, and knife handles number7, 4, and 3.138
(8) Biopsy Needles. Biopsy needles are used for the removal of fluids or tissue forthe purpose of microscopic examination. Many sizes and varieties of biopsy needlesare available in stainless steel, as well as disposable varieties. Disposable needles donot require sharpening and inspection as do reusable biopsy needles. Reusable biopsyneedles must be sharp and free of burrs to assure proper function and avoid damageand trauma to tissue. Examples of biopsy needles: Abrams Pleural Biopsy Punch andFranklin-Silverman Biopsy Needle.(9) Suction Tubes. Suction tubes are used for the removal of blood, tissue, andfluids from the surgical site to allow surgeons a clear view of the anatomical structuresduring the operative procedure. Several types of tubes can be used, depending on theprocedure, and many will have removable tips that require close attention during thecleaning process. The tube is attached to suction tubing connected to a graduatedreservoir to measure the amount of fluid removal. Examples of suction tubes: PoolAbdominal, Frazier, Rhoton, and Yankauer Suction Tubes.Miscellaneous Instruments(A) Frazier Suction, (B) Rhoton Suction, (C) Yankauer, (D) Probe w/eye andGroove Director, (E) No. 3 Knife Handle, (F) No. 4 Knife Handle,(G) No. 7 Knife Handle, (H) Abrams Needle, and (I) Vim Silverman Needle139
"Anatomy" of the Hand-held Instrument and ScissorsThe structure of a typical hand-held hemostat or clamp consists of jaws, boxlock, shanks, ratchets, and finger rings. The surgical scissors consists of jaws,shanks, finger rings, and a screw.3. ANATOMY AND QUALITY OF SURGICAL INSTRUMENTATIONa. The majority of surgical instruments are made from stainless steel which will varyin grade. Stainless steel, in most respects, is an ideal material that resists rusts, nicks,maintains a fine point, and, in the case of scissors, retains a keen edge for cutting.However, many are mislead by the name "stainless," since stainless steel can spot andstain. In actuality, stainless is a "misnomer." There really is no "stainless" type of steel.Many surgical instrument companies "passivate" instruments prior to selling them, toassure the least amount of staining and spotting.b. Passivation is a process which helps ensure an uninterrupted protective layer ofchromium oxides is present on the surface of the instrument. This protective layer helpsprevent against corrosion, spotting, and staining. Passivation occurs by exposing aninstrument to the atmosphere or certain other oxidizing agents which results in a thin,protective surface or film. The chromium oxides are actually strengthened by repeatedexposure to the oxidizing conditions that exist when washing and reprocessinginstruments occur. Repeated instrument processing actually passivates it further, whichexplains why older instruments tend to stain and spot less than the new ones.140
c. Other metals used in the construction of some surgical instruments are titaniumalloy, copper, and brass. Some instruments are electroplated which means theinstrument has a highly polished finish and often is easier to keep shiny. Thedisadvantage to this type of finish is the electroplating process can leave holes in thefinish, resulting in potential rust and deterioration of the plating. Once the plating startsto deteriorate, the instrument should no longer be used for two reasons: the plating canchip off into the surgical wound site and cause infection and, once the plating ischipped, sterilization of the instrument cannot be accomplished.d. There are four basic types of instrument finishes available. Shiny or mirror finish,which tends to reflect light and can restrict the vision of the surgeon. This finish doesnot spot and discolor as easily as other finishes. Satin or patina finish and the dull ormatte finish reduce the glare at the wound site but tend to stain and spot morefrequently. The matte finish is attained by a sandblasting technique utilizing glassbeads or silicone. The fourth finish is an ebonizing type and is achieved by placing theinstruments in a chemical bath. It is a nonglare finish primarily used for laser surgery.This finish is a black, microscopically irregular surface which scatters and absorbs laserenergy. It keeps the energy from bouncing onto tissue surrounding the intended targetand damaging the healthy tissue.e. Instruments are available in two grades. The common instruments, hemostats,scissors, and soft tissue, are available in a "floor grade" metal. These instruments aremade from forgings of lower grade quality metals and are usua lly plated. They usuallybend or break easily, and the precision of key features is less exact than the higherquality O.R. grade instruments. Plated instruments can be scratched or chippedrelatively easily and rust much easier than the higher quality instruments. They must bereplaced more frequently. O.R. grade instruments are made from 300-4 grade stainlesssurgical steel and are more resistant to corrosion and wear. It is vital that the lowergrade instrumentation be processed separately from the O.R. grade instruments. Rust,like cancer, can spread if these instruments are mixed. It is vitally important to protectthe resources invested in surgical instrumentation.4. CARE AND HANDLINGa. Care of the surgical instrument begins in surgery during their use. Theinstruments should be rinsed or wiped periodically to prevent blood and body fluids fromdrying. Avoid bouncing, dropping, and placing large, heavy instruments on top ofdelicate ones. The weight of a mass of instruments or enta nglement in a haphazardheap can cause damage. Instrument counts are vital for patient care, as well aspreventing loss by accidentally throwing them into the trash with the disposable drapesor sending them to the laundry with the surgical linens.141
b. Blood and saline are the most common causes for deterioration of stainless steel.Exposure to these two elements will result in corrosion and ultimately pitting. Otherchemicals to avoid are:Aluminum chlorideBloodDakin's solutionPhenolFerrous chlorideBarium chlorideCarbolic AcidFerrous chorideMercury saltsHydrochloric acidCalcium chlorideChlorinated limeMercury bichloridePotassium thiocyanateIodinec. After surgery, string instruments not used during the procedure should be restrung on their instrument stringer and placed back into the tray with any retractors ormiscellaneous instruments not used. The instruments used during the procedureshould be rinsed in water and any gross soil removed. Whenever possible, the soiledinstruments should be placed in a soaking solution containing an enzymatic agent, andall instruments placed in covered containers and back into the case cart (an enclosedmetal cart) for transportation to SPD. In the eve nt your facility does not utilize a casecart system, the instruments should be placed into covered containers and picked uputilizing a closed/covered cart system.5. RECOMMENDED PROCESSING PROCEDUREa. Reprocessing of surgical instruments involves several steps:(1) Safe transport to the decontamination area.(2) Cleaning, safe handling, and decontamination.b. Safe transport after use is designed to prevent contamination of personnel andthe environment. Instruments and items sho uld be placed in covered containers and/orimpervious bags for transport to the decontamination area. Personal protectiveequipment is required of all decontamination personnel, and these requirements mustbe followed to prevent exposure to the technician, regardless of the types of itemsreceived into the area.c. All instruments set up in the operating room will require reprocessing, regardlessof their use during the procedure. Instrument sets opened and not used still requireprocessing through an ultrasonic washer/sterilizer or washer/decontaminator. Inspectthe instruments for tissue or bone remaining in the teeth or grooves. Remove thisdebris by holding the instrument under the surface of the water and scrubbing the areawith an instrument b rush.d. During the cleaning process, always remember to open all instruments. Forexample, scissors should be opened, instruments with box locks should not be in alocked position, and multipiece retractors, staplers, etc., should be disassembled prior142
to cleaning, as well as the required decontamination apparel required and mentioned inthe Decontamination Chapter. This allows for all areas to be exposed to the cleaningprocess. Attention to all cannulated items or items with lumens,such as suction tubes, needles, and some orthopedic instruments is vital. These areasmay harbor blood and body tissue. Brushes are available from manufacturers in manysizes, allowing access to the cannulated areas, and should be used faithfully to assureany and all debris is removed.e. During the initial cleaning and throughout the subsequent steps, instrumentsshould be handled in such a manner as to avoid damage to the instrument and toprevent injury to the technician. Heavy rubber or plastic gloves should be worn, as wellas the required decontamination apparel required and mentioned in theDecontamination Chapter. This includes face shields or goggles, gloves, plastic apron,hair cover, and rubber shoe covers. Instruments should be handled in small groups toavoid tangling and damage. Needles should be separated and processed separately.The technician should watch for scalpel blades still attached to knife handles, and theseshould be removed and disposed of in sharps containers. All scalpel blades, disposableneedles, saw blades, and drill points used during a surgical procedure should bedisposed of by the operating room staff but may be inadvertently overlooked. Manyinstruments contain sharp edges and parts, and extreme care should be taken by thetechnician while handling any sharp item.f. Only nonabrasive cleansers should be used for instrument cleaning, as theabrasive cleaners can damage the surface of the instrument, resulting in corrosion andrust. Instruments should be exposed to detergents that maintain a pH between 6 and 8.A neutral pH of 7 is ideal since a pH level too high (alkaline) or too low (acidic) willdamage the surface of the instrument. Once this process is complete, rinse theinstruments, then place them in the ultrasonic.g. If the gross soil has been removed properly, the ultrasonic should remove theremaining soil. Gross soil is defined as excessive blood or body tissue that wouldimpair the use of the instrument. Visual blood or body tissue is not necessarily definedas gross soil. The ultrasonic will penetrate into the box locks, joints, and screw areas ofthe instrumentation. The cleaning solution utilized by the ultrasonic should be changedfrequently, as mentioned in the Decontamination Chapter. Instruments should beplaced loosely in the ultrasonic, in metal baskets. Avoid plastic and rubber in theultrasonic cleaner as they will absorb the sonic energy and the process of cavitation willnot take place. After removing them from the ultrasonic, visually inspect the instrumentsfor cleanliness. Instruments should then be rinsed and processed through thewasher/sterilizer. Items that cannot be processed through the washer/sterilizer shouldbe rinsed and placed in the drying chamber of the ultrasonic. If a drying chamber is notincluded on existing equipment, the instruments should be air dried or patted dry with anabsorbent material so that no water is left standing on the instruments.143
h. Microsurgical and delicate eye instruments should not be processed through awasher/sterilizer because the turbulent action of steam mixed with water may damagethem. Once these delicate instruments are processed through the ultrasonic, rinsed,and dried, they should be processed on a sterilize cycle o nly to assure a decreasedbioburden is achieved to allow safe assembly by the preparation room instrumenttechnician.i. Washer/sterilizers are the next step in the cleaning process. Stainless steelinstruments should not be processed close to instruments made of metals, such asnonanodized aluminums, brass, copper, or chrome plating. A reaction known aselectrolysis may occur, resulting in metal plating onto another. This reaction can resultin permanent damage and staining. Ideally, demineralized or deionized water should beused in the washer/sterilizer to prevent mineral buildup and chemical reactionsassociated with regular tap water. A drying cycle should be set to assure theinstruments will dry completely and not emerge wet after the cycle. If the instrumentsdo not dry completely, steps should be taken to dry the instruments. Utilizing an airhose to blow excessive moisture from the instruments or manually drying withabsorbent material are two recommendations.j. Newer washer/sterilizers consist of a lubrication cycle that exposes instruments toa lubricant that helps prevent stiff and hard working joints, box locks, and assuressmooth action of multifaceted items such as rongeurs, retractors, and stapling devices.Most facilities do not have the newest available processing equipment, and lubricationof instruments must be accomplished in the preparation area, prior to sterilization.k. Controversy still exists concerning the order of processing instruments. Someinstitutions recommend processing the instruments through the washer/sterilizer first toprotect the technician working with the contaminated items. Washer/sterilizers may notremove all of the soil and will bake any remaining debris onto the instrument, whichmakes it more difficult to remove. The ultrasonic will not be able to remove baked ondebris and would require the technician to manually clean all instruments. A reminder -proper attire and safe handling are the keys to proper processing of instruments and stillallow protection for the decontamination room technician.l. Telescopes, fiberoptic cords, and power equipment will require manual cleaningand disinfecting and cannot be processed in the same manner as the general hand heldinstrumentation.6. PREPARATION AND STERILIZATIONa. Recommended steps to follow in the preparation area:(1) Inspection for cleanliness and proper function.144
(2) Separating instruments that require repair or replacement.(3) Set or tray assembly and single instrument packaging.(4) Preparation for sterilization.(5) Sterilization and sterile storage.(6) Transport to point of use.b. Once the instruments have been received into the preparation area, a thoroughinspection for cleanliness and proper function must be done while assembling theinstrument tray or prior to storage. Depending on the facility, instruments are eitherassembled into sets or trays, or stored until the next surgical schedule is received.Once the schedule is posted, instrument sets will be assembled for those particularcases and the process is repeated. It is ideal to have the sets pre-assembled in case ofemergency surgery or add-on cases.c. If any instrument is received into the preparation area with visible evidence ofsoil, it should be returned to decontamination for reprocessing. Never clean aninstrument in the clean preparation environment. Proper instrument function andcondition should also be assured. To check a needle holder, place it in the lockedposition and hold it up to the light. Visible wear is apparent when a gap is notedbetween the tungsten carbide inserts and should be replaced. Another method wouldbe to place an appropriate size suture needle into the jaws, closing the ratchets to thesecond position and attempting to turn the needle with the fingers. If the needle turns,the inserts are worn and should be replaced. Extreme care should be taken to avoidinjury.d. Other items to look for will include checking for nicks, rust, corrosion, burrs,pitting, and cracks in the box lock. Certain instruments should be checked for properjaw alignment, freely moving box locks, loose screws, and freely moving hinges onscissors or other multijointed instruments. The proper tension is required with scissorsto allow cutting surfaces of scissors to meet properly. Test instruments with box locksand ratchets to assure proper tension. The tips of instruments with jaws should justmeet before the rachet is engaged. As the jaws engage, the entire length of the jawshould mesh. The instrument should be tested by locking the ratchet into the notch andgently tapping it against the palm of your hand, or gently against a counter edge. If theratchet disengages or pops open, the instrument requires repair.e. Scissors should be tested for sharpness by cutting a single layer of gauze. Asharp pair of scissors will cut cleanly through, all the way to the tips. Burrs may benoted on the tips of the scissors as you are cutting the gauze, even if the blades appearsharp. Paper should never be used to test scissors because it can dull the scissors and145
is not a true test for sharpness. There are new products available for testing the cuttingedge of scissors which resemble the texture of tissue.f. A detailed instrument repair program should be established, and a reputableinstrument repair company contracted with, to assure the instruments are repairedcorrectly and returned in a timely manner. Cost will be a major factor in the repair ofsurgical instrumentation and should be tracked. A designated area should be set asidefor damaged instrumentation and the instruments should be repaired on a set schedule.It is vital that all malfunctioning instruments be repaired and not returned to aninstrument set. An improperly functioning instrument could cause delays during thecourse of the surgery, or worse, cause harm to the patient.7. INSTRUMENT SET ASSEMBLYa. Instrument trays should be assembled using a detailed photo p rocedure. Ringhandled instruments should be placed on a stringer, instrument rack, or other meansthat allows the instruments to remain in an open or unlocked position. This will allowthe sterilant contact to all surfaces. Instruments with multi parts, such as a Balfourretractor or tonsil snare, should be disassembled to allow all parts exposure to thesterilant.b. Instruments placed on a stringer or rack will require placement in such a mannerto prevent damage to the instruments and easy, orderly access by the operating roomscrub nurse. The illustration below shows the proper alignment of string instruments.The scissors can be turned in, toward the center of the stringer, as long as the tips donot touch another instrument. In many cases, the tips of the curved scissors will faceaway from the center of the stringer to prevent damage to the curved tips. The shorterinstruments are at the end of the stringer, with the longer toward the center. This orderaids the operating room nurse since the instruments at either end of the stringer will beused first during the procedure, with progression to the longer instruments as the caseproceeds.c. Knife handles, tissue forceps, pickups, probes, etc., may be wrapped in medicalgrade paper or placed in pockets to allow easy access to the items. Note illustration.Foam inserts can be purchased by the roll or individually. The foam may be cut to thedesired length, depending on the number of instruments used. It is important toremember only medical grade paper or materials should be placed inside an instrumenttray. Nonmedical grade paper will contain pulp and wood particles that can redepositon instruments during a pre-vacuum sterilization cycle. Other items, such as gauze,cotton tipped applicators, etc., should be packaged separately from the instrument setsto allow proper exposure to the sterilant. Gauze is not recommended to be included insurgical instrument trays but, if it is, it must be included on the count sheet. Operatingroom nurses are required to do a sponge count, and any addition
instruments, versus the ward or floor grade instruments, with the different types of surgical instruments available. Regardless of the type of support offered a medical facility, the SPD technicia n should be familiar with the different types of surgical instruments in the event the f