Transcription
Assembly, Maintenance & Operating ManualPatterson Fan Company, IncBlythewood, SC 29016www.pattersonfan.com800.768.3985
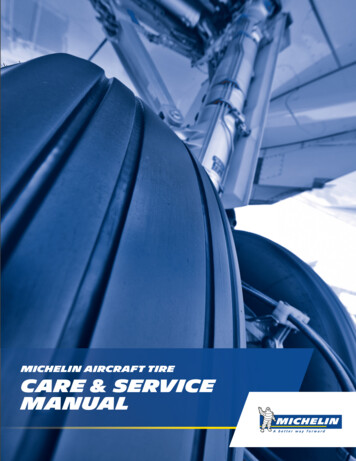
Note: There are many acceptable methodsfor hanging a Patterson Yoke Mount fan. Themost important things to remember are thatthe yoke must be securely connected to asolid structure and that all materials used tohang the yoke and fan must be rated for thistype of rigging and workload. Below is whatwe consider to be the simplest method of fansuspension. Feel free to improvise, but pleaseuse caution and good judgment.1. Secure the “U” Shaped Yoke to theobject from which you intend to mountthe fan. Use a 5/8” bolt, a 5/8” nut and(2) 5/8” washers. Tighten the nut onto thebolt using a 5/16” bolt end wrench andratchet with 5/16” socket.2. The factory assembled fan head fitsinside of the “U” shaped yoke, thethreaded studs on each side of the fanfit through the predrilled holes on the “U”shaped yoke. Secure the factory assembled fan head to the “U” shaped yokewith the supplied nuts. Mount the factoryassembled fan head so that the motormount is below the motor.3. If safety cable installation is desired (rec-ommended), use a length of chain orcable to secure the fan to a solid surfaceand attach to the fan. Make sure cableor chain is rated for the weight and purpose of securing the fan.Patterson Fan Company, IncBlythewood, SC 29016www.pattersonfan.com800.768.3985
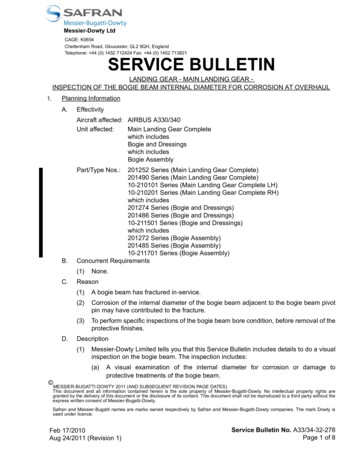
Note: Important things to remember are thatthe wall mount should be a solid structureable to support the weight of the fan safelyand that the fan should not be at a heightthat will cause employees to bump theirheads. Ideally, the fan should be mountedto blow into the back of the truck down thetop corner of either side of the trailer.1. Secure the wall bracket and arm to the solidsurface where you will hang the fan. A structurally secure solid wall or beam is best.2. Secure the “U” shaped yoke to the arm of thewall bracket. Use the 5/8” bolt and 5/8” nutsupplied. Tighten the nut onto teh bolt usinga 5/16” box end wrench and ratchet with a5/16” socket. For clearance reasons, the “U”shaped yoke must open down.3. The fan head fits inside the “U” shaped yoke,the threaded studs on each siide of the fanfits through the predrilled holes on the “U”shaped yoke. Secure the fan head to the “U”shaped yoke with the supplied nuts. Mountthe fan head so that the motor mount isbelow the motor.Note: Due to continual product improvement,items are subject to change without notice.Patterson Fan Company, IncBlythewood, SC 29016www.pattersonfan.com800.768.3985
Note: The most important thing to remember is that ifthe fan is at a level near people, it should be equippedwith OSHA approved Patterson finger guards. Pleasecontact your factory sales representative to order.1. Secure Part A of the wall bracket to the solidsurface from which you will hang the fan. Thereis a single mounting hole on the short end of thepart. Secure part A using a wall anchor, etc.(Wall anchor not included.) Place a level on thepart.2. Position part B under part A as shown andsituate part B in such a way so that part Abecomes level. Mark part B for the hole. Attachpart B using the appropriate wall anchor, (notincluded).3. Secure the “U” shaped yoke to the wall bracketusing the supplied 5/8” bolt and nut. The “U”shaped yoke may open up or down, depending on whether the wall bracket is thick side upor down. If you plan to add an oscillator, mountthe yoke so that it opens up. The bolt must gothrough all three pieces. Check for level andstability.4. The factory assembled fan head fits inside of the“U” shaped yoke. Secure the fan head to theyoke with the supplied nuts. Mount the fan headso the motor mount is below the motor.Note: Due to continual product improvement,items are subject to change without notice.Patterson Fan Company, IncBlythewood, SC 29016www.pattersonfan.com800.768.3985
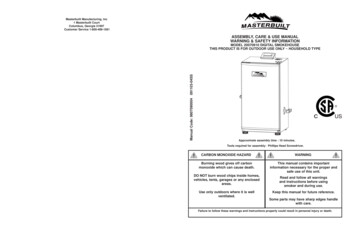
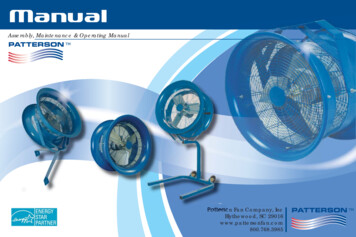
90 90 X2X30 1. Attach two eyebolts to holes in top front of fan. Attach third eyebolt to back rear hole in fan.2. By means of a mechanical lift (cherry picker, scissor lift, etc.) get the factory assembled fan head to the point where you plan to suspend it.You will need three lengths of chain, three connectors, hardware for chains and bolt cutters.3. Secure two lengths of chain to the beam or girder number 1 about two times the distance apart that the fan will hang down (see diagram).The third length of chain should be centered between the two front lengths of chain and attached to beam number 2. Attach the chains tothe beams using your preferred method.4. Connect the lengths of chain to the eyebolts on the factory assembled fan head using the chain connectors.5. Rough focus the fan on your target while on the mechanical lift.6. Get a co-worker to stand at the target mark. Make sure the power is turned off. Have someone plug the fan in.Let the fan run for approximately 30 seconds (to get up to speed and settle itself down). With someone onthe floor, someone at the fan, and someone at the power, focus the fan. DO NOT ATTEMPT TO ADJUST THEFAN WHILE IT IS RUNNING!7. Remove excess chain with bolt cutters.Note: Due to continual product improvement,items are subject to change without notice.Patterson Fan Company, IncBlythewood, SC 29016www.pattersonfan.com800.768.3985
RMRack Mount Fan Assembly InstructionsNote: Important things to remember are thatthe wall mount should be a solid structure ableto support the weight of the fan safely and thatthe fan should not be at a height that will causeemployees to bump their heads. Ideally, thefan should be mounted to blow into the backof the truck down the top corner of either sideof the trailer.1. Secure the wall bracket and arm to the solidsurface where you will hang the fan. A structurally secure solid wall or beam is best.2. Secure the “U” shaped yoke to the arm of thewall bracket. Use the 5/8” bolt and 5/8” nutsupplied. Tighten the nut onto teh bolt usinga 5/16” box end wrench and ratchet with a5/16” socket. For clearance reasons, the “U”shaped yoke must open down.3. The fan head fits inside the “U” shaped yoke,the threaded studs on each siide of the fanfits through the predrilled holes on the “U”shaped yoke. Secure the fan head to the “U”shaped yoke with the supplied nuts. Mountthe fan head so that the motor mount isbelow the motor.Note: Due to continual product improvement,items are subject to change without notice.Patterson Fan Company, IncBlythewood, SC 29016www.pattersonfan.com800.768.3985
1.All Patterson Fans are designed to be virtually maintenance free. Routine cleaning and inspection are recommended.On an as need basis, clean the fan of all dust, dirt and grease. Regular cleaning will keep your fan operating at optimalperformance levels.2.On an annual basis, we recommend you inspect the following: tightness of the blades, integrity of the motor welds,tightness of the safety guards, tightness of 5/8” bolt and washer and the security of the safety chain.3.If you find any areas of concern as a result of your routine inspection, or have any questions about the assembly or operation instruction, please call your factory sales representative at 800-768-3985.
Please read carefully before assemble, install, operate or maintain any Patterson FanProduct. Protect yourself and others by observing all safety information. Failure tocomply with instructions could result in personal injury and/or property damage. Retaininstructions for future reference.Disconnect power source before installing or servicing. Failure todisconnect power source can result in fire, shock or serious injury.1.2.Patterson products should be installed and serviced by qualified technicians only.Follow all local electrical and safety codes, as well as the National Electric Code (NEC) and the Occupational Safety and Health Act(OSHA) in the United States.3. The unit should be installed, protected and fused in accordance with latest issue of the National Electrical Code, MEMA StandardPublication No. MG2 and local codes.4. Motor must be securely and adequately grounded. This can be accomplished by wiring with a ground, metal-clad raceway system,using a separate ground wire connected to the bare metal of the motor frame, or other suitable means.5. Always disconnect power source before working on or near a motor or its connected load. Lock open position and tag to preventunexpected application of power.6. In accordance with OSHA requirements. Guarding is required if unit is mounted less than 7 feet above floor or where workers have access.7. Keep hands and clothing away from moving parts.8. Be careful when touching the exterior of an operating motor; it may be hot enough to cause injury. This condition is normal if operatedat a rated load and voltage and built to operate at higher temperatures.9. Protect power cable from coming into contact with sharp objects.10. Do not tangle power cable and never allow cable to come in contact with oil, grease, hot surfaces or chemicals.11. Make certain that the power source confirms to requirements of your equipment.Single Phase MotorsThe factory assembled fan head is equipped with a 12 foot long cord and connector. To turn on fan, plut it in; to turn off fan, unplug it.Three Phase MotorsA cord and connector is not supplied with three phase motors. These fanswill need to be fitted with an appropriate cord and connector or hard wired directly to a power source. It the fan is supplied with fingerguards, the rear finger guard will need to be partially removed to access the motors internal wiring. Remove all but one of the self-tapping screws and place them in a safe place. You will use them again. Rotate the guards around on the single self-tapping screw. Wirethe fan. Replace the guard using the saved self tapping screws.When looking at the front of the fan, the blade should be turning clockwise. It it does not, eth electrical connection wires may need tobe reversed. If reversing the wires does not work, contact your factory representative.
Patterson Fan Company, Inc Blythewood, SC 29016 www.pattersonfan.com 800.768.3985 Attach two eyebolts to holes in top front of fan. Attach third eyebolt to back rear hole in fan. . Get a co-worker to stand at the target mark. Make sure the power is turned off. Have someone plug the fan in. 6. Let the fan run for approximately 30 seconds (to .