Transcription
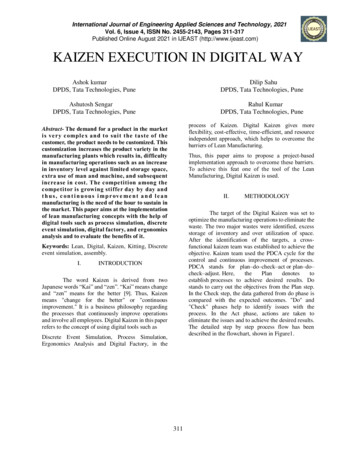
Masterbuilt Manufacturing, Inc1 Masterbuilt CourtColumbus, Georgia 31907Customer Service 1-800-489-1581ASSEMBLY, CARE & USE MANUALWARNING & SAFETY INFORMATIONManual Code: 9807090004 091103-04SSMODEL 20070910 DIGITAL SMOKEHOUSETHIS PRODUCT IS FOR OUTDOOR USE ONLY HOUSEHOLD TYPEApproximate assembly time : 10 minutes.Tools required for assembly: Phillips Head Screwdriver.CARBON MONOXIDE HAZARDWARNINGBurning wood gives off carbonmonoxide which can cause death.This manual contains importantinformation necessary for the proper andsafe use of this unit.DO NOT burn wood chips inside homes,vehicles, tents, garages or any enclosedareas.Use only outdoors where it is wellventilated.Read and follow all warningsand instructions before usingsmoker and during use.Keep this manual for future reference.Some parts may have sharp edges handlewith care.Failure to follow these warnings and instructions properly could result in personal injury or death.
WARNINGS & IMPORTANT SAFEGUARDSREAD ALL INSTRUCTIONSLIMITED WARRANTY INFORMATIONMasterbuilt warrants its products to be free from defects in material and workmanship under proper assembly, normaluse and recommended care for 90 days from the date of original retail purchase.Masterbuilt warranty does not cover paint finish as it may burn off during normal use.Masterbuilt warranty does not cover rust of the unit.When using electrical appliances, basic safety precautions should always be followed includingthe following: For outdoor use only. Do not operate in an enclosed area. Unit MUST be on the ground. Do not place unit on tables or counters. Do not plug in electric smoker until fully assembled and ready for use. Use only on properly grounded outlet. Do not use during an electrical storm. Do not expose electric smoker to rain or water at anytime. To protect against electrical shock do not immerse cord, plug or controller in water or other liquid. Do not operate any appliance with a damaged cord or plug, or after appliance malfunctions or is dropped ordamaged in any manner. Contact Masterbuilt Customer Service for assistance at 1-800-489-1581. Keep a fire extinguisher accessible at all times while operating electric smoker. Do not let cord touch hot surfaces. Do not place on or near a hot gas or electric burner, or in a heated oven.Masterbuilt requires reasonable proof of purchase for warranty claims and suggests that you keep your receipt. Uponthe expiration of such warranty, all such liability shall terminate.Within the stated warranty period, Masterbuilt, at its discretion, shall repair or replace defective components free ofcharge with owner being responsible for shipping. Should Masterbuilt require return of component(s) in question forinspection Masterbuilt will be responsible for shipping charges to return requested item.This warranty excludes property damage sustained due to misuse, abuse, accident, damage arising out of transportation, or damage incurred by commercial use of this product.This expressed warranty is the sole warranty given by Masterbuilt and is in lieu of all other warranties, expressed orimplied including implied warranty, merchantability, or fitness for a particular purpose.Neither Masterbuilt nor the retail establishment selling this product, has authority to make any warranties or to promiseremedies in addition to or inconsistent with those stated above.Masterbuilt’s maximum liability, in any event, shall not exceed the purchase price of the product paid by the originalconsumer/ purchaser. Some states do not allow the exclusion or limitation of incidental or consequential damages. Insuch a case, the above limitations or exclusions may not be applicable.California residents only: Not withstanding this limitation of warranty, the following specific restrictions apply; if service,repair, or replacement of the product is not commercially practical, the retailer selling the product or Masterbuilt willrefund the purchase price paid for the product, less the amount directly attributable to use by the original buyer prior tothe discovery of the nonconformity. Owner may take the product to the retail establishment selling this product in orderto obtain performance under warranty.This expressed warranty gives you specific legal rights, and you may also have other rights which vary from state tostate. Keep children and pets away from electric smoker at all times. Do not allow children to use electric smoker.Close supervision is necessary should children or pets be in area where electric smoker is being used. Fuel, such as charcoal briquettes or heat pellets, are not to be used in electric smoker.Go Online www.masterbuilt.comor complete and return toAttn: Warranty RegistrationMasterbuilt Mfg. Inc.1 Masterbuilt Court - Columbus, GA 31907 Never use electric smoker as a heater (READ CARBON MONOXIDE HAZARD). Use electric smoker only on a level, stable surface to prevent tipping. Electric smoker is hot while in use and after. Electric smoker is HOT while in use and will remain HOT for a period of time afterwards. Use caution. Do not touch HOT surfaces.Name: Do not allow anyone to conduct activities around electric smoker during or following its use until the unithas cooled. Electric smoker is HOT during operation and remains HOT for a period of time following use.Address: The use of alcohol, prescription or non-prescription drugs may impair the user’s ability toproperly assemble or safely operate electric smoker.Phone Number:E-Mail Address:Model Number:Serial Number:Purchase Date:Place of Purchase:City, State/Province, Postal Code:WARNINGS & IMPORTANT SAFEGUARDS CONTINUED ON PAGE 2114
MASTERBUILT SMOKIN’ RECIPES continuedSMOKED HAMBURGER JERKYINGREDIENTS:Ground beef (lean)Ginger (grated)AllspiceSugarGarlic (minced)Soy sauceINGREDIENTS:VenisonBrown sugarWorcestershireGarlic saltSoy sauceDry mustardSaltPepperWater2 lbs (0.9l kg)2 tsp1 tbs4 tbs1 clove1/2 cupSUGGESTED WOOD FOR SMOKING:Hickory or Mesquite chips Avoid bumping or impacting electric smoker.2 lbs (0.91kg)1/2 cup1/8 cup1/2 tsp1/2 cup1/2 tsp1/4 cupdash3 cups Never move electric smoker when in use. Allow electric smoker to cool completely before moving orstoring. Be careful when removing food from electric smoker. All surfaces are HOT and may cause burns. Useprotective gloves or long, sturdy cooking tools. Do not cover cooking racks with metal foil. This will trap heat and cause severe damage to electric smoker.SUGGESTED WOOD FOR SMOKING:Hickory or Mesquite chipsINSTRUCTIONS:Press hamburger meat into flat strips 5” (13cm) long by 1 1/2” (4cm)wide and 1/4 “ (6mm) thick. Place one layer of hamburger strips in dishfor marinating. Combine all marinade ingredients in a small bowl untilblended well. Sprinkle marinade over meat, soaking well. Turn meatover and again sprinkle with marinade. Add layers of hamburger stripsto marinating dish and repeat sprinkling process until both are used.Cover tightly and let marinate in refrigerator for 6 to 10 hours. Rotatemeat layers occasionally during this time. Place in smoker at 140 F(60 C). Cook for 4 hours. Drip tray is only for the bottom of electric smoker. Do not put drip tray on cooking racks this may damageelectric smoker.INSTRUCTIONS:Cut meat into 1/4” to 1/2” (6-13mm) thick strips about 5” (13cm) longand 1 1/2” wide (4cm). Combine all marinade ingredients in a smallbowl until blended well. Marinate meat for 6 to 8 hours. Dry andplace in smoker at 140 F (60 C). Smoke for 12 to 16 hours. Wood chip bowl is HOT when electric smoker is in use. Use caution when adding wood. To disconnect, turn controller “OFF” then remove plug from outlet. Remove plug from outlet when the appliance is not in use, before putting on or taking off parts, and beforecleaning. Allow to cool before handling.SMOKED PORK BUTT Dispose of cold ashes by placing them in aluminum foil, soaking with water and discarding in anon-combustible container.SMOKED SAUSAGEINGREDIENTS:Fresh Pork or Beef sausageSeasonings to tasteServings for 6INGREDIENTS:Fresh Pork ButtSaltBrown sugarChili PowderWARNINGS & IMPORTANT SAFEGUARDS continuedVENISON JERKY7 lbs (3.1kgs)1/2 tsp1/4 cup2 tbsSUGGESTED WOOD FOR SMOKING:Apple chips Do not store electric smoker with HOT ashes inside unit. Store only when all surfaces are cold.SUGGESTED WOOD FOR SMOKING:Hickory or Mesquite chips Accessory attachments not supplied by Masterbuilt Manufacturing, Inc. are not recommended and maycause injury.INSTRUCTIONS:Place sausage in smoker at 150 F (65.5 C). Smoke for 5 to 6 hoursor until outside casings begin to dry and change to a red color. Never use electric smoker for anything other than its intended purpose. This unit is not for commercial use. Always use electric smoker in accordance with all applicable local, state and federal fire codes.INSTRUCTIONS:Mix ingredients and rub onto pork butt. Cook pork butt for 5 hours in225 F (107 C) smoker using apple wood chips during first 3 hours.After 5 hours remove butt and wrap in heavy foil. Cook for anadditional 1 to 1 1/2 hours. Internal temperature should be 160 F(71 C). Serve. Longer extension cords are available and may be used if care is exercised in their use. If a longer extension cord is used the marked rating should be at least as great as the electrical rating of theappliance. The extension cord must be a grounding -type 3-wire cord. Outdoor extension cords must be used with outdoor use products and are marked with suffix "W" and withthe statement "Suitable for Use with Outdoor Appliances.WOOD SMOKING GUIDE FOR MEATS CAUTION - To reduce the risk of electric shock, keep extension cord connection dry and off the ground.WOOD FLAVORPOULTRYFISHHAMBEEFPORKHickory Pungent, smoky, bacon-like flavorMesquiteSweet and delicate flavorAlderDelicate, wood smoke flavorPecanBold and hearty flavorMapleSweet, subtle flavorAppleSweet, delicate flavorCherrySweet, delicate flavor LAMB Extreme caution must be used when moving an appliance containing hot liquids. Do not clean this product with a water spray or the like. SAVE THESE INSTRUCTIONS. WARNING Combustion by-product produced when using this product containschemicals known to the State of California to cause birth defects,other reproductive harm, or cancer. The materials used in this product may contain lead a chemical known to the State ofCalifornia to cause birth defects and other reproductive harm.132
LET'S GET STARTED! This is a slow smoker allow sufficient time for cooking. Smoker is for OUTDOOR USE ONLY. "Preseason" smoker prior to first use. See page 8. Pre-heat smoker for 30 to 45 minutes at max temperature before loading food. DO NOT cover racks with aluminum foil as this will not allow heat to circulate properly. Do not overload smoker with food. Extra large amounts of food may trap heat, extend cookingtime and cause uneven cooking. Leave space between food on racks and smoker sides to ensureproper heat circulation. If utilizing cooking pans, place pans on center of rack to ensure evencooking. Please see manual for more detail.MASTERBUILT SMOKIN’ RECIPES continuedSMOKED STUFFED SALMONSMOKED TROUTServings for 4Servings for 6INGREDIENTS:Salmon (drawn)OilGreen onion (chopped)Tomato ( peeled and chopped)Dill (fresh and chopped)Bread cubes (dry)Celery (chopped)SaltLemon pepperGarlic (minced)4 - 5 lbs (1.8-2.2 kgs)3 tbs1/4 cup1 cup1/4 cup1/2 cup1/4 cup1/4 tsp1/2 tsp1 clove Store smoker in a dry area after use. Extreme cold temperatures may extend cooking times.INSTRUCTIONS:Prepare salmon and brush with oil. Combine remaining ingredients ina small bowl. Stuff salmon with mixture. Place salmon on a sheet ofheavy aluminum foil that has been doubled and greased. Place insmoker at 225 F (107 C) and cook for 3 to 4 hours. Make sure thereis room on either side of foilto allow airflow insidesmoker.ENJOY!INSTRUCTIONS:Mix recommended amounts of water, soy sauce, teriyaki sauce andsalt with other ingredients to your liking in a small container. Placefillets into marinade, cover and let soak in refrigerator overnight.Smoke for 3 to 4 hours or until meat is flaky and dry in smoker at225 F (107 C).MAPLE GLAZED HAMServings for 6-8SMOKED SUMMER VEGETABLESServings for 4-6INGREDIENTS:Summer SquashZucchiniOnionMushroomsFrench Cut Green BeansINGREDIENTS:Ham shank or butt (fully cooked, bone-in)Maple syrupGingerNutmegAllspiceClovesPineapple slices (canned)Maraschino Cherries5 - 7 lbs (2.2-3.1 kgs)1 1/2 cup1 tsp1/4 tsp1/2 tsp16 whole1 can1 jarSUGGESTED WOOD FOR SMOKING:Hickory or Mesquite chipsSUGGESTED WOOD FOR SMOKING:Hickory or apple wood chips CLEAN AFTER EVERY USE. This will extend the life of your smoker and prevent mold andmildew.4-62 cups1/4 cup1/4 cup1/2 cup1 tspSUGGESTED WOOD FOR SMOKING:Hickory, alder or apple chipsSUGGESTED WOOD FOR SMOKING:Hickory chips Close air damper on top of unit to retain moisture and heat. If cooking foods such as fish or jerky,open air damper to release moisture. Temperature reading on control panel will fluctuate or - 10 to 15 degrees as smoker cycles onand off.INGREDIENTS:Trout filletsWaterSoy sauceTeriyaki sauceSaltLemon pepperGarlic saltDill seedINSTRUCTIONS:Rinse and thinly slice summer squash, zucchini and onion. Mix all vegetablestogether. Form cup shaped containers using heavy duty aluminum foil. Placeabout 1 cup of vegetable mix in each foil cup. Season to taste with your favoriteherbs and spices. Pinch top of foil cups together. To allow smoke penetration puta couple of small holes around top of each vegetable cup. Place foil cups insmoker at 220 F (104 C) for 1 hour. Serve.INSTRUCTIONS:Remove thick skin and trim fat leaving no more than 1/2” (13mm)thick covering on ham. Score ham. Combine syrup, ginger, nutmeg,and allspice in a small bowl. Place ham in a large dish and bastewith syrup mixture. Let ham stand in syrup mixture for 1 to 2 hoursbasting frequently until ham at room temperature. When ready tosmoke remove ham from dish and stud with cloves. Place ham in225 F (107 C) smoker. Cook for 2 to 3 hours. Baste with syrupmixture at least two times during cooking time. Before last hour ofsmoking, decorate ham with canned pineapple and cherries andbaste. Internal temperature of ham should be at 130 F to 140 F(54-60 C) when heated thru.TO ENSURE THAT IT IS SAFE TO EAT, FOOD MUST BE COOKED TO THE MINIMUM INTERNALTEMPERATURES LISTED IN THE TABLE BELOW.USDA* Safe Minimum Internal TemperaturesFish145 F (63 C)Pork160 F (71 C)Egg Dishes160 F (71 C)Steaks and Roasts of Beef, Veal or Lamb145 F (63 C)Ground Beef, Veal or Lamb160 F (71 C)Whole Poultry (Turkey, Chicken, Duck, etc.)165 F (74 C)Ground or Pieces Poultry (Chicken Breast, etc.) 165 F (74 C)123* United States Department of Agriculture
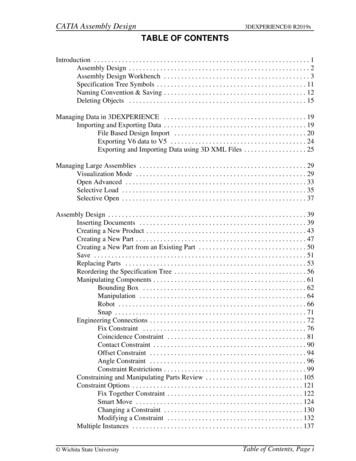
PARTS LISTIMPORTANT FACTS ABOUT USING SMOKER1 Maximum temperature setting is 275 F (135 C).21112 Wood chip loader and wood chip holder MUST be in place when using smoker.This minimizes the chance of wood flare ups. Wood chips must be used in order to produce smoke and create the smoke flavor.See “Wood Smoking Guide for Meats” section in this manual.610 Check grease tray often during cooking. Empty grease tray when full. Greasetray may need to be emptied periodically during cooking.4 Do not leave old wood ashes in the wood tray. Once ashes are cold empty tray.Tray should be cleaned out prior to and after each use to prevent ash buildup. This is a smoker. There will be a lot of smoke produced when using wood chips.Smoke will escape through seams and turn the inside of smoker black. This isnormal. To minimize smoke loss around door, door latch can be adjusted to furthertighten door seal against body.Loosen hex nut on doorlatch. Turn hook clockwiseto tighten as shown.Secure hex nut firmlyagainst door latch.93 Do not open smoker door unless necessary. Opening smoker door causes heat toescape and may cause wood to flare up. Closing the door will re-stabilize thetemperature and stop flare up.785ITEM NO.QUANTITY DESCRIPTIONQUANTITYDESCRIPTION11Smoker Body71Wood Chip Loader21Digital Control Panel81Grease Tray31Water Bowl92Adjustable Screw Leg (pre-assembled)41Wood Chip Holder102Leg Boot (pre-assembled)51Drip Pan111Air Damper (pre-assembled)64Cooking Rack121Door (pre-assembled)PARTS LISTITEM NO.DESCRIPTIONITEM NO.DESCRIPTION9907090049Door (Black)910050029Cooking Rack990050048Digital Control Panel Kit910050030Water BowlFor cooking racks, water bowl and drip tray use a mild dish detergent. Rinse and drythoroughly.990050049Cooking Rack Support Rack Kit9007090093Wood Chip Loader990070024Wood Chip Holder Kit910070028Drip PanFor wood chip holder and wood chip loader, clean frequently to remove ash build up,residue and dust.9007090092Wood Chip Holder910060047Grease Tray9907090033Element Kit9900500024Grease Tray Bracket Kit9907090047Body Kit (Black)910050006Adjustable Screw Leg990060221Air Damper Kit910050009Leg Boot990050222Door Latch Kit (Black)9807090004Instruction Manual9907090041Door Hinge Kit (Black)998050010Hardware KitHOW TO CLEAN SMOKERFor the interior and exterior of smoker simply wipe down with a damp cloth. Do notuse a cleaning agent. Make sure to dry thoroughly.Door seal and inside seam that seal attaches to MUST be cleaned after each use tokeep seal in proper working condition.11ITEM NO.ALWAYS MAKE SURE UNIT IS UNPLUGGED AND COOLTO THE TOUCH BEFORE CLEANING AND STORING.STOP!DO NOT RETURN TO RETAILERFor Assembly Assistance, Missing or Damaged PartsCall: MASTERBUILT Customer Service at 1-800-489-1581.4
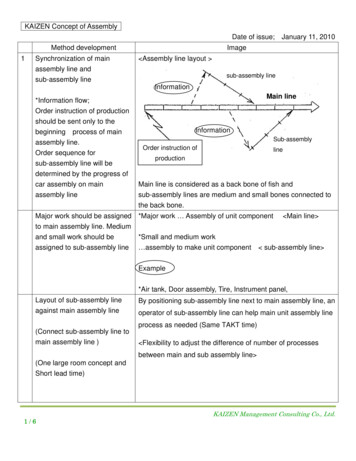
ASSEMBLY INSTRUCTIONSCONTROL PANEL OPERATING INSTRUCTIONSTools required for assembly: Phillips Head Screwdriver.tension nutStep 1Adjust feet by turningclockwise/counter-clockwise sothat smoker is level when unit isupright. Once level, secure back legpositions with attachedtension nuts.Note: Direct sunlight may interfere with reading LED display, block light if needed.To set temperature: Press ON button. Press SET TEMP button once-LED display will blink. Use /- to set temperature. Press SET TEMP button again to lock in temperature.Note: Heating will not begin until timer is set. To set timer: Press SET TIME button once-LED display for hours will blink. Use /- to set hours. Press SET TIME button again to lock in hours. The minutes LED will start blinking. Use /- to set minutes. Press SET TIME to lock in minutes and start cook cycle.Heat will turn off when time has expired.To RESET control panel:If control panel shows an error message, turn electric smoker off, unplug unit from outlet, waitten seconds, plug unit back into outlet, then turn electric smoker on. This will reset control panel.TROUBLESHOOTING GUIDESymptomPower light won't come onStep 2Position control panel to top ofsmoker.Align slot on wire connecter fromcontrol panel with tab on wireconnecter on smoker as shown andconnect together.CauseNot plugged into wallCheck wall connectionHouse fuse trippedMake sure other appliances are not operating onthe same electrical circuit. Check household fuses.Wire connector on controller not properly See Step 2 on Page 5connected to smokerController malfunctioningContact Masterbuilt at 1.800.489.1581Unit takes excessive amount of time to Unit plugged into an extension cordheat up (longer than 60-70 min)Door not closed properlyController malfunctioningThere is a gap between the door and Latch not holding door closedthe smoker when in useDoor alignmentDamaged door sealDrip pan not in placeGrease is leaking out of smokerthrough door and legsNo smokeSet unit so an extension cord does not have to beusedClose door and fasten latch securelyContact Masterbuilt at 1.800.489.1581Adjust latch to hold door tighter against bodyContact Masterbuilt at 1.800.489.1581Contact Masterbuilt at 1.800.489.1581Reposition so hole lines up with drain hole inbottom of unitClean unitExcess grease or oil build-up in unitDrain tube in back of unit is not draining Check drain tube positioning at back of unitNo wood chipsAdd wood chips See Page 9Temperature rapidly decreased, or shut Faulty control unitdown after few hours of use5Possible SolutionContact Masterbuilt at 1.800.489.1581Controller displaying error messageController malfunctioningContact Masterbuilt at 1.800.489.1581Power light is on, unit isn'theatingController/unit malfunctioningContact Masterbuilt at 1.800.489.1581Controller does not adjust heatController/unit malfunctioningContact Masterbuilt at 1.800.489.158110
HOW TO USE WOOD CHIP LOADERASSEMBLY INSTRUCTIONS ContinuedPre-soak wood chips for at least30 minutes.Step 3Before starting unit, place 1 cup ofwood chips in chip loader.Mount control panel by insertingstabilizing screw head into keyholeas shown.Never use more than 1 cup ofwood chips at a time.stabilizing screwInsert wood chip loader into smoker.Wood chips should be level with toprim of wood chip loader.Note: Stabilizing screw may needslight adjustment for snug fit.Turn handle to “Unload” mark onsmoker. Wood will drop onto woodchip holder. Turn handle to “Load”and leave wood chip loader in placeinside smoker.Check wood chip holder periodicallyto see if wood has burned down byremoving wood chip loader andlooking into smoker through hole.Add more chips as needed.keyholeWood chip loader must be pulled outcompletely from smoker whenchecking wood chip level.LoadUnloadAdding more wood duringsmoking process:Caution: Keep smoker door closedwhen adding wood chips.Note: Wood chip loader will be HOTeven if handle is not.To add wood, turn handle to “Load”mark on smoker.Pull wood chip loader from smoker.LoadUnloadPlace wood chips in wood chiploader and re-insert into smoker.Step 4Secure control panel to smoker with(2) m5X.08x10 panhead screwsprovided.Note: Do not over tighten.Turn handle to “Unload” mark onsmoker. Wood will drop onto woodchip holder.Temperature may spike briefly afterwood is added. It will stabilize aftera short time. Do not adjust.CAUTIONWhen door is opened a flare up may occur. Should wood chips flare up, immediately closedoor, wait for wood chips to burn down then open door again. Do not spray with water.96
ASSEMBLY INSTRUCTIONS ContinuedASSEMBLY INSTRUCTIONS ContinuedSOME PARTS NOT SHOWN FORCLARITY.SOME PARTS NOT SHOWN FORCLARITY.Step 5Place wood chip holder in smoker asshown.Step 7Slide cooking racks onto guidesinside smoker.Note: Wood chip holder and woodchip loader MUST be in place whenusing smoker. This minimizes thechance of wood flare ups.Step 8Slide brackets on back of greasetray onto tabs on back of smokerbody until grease tray stops.SOME PARTS NOT SHOWN FORCLARITY.Step 6Place water bowl onto lower bracketinside smoker.Place drip tray inside smoker belowheating element as shown.Note: Water bowl must always be inplace during smoking process, evenif there is no water or other liquid inbowl. Bowl will prevent food fromdripping onto wood chips.PRESEASON INSTRUCTIONSPreseason smoker prior to first use. Make sure water pan is in place with NO WATER. Settemperature to 275 F (135 C) and run unit for 3 hours. Shut down and allow to cool. Some smokemay appear during this time, this is normal.During last 45 minutes, add 1 cup of wood chips in chip loader to complete preseasoning.SMOKER IS READY TO USE78
Keep this manual for future reference. Some parts may have sharp edges handle with care. WARNING Masterbuilt Manufacturing, Inc 1 Masterbuilt Court Columbus, Georgia 31907 Customer Service 1-800-489-1581 Tools required for assembly: Phillips Head Screwdriver. Manual Code: 9807090004 091103-04SS ASSEMBLY, CARE & USE MANUAL WARNING & SAFETY .