Transcription
Owner’s Manual & Safety InstructionsSave This Manual Keep this manual for the safety warnings and precautions, assembly,operating, inspection, maintenance and cleaning procedures. Write the product’s serial number in theback of the manual near the assembly diagram (or month and year of purchase if product has no number).Keep this manual and the receipt in a safe and dry place for future reference.WITH NIGHT VISIONVisit our website at: http://www.harborfreight.comEmail our technical support at: productsupport@harborfreight.comWhen unpacking, make sure that the product is intactand undamaged. If any parts are missing or broken,please call 1-888-866-5797 as soon as possible.Copyright 2022 by Harbor Freight Tools . All rights reserved.No portion of this manual or any artwork contained herein may be reproduced inany shape or form without the express written consent of Harbor Freight Tools.Diagrams within this manual may not be drawn proportionally. Due to continuingimprovements, actual product may differ slightly from the product described herein.Tools required for assembly and service may not be included.Read this material before using this product.Failure to do so can result in serious injury.SAVE THIS MANUAL.22c
WARNING SYMBOLS AND DEFINITIONSThis is the safety alert symbol. It is used to alert you topotential personal injury hazards. Obey all safety messagesthat follow this symbol to avoid possible injury or death.Indicates a hazardous situation which, if not avoided,will result in death or serious injury.Indicates a hazardous situation which, if not avoided,could result in death or serious injury.Indicates a hazardous situation which, if not avoided,could result in minor or moderate injury.Addresses practices not related to personal injury.Important Safety InformationRead all safety warnings and instructions.Failure to follow the warnings and instructions may result inelectric shock, fire and/or serious injury.Save all warnings and instructions for future reference.Installation Safety1.2.Keep children and bystanders away3.while installing a camera. Distractionscan cause you to lose control.4.Do not overreach when installingthis product. Keep proper footingand balance at all times. This enablesbetter control in unexpected situations.Page 2Wear ANSI-approved safetygoggles during installation.This product is not a toy. Mountit out of reach of children.For technical questions, please call 1-888-866-5797.Item 69654
Operation Safety1.Do not operate electrically powered4.products in explosive atmospheres,such as in the presence of flammableliquids, gases, or dust. Electricallypowered products create sparkswhich may ignite the dust or fumes.Do not abuse the Power Cord. Neveruse the cord for unplugging the plugfrom the outlet. Keep cord awayfrom heat, oil, sharp edges or movingparts. Damaged or entangled cordsincrease the risk of electric shock.2.The adapter must match the outlet.Never modify the plug in any way.Unmodified plugs and matching outletswill reduce risk of electric shock.5.3.Do not expose the Power Adapter ofthis product to rain or wet conditions.Water entering the Power Adapter willincrease the risk of electric shock.The warnings, precautions, andinstructions discussed in this instructionmanual cannot cover all possibleconditions and situations that mayoccur. It must be understood by theoperator that common sense andcaution are factors which cannotbe built into this product, but mustbe supplied by the operator.4.Disconnect the Power Adapterfrom the power source beforemaking any adjustments, changingaccessories, or storing this product.Such preventive safety measuresreduce the risk of electric shock.5.Maintain labels and nameplateson the camera. These carryimportant safety information. Ifunreadable or missing, contactHarbor Freight Tools for a replacement.Service Safety1.Product service must be performedonly by a qualified technician.2.When servicing a product, useonly identical replacement parts.3.Maintain this product with care.Keep this product clean. Do not usea damaged product. Tag damagedproducts “Do not use” until repaired.SAVE THESE INSTRUCTIONS.Item 69654For technical questions, please call 1-888-866-5797.Page 3
GroundingTO PREVENT ELECTRIC SHOCK AND DEATH FROMINCORRECT GROUNDING WIRE CONNECTION:Check with a qualified electrician if you are in doubt as to whether theoutlet is properly grounded. Do not modify the power cord plug providedwith the camera. Never remove the grounding prong from the plug. Do not use thecamera if the power cord or plug is damaged. If damaged, have it repaired by aservice facility before use. If the plug will not fit the outlet, have a proper outletinstalled by a qualified electrician.1.The included adapter doesnot require grounding.2.The adapter may be used in eitherof the 120 volt outlets shown in thepreceding illustration. (See Figure A.)Figure A: Outlets for 2-Prong PlugExtension CordsNote: Do not use an extension cord with this item’s adapter.SymbologyDouble InsulatedVACAAmperesVolts Alternating CurrentSpecificationsPowerAdapter100-240 VAC / 50-60 Hz / 0.3A Input6.1VDC-12VDC / 0.1-1.5A /12W OutputResolution1024 x 480Cable80 feetAngle90º up and down, 360º side to sidePage 4Night VisionTypeInfrared LED’s with Low Light SensorImage TypeDaylight: ColorInfrared: Black & WhiteOperatingTemperature14 ºF to 122 ºFFor technical questions, please call 1-888-866-5797.Item 69654
Installation InstructionsRead the ENTIRE IMPORTANT SAFETY INFORMATION sectionat the beginning of this manual including all text undersubheadings therein before set up or use of this product.TO PREVENT SERIOUS INJURY FROM ELECTRIC SHOCK:Unplug the Power Adapter from its electrical outlet before installation.ComponentsCableCameraCameraPhone ideo Plug Audio PlugBlackPower PlugMountingScrewsDrywallAnchorsBefore Mounting1.Before mounting the Security Camera,test the camera by connecting allthe cables and making sure that theunit functions properly as describedin the following Set Up section.c. Choose a location high enough sothat it is out of reach of childrenand others who might tamperwith the unit, but still covers thedesired viewing area adequately.2.When planning the mountinglocation and angle of the Camera,consider the following:d. Take into consideration the length ofthe cable and the need to place theModular Jack in a safe, dry location.Do not expose the Modular Jackto weather. Route the cord soas to avoid a tripping hazard.a. Do not mount the Camera inbright or direct sunlight.b. At night windows can reflect backinto the Camera, interfering withthe image. Test the Camera in theintended location before mounting.Item 69654For technical questions, please call 1-888-866-5797.Page 5
Mounting1.Adjust the Camera to the desired angle:a. Remove adhesive pad and inserta screwdriver (sold separately)into the center of the CameraBase and loosen the bolt.b. Adjust the angle of the Camera,then tighten the bolt.2.Mount the Camera to the chosenlocation, using the three includedScrews through the three holesin the Camera Base.ScrewsCamerac. Replace the adhesive pad.Camera BaseCamera BaseWARNING! TO PREVENTSERIOUS INJURY: Check forhidden wiring before securing.Note: The adhesive pad can be usedinstead of the screws for indoor locations.Do not use adhesive pad to mountoutdoors, it is not weatherproof.Page 6For technical questions, please call 1-888-866-5797.Item 69654
Cable Connection1.Connect the Camera Phone Jackto the Modular Jack.Modular Jack2.Insert the Yellow Plug of the Cable intothe Television/Monitor’s Video Input Port(Television/Monitor sold separately).3.Insert the White Plug of the Cableinto the Television/Monitor’sAudio Input Port.4.Insert the Black Plug of the Cable intothe Power Adapter’s cable connector.5.Then, plug the Power Adapterinto the nearest 120 volt,grounded, electrical outlet.CAUTION! The Power Adapter MUSTbe used indoors in a clean, dry location.CameraPower AdapterTelevision/Monitor (not included)CableItem 69654For technical questions, please call 1-888-866-5797.Page 7
Operating InstructionsRead the ENTIRE IMPORTANT SAFETY INFORMATION sectionat the beginning of this manual including all text undersubheadings therein before set up or use of this product.1.Turn on the television/monitor andset to video/AV mode. The camera’sview should appear on the screen.Page 82.The Camera will operate continuously(day and night) while thePower Adapter is plugged in.3.When not using the Camera, unplug thePower Adapter from the electrical outlet.For technical questions, please call 1-888-866-5797.Item 69654
Inspection, Maintenance, and CleaningProcedures not specifically explained in this manual mustbe performed only by a qualified technician.TO PREVENT SERIOUS INJURY FROM ELECTRIC SHOCK:Unplug the Power Adapter from its electrical outletbefore inspection, maintenance, or cleaning.1.BEFORE EACH USE, inspect thegeneral condition of the Camera.Check for loose screws, misalignmentor binding of moving parts, crackedor broken parts, damaged electricalwiring, and any other conditionthat may affect its safe operation.If a problem occurs, have the problemcorrected before further use.Do not use damaged equipment.2.WEEKLY: Wipe off Camera Lens witha soft, clean, moist cloth. Then dry.TroubleshootingProblemPossible CausesProbable SolutionsCamera does not work.1. No power at outlet.2. Cables not properlyconnected.1. Check power at outlet.2. Check that all cables aresecurely connected.Poor image quality.Camera lens is dirty.Clean Camera lens.View undesirable.Camera out of adjustment.Adjust Camera up, down, left, andright to obtain desired view.Image on the televisionis upside down.Camera not mounted correctly.Reposition camera mount to mounting holesat the top rear of the camera (see page 8).Item 69654For technical questions, please call 1-888-866-5797.Page 9
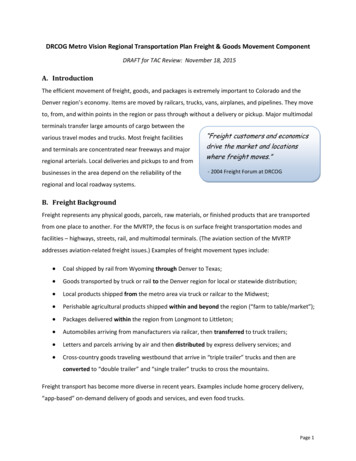
Parts List and DiagramPartDescriptionQty1Camera12Power Adapter13Cable14Screw Kit (3 screws and 3 anchors)11324Record Product’s Serial Number Here:Note: If product has no serial number, record month and year of purchase instead.Note: Some parts are listed and shown for illustration purposes only, and are not availableindividually as replacement parts. Specify UPC 193175459985 when ordering parts.Page 10For technical questions, please call 1-888-866-5797.Item 69654
PLEASE READ THE FOLLOWING CAREFULLYTHE MANUFACTURER AND/OR DISTRIBUTOR HAS PROVIDED THE PARTS LIST ANDASSEMBLY DIAGRAM IN THIS MANUAL AS A REFERENCE TOOL ONLY. NEITHER THEMANUFACTURER OR DISTRIBUTOR MAKES ANY REPRESENTATION OR WARRANTYOF ANY KIND TO THE BUYER THAT HE OR SHE IS QUALIFIED TO MAKE ANYREPAIRS TO THE PRODUCT, OR THAT HE OR SHE IS QUALIFIED TO REPLACE ANYPARTS OF THE PRODUCT. IN FACT, THE MANUFACTURER AND/OR DISTRIBUTOREXPRESSLY STATES THAT ALL REPAIRS AND PARTS REPLACEMENTS SHOULDBE UNDERTAKEN BY CERTIFIED AND LICENSED TECHNICIANS, AND NOT BY THEBUYER. THE BUYER ASSUMES ALL RISK AND LIABILITY ARISING OUT OF HIS ORHER REPAIRS TO THE ORIGINAL PRODUCT OR REPLACEMENT PARTS THERETO, ORARISING OUT OF HIS OR HER INSTALLATION OF REPLACEMENT PARTS THERETO.FCC Statement – Incidental Emitter:This device complies with part 15 of the FCC Rules. Operationis subject to the following two conditions:(1) This device may not cause harmful interference, and(2) this device must accept any interference received, includinginterference that may cause undesired operation.Note: This equipment has been tested and found to comply with the limits for a Class Bdigital device, pursuant to part 15 of the FCC Rules. These limits are designed to providereasonable protection against harmful interference in a residential installation. Thisequipment generates, uses and can radiate radio frequency energy and, if not installedand used in accordance with the instructions, may cause harmful interference to radiocommunications. However, there is no guarantee that interference will not occur in aparticular installation. If this equipment does cause harmful interference to radio ortelevision reception, which can be determined by turning the equipment off and on, the useris encouraged to try to correct the interference by one or more of the following measures:– Reorient or relocate the receiving antenna.– Increase the separation between the equipment and receiver.– Connect the equipment into an outlet on a circuit differentfrom that to which the receiver is connected.– Consult the dealer or an experienced radio/TV technician for help.Item 69654For technical questions, please call 1-888-866-5797.Page 11
Limited 90 Day WarrantyHarbor Freight Tools Co. makes every effort to assure that its products meet highquality and durability standards, and warrants to the original purchaser that this productis free from defects in materials and workmanship for the period of 90 days from thedate of purchase. This warranty does not apply to damage due directly or indirectly,to misuse, abuse, negligence or accidents, repairs or alterations outside our facilities,criminal activity, improper installation, normal wear and tear, or to lack of maintenance.We shall in no event be liable for death, injuries to persons or property, or for incidental,contingent, special or consequential damages arising from the use of our product.Some states do not allow the exclusion or limitation of incidental or consequentialdamages, so the above limitation of exclusion may not apply to you. THIS WARRANTYIS EXPRESSLY IN LIEU OF ALL OTHER WARRANTIES, EXPRESS OR IMPLIED,INCLUDING THE WARRANTIES OF MERCHANTABILITY AND FITNESS.To take advantage of this warranty, the product or part must be returned to uswith transportation charges prepaid. Proof of purchase date and an explanationof the complaint must accompany the merchandise. If our inspection verifiesthe defect, we will either repair or replace the product at our election or we mayelect to refund the purchase price if we cannot readily and quickly provide youwith a replacement. We will return repaired products at our expense, but if wedetermine there is no defect, or that the defect resulted from causes not within thescope of our warranty, then you must bear the cost of returning the product.This warranty gives you specific legal rights and you may alsohave other rights which vary from state to state.26677 Agoura Road Calabasas, CA 91302 1-888-866-5797
WITH NIGHT VISION Owner's Manual & Safety Instructions Save This Manual Keep this manual for the safety warnings and precautions, assembly, operating, inspection, maintenance and cleaning procedures. Write the product's serial number in the back of the manual near the assembly diagram (or month and year of purchase if product has no number).