Transcription
Personal Viewing System (PVS15)Operation and Maintenance Guide chPOWERvolaudiosource1234567890
Radio Frequency Interference (RFI)Always follow basic safety precautions when using thisequipment to reduce the chance of injury, fire, or damage.Federal Communications Commission, Part 15 Read all instructions before installing and using theequipment. Follow any labels on the equipment.WARNING: To prevent fire or electrical shock, do not expose thisequipment to rain, moisture or excess heat. Use the power adapter provided with the equipment. Plug thepower adapter into an appropriate, grounded power outlet asmarked on the equipment. Do not use accessory attachmentsthat are not recommended by the manufacturer, as suchattachments may cause injuries.The unit has been tested and found to comply with the limits forPart 15 of the FCC Rules. These limits are designed to providereasonable protection against harmful interference when theequipment is operated in a commercial environment.The PVS generates, uses, and can radiate radio frequency energyand, if not installed and used in accordance with the assembly,installation and maintenance instruction manuals, may causeharmful interference to radio communications. Position power cables so that they are not walked on orpinched by items placed upon or against them. Make sure that the equipment has adequate ventilation. Donot place anything on top of or over the equipment. Do notuse on a cushioned surface that could block the ventilationopenings. Keep the equipment away from water and moisture. Locate the equipment away from sources of heat, such asradiators, heat registers, and stoves. Avoid temperatureextremes. Reorient or relocate the receiving antenna. Increase the separation between the equipment and thereceiver. Avoid dropping anything on or spilling anything inside theequipment, because doing so can damage the electronics. Connect the equipment into a separate outlet that uses adifferent circuit than the receiver. Do not attempt to service the unit yourself except to follow themaintenance instructions found in this manual.Consult a Cardio Theater or an experienced radio/TV technicianfor help.However, there is no guarantee that interference will not occur ina particular installation. If the unit does cause harmful interferenceto radio or television reception, which can be determined byturning the equipment off and on, the user is encouraged to try tocorrect the interference by one or more of the following measures:IMPORTANT SAFETY INSTRUCTIONSImportant Safety InstructionsWARNING: Per FCC rules, changes or modifications not expresslyapproved by Cardio Theater could void the user’s authority tooperate the equipment.Operation and Maintenance Guide: Important Safety Instructions1
Canadian Department of CommunicationsThe PVS does not exceed the Class A limits for radio noiseemissions from a digital apparatus set out in the Radio InterferenceRegulations of the Canadian Department of Communications.Le présent appareil numérique n’émet pas de bruitsradioéélectriques dépassant les limites applicables aux appareilsnumériques de la class A prescrites dans le Règlement sur lebrouillage radioélectrique édicté par le ministére desCommunications du Canada.Operation and Maintenance Guide: Important Safety Instructions2
Table of ContentsImportant Safety Instructions .1Using the Video Setup Menu . 12Radio Frequency Interference (RFI) .1Canadian Department of Communications . 2Maintenance and Troubleshooting . 15Cleaning the PVS and Controller .15Checking the Standalone Controller .15Troubleshooting the PVS .16Replacing the Headphone Jack .17Before You Begin .4Required Tools . 5Obtaining Service . 5Limited Warranty . 18Initial Search for Channels .6Manually Adding or Deleting Channels .7Using the Standalone Controller toSet Up Custom Features .8Automatic Power On/Off Setup . 8Default Channel Setup . 9TV and DVD/CD Setup .10Quick Reference .11Operation and Maintenance Guide: Table of Contents3
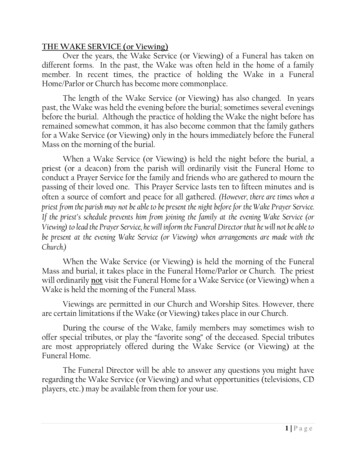
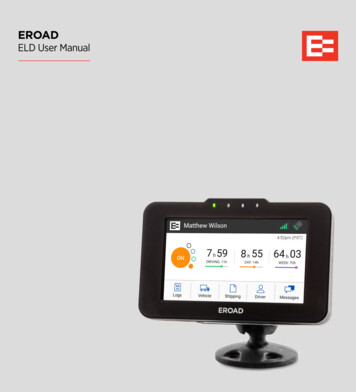
Before You BeginThe Cardio Theater Personal Viewing System (PVS) addspersonalized entertainment to workouts. A person steps on theexercise equipment, plugs headphones into the jack, selects a TVprogram using the Channel buttons, and begins exercising. Theprogram appears on a bright, full-color liquid crystal display (LCD)directly in front of the person, rather than at a distance on the wall.Volume buttons on the standalone controller allow a person tochange the audio level. Depending on how the PVS screen isconfigured, Closed Captioning may appear allowing people toexercise without headphones.PVS screenFitness facilities can add a PVS screen to any Precor exerciseequipment using an integrated bracket assembly. The bracketassembly allows the PVS screen to be installed conveniently closeto people exercising. For exercise equipment from othermanufacturers, fitness facilities can use a stand designed to safelysupport the PVS screen, and place the stand near the equipment.Figure 1 shows the PVS screen and standalone controller. Thestandalone controller is attached during installation; it can beattached to the handlebars of almost any exercise equipment, exceptthose with handlebars that move.Red LED turns on when PVS screenis on and flashes to indicateprogramming mode.Power button turns the screenon and off. Channel buttons let youscroll through theavailable channels.chPOWERvolaudiosource123456789Volume buttons let you adjust theaudio level when usingheadphones.0Number keys let youenter specific channelnumbers. Headphone jackFigure 1: Overview of PVS screen and standalone controllerOperation and Maintenance Guide: Before You Begin4
The PVS screen receives power from a standard AC power outlet. Itdoes not rely on power from the exercise equipment.The standalone controller receives power from the PVS screen. Thecoiled power cable is connected to the screen (and controller)during assembly.This guide explains how to set up some custom features on the PVSthat the fitness facility might want to use, such as Automatic PowerOn/OFF and Default Channel. It also lists all of the video setupoptions available and covers any maintenance requirements. Forproper operation and maintenance, please read this guidethoroughly and follow the instructions.For information about installing the PVS and standalone controlleron equipment, refer to the appropriate integrated bracket assemblyinstructions. To install the PVS on a stand, refer to the PersonalViewing System (PVS) Stand Assembly Instructions.Important: This guide covers PVS software version 5.04 and 5.05.Your software may be different from that described in this guide.Required ToolsObtaining ServiceDo not attempt to service any of the equipment provided in theCardio Theater PVS system except as described in this guide. Forinformation about product operation or service, refer to the CardioTheater web site at www.cardiotheater.com or contact an authorizedCardio Theater Technical Support Representative at1-800-776-6695 or service@cardiotheater.com. Representativesare available to serve you from 6:00 am to 5:00 pm, Monday throughFriday, U.S.A. Pacific Time.Returning Equipment to Cardio TheaterTo return equipment to Cardio Theater for any reason, you mustcontact Cardio Theater Technical Support and obtain a returnauthorization (RMA) number. When requesting the RMA number,explain why you are returning the equipment, for example youordered too many controllers and the extra controller can bereturned to stock, or the equipment needs repairs.Important: Equipment must be shipped with an RMA number inorder for Cardio Theater to process it. Any equipment receivedwithout an RMA number will be returned to the sender.You will need a a remote control (CXITVRMT-102) to perform anumber of important functions on the PVS screen, from initiallysetting up the available channels to customizing its operation. Youmay find it useful to have more than one remote control in yourfacility. Contact your Cardio Theater dealer to order one or moreremote controls as desired.Operation and Maintenance Guide: Before You Begin5
Initial Search for ChannelsAfter you install the PVS hardware and all power and cable orantenna connections are completed, turn on the PVS screen and runthe automatic search feature. This feature identifies the TV channelsthat are available. After the feature runs, the PVS screen displaysonly those channels that are available.Important: You will need the remote control to run the automaticsearch feature. The standalone controller does not access the VideoSetup menu, so you cannot use it for this procedure.While you are in the Video Setup menu, if you do not press a buttonor complete a sequence within 15 seconds, the Video Setup menudisappears and the PVS screen will return to normal viewing mode.9. Make sure Auto Search is highlighted and press the SEL button.10. Select the appropriate mode for the input you plan to use, andthen press the SEL button. Typically, you will choose the CableTV mode.The screen shows the message “Scanning XX STOP: Menukey.” The XX changes as the automatic programming featurescans the available channels. This process may take severalminutes to finish. When done, the lowest programmed channelappears on the screen.Note: You can stop the automatic programming process at anytime by pressing the Menu button.1. Turn on the PVS screen.2. Press the MENU button on the remote control. The Video Setupmain menu appears on the PVS screen.Note: If the Video Setup menu does not appear, try moving theremote control closer to the screen and press the Menu buttonagain. The remote control works best close to the screen.3. Use the Channel (CH) – button to move down to TV Install.4. Press the SEL button to select TV Install.5. Move down to TV System and press the SEL button.6. Highlight USA and press the SEL button. “TVSystem–USA”appears on the screen confirming your selection.7. Press the MENU button again to display the Video Setup menu.8. Use the channel (CH)-button to move down to TV Install, andpress the SEL button.Operation and Maintenance Guide: Initial Search for Channels6
Manually Adding or Deleting ChannelsSometimes, after running the automatic search feature, the PVSscreen does not have all the channels you require. Follow theseinstructions to add any missed channels, or delete unwantedchannels.Important: You will need the remote control to add or deletechannels. The standalone controller does not access the VideoSetup menu, so you cannot use it for this procedure.While you are in the Video Setup menu, if you do not press a buttonor complete a sequence within 15 seconds, the Video Setup menudisappears and the PVS screen will return to normal viewing mode.1. Make sure the PVS screen is turned on.5. Press the SEL button to select TV Install.6. Move down to Add/Erase and press the SEL button. The currentstatus of the specified channel appears on the screen.7. Use the Volume (VOL) and – buttons to select the Add ( ) orErase (–) command. “Added” or “Erased” appears on the screenbased on the action specified.8. Use the Channel buttons to scroll through the channels toconfirm that the channel has been added or deleted as desired.9. Repeat these steps to add or remove additional channels asneeded.2. Specify the channel you want to add or delete using the numberbuttons on the remote control. The specified channel appears onthe PVS screen.3. Press the MENU button on the remote control. The Video Setupmain menu appears on the PVS screen.4. Use the Channel (CH) – button to move down to TV Install.Operation and Maintenance Guide: Manually Adding or Deleting Channels7
Using the Standalone Controller to Set Up Custom FeaturesCardio Theater has customized a number of features that arecommonly used in a fitness facility. The customization allows you toeasily enable or disable a feature using the standalone controller.Use of these features is optional. Automatic Power On/Off feature causes the PVS screen to turnoff automatically when headphones are removed and turn on whenheadphones are inserted. Default Channel feature lets you specify a channel that willappear whenever the screen is turned on. You might use thisfeature if you offer an in-house channel. TV and DVD/CD feature allows access to a DVD or CD playerwhen one is installed. Once the feature is enabled, a person canpress the Source button on the standalone controller to switch tothe DVD player and watch a movie. Or, with the TV on, a personcan press the Audio button and listen to a favorite CD whilewatching a TV program.This section provides instructions for setting up each of thesefeatures. At the end of this section, you will find a table that providesa quick reference to the buttons you press. Once you are familiarwith setting up these features, you may find the table is all you need.Important: You must use the standalone controller to set up thesefeatures. The remote control accesses the standard PVS features,not the customized Cardio Theater features.Automatic Power On/Off SetupThe Automatic Power On/Off feature turns the PVS screen onautomatically when headphones are inserted into the headphonejack. At the end of the exercise session, when the headphones aredisconnected from the jack, the screen turns off after approximately30 seconds. This feature is typically used to conserve power andlengthen screen life.This procedure uses the standalone controller only.1. Press both Volume and buttons simultaneously until the redLED begins flashing (about 5 seconds). The flashing LEDindicates that the PVS screen has entered Program Devicemode. If nothing happens, try pressing both Volume and buttons at the same time again.Note: While you are in Program Device mode, if you do not pressa button within 15 seconds, the PVS screen will time out andreturn to normal viewing mode.2. Choose one based on what you want to do: To enable the feature, press the Channel To disable the feature, press the Channel As soon as you press a button, the PVS screen returns to normalviewing mode and the red LED stops flashing.Operation and Maintenance Guide: Using the Standalone Controller to Set Up Custom Features8
Default Channel SetupThis feature lets you determine what channel appears when the PVSscreen is turned on. Your fitness facility can offer an in-housechannel or special informative channel when the Default Channelfeature is enabled.With this feature enabled, when someone turns off the PVS screen,it will go through a specific power-down sequence that sets thescreen to the desired channel before it turns off. Then, when thescreen is turned on, that channel appears.When this feature is not enabled, the PVS screen just turns off.Then, when someone turns it on, the last channel being viewed willappear on the screen.2. To enable this feature, specify the desired default channel usingthe 0–9 keys on the standalone controller, and entering up tothree numbers for cable TV mode (or two numbers for air TVmode). The specified channel appears on the screen. Then,either wait for the timeout or press a Volume button.The standalone controller stores the specified channel in memoryas the default.3. To disable this feature, press one of the Volume buttons withoutpressing any number keys.The PVS screen returns to normal viewing mode and the redLED stops flashing.This procedure uses the standalone controller only.1. Press both Volume and buttons simultaneously until the redLED begins flashing (about 5 seconds). The flashing LEDindicates that the PVS screen has entered Program Devicemode.Note: While you are in Program Device mode, if you do not pressa button within 15 seconds, the PVS screen will time out andreturn to normal viewing mode.Operation and Maintenance Guide: Using the Standalone Controller to Set Up Custom Features9
TV and DVD/CD SetupEnable this feature when the PVS screen is connected to a DVD orCD player. Then, a person can press the Source button on thestandalone controller to switch from normal TV mode to the DVDplayer and watch a movie. Or, if a CD player is connected, a personcan press the Audio button and listen to a favorite CD whilewatching a TV program.2. To enable this feature, press the Source button on thestandalone controller. Both Source and Audio buttons can nowbe used.3. To disable this feature, when no DVD or CD player is connected,press the Audio button.The PVS screen returns to normal viewing mode and the redLED stops flashing.Only one of these features is available at a time. For example, aperson cannot watch a movie and listen to a CD at the same time.When a person is watching a DVD, the CD player option is notavailable.If you enable this feature, you might consider enabling the ClosedCaptioning feature as well. This will allow people watching the TVand listening to a CD to better follow the TV programming byreading the text that appears. You enable Closed Captioning throughthe Video Setup menu using the remote control. Refer to Using theVideo Setup Menu for more information.This procedure uses the standalone controller only.1. Press both Volume and buttons simultaneously until the redLED begins flashing (about 5 seconds). The flashing LEDindicates that the PVS has entered Program Device mode.Note: While you are in Program Devide mode, if you do not pressa button within 15 seconds, the PVS screen will time out andreturn to normal viewing mode.Operation and Maintenance Guide: Using the Standalone Controller to Set Up Custom Features10
Quick ReferenceOnce you are familiar with setting up the customized Cardio Theaterfeatures, you may find the following table useful as a quick reference.Remember these features can only be set up using the standalonecontroller.Table 1: Quick reference to customized featuresActionAutomatic PowerOn/Off FeatureDefault ChannelFeatureTV and DVD/CDFeatureAccessfeaturePress both Volume Press both Volume Press both Volume and buttons and buttons and buttonsEnablePress Channel Enter a channelPress Sourcenumber, then press buttonVolume DisablePress Channel Press Volume Press Audio buttonOperation and Maintenance Guide: Using the Standalone Controller to Set Up Custom Features11
Using the Video Setup MenuThe PVS screen offers a number of features that are accessible onlyfrom the Video Setup menu. You access the Video Setup menuusing the remote control. Access to this menu and its featuresshould be limited to facility personnel.While you are in the Video Setup menu, if you do not press a buttonwithin 15 seconds, the Video Setup menu disappears and the PVSscreen will return to normal viewing mode.Table 2 gives an overview of how to use the menu. Tables 3 and 4show the main and second-level menus.Table 3: Main menu of Video SetupMain Menu SelectionDescriptionPictureAllows you to adjust contrast, brightness, hueand other features to improve the quality ofthe picture shown on the screen.SoundProvides controls for changing the quality ofthe audio and adjusting audio through thespeakers.TV InstallAllows you to configure the PVS channels.CaptionDisplays any captioning provided by theprogramming.V-ChipAllows you to block unwanted TV programsbased on different ratings.Table 2: How to use the Video Setup menuActionRemote ControlAccess Video Setup menuPress Menu buttonOSDLets you set the language for on-screendisplays and other OSD features.Move up and down throughthe menuUse Channel (CH) and – buttonsInputLets you specify which hardware input youwant the PVS screen to use.Select an itemPress SEL buttonInformationDisplays information about the PVS screenincluding software version.Change a parameter valueUse Volume (VOL) and – buttonsGo back to the previous menulevelPress MENU buttonEnter a passwordUse the number buttonsOperation and Maintenance Guide: Using the Video Setup Menu12
Table 4: Second-level menuMain MenuSecond LevelInformationTV InstallAuto SearchAir TV HRCCable TV IRCHRCIRCTV SystemAutoUSAJapanMain MenuSecond LevelInformationPictureContrastDefault 50 barsBrightnessDefault 50 barsSaturationDefault 50 barsHueDefault 50 barsSharpnessDefault 4Fine TuneDefault 50 barsColor TempDefault Mode 2Add/EraseSpecify the channel you wantto add or erase beforeselecting this commend. Usethe Volume and – buttonsto add or erase the channel.ResetSoundVolumeSelectable from integratedcontroller or remote controlTrebleDefault 50 barsNoise ReductionDefault OnBassDefault 50 barsAuto PowerBalanceDefault 50 barsMTS (stereo or mono)Default stereoDefault OffLets a facility use a circuitbreaker to turn off and on anynumber of PVS screens.When the PVS screens areturned on, they will return tothe channel and volume thatwere set when they wereturned off.Operation and Maintenance Guide: Using the Video Setup Menu13
Main MenuSecond LevelInformationCaptionCaption–OffDefault OffCC1CC2V-ChipOSDInputTV guideDefault NoneMPAA ratingDefault NoneChange PasswordDefault password 0000Do not forget your passwordonce set.OSD LanguageDefault EnglishOSD ControlDefault V PositionTVVideoS-VHSComponentInformationH FreqV FreqSoftware versionDisplays information aboutscreen. This manual coverssoftware version NRevC5.04and NRevC5.05.Operation and Maintenance Guide: Using the Video Setup Menu14
Maintenance and TroubleshootingIn general, the PVS screen and standalone controller require littlemaintenance and will rarely experience problems once installed.However, you may find the information in this section useful.This section also explains how to replace the headphone jack whenit no longer provides good audio quality.Cleaning the PVS and ControllerFor the Precor exercise equipment, follow the daily cleaninginstructions and cautionary statements found in the ProductOwner’s Manual.Checking the Standalone ControllerCheck the standalone controller often to make sure it is secure andcannot be moved. Also make sure that the controller is positioned sothat moisture from people exercising cannot enter through theconnection and damage the electronics.Make sure that the rubber boot around the RJ45 connector isproperly positioned. Push the rubber boot firmly into the recessaround the connector to ensure a tight seal.Periodically dust the PVS screen with a soft clean cloth.CAUTION: Do not use liquid cleaners or aerosol cleaners toclean the screen. Do not use any solvents such as alcohol andpaint thinner, or acidic cleaners.Each week, clean the standalone controller with a mild soap andwater solution. Lightly dampen a soft clean cloth with the solutionand wipe the controller. Do not use too much solution on the cloth orspray cleaning solution directly on controllers. Doing so could causemoisture to enter through the connector and damage the controller.Operation and Maintenance Guide: Maintenance and Troubleshooting15
Troubleshooting the PVSTable 5 may help you to understand and troubleshoot any problemsthat you encounter with the PVS screen and standalone controller. Ifthe suggestions in the table do not help you solve the problems thatyou encounter, please contact Cardio Theater Technical Support.Table 5: How to solve most problemsWhat to DoBars onscreenTry a new channel; it may be station trouble. Make surevideo cable is connected to connector on the back ofthe PVS screen. Check for local interference.Poor TVreceptionAdjust Sharpness under the Picture menu (in VideoSetup menu). Try a new channel; it may be stationtrouble. Make sure coaxial cable is securely connectedto its connector on the back of the PVS screen. Checkfor local interference.What to DoNo powerMake sure the red LED is lit on the screen and on thecontroller. Check the power adapter to see if the greenLED is lit. If Automatic Power On/Off feature isenabled, connect head phones to the jack.Ghosts inpictureTry a new channel; it may be station trouble. Make surecoaxial cable is securely connected to its connector onthe back of the PVS screen. Check for localinterference.No ClosedCaptioningMake sure Caption is On under the Caption feature inthe Video Setup menu. Closed Captioning may not beavailable on that channel; try a different channel.TV programcannot bewatchedClosedcaptioning isdelayedA delay between captioning and the actual dialogue iscommon in live broadcasts.Specify channel using 0–9 keys on the standalonecontroller or remote control. If necessary, rerun theScan Channel feature (see Initial Search forChannels.)No pictureMake sure the correct system has been specified inSystem Select in the TV Install menu (in Video Setupmenu). Make sure PVS screen is fully plugged into apower outlet. Push the Power button. Try a newchannel; it may be station trouble. Turn the PVS screenoff, and then turn it back on after one minute.Poor pictureAdjust controls such as Brightness, Hue, andSharpness under the Picture menu (in Video Setupmenu).No audioIncrease the audio level with the Volume button.Check the headphone jack. Replace the headphonejack if necessary.Poor audioRe-insert the plug into the headphone jack. Try movingthe plug in the jack to see if the sound improves.Replace the headphone jack if necessary.Operation and Maintenance Guide: Maintenance and Troubleshooting16
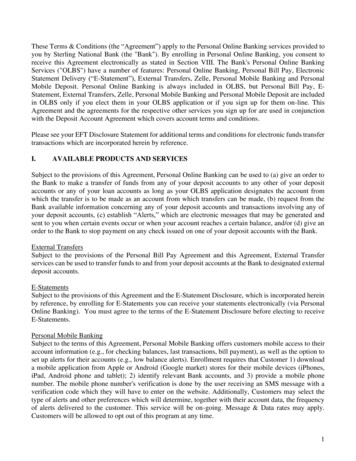
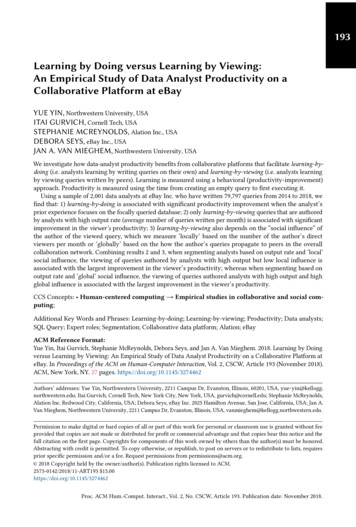
Replacing the Headphone Jack4. Remove the headphone jack.When someone using a controller experiences no sound or poorsound quality (such as intermittent sound or crackling), you shouldcheck the headphone jack. Try moving the headphone plug in theheadphone jack. If the problem continues, the jack should bereplaced.5. Insert a new headphone jack. Insert the two screws and tighten.The controller is designed to make changing the headphone jacka quick and easy job, one easily done at the facility. You will needa Phillips-head screwdriver to replace the headphone jack.6. If needed to re-attach the receiver, insert two wire ties throughthe holes in the mounting bracket on the back of the controller.7. If needed, place the receiver on the neoprene mounting pad orrubber adapter mounts, and then attach it to the equipment withthe wire ties. Use the pliers to tighten the wire ties so the receivercannot move.You do not need to disconnect the power cable from the controllerto perform this procedure.Important: Be sure to secure the receiver so that it cannotmove. If the receiver moves, it may damage the exerciseequipment as well as itself, and void the Limited Warranty.1. Determine whether or not you need to remove the receiver fromits location to access the two screws on the back that hold theheadphone jack.8. If you re-attached the receiver, cut off the excess plastic from thewire ties, being careful not to leave any sharp edges on the wireties.2. If needed, cut the two wire ties holding the receiver to theequipment. Remove the wire ties from the receiver and toss.9. Check the rubber boot over the connector to make sure it coversthe connector with a tight seal.3. Remove the two screws at the bottom of the receiver with aPhillips-head screwdriver. See Figure 2.Remove these twoscrewsFigure 2: Remove screws holding headphone jackOperation and Maintenance Guide: Maintenance and Troubleshooting17
Limited WarrantyPLEASE READ THESE WARRANTY TERMS AND CONDITIONS CAREFULLY BEFOREUSING YOUR CARDIO THEATER PRODUCT. BY USING THE EQUIPMENT, YOU ARECONSENTING TO BE BOUND BY THE FOLLOWING WARRANTY TERMS ANDCONDITIONS.Limited Warranty.Precor Incorporated (“Precor”) warrants all new Cardio Theater products to be free fromdefects in materials and manufacture for the warranty periods set forth below. The warrantyperiods commence on the invoice date of the original purchase. This warranty applies onlyagainst defects discovered within the warranty period and extends only to the originalpurchaser of the product. Parts repaired or replaced under the terms of this warranty will bewarranted for the remainder of the original warranty period only. To claim under thiswarranty, the buyer must notify Precor or your authorized Cardio Theater dealer within 30days after the date of discovery of any nonconformity and make the affected productavailable for inspection by Precor or its service representative. Cardio Theater productdeemed defective by a Cardio Theater representative, will be issued a return authorizationnumber. Precor will not accept returns without a return authorization number. Precorreserves the right, at their option, to repair or replace the product after verification of defect.Product that fails after the warranty period expires will be repaired or replaced at the currentpart and labor pricing after authorization from the customer. Repairs are warranted for 90days.Precor’s obligations under this warranty are limited as set forth below.Warranty Periods and Coverage. Cardio Theater TransmittersxTV-T Wireless or Wired Floor ModelsxTVFM system transmitter Cardio Theater ReceiversXTV-R Wireless or Wired Upper ModelsXTVFM system receiver Cardio Theater LCD Screen (PVS) Cardio Theater Screen Controllers Quick Change Headphone Jack Opti
Cardio Theater PVS system except as described in this guide. For information about product operation or service, refer to the Cardio Theater web site at www.cardiothea ter.com or contact an authorized Cardio Theater Technical Support Representative at 1-800-776-6695 or service@cardiotheater.com. Representatives