Transcription
Tutorials:UsingAutodesk Revit Design 2010
Autodesk 3ds Max Design 2010 Software 2009 Autodesk, Inc. All rights reserved. Except as otherwise permitted by Autodesk, Inc., this publication, or parts thereof, may not bereproduced in any form, by any method, for any purpose.Certain materials included in this publication are reprinted with the permission of the copyright holder.The following are registered trademarks or trademarks of Autodesk, Inc., in the USA and other countries: 3DEC (design/logo), 3December,3December.com, 3ds Max, ADI, Alias, Alias (swirl design/logo), AliasStudio, Alias Wavefront (design/logo), ATC, AUGI, AutoCAD, AutoCADLearning Assistance, AutoCAD LT, AutoCAD Simulator, AutoCAD SQL Extension, AutoCAD SQL Interface, Autodesk, Autodesk Envision, AutodeskInsight, Autodesk Intent, Autodesk Inventor, Autodesk Map, Autodesk MapGuide, Autodesk Streamline, AutoLISP, AutoSnap, AutoSketch,AutoTrack, Backdraft, Built with ObjectARX (logo), Burn, Buzzsaw, CAiCE, Can You Imagine, Character Studio, Cinestream, Civil 3D, Cleaner,Cleaner Central, ClearScale, Colour Warper, Combustion, Communication Specification, Constructware, Content Explorer, Create what's Next (design/logo), Dancing Baby (image), DesignCenter, Design Doctor, Designer's Toolkit, DesignKids, DesignProf, DesignServer, DesignStudio,Design Studio (design/logo), Design Web Format, Discreet, DWF, DWG, DWG (logo), DWG Extreme, DWG TrueConvert, DWG TrueView, DXF,Ecotect, Exposure, Extending the Design Team, Face Robot, FBX, Filmbox, Fire, Flame, Flint, FMDesktop, Freewheel, Frost, GDX Driver, Gmax,Green Building Studio, Heads-up Design, Heidi, HumanIK, IDEA Server, i-drop, ImageModeler, iMOUT, Incinerator, Inferno, Inventor, InventorLT, Kaydara, Kaydara (design/logo), Kynapse, Kynogon, LandXplorer, LocationLogic, Lustre, Matchmover, Maya, Mechanical Desktop, Moonbox,MotionBuilder, Movimento, Mudbox, NavisWorks, ObjectARX, ObjectDBX, Open Reality, Opticore, Opticore Opus, PolarSnap, PortfolioWall,Powered with Autodesk Technology, Productstream, ProjectPoint, ProMaterials, RasterDWG, Reactor, RealDWG, Real-time Roto, REALVIZ,Recognize, Render Queue, Retimer,Reveal, Revit, Showcase, ShowMotion, SketchBook, Smoke, Softimage, Softimage XSI (design/logo),SteeringWheels, Stitcher, Stone, StudioTools, Topobase, Toxik, TrustedDWG, ViewCube, Visual, Visual Construction, Visual Drainage, VisualLandscape, Visual Survey, Visual Toolbox, Visual LISP, Voice Reality, Volo, Vtour, Wire, Wiretap, WiretapCentral, XSI, and XSI (design/logo).TrademarksThe following are registered trademarks or trademarks of Autodesk Canada Co. in the USA and/or Canada and other countries: Backburner,Multi-Master Editing, River, and Sparks.The following are registered trademarks or trademarks of Moldflow Corp. in the USA and/or other countries: Moldflow MPA, MPA (design/logo),Moldflow Plastics Advisers, MPI, MPI (design/logo), Moldflow Plastics Insight, MPX, MPX (design/logo), Moldflow Plastics Xpert.clothfx is a trademark of Size8 Software, Inc. Havok.com is a trademark or registered trademark of Havok.com Inc. or its licensors. Intel is aregistered trademark of Intel Corporation. mental ray is a registered trademark of mental images GmbH licensed for use by Autodesk, Inc. Allother brand names, product names or trademarks belong to their respective holders.DisclaimerTHIS PUBLICATION AND THE INFORMATION CONTAINED HEREIN IS MADE AVAILABLE BY AUTODESK, INC. "AS IS." AUTODESK, INC. DISCLAIMSALL WARRANTIES, EITHER EXPRESS OR IMPLIED, INCLUDING BUT NOT LIMITED TO ANY IMPLIED WARRANTIES OF MERCHANTABILITY ORFITNESS FOR A PARTICULAR PURPOSE REGARDING THESE MATERIALS.
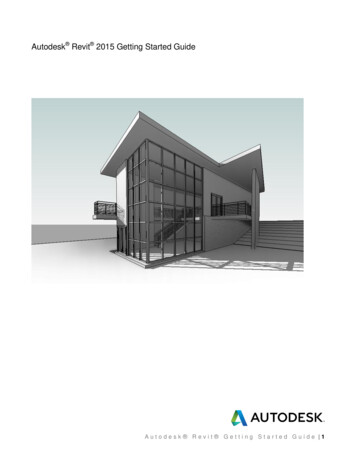
Using Autodesk Revit9This tutorial is intended for those who want to take designs created in Autodesk Revit andadd professional rendering effects in 3ds Max Design.Revit data is imported as an FBX file, a format preferable to others (such as DWG), for itsability to transfer scene metadata as well as geometry, material, and lighting information.Once the FBX file has been imported, you can use the capabilities of 3ds Max Design to createphotorealistic renderings based on the Revit data.771
In this tutorial, you will learn how to: Prepare scene files created in Autodesk Revit for export to 3ds Max Design. Import Revit FBX files into 3ds Max Design, carry out test renders and make requiredadjustments. Add Sky Portals to improve the interior daylight illumination of enclosed structures. Use the Scene Explorer to organize objects created in Revit. Edit properties of Revit objects in 3ds Max Design.Skill level: IntermediateTime to complete: 1.5 hoursNOTE The time to complete estimate does not take into account the time required torender the images of scenes you develop in this tutorial. If you wish to render all thesuggested images, add approximately three hours of to the estimate.772 Chapter 9 Using Autodesk Revit
Preparing the Scene in RevitSet up the lesson:To complete this lesson, you must have Revit installed on your workstation.Open the Revit application and navigate to the\scenes\interoperability\using autodesk revit files folder. Highlight beachhouse.rvtand click Open.If you do not have Revit installed, proceed directly to the next lesson,Importing Revit Files Into 3ds Max Design on page 790.Change the roof material in Revit:The beachhouse.rvt scene features the model of a bungalow, sited on a beach.In the steps that follow, you will use options in Revit to change the model’sroof material, in preparation for the scene’s export.NOTE Even though you can modify materials in 3ds Max Design, it is a good ideato make your changes in Revit if this is the application you are the most comfortableusing.Preparing the Scene in Revit 773
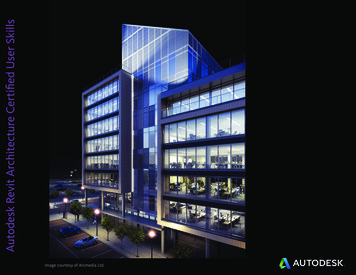
1Select the roof object and click the Element Properties button.2 On the Element Properties dialog, click Edit/New.3 On the Type Properties dialog Type Parameters group Constructionrollout Structure item, click Edit.4 On the Edit Assembly dialog, click Preview.A panel displays to the left, showing a detailed cross-section of the roof.774 Chapter 9 Using Autodesk Revit
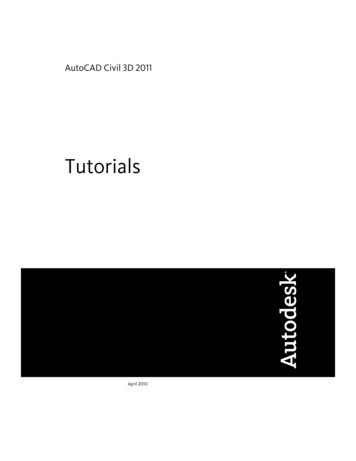
5 In the Layers group Material column, click the top item in the list,Roofing - Asphalt, then click the browser icon.Preparing the Scene in Revit 775
6 On the Materials dialog, click the Render Appearance tab to display athumbnail of the roof shingle.7 In the Materials group, scroll down and choose Roofing - Slate.776 Chapter 9 Using Autodesk Revit
If this material is not available on your system, click Replace and choosean alternate material from the Render Appearance Library.8 Click OK on all the open dialogs to exit the material edit controls.The texture and mapping coordinates of your selected material will beproperly transferred to 3ds Max Design, with no further interventionrequired on your part.Check light-object properties in Revit:Like materials, all light-object properties in the Revit scene are accuratelytransferred to 3ds Max Design. It is therefore best to make sure that the lightsyou have in the current scene possess the properties you want to use in 3dsMax Design.Preparing the Scene in Revit 777
1 In the Project Browser, under Views Ceiling Plans, double-click Level1, and zoom in to the model.2 Select any ceiling light object in the scene.778 Chapter 9 Using Autodesk Revit
A description of the light object displays in the upper-left toolbar, asshown below.3Click the Element Properties button and on the ElementProperties dialog, click Edit New.4 On the Type Properties dialog Type Parameters group, scroll down tothe Photometrics rollout and review the parameters displayed.Preparing the Scene in Revit 779
These values, particularly Initial Intensity and Color, will affect therendered result in 3ds Max Design, so be sure these parameters containthe result you are looking for. (You can later update these values in 3dsMax Design, if you need to.)5 Click the Initial Intensity button to view more detail on light intensity.NOTE 3ds Max Design uses Lumens to measure light intensity of objects,not Watts. When a Revit scene is imported into 3ds Max Design, all wattageis converted into Lumens, but the light object intensity is unaffected.6 Click OK to exit the dialogs.780 Chapter 9 Using Autodesk Revit
7 Back in Level 1 view, select the Pendant Light object and click the ElementProperties button to open the Element Properties dialog.8 Click Edit/New and review the Photometric properties, as you did for theceiling light object.9 Click OK to exit the dialogs.Create a camera:By default, the 3D view in Revit uses an isometric perspective, but therecommended view for scenes exported to 3ds Max Design is a camera view.You must therefore have at least one camera view created in Revit before youexport the scene.While you can create multiple cameras in Revit, only one can be exported to3ds Max Design. In this case, you will create a camera for an exterior viewpoint.1 From the Project Browser, navigate to Views Floor Plans and double-clickLevel 1.2 Go to the View menu and click Camera.Preparing the Scene in Revit 781
3 Place the camera by clicking on the lower-right corner of the scene, thenclick the gizmo at the front double doors.782 Chapter 9 Using Autodesk Revit
A camera view is now created. This is the view you will initially use torender your image in 3ds Max Design.Preparing the Scene in Revit 783
4Click the Element Properties icon and on the Element Propertiesdialog Instance Parameters rollout, scroll down to the Extents rollout.5 On the Identity Data rollout View Name field, change the name of thecamera to Exterior.6 Turn off Far Clip Active.784 Chapter 9 Using Autodesk Revit
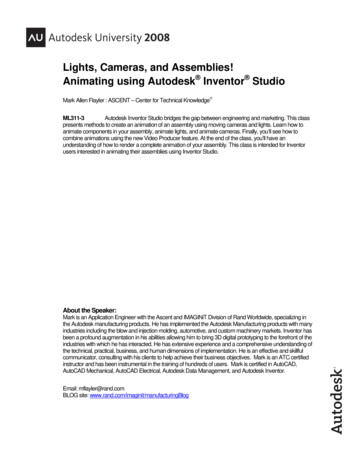
With this option turned off, the camera will be able to detect the sceneterrain beyond the bungalow model. As with light and material properties,you can also modify clipping parameters in 3ds Max Design if you needto.Preparing the Scene in Revit 785
Camera view with clipping turned off, showing scene backgroundCheck the render setup and export the scene:1 Right-click View and choose Rendering to display the Rendering panel.786 Chapter 9 Using Autodesk Revit
2 Click Rendering Dialog to display the Rendering dialog.Most of the rendering values do not need to be changed, since the actualrendering of the scene will take place in 3ds Max Design. The Schemesetting in the Lighting group is one possible exception.If you choose Sun Only in the Lighting group Scheme drop-down list,only the daylight system will be turned on in the 3ds Max Design sceneand all the man-made light objects will be turned off. Conversely, if youchoose Artificial Only, just the man-made light objects will be used inthe scene and the daylight system will be turned off.3 In this case, you do not want to use the interior lights yet, so keep Exterior- Sun Only as your setting. (You still have the option of turning theman-made lights back on in 3ds Max Design, if you need to.)Preparing the Scene in Revit 787
4 In the Lighting group Sun setting, click the Sun drop-down menu andchoose Edit/New from the list of presets.Here, you will set the geographic location and time of day for the positionof the sun created by the daylight system.On the Sun And Shadows Settings dialog Still tab, Sunlight From TopRight is automatically selected from the list of single-position presets.Single Day and Multi-Day tabs let you choose presets that animate thesun position over the course of one or more days.788 Chapter 9 Using Autodesk Revit
5 With Sunlight From Top Right selected, click Duplicate.This creates a new preset that you will customize and save for later use.6 In the Name dialog, type East Coast.This name is appropriate because you want the daylight system to showthe actual sun position at Cape Cod in mid afternoon.7 In the Settings group, turn on By Date, Time and Place.8 Leave Place set to Boston, MA since this city is in geographic proximityto Cape Cod. Check that the Date field is set to 5/10 and the Time fieldis set to 3:17 PM, then click OK.You are now ready to export the scene file in FBX format.9 From the main menu, choose File Export 3ds Max (FBX).Preparing the Scene in Revit 789
10 On the Export 3ds Max (FBX) dialog File Name/Prefix field, rename thefile my beachhouse, and in the Save In field, navigate to the folder whereyou want to store the scene for ready access. You will import the sceneinto 3ds Max Design from this folder in the next lesson.11 Click Save to export the scene.NextImporting Revit Files Into 3ds Max Design on page 790Importing Revit Files Into 3ds Max DesignSet up the lesson:The Revit file you will import is based on the metric system. Your work sessionin 3ds Max Design must therefore be in metric units. Open 3ds Max Design and from the main menu, choose Customize Units Setup. In the Display Unit Scale group, turn on Metric.790 Chapter 9 Using Autodesk Revit
Import the FBX file and adjust the daylight illumination:1From the Application menu, choose Import Import.2 On the Select File To Import dialog, navigate to the folder containing thescene file you exported from Revit in the previous lesson.If you did not complete the previous lesson, navigate to the beachhouse.fbxfile that has been set up for you in the \import\revit files folder.3 Click Open to display the FBX Import dialog.The FBX file exchange format has extensive and customizeable file-transfercapabilities, giving you control over which types of information to includein the imported file.Revit files require no customization: all information from the Revit scenewill be imported.4 In the Presets group drop-down list, choose Autodesk Architectural (Revit).5 Click OK.The FBX Import/Export Warning message box displays, informing youthat 3ds Max Design will be converting scene light object properties fromWatts to Lumens. This message is not an error: lights will be properlytrans
Tutorials: Using Autodesk Revit . Revit data is imported as an FBX file, a format preferable to others (such as DWG), for its ability to transfer scene metadata as well as geometry, material, and lighting information. Once the FBX file has been imported, you can use the capabilities of 3ds Max Design to create photorealistic renderings based on the Revit data. 9 771. In this tutorial, you .