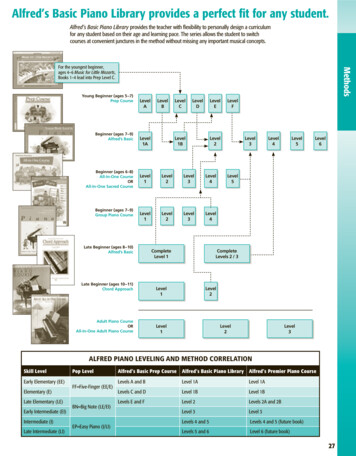
Transcription
Computer Classes at the LibraryEast Brunswick Public LibraryQuickBooks Basics – Level 2Part IV – Working with your Bank Accounts in QuickBooksWrite a check1. From Home page select Write checks from Banking area2. Select bank account from which to write the check3. Select recipient from drop down next to Pay to the Order of. If you have pre-entered all of yourvendors, the address field will automatically populate.Note: navigation within QuickBooks is a little different than Microsoft products. You need tohit the TAB button to move from field to field. Navigating within the drop down box by typingin the start of a name and then hitting the enter key does not take you to the next field. Youneed to click on the name within the field to automatically move tothe next field.4. Type in amount numerically. It automatically populates the writtenDollars field.5. Preferences – having QuickBooks recall last transactions for yourvendors on the My Preferences tab. Useful if you are going to haverecurring charges for the same amount.6. Use the Memo area.7. Below the check, select the account against which this is being debited.8. Click Save and close9. To see your check register select use Register from the Banking in themenu bar.10. Click OK to view your Checking account register.11. The check that you just wrote is listed as a check that still needs to beprinted and the amount are not yet removed from the account.12. Close the register.13. Note that there is behind the scenes Accounts Payable actions that QuickBooks is automaticallyperforming when you fill out the check form.14. You can also open a register when no form is open by clicking on the Chart of Account buttonon the home page or from the Lists menu.15. Open any of the accounts (e.g. savings) by double clicking on it in the list or go to the Activitiesbutton and select Use Register or use keyboard shortcut Ctrl R16. To close the register click on the X in the top right handcorner of the window.17. To sort register entries note the sort by option in thebottom left side of the screen. Click on the drop down menuIntroduction to QuickBooks Level 1Winter 2011
Computer Classes at The LibraryEast Brunswick Public Libraryand choose to sort by date, type and number, or amounts, number/Ref, Order entered 18. Note the register and the columns. The checkmark between payment and deposit indicateswhether the transaction has cleared the bank. Note Running balance after each entry and theending balance at the bottom of the screen.Entering handwritten checksFor on the spot checks for unexpected purchases.1.2.3.4.5.6.7.8.9.10.11.From Menu bar – Banking – select Use registerChoose correct checking account.OkType in check number in first available line.Tab to name field type in nameIf this is a new vendor you can select the quick add field and click OK.Type in amountSelect account.Type in a memo if neededClick on the Record button on the bottom right corner of the screenClose the register.Note: When you do this QuickBooks creates a journal entry. It debits your Office suppliesaccount for the amount that you just wrote and credits your checking account for the sameamount behind the scenes.Transferring money between accountsThere is a QuickBooks Transfer Funds between accounts window. E.g. from checking to savings.From Menu bar – Banking – select Transfer FundsWhen you select the accounts from the drop down menus, the account balance in each displays.Fill in the Transfer amount.If you have already manually transferred the funds you will not need to use the online fundstransfer button but click OK to continue with the transfer from the dialog box.Page21.2.3.4.Introduction to QuickBooksWinter 2011
Computer Classes at The LibraryEast Brunswick Public Library5. Another journal entry is being made behind the scenes which debits your checking account forthe amount you transferred and credits your checking account.Bank account reconciliationBalancing your checkbook in QuickBooks.One of the benefits of using QuickBooks is not having to worry about addition and subtraction errors.Still you need to reconcile your checkbooks monthly. That way you don’t have to worry aboutoverdrafts and nasty bank fees; you can make sure that the bank did not create any errors (notimpossible); and helps make sure that your financial record keeping is accurate.1. Take your monthly statement (which shows all of the activity in your account since the previousstatement)2. Things to reconcile include:a. Opening balanceb. Ending balancec. Interest receivedd. Service chargese. Deposits/withdrawalsf. Automatic payments or other transactionsg. Checks writtenAny QuickBooks account can been reconciled. This includes savings accounts, credit card accounts, andmoney market funds. You want to make sure that your records and the bank’s records agree.1.2.3.4.5.6.7.8.9.10.11.12.Choose which account you are going to reconcileGo to menu bar Banking select reconcileChoose account (in this example – checking)Type in date of statement, the ending balance, service charge and service charge dateClick continueA reconciliation window appears.You can choose which information you want to see – near bottom right corner – Columns todisplay - Choose all.Mark off items cleared on your bank statement by clicking on the item in the reconcile window.When finished, click Reconcile Now.Reconciliation reports automatically open ( choose both)Reconciliation Summary and the Reconciliation detail report displayIf you made any errors in your reconciliation attempt you will get a locate discrepancies windowwhich will allow you back in to the reconciliation to locate and fix any errors.Introduction to QuickBooksWinter 2011PageSummary and detail reports mentioned above can also be saved as PDF files. There is also a Reconcilediscrepancy report. This shows changes made to previously reconciled transactions, making it easier to3Reconciliation reports
Computer Classes at The LibraryEast Brunswick Public Libraryfind discrepancies. This is useful when the beginning balance that QuickBooks shows is different thanthe ending balance from the bank statement.This is available from the Menu bar Banking menu Reconcile locate discrepancies windowThis is also where you can undo your last reconciliation without having to uncheck each entry in thereconciliation on the statement manually.Your cleared checks in your QuickBooks registerTo see your cleared checks in your QuickBooks register, go to the:1.2.3.4.5.Menu bar BankingSelect Use Register.Select checking.OKCheckmarks should appear next to all cleared items.Search for specific transactionsRather than just browse thru your register you can use the QuickBooks Find command to locate aspecific check that you’ve written. E.g. To find all checks greater to or equal to 500 written during theyear do the following:Introduction to QuickBooksPage41. Go to Edit in the Menu Bar2. Select Find. (same as windows shortcut - Ctrl F)3. Click on the Advanced tabWinter 2011
Computer Classes at The LibraryEast Brunswick Public Library4. You will Use the Choose Filer list multiple times to choose the way you want to modify yoursearch. Choose transaction type – check. It puts Check in the list of current choices; choosedate - This calendar year to date. It puts that in the current choices box. Choose amount andequal to or greater than 500.00. That filter will then appear in the Current choices box. ClickFind. A list of all check during the current year equal to or greater than 500.00 will appear inthe Find window.Part V – Using other accounts in QuickBooksCredit CardsIntroduction to QuickBooksWinter 2011PageEntering credit chargesYou can enter credit charges to this account when you charge an item or when you receive the bill.(When you do it depends upon whether you like to enter your charges all at once (when you receiveyour bill) or incrementally. There is an advantage to enter your charges incrementally – you can keep5If you also pay for expenses with a credit card you will need to set up a credit card account inQuickBooks to track your purchases, payments and other charges in your credit card account. The viewis very similar to a regular checking/savings account register.
Computer Classes at The LibraryEast Brunswick Public Librarytrack of your spending. You can also apply the charges to a specific job if that is what your purchase wasfor.Entry form:1.2.3.4.5.6.7.8.9.10.Go to Menu BarSelect BankingSelect Enter Credit Card ChargesMake sure the correct card is selected.Enter Purchased fromRef number refers to transaction number. This is on most credit card receipts for identificationand tracking. You can enter it but don’t have to.Enter purchase amount in amount field.Navigate to Expenses tab and select the account to charge it to.Click save and close.If you make a mistake before you save there is a Clear button at the bottom.Note that there is also a memo field for you to add additional info. However, if the purchase is formaterials for a particular job, the best way to handle it is to enter the purchase in the register andfill in the Customer: Jobs information on the right side of the screen. Put a checkmark in the Billablecolumn so that the expense will be passed along to the customer.Reconciling credit card statementsThis is almost identical to reconciling your banking accounts.Introduction to QuickBooksPage61. Choose Chart of Accounts2. Select the appropriate account3. Click on the Activities button and select Reconcile credit card.Winter 2011
Computer Classes at The LibraryEast Brunswick Public Library4.5.6.7.8.9.10.11.Fill in the ending balanceEnter the current date in the statement date fieldClick ContinueThe reconciliation window displaysType in the statement dateType in the ending balanceClick ContinueThen mark off the transactions on the bill that have cleared (put a checkmark next to thoseitems) including debits and credits and payments.12. Then click Reconcile Now.13. The default view that next appears is the balance due with the option to write a check. Click OKto do so.14. You also get a Reconciliation Report option which you can view and save as PDFs or share withothers. You can also modify the parameters of the report. (More on that later). Once you closethe reports window you can write the check to pay your credit card.Pay your Credit Card1. Continuing from the prior exercise, make sure that you have selected the correct account fromwhich to pay the bill (Checking)2. In the pay to the Order of field, select the correct vendor.3. The amount is already prefilled in, as is the address and the account under Expenses belowcompletes the bookkeeping.4. Click the to be printed box.5. Click Save and close and the transaction is recorded subtracting the amount of the check fromyour checking account and subtracting the same amount from your credit card balance.6. Close.Asset AccountsQuickBooks has two types of accounts in which to record your short term or long term assets: Other Current Asset account - These are for tracking assets converted into cash or used upwithin a short duration (within a year). E.g. Inventory, T-bills, CDs, expenses that you havealready paid and expect to be reimbursed for, prepaid deposits, accounts receivable, bankaccounts, and cash.Fixed Asset account – a long term asset that you won’t likely beconverting into cash -- a company vehicle, any equipment (such asyour computer network and business machinery) Introduction to QuickBooksPage7Add New Accounts:1. Open the Chart of Accounts2. From Accounts menu button at the bottom of the window clickNew.Winter 2011
Computer Classes at The LibraryEast Brunswick Public Library3. The Add New Account:Choose Account typewindow appears.4. Click on Other.5. Choose other Asset fromthe drop down menu.6. Click Continue.7. Enter the Account Name8. Things to consider underEnter an OpeningBalance:a. Enter an openingbalance if youraccount had abalance beforeyour QuickBooksstart date.b. If your accountdid NOT have a balance before your company’s start date, you will need to create atransaction in QuickBooks that adds money to the account – e.g. starting a bank accountwith a deposit, buying an asset with a check 9. Enter the opening balance.10. Enter the date (the balance on this account as of the day before your QuickBooks start date.11. Click OK.12. Click Save and close.This new account will now display in your Chart of Accounts. If you used this as the example in the bookdisplays as the prepaid rent account, you should decrease the amount in the account (the accountregister) each month by your rent payment and assign it to your rent expense account.Fixed Asset AccountsThese accounts are for use for your business’s property which you don’t plan on cashing in on or are notfor sale. Since they last for years, you spread their cost over several years. But since their value alsodeclines with wear and tear, you can also account for depreciation.Value of a fixed asset Original cost – accumulated depreciation since original purchase.Data that you will want to include on your balance sheets include:8Original cost (plus any subsequent improvements)Its current value (see formula above)Current value on the third line.Page Introduction to QuickBooksWinter 2011
Computer Classes at The LibraryEast Brunswick Public LibraryAccount set up will include a separate fixed asset account for each asset with two subaccounts – originalcost and accumulated depreciation.1.2.3.4.5.Repeat steps I, 2, and 3 above to set up your new Fixed Asset account.Now choose Fixed Asset (major purchase) and click Continue.Enter the Account NameClick Save and CloseNow add the subaccounts:a. Repeat steps I, 2, and 3 from Add New Accountsb. Choose Fixed Asset (major purchase) and click Continue.c. Type in Cost in Account Named. Now click on the checkbox in front of Subaccount of and select of name of the parentaccount that you just created.e. Click save and new to add the 2nd subaccount.f. Repeat steps I, 2, and 3 from Add New Accountsg. Choose Fixed Asset (major purchase) and click Continue.h. Type in Depreciation in Account Namei. Click Save and Close.6. Your chart of accounts will show a new Fixed Asset account with 2 subaccounts, Cost andDepreciation with no amounts filled in.“The amount you enter as the opening balance depends on whether you acquired the asset before orafter your QuickBooks start date. If you acquired the asset after your QuickBooks start date, you don’tenter an opening balance. If you acquired the asset before your QuickBooks start date, you enter theaccumulated depreciation of the asset as of the start date – entered as a negative number.”11Page97. To enter the cost (after QuickBooks start date) you would purchase the asset and pay for it witha check or your credit card entering the purchase amount as detailed in Part IV Write a Check orPart V Entering Credit Charges. However, in the Account Field below Expenses, you shouldchoose the Asset account.8. To enter the depreciation (purchase before the QuickBooks start date), you would use theasset’s depreciation subaccount.a. Go to Chart of Accountsb. Select the Depreciation Subaccount for your Fixed Assetc. Click Activities button and choose Use Registerd. Enter the depreciation amount in the Decrease columne. Press Tab.f. In the Account Field select Depreciation Expense form the drop down menu.g. Click Record.h. Close the register window.QuickBooks Learning Guide 2010 by A.L. Craig c2009 page142.Introduction to QuickBooksWinter 2011
Computer Classes at The LibraryEast Brunswick Public LibraryWhat you have done is to have subtracted the depreciation amount for the current value of your assetin your fixed asset account AND added the amount the asset has depreciated in your expense accountthat tracks depreciations.Liability AccountsLiability accounts track your company’s debts from your bills, credit card debts, sales tax you owe thegovernment, employee withholdings you owe the government, and both short-term and long-termdebts.Types of Liability accounts: Short term – Other Current Liability Account -- debts that you expect to pay (accounts payable)within a year or short term loans or lines of creditLong term – Long Term Liability Account – longer term loans – a mortgage for your property Track the progress of your loans with a Long Term Liability account1. Go to the Chart of Accounts2. Click the Account Menu button and click New.3. In the Add New Account window select Other4. Then choose a long term liability.5. Click Continue.6. Type in the Account name7. Do not enter an opening balance.8. Click Save and Close.Now go and record an increase in that asset’s cost account (which we already set up in the Fixed Assetaccount example above).1.2.3.4.5.Go to the Chart of AccountsChoose the Cost subaccount for the asset being enteredThe Cost register for the asset appears.Type in the purchase price in the Increase FieldIn the Account field, be sure to select the long term liability account that you just set up fromthe drop down menu.6. Click Record.7. Close the register and the chart of accounts.PageAssets as ItemsYou will also want to keep track of all of your assets as items and need to create an item for your newasset1. Go to Lists in the Menu BarIntroduction to QuickBooks10When this is done, you have recorded the value of your Cost asset (opening balance) and also enteredyour loan – long term liability account (again setting the opening value).Winter 2011
Computer Classes at The LibraryEast Brunswick Public Library2.3.4.5.6.7.8.9.Click on Fixed Asset Item ListFrom the Item menu (bottom left corner of window select New.Type in the nameWhether it is newPurchase DescriptionThe Date and the costEnter the name of the vendor from whom you purchased itGive other miscellaneous information as needed – e.g. a description, serial number date ofwarranty expiration.10. Choose the asset account for this item (cost)11. Click OK.12. CloseRecord a loan paymentTo record the loan payment on your new asset you will also want to include the interest paid and theprincipal for two separate accounts. This means that you will have to keep track monthly what you arepaying and QuickBooks will also track these payments for you separately.1. Use the Write Checks option from the banking menu or the home page icon.2. In the Pay to the order of write the name of the lending institution (already entered in yourVendor list).3. Tab4. Type in the dollar amount of the check.5. Make sure To be printed has a checkmark.6. In the Expenses section below the check you will want to record the interest portion of thepayment on one line and the principal on the other.7. Under Account, click the down arrow and select, Interest Expense: Loan Interest and type in theamount.8. In the next line select the long term liability account. QuickBooks will automatically fill in thebalance for the principal.9. Click Save and close.What happens behind the scenes: QuickBooks subtracts the entire payment from your checking account.In your Expenses: Interest account QuickBooks enters the interest amount as an interestexpense.In you Long term liability account for the asset, QuickBooks subtracts the principal paymentfrom the current value of the liability (marking your reduction in indebtedness)11 PagePart VI - Recording Sales Information in QuickBooksSales info can be recorded in a number of ways in QuickBooks:Introduction to QuickBooksWinter 2011
Computer Classes at The Library East Brunswick Public LibraryInvoices (when the sale is not paid for at the time of purchase)A sales receipt (to mark the official payment of the item)A credit memo (Overpayments)InvoicesInvoices are billing for payments to be collected in the future.Data to be included on the invoice at a minimum: Name and address of customerItemized list of items purchased with charges.To search for Invoices:1. Click on the Create Invoices icon on the home page.2. A new blank invoice appears.3. Click on the Previous button4. Previously billed invoices display in date order.-OR –5. Go to Edit in the menu bar and selectFind Invoices – OR – use keyboardshortcut – CTRL F. The FindInvoices dialog box will allow you tofind by customer name/job, within adate range, a specific invoice numberor amount.– OR –6. Clicking on the Advanced button willallow you to apply multiple filters to your search from one screen. Choose your filter:transaction type and then select it (invoice) from the next drop down menu. Choose anotherfilter: Perhaps customer name (?) and then select it (them for more than one) from the contextsensitive drop down menu.- OR -Introduction to QuickBooksWinter 2011PageTemplatesThere are a number of basic templates for your invoices that come with QuickBooks depending uponwhich version of the software that you use and your company type. There is an on screen and printedversion of each. This duality allows you to enter all of the data that you want to know and keep, butonly print the fields that you want the customer to see. These forms, like all forms in QuickBooks aresavable in PDF format.127. You can also click on the Find icon (magnifying glass) in the Create Invoices window to searchfor a particular customer.
Computer Classes at The LibraryEast Brunswick Public LibraryTemplate types Custom – allows you to tailor the contents and the look of your invoice Product – use if you sell and ship parts and products Professional – use if you sell services and want a lot of description room for those services Service – use if you sell services and occasionally sell products.Creating an Invoice1. Click on the Create Invoices icon on the home page.2. A new blank invoice form appears with the current date and with the next invoice number in thequeue assigned.Page133. Choose the type of invoice that you want to use from the drop down menu in the upper rightcorner.4. Then fill out the information about the customer – from the Customer – Jobs drop down menuin the upper left corner choose from the list of existing customers. [For a new customer select Add New from the menu.]5. If you choose a preexisting customer, the Bill to information will automatically populate whenyou make your selection, as will the terms and the contract information.6. Use the bottom half of the invoice to fill out the list of items or services that the customer haspurchased. This will populate as you choose from the list of your inventory that you havealready entered into QuickBooks. [Note that there is also and Add New item option that youcan enter on the fly if you have created a new item or service.]Introduction to QuickBooksWinter 2011
Computer Classes at The LibraryEast Brunswick Public Library7. Items can also be a discount, a subtotal line, a markup or a sales tax calculation.8. Select the item from the drop down menu and press TAB. [Shortcut tip -- typing in the firstcouple of letters will drop you down in the list to the items that begin with those letters.]9. Pressing TAB fills out all of that item information such as any description that you havepreviously entered and rate. Fill in the Quantity column next to that item and press TAB againand QuickBooks will automatically calculate the total amount for that item.10. If there is tax you can also calculate it for the item in the Tax column.11. Note that there is a button to print preview your document (top right corner) and checkboxes toeither print it or email it (bottom left corner).12. Click save and close to record the transaction. Behind the scenes, QuickBooks records theinvoice in your account receivable register.13. To view this, go to Chart of Accounts on the home page and select Accounts Receivable.14. Double click on the just entered sale and the original invoice will display.Memorizing invoicesIf you make the same sale again and again, or have standing monthly orders you can have QuickBooksmemorize an invoice so that you don’t have to enter in the information in each time you make the samesale.To do this, open an invoice of a type that you create frequently.Go to Edit in the MENU Bar and select Memorize transaction (or CTRL M).Name the transaction, set up reminders, if necessary and click OK.Close all open windows.To call up that transaction again, go to Lists in the Menu Bar (or CTRL T)Choose Memorized Transactions and double click on the transaction that you want.The Create Invoices window appears with a new invoice number and current date. Modify, ifneeded.8. Click Save and Close and the transaction will be recoded in your Accounts Receivable register.9. Click Esc to exit from the Memorized Transactions List.Page141.2.3.4.5.6.7.Introduction to QuickBooksWinter 2011
Computer Classes at The LibraryEast Brunswick Public LibraryEntering ItemsRelated to the occupation of creating invoices and billing customer is your inventory of goods andservices. Depending upon the amount of time you have for set up you would generally want to enter asmuch as possible of this into QuickBooks on setup. However, you will update your inventory from timeto time and offer new services. You can enter them as follows:1. Choose Item List from the Customer menu in the Menu Bar - OR – go to Lists in the Menu Barand select Item Lists. A list of all your items and services appears2. Click on the Item menu in the bottom left corner of the page and select New or use keyboardshortcut CTRL N.3. The New Item window appears.4. Select the type of item you areentering – a service, inventorypart, 5. Name your new item, service, 6. If it is a sub item of a preexistingitem group, click in that checkboxto select it.7. Choose the group that it is a subitem of.8. Type in a description and rate andany other info that you deemrequired.9. Assign the new item to one of your company’s income accounts.10. Click OK to enter your new item.11. Close the Item list.Assigning multiple price values to items depending upon customerE.g. Perhaps you want a different price for residential customer vs. commercial customers. You canassociate these different levels with specific customers so that you don’t have to do this manually eachtime you create an invoice for a customer. Price levels can be used for the following items: services,inventory, non-inventory part, and inventory assembly items only.You would apply the following steps to initiate this.1. Create a new price level2. Associate it with one or more of your customers and then3. Use it to create your invoices for that customer.Page15Create a New Price Level1. Go to Lists on the Menu Bar2. Choose Price Level List.Introduction to QuickBooksWinter 2011
Computer Classes at The LibraryEast Brunswick Public Library3. Click on the Price Level button in the bottom left corner of the screen and select New - OR –CTRL N.4. Type in the name for your new price level.5. Choose the type.6. Type in the percentage of “decrease.” And hit TAB7. Choose how you want to round off uneven amounts.8. Click OK.9. Close the Price Level List.PageUsing Price Levels on a sales form1. Search for and open the customer for which you just associated a new price level from theCustomer Center.2. Click on New Transaction at the top of thescreen below the icon bar.3. Choose the type of transaction - Invoices,estimates 4. You will see the name of the customerappear in the Customer: Job drop downmenu at the top of the screen. Hit TAB andthe discount amount name will appear inbrackets next to Customer: Job. (This info isfor you only. It will not appear on printedreceipts.)5. Choose an item from the item column, typein your quantity; you will see the extension of information for that item.6. Type in another item and you will see that info for your second item.7. To compare the rates leave your invoice open and go to Lists in the Menu Bar and Select ItemList.8. Select the item that you just added to the invoice and compare the rate to the rate there. Youwill see that the discount is automatically applied.9. Close the Item List.10. Record the invoice – Click Save and Close.16Associate a price level with a customer1. Click on the Customer Center in the icon bar.2. Search for and find your customer. (Click the Magnifying glass)3. The customer information will display on the right side of the screen4. Click the Edit Customer button.5. Click the Additional info tab.6. From the Price Level drop down menu select the name of the price level that you just created.7. Click OK.Introduction to QuickBooksWinter 2011
Computer Classes at The LibraryEast Brunswick Public LibraryYou can also apply price levels to individual items on a sales receipt rather than associating it withspecific customers. Rather than giving a customer a discount on the whole purchase, this will give themdiscounts on specific items only.To do this in your invoice, select your item from the item list and move to the rate column and select therate for each item individually, depending upon whether you want to offer them the discount.Sales ReceiptsUsed when a customer pays the bill at the time of the service for whatever method of payment that youallow – cash, credit card, check.Data to be included on the invoice at a minimum: Name and address of customerItemized list of items purchased with charges.Amount paid and how payment was made.Introduction to QuickBooksPage17To display your Sales Receipts:1. Click on the Create Sales Receipts button on the home page.2. A new blank sales receipt appears.Winter 2011
Computer Classes at The LibraryEast Brunswick Public Library3. Click on the Previous button4. Previously completed sales transactions appear in date order.StatementsIf you would prefer to send out accumulated “monthly” charges rather than sending out individualinvoices, statements can be used. To use the statement method: Enter charges as they are incurred.At the end of your billing period, you will send out a statement that shows the previous balance,new charges incurred in detail, any payments made,
To see your cleared checks in your QuickBooks register, go to the: 1. Menu bar Banking 2. Select Use Register. 3. Select checking. 4. OK 5. Checkmarks should appear next to all cleared items. Search for specific transactions Rather than just browse thru your register you can use the QuickBooks Find command to locate a specific check that you .