Transcription
MunisTimeEntry- BoardPascoCounty,FL
Munis MenusIn Munis, menus are available according to the security permissions granted to your user roles.Typically, permissions are granted according to need. For example, if your primary job is to entertimesheets in Payroll, you may not be able to see the System, Financials, General Revenues, or othermenu options.Menus are divided by Munis products, and then by applications within those products. For example,Financials is a product, and Accounts Payable is an application within that product. Within anapplication, there are many programs.Munis Payroll Processing, Version 10.1Page 2
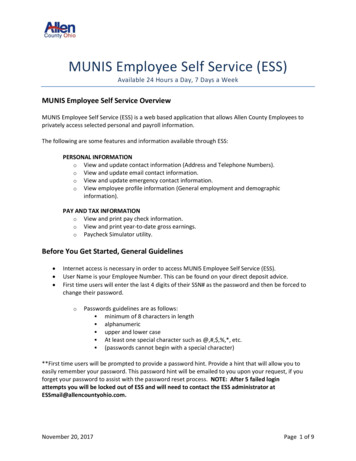
Standard Screen FeaturesThe standard Munis program screen contains several working sections, including a banner, a ribbon,menu options, and a navigation bar.At the top of the screen, the banner includes the Help, Settings, and Enhancement buttons.Directly under the banner is the Munis ribbon. This ribbon contains groups of related buttons that allowyou to perform various actions throughout Munis programs.The work area for a Munis program is centered on the screen; the work area contains the fieldsrequired to complete program actions. Often, if there are numerous fields, the work area is divided intotabs, which sort the fields by intended use or purpose.Munis Payroll Processing, Version 10.1Page 3
The navigation bar at the bottom of the screen allows you to move through an active set of records onerecord at a time, to move to the first or last record of the set, or to open attachments. You can alsoopen a browse screen that lists all of the records in the active set.The Menu group in the ribbon provides the program-specific actions available for a program. Theseoptions differ according to program as they may display additional screens for the selected program orthey open other related programs. For programs that have multiple options, click the More arrow toview the complete list.Munis Payroll Processing, Version 10.1Page 4
DisclaimerTyler Technologies, Inc. Consultant believes that the information described in this manual is accurate and reliable, and much care hasbeen taken in its preparation. However, no responsibility, financial or otherwise, can be accepted for any consequences arising out ofthe use of this material, including loss of profit and indirect, special, or consequential damages. No warranties extend beyond theprogram specification.The client should exercise care to assure that use of the software and related sections is in full compliance with the laws, rules, andregulations of the jurisdictions in which it is used. These materials are confidential, unpublished works of Consultant. Consultant grantsto the Client a royalty-free nonexclusive license to use anything created or developed by Consultant for Client contained in this manual.The license shall have a perpetual term and Client may not transfer it. Consultant shall retain all copyrights, patent rights and otherintellectual property rights to this manual.The information contained herein is subject to change. Consultant assumes no responsibility to advise clients of changes or additions.Munis Payroll Processing, Version 10.1Page 5
PrerequisitesBefore you can successfully complete this process, you must ensure that roles granting the necessarypermissions have been assigned to your user account. If the roles have not been established, contactthe system administrator to have them updated or added into the Munis system.Confirm the following: You have permission to access the Time Entry Program. The Payroll Control Settings program reflects the correct settings for your organizations.Munis Payroll Processing, Version 10.1Page 6
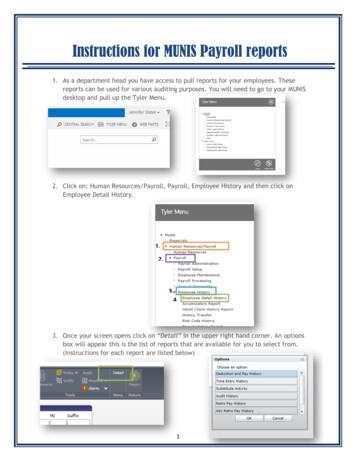
Payroll Time EntryTo access Payroll Time Entry:Departmental Functions Time EntryThe Time Entry program allows you to maintain time and attendance records for employees. When youopen Time Entry, the program displays a payroll verification message.Verify the dates on the screen, as shown above, to ensure that the active payroll is the correct payrollbefore entering time. If the active payroll is not correct, contact the Payroll Department.Setting PreferencesSee page 20 of this document for instructions on how to set preferences. This process will also need tobe done when you enter Time Entry in to the LIVE database. Once the settings are set, no changesshould be made going forward.Munis Payroll Processing, Version 10.1Page 7
Starting a BatchOnce you confirm the dates, the program opens the Time Entry program. Only one batch should becreated for a payroll period. If data entry is completed on a daily basis or if multiple users enter time,use the Resume option to continue adding time to the current batch. To review detail records duringthe batch entry, click Scan Detail.Only Time Entry users with time entry responsibilities for more than one location have the opportunitymake changes on batch entry. For these employees, the primary location assignment displays in theLocation box. If you are completing data entry for employees in more than one location, you may wishto separate those employees into separate batches. In this case, change the Location value.Munis Payroll Processing, Version 10.1Page 8
Please take note that this is your one and only opportunity to add a coment to your batch header. Oncethe screen is saved, the comment field is no longer accessible.Munis Payroll Processing, Version 10.1Page 9
Auto LoadWhen you have a defined time entry group, you can automatically load time entry records when youcreate a new batch. The autoload process takes a predefined list of employees (and, as another option,pay types) and creates time entry records for each employee with the appropriate pay codes. You cancreate groups for autoloading using the Time Entry Groups program.The Auto Load process is available when the Enable Autoload check box is selected on the Time EntryPreferences screen. When you click on the dropdown arrow, a list of your auto load groups will appear.Most will have one group to choose from. Others may have more than one. If you have more than onegroup listed, there will need to be a separate batch for each auto load group. In this example, there isjust one group to choose.On the Autoload screen:1. Select your group from the Group list.2. Click Accept.ResumeTime Entry should be done consistently throughout a pay period. It is more efficient to processemployee time each day, rather than entering all the time in advance of a pending deadline. Allemployee time for a pay period be entered into a single batch.To add time to an existing batch, click Resume on the Time Entry Header screen.ProofTo proof a batch prior to releasing it for approval, use the output options on the ribbon on the TimeEntry Batch Header screen to create a report. When you click Preview, PDF, Print, or Text File, theprogram displays the Report Options screen.Munis Payroll Processing, Version 10.1Page 10
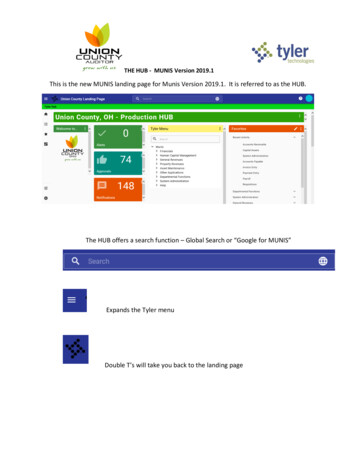
While multiple options are available, use the following selections to create a detailed snapshot of allrecords within the selected batch: Report – Standard Option – Detail Include – Batch Sort – Employee NameIf corrections are required for the current Time Entry batch, click Scan Detail to browse a list of recordwithin the batch and select the record to update.After any change in employee data, you should create a new proof report for review.ReleaseOnce a batch has been reviewed, click Release on the Time Entry Batch header screen to release thebatch for review and approval.Approvers have the option to approve the batch, reject the batch, or forward the batch to anotherapprover. If an approver rejects a batch, they must enter a comment as to why they rejected the batch.In this case, the program returns the rejection notice to you so that you can update the batch, asrequired, for approval.Daily GridWhen you use the Daily Grid option with Autoload, the program completes the default values foremployees and displays daily work hours in all of the employee’s defined standard work days. Reviewthese automatic entries.Munis Payroll Processing, Version 10.1Page 11
To navigate from week one to week two, use these arrows If all entries are correct and no changes are needed, use the navigation arrows at the bottom of thescreen to scroll to the next employee to review.To make changes to any entry, or to add additional information:1. Click Updateand press Tab to move to the appropriate field.2. Enter the correct number of hours in the Base Pay or press Tab to the Pay field to enter the correctpay type code. When entering in Leave Time (Vacation, Sick, Personal, etc), be sure to zero out thebase pay hours for that day. The base paycode for Transportation and Place is 110, which willalways be the top line on the daily grid. All employee’s should have all of their allowed paycodes inthe list that populates on this screen. If there comes a time where you are expecting to see apaycode and it is not in the list, you will need to contact payroll for assistance.3. Press Tab to move to the Hours box and enter the correct number of hours.4. Complete all required changes and then click Accept.5. Navigate to the next employee record and complete the process for each.Munis Payroll Processing, Version 10.1Page 12
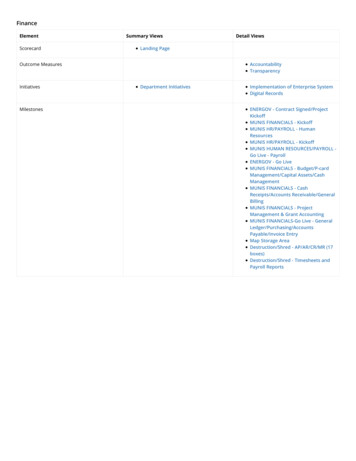
Edit DetailsThe Daily Grid option works most efficiently when only basic information displays. For exception basedtime entry, only seeing the employee’s exception hours is usually sufficient. However, you mayencounter a situation where you need to add a “Comment” or a “Reason” code.To edit information on a pay line, highlight the pay line and click Edit Details.Munis Payroll Processing, Version 10.1Page 13
The program displays the Time Entry Details screen.1. Click Updateand press Tab to move to the appropriate field.2. Make the required changes. Please take note that only Comments and attaching Reason codes areallowed. No changes are to be made to the “Account” or “Allocation” fields. It is imperative that youcontact Payroll to assist with these types of changes.3. Click Accept, and then click on “Return” to return to the Daily Grid screen.The following table provides details for each field on the Time Entry Detail screen.FieldDescriptionDSBPCFrom/ToThese are the start and end dates for thetime you are entering (may be a singleday, a range of days or for the entirepayroll period).The default values for these dates arefrom the Payroll Start Status screen. Youcan change the dates, but they must fallon or between the dates on the PayrollStart and Status screen.AbsenceThis list specifies if this time entry recordis an absence (accrual) record.If Yes, the pay type category must be 3Absence/Accrual. If you are recording timeand attendance for purposes other than anabsence, select No.Munis Payroll Processing, Version 10.1Page 14
FieldEmployeeNumberDescriptionDSBPCThis box contains the employee number/ID number.DepartmentActivityThis box specifies the department codefrom the batch header screen.Department codes must exist in theDepartment Codes program.A department code is optional unless youare using activity costs. This will reaminblank. DO NOT USEJob ClassThis box identifies the employee’sprimary job class code from EmployeeMaster.The Job Class can be changed if theemployee worked in a different job classand has that job class defined in EmployeeJob/Salary.PayThis box displays the pay code.The employee’s base pay code is thedefault value.QuantityThis is the number of hours to be credited Enter the number of hours, days, orunder pay code selected.amount as the quantity.UOMThis is the unit of measure (UOM) for thequantity. The program completes thisdefault value correctly based ondefinitions made within the Pay Masterrecords and cannot be changed.UOM will default from the Pay Masterwhen defined on each Pay Code. DO NOTCHANGERate/AmountThis box displays the calculated payamount for this record (Quantity X Rate).This box is display only.Rate is the unit amount defined on the JobSalary, the Amount is the total Quantity xRate. DO NOT CHANGEAllocationThis box contains the general ledgerallocation code to which to assign thetime.If you enter a value in the Job Class orPay box, the program completes theallocation code from the EmployeeJob/Salary or Pay Master program. If youdo not use allocation codes, the programcompletes the general ledger accountinformation from Employee Job Salary orPay Master. To manually assign anemployee's time to two or more generalledger accounts, click the folder button todisplay the Manual GL Allocation screen.Allocation codes must exist in AllocationCodes in Munis General Ledger. Used ifthe payment is to be split betweenmultiple general ledger accounts.Fixed Allocations are defined on theposition and do not need to be definedagain. DO NOT ADD OR CHANGE.Contact Payroll to assist!ProjectAllocationThis box identifies a project allocationProject Allocation will not be used at thiscode, if applicable, which allocates pay to time.project accounts. Project allocation codesare maintained in the Payroll ProjectMunis Payroll Processing, Version 10.1Page 15
FieldDescriptionDSBPCAllocations program.ProjectAccountThis box identifies the project accountassociated with the pay. This box is onlyaccessible if your organization usesMunis Project Accounting.AccountThis box identifies the general ledgerThe default value comes from Job Classaccount number associated with theMaster or Pay Master. DO NOT CHANGE.employee pay.Contact Payroll to assist!!This is the employee's primary location code.This list provides the personnel reasonReason codes may be used. Select thecode for the time entry. Personnel reason desired “Reason”.codes must exist in Miscellaneous Codesfor the code type REAS. The reason isoptional for an absence record (forexample, family sick, bereavement, jury,and so on.)LocationReasonProject Account will not be used at thistime.NotesThis box contains notes associated withthe selected time entry record. Theprogram adds detail dates to this boxwhen it is blank and the Quantity is DDaily or H-Hourly and the value of theAbsence List is Y-Yes or S-Sub Only.Work OrderThis box contains the work order number Work Order will not be used.associated with this record. If yourorganization uses Munis Work Orders,Fleet, and Facilities, the program verifiesthe work order number and task. Thepayroll activity codes and work orderactivity codes must be an exact match.This box contains up to 25 characters.When the Use Work Order Activity Codescheck box is selected in the PayrollControl Settings program, the programlooks for a matching PR activity codebefore searching for a WM activity code.This allows the field help list to includeWM activity codes, but a PR activity codemay override a WM activity code, if itexists. Requires use of Munis Work OrderModuleRefThis box contains reference information.Munis Payroll Processing, Version 10.1The Notes box can contain up to 50characters. Optional text entry for notesYou can enter up to 20 characters of text.This box provides field help for bus tripnumbers, but the program does notvalidate the entries.Page 16
ProofTo proof a batch prior to releasing it for approval, use the output options on the ribbon of the Time EntryBatch Header screen to create a report. When you click Preview, PDF, Print, or Text File, the programdisplays the Report Options screen.While multiple options are available, use the following selections to create a detailed snapshot of allrecords within the selected batch: Report – Standard Option – Detail Include – Batch Sort – Employee NameIf corrections are required for the current Time Entry batch, click Scan Detail to browse a list of recordwithin the batch and select the record to update.After any change in employee data, you should create a new proof report for review.Munis Payroll Processing, Version 10.1Page 17
ReleaseOnce a batch has been reviewed, click Release on the Time Entry Batch header screen to release thebatch for review and approval.Approvers have the option to approve the batch, reject the batch, or forward the batch to anotherapprover. If an approver rejects a batch, they must enter a comment as to why they rejected the batch.In this case, the program returns the rejection notice to you so that you can update the batch, asrequired, for approval.Munis Payroll Processing, Version 10.1Page 18
Time Entry PreferencesThe Preferences screen allows you to customize your default report and screen preferences for TimeEntry. For example, if you will always enter time using the same method or you always want to useexactly the same report, set these preferences. Once defined, the program displays screens orpresents options according to these settings. You can update these preferences at any time to reflectchanges in usage.From the Batch Header screen, click on More and then select Preferences from the Menu group on theribbon.On the Preferences screen, click Updateuser ID.Munis Payroll Processing, Version 10.1to modify the standard time entry preferences for yourPage 19
FieldDescriptionDSBPCPreferences This box displays the user ID for the active account. The program completesForthis value; it is display only.Report Preferences TabReportOptionIncludeSortEmployeeSubtotalsHide SSNThis list indicates the type of report tocreate. The default value is AlwaysChoose, which allows you to select areport type each time you create it.This list sets the default for the reportoption: detail or summary.This list indicates the batches toinclude: batch (the current batch), clerk(batches by the selected user), or allbatches (all batches in the payroll).This list identifies a standard sortingformat for time and attendance reports.This checkbox, if selected, directs theprogram to subtotal by employee.This is available for the standard reportin detail format.This check box, if selected, directs theprogram to not display Social Securitynumbers in reports.Munis Payroll Processing, Version 10.1Report by Always Choose will beselected.Option by Detail will be selected.Include by Batch will be selected.Sort by Employee Name will beselected.Employee Subtotals should bechecked.Hide SSN should be checked.Page 20
FieldDescriptionDSBPCDatesOutsidePayrollThis check box, if selected, directs theprogram to reduce the active set ofrecords where the value of the timeentry records' From and/or To datesfall outside of the defined payroll startand end dates.Dates Outside Payroll should beunchecked.Screen Preferences TabDefaultScreenThis list determines the default timeand attendance entry screen.The default value is Always Choose,which allows you to select the screenwhen accessing the program.Munis Payroll Processing, Version 10.1Default Screen for Time Entry shouldbe Detail. Advance uses should havethe ability to Always Choose.Page 21
FieldDescriptionDSBPCFind SortOrderAccountDescriptionThis list determines the sort for recordsin an active (find) set.This list indicates the general ledgeraccount description to display on theDaily Grid screen.This list provides the default value forthe Absence list on the Time EntryDetail screen; the default value for thislist is No.Find Sort Order should be EmployeeName.Account Description should beAccount Description.AutoloadDefaultThis list provides a default Time Entrygroup for the autoload option; thedefault value for this list is blank.Autoload Default should be blank.Daily GridDaysThis box contains the number of days Daily Grid Days should be set to 14.to add to the daily grid prior to thepayroll start date. This enables you toenter data for pay records for priorpayrolls to include in the currentpayroll.Note: The program does not adjust thework week in the display. The daily griddisplays the first day defined (typicallythe first payroll day) and displaysfollowing days in seven dayincrements. For example, if the payrollstart date is a Monday and you elect toadd three days to the daily grid, thedaily grid displays the first day asFriday.Prompt toVerifyThis check box, if selected, directs theprogram to verify the current batchafter reporting.This check box, if selected, directs theprogram to use the autoload optionwhen creating new batches.This check box, if selected, allows timeentry using the military time format (forexample, 4:00 p.m. as 1600 hours).This check box, if selected, directs theprogram to display a warning when payrecords entered do not exist in theEmployee/Job Salary program for theselected employee.This check box directs the program toautomatically update the To date whenyou change the From date. If thisAbsenceDefaultEnableAutoloadHours Entryin MilitaryWarn OnUndefinedPay TypeSet 'To' Datefrom 'From'DateMunis Payroll Processing, Version 10.1Absence Default should default as N –No. If a clerk was processing PTOonly then it would recommend tochange the default to Y – Yes.Prompt to Verify check box should beunchecked, this will require that eachbatch be verified.Enable Autoload check box shouldremain unchecked unless the user isautoload a defined group regularly.Hours Entry in Military should remainunchecked.Warn On Undefined Pay Types shouldbe unchecked for most users,recommend checking for new users.Set ‘To’ Date from ‘From’ Date shouldbe checked.Page 22
FieldRecord DateNotesDescriptionDSBPCcheck box is selected, the To date isreset to the From date; if this checkbox is not selected, the To dateremains at the default value.This check box, when selected, directs Record Date Notes should bethe program to copy the time entrychecked.detail dates into the Notes box whenthe UOM is D-Day or H-Hour and theAbsence Type is S-Sub Only or Y-Yes,and the Notes box is blank. The FindPending process also updates theNotes box but only when the UOM isD-Day.Pending Preferences TabPendingThis check box, if selected, automatically prompts the user to load pending timePromptentry records when starting a Time Entry batch.Default Group This list identifies a time and attendance group for which to automatically loadrecords. Select the blank list option to provide the user a list of groups fromwhich to choose for autoloading.Daily Grid Fields TabMunis Payroll Processing, Version 10.1Page 23
FieldDescriptionDSBPCThis tab defines the preferences for the columns that display on the Daily Gridscreen. The default values for all check boxes on this tab is selected; when youclear a check box, the program hides that column on the Daily Grid screen. Toview that column when the Daily Grid screen is active, right-click on the tableheader and select the column. If you set a column to hidden using the tableheader right-click method, that column may still be hidden when the programinitially opens. IF you have no employees that will ever work on a Sunday orSaturday, you can remove these days from showing on the Daily Grid. Pay 1 Sunday and Pay 7 SaturdayMunis Payroll Processing, Version 10.1Page 24
Munis Payroll Processing, Version 10.1 Page 2 Munis Menus In Munis, menus are available according to the security permissions granted to your user roles. Typically, permissions are granted according to need. For example, if your primary job is to enter timesheets in Payroll, you may not be able to see the System, Financials, General Revenues .