Transcription
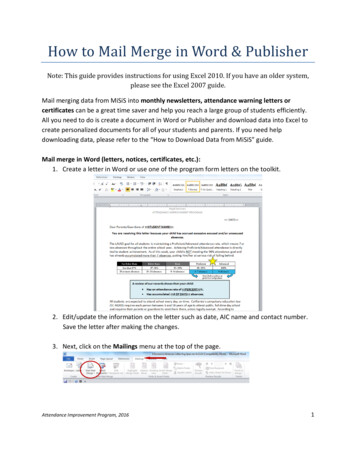
How to Mail Merge in Word & PublisherNote: This guide provides instructions for using Excel 2010. If you have an older system,please see the Excel 2007 guide.Mail merging data from MiSiS into monthly newsletters, attendance warning letters orcertificates can be a great time saver and help you reach a large group of students efficiently.All you need to do is create a document in Word or Publisher and download data into Excel tocreate personalized documents for all of your students and parents. If you need helpdownloading data, please refer to the “How to Download Data from MiSiS” guide.Mail merge in Word (letters, notices, certificates, etc.):1. Create a letter in Word or use one of the program form letters on the toolkit.2. Edit/update the information on the letter such as date, AIC name and contact number.Save the letter after making the changes.3. Next, click on the Mailings menu at the top of the page.Attendance Improvement Program, 20161
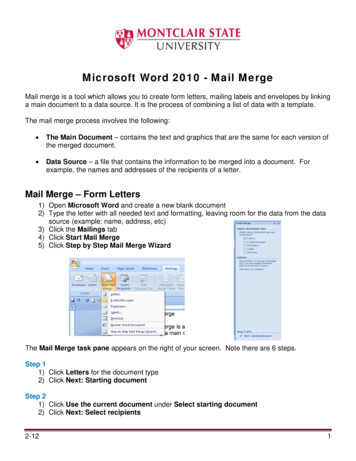
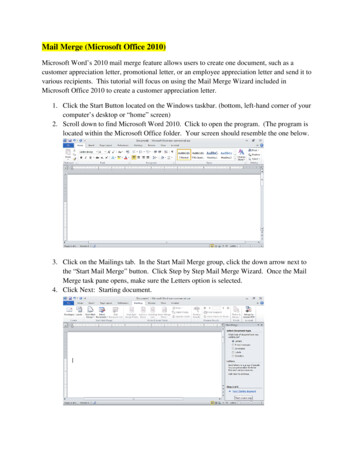
4. Click on the Start Mail Merge icon. On the dropdownmenu, click on Step by Step Mail Merge Wizard.5. The Mail Merge guide will pop up on the right hand side of yourscreen.6. At the bottom of the menu, you will see which step you are on.Step 1: Select document type. Letters is already selected foryou. Click on the blue highlighted Next: Starting document.7. Step 2: Select starting document. Use the current document isalready selected. Go to the bottom and click on the bluehighlighted Next: Select recipients.Attendance Improvement Program, 20162
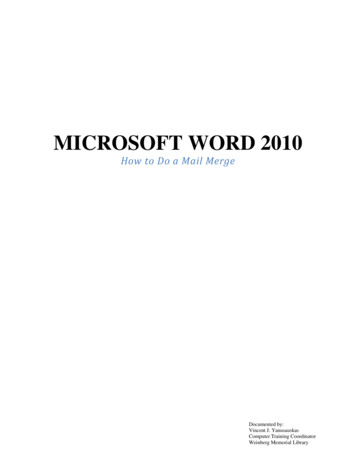
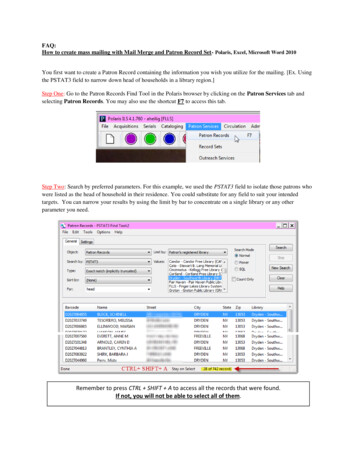
8. Step 3: Select recipients. In this step, you will use the data youdownloaded from MiSiS and formatted in Excel to be merged intoyour letters.9. Click on the blue highlighted Browse link. A window titled SelectData Source will open. Find the Excel document with the data foryour letter. Select the document name and click the Open button.10. The next window titled Select Tablewill open. Select the name of the sheetyou created in Excel for this letter.After you click on the name, it will behighlighted in blue. Then click the OKbutton.11. The next window titled Mail MergeRecipients will open. Here you cancheck to make sure you opened thecorrect list. You can also sort the datahere if you did not already in Excel. Forexample, do you want the letters to beprinted in alphabetical order? Sort byname. Do you want the letters to beprinted by classroom? Sort by room.When you are done, click OK.Attendance Improvement Program, 20163
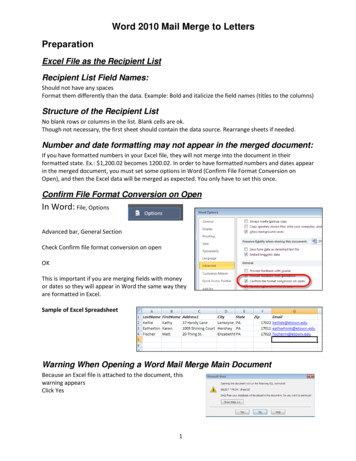
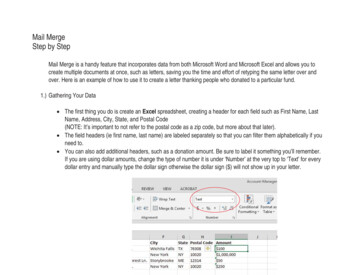
12. Under Use existing list, you will now see the name of your list ofstudents and data. (If you ever need to select a different list, youcan click on the blue highlighted Select a different list.)13. Now that you have selected your data for the letters, click on the blue highlighted Next:Write your letter at the bottom of the guide.14. Step 4: Write your letter allows you to enter the data you want to merge into yourletter. You will click or highlight on your letter where you want to insert some data.Then you will go to the right hand menu and click on the blue highlighted More Items.15. A window will pop up titled Insert Merge Field. The list offields shown matches the column headings in your Excel list ofstudents. Click on the data you want entered into that area ofthe letter. After it is highlighted in blue, click the Insertbutton. After the field is inserted, the Cancel button changesto Close. Click on the Close button and you will see your fieldinserted into the letter.Attendance Improvement Program, 20164
16. Now you can repeat the previous step to insert data fields into all areas of your letter.17. When inserting the attendance percentage in mail merge, the numbers sometimescome out with too many decimal places. Use these steps to correct that problem.a. To control percentage formatting in Word that displays like 0.83333333333%:1. Highlight your mergefield, which will look something like «Percent»2. Press Ctrl-F9 to wrap another field around it like this { «Percent» }3. Edit the field so that you get { «Percent»*100\#0.00%}4. Position the cursor anywhere in this field and press F9 to update it5. Your percentage should now display as 83.33%b. If the percentage displays like 83.3333333333333%, then input this formula:1. Highlight your mergefield, which will look something like «Percent»2. Press Ctrl-F9 to wrap another field around it, thus { «Percent» }3. Edit the field so that you get { «Percent» \#0.00%}4. Position the cursor anywhere in this field and press F9 to update it5. Your percentage should now display as 83.33%Note: The precision of the displayed value is controlled by the ‘0.00.’ You can useanything from ‘0’ to ‘0.000000000000000.’Attendance Improvement Program, 20165
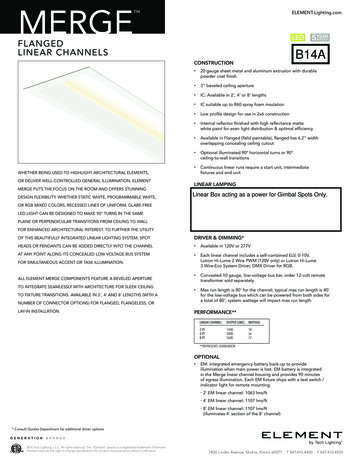
18. Step 5: Preview your letters. Here you can see what yourletters will look like when printed. Click on the arrows nextto Recipient: and you can scroll through a few individualletters to check for any spacing or formatting issues. Afteryou are satisfied with the look of your letters, go to thebottom and click on the blue highlighted Next: Complete themerge.a. In case you don’t want to print letters for all thestudents in your list, the blue highlighted Edit recipientlist will allow you to select which students’ letters youwant to print.19. Step 6: Complete the merge. Now it is time to print yourletters. Click on the blue highlighted Print.20. A window will pop up titled Merge to Printer. It gives theoption of printing all records, current record or a specificrange. Leave it on the default of All and then click the OKbutton.21. Next the Print window will open. Makesure the correct printer is in the Namebox and the correct settings areselected under Properties (color,printing on both sides, etc).22. Click the OK button and you will soonhave your mail merged letters.Attendance Improvement Program, 20166
Mail merge in Publisher (certificates, postcards, tickets, etc.):*The steps in this guide use the example of a certificate, but any type of Publisher document can be used.1. Create a certificate in Publisher or use one of the program forms on the toolkit.2. Edit/update the information on the certificate such as dates, Principal and AIC name,and school name and logo. Save the certificate after making the changes.3. Next, click on the Mailings menu at the top of the page.4. Click on the Mail Merge icon. On the dropdown menu,click on Step by Step Mail Merge Wizard.5. The Mail Merge guide will pop up on the right handside of your screen. It gives an overview of How MailMerge works. At the bottom of the menu, you will seewhich step you are on.6. Step 1: Create recipient list. Use an existing list isalready selected for you. Click on the blue highlightedNext: Create or connect to a recipient list.Attendance Improvement Program, 20167
7. A window titled Select Data Source will open. Find the Excel document you created withthe data for your certificate. Select the document name and click the Open button.8. The next window titled Select Table will open.Select the name of the sheet you created inExcel for this letter. After you click on thename, it will be highlighted in blue. Then clickthe OK button.9. The next window titled Mail MergeRecipients will open. Here you can checkto make sure you opened the correct list.You can also sort the data here if you didnot already in Excel. For example, do youwant the certificates to be printed inalphabetical order? Sort by name. Do youwant the certificates to be printed byclassroom? Sort by room. When you aredone, click OK.Attendance Improvement Program, 20168
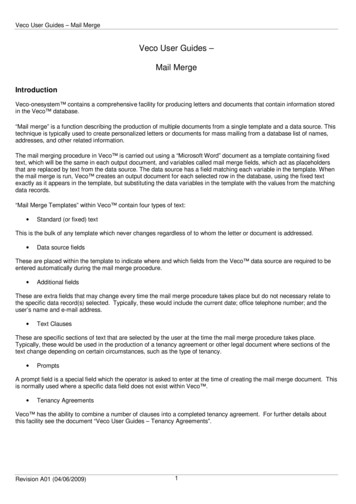
10. Now Step 2: Prepareyour publication willshow in the guide onthe right hand side ofyour screen. This stepallows you to enter thedata you want to mergeinto your certificate.You will click orhighlight on yourcertificate where youwant to insert somedata. Then you will go to the right hand menu and click on item you want inserted intoyour document.11. After you insert all the items you want to merge into your certificate, click on the bluehighlighted Next: Create merged publications at the bottom of the guide.12. Step 3: Create merged publications will allow you topreview and print your certificates.Attendance Improvement Program, 20169
13. Click on the blue highlighted Print Preview to review your certificates, if necessary.You can preview your individual certificates by clicking on the arrows underneath the certificate.14. After reviewing your certificates, make sure the correct printer is showing under Printerand the correct settings are selected under Printer Properties (color, printing on bothsides, etc).15. Click the OK button and you will soon have your mail merged certificates.Attendance Improvement Program, 201610
Mail merge in Word (letters, notices, certificates, etc.): 1. Create a letter in Word or use one of the program form letters on the toolkit. 2. Edit/update the information on the letter such as date, AIC name and contact number. Save the letter after making the changes. 3. Next, click on the Mailings menu at the top of the page.