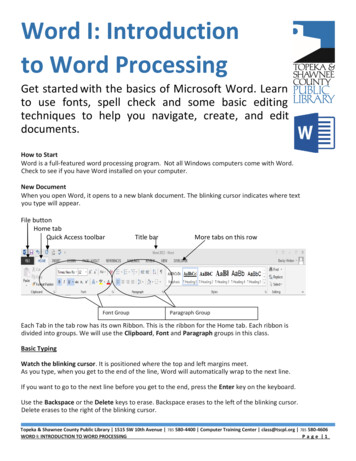
Transcription
MICROSOFT WORD 2010How to Do a Mail MergeDocumented by:Vincent J. YanusauskasComputer Training CoordinatorWeinberg Memorial Library
IntroductionIf you have used any of the Office 2007 applications then you are already aware that the Ribboninterface replaced the familiar menus and toolbars with Tabs, Groups, and Commands. AlthoughWord 2010 retains the same interface it offers: (1) a new Backstage view to manage yourdocuments, (2) the ability to customize the Ribbon with custom Tabs and Groups, (3) an Infomenu that displays different commands, properties, and metadata depending on the status andlocation of the document, (4) a new Screenshot tool and other numerous features.However, creating a mail merge in the latest version has remained the same as in Word 2007.The tab “Mailings”, still hosts the tools and commands used to create merged documents fore-mail messages, labels, address envelopes or even a directory. This includes retaining thepopular Mail Merge Wizard to provide users with step by step help to complete their task.Note: The term directory refers to address lists that can be saved along with your mailings.Creating a Merged Document1. Click on the tab “Mailings” and then the icon “Start Mail Merge”.2. Choose either the icon “Letters” or the “Step by Step Mail MergeWizard”. For this example select the Step by Step Mail MergeWizard.New users often prefer the Step by Step Mail Merge Wizard because it usessix steps to generate a merge document. In addition, the user may return toa pervious step at any time.3. This will open the Wizard in a Task Pane located in the right hand sideof the current documents window.Special Mention: Notice that when you make a selection in the Wizard panethe next level reflects your choices and may require making additionalchoices.Step 1Select document type – The five different document types are Letters, Email messages, Envelopes, Labels, or a Directory. Choose “Letters” for thedocument type and then click on “Next”.2
Step 2Select starting document – In the second step the user decides on whether to use the currentdocument, an existing template, or another document (form letter) for the working file.You will choose to Starting from an existing document. Current document – allows the user to enter text immediately in the present document.Special Note: Word allows the recycling and editing of past form letters. Simply open thedesired document before starting the Word Mail Merge Wizard and attach the data sourceif prompted. Starting from a template – There are ten mail merge templates to choose from, each canbe edited to meet your needs. Starting from an existing document – The user locates and opens the desired document(form letter) from a designated location.4. Click on “Open” to locate the document. Word provides a warning message that the contentsof the existing document will be lost during the change.5. Click “Next” to continue to Step 3.Creating a New Data Source Step 3Select recipients – In third step the user is required to select a Data Source from anexisting list or to create a new one. Data sources are any Word, Excel, or Access filethat contains information to use in the Mail Merge.1. Select the option to “Type a New List” and then click the link “Create” located inthe lower menu. This opens the “New Address List dialog box”. To add information type in the fields provided. To rename, delete, or reposition a field click on the button Customize. To add another entry click on the New Entry button.3
2. After completing the address list click OK to name and save the list. By default the file issaved as an .mdb database file in a folder titled My Data Sources.Note: When opening an existing datasource remember to remove the lastrow’s checkmark to remove the blankdata from the file.3. In the Mail Merge Recipients dialog box you can edit each recipient’s information or searchfor specific fields.How to:Sort – click on the columnheading.Remove a recipient withoutdeleting them – remove thecheckmark in front of thename.Select All – all recipients willbe included in the data source.Clear All – deselect allrecipients in the data source.Find – a search function usedto find a specific recipient.Edit – click on an existingrecord and then the Edit button, edit the existing information when the Address dialog box opens.Add New Record (Entry) – click on an existing record and then the Edit button, when the Addressdialog box opens click on the New Entry button. Add the new information.Validate – requires a third party source to check the validity of the data.4
Step 4Adding Merge FieldsWord provides assistance with several items such as Address Blocks, Greeting Lines, ElectronicPostage, Postal Bar Codes, and fieldsspecified in your data source.To add a field click inside the documentlocation where the first field is to be insertedand then choose from one items listed orclick on “More items” to access the InsertMerge Fields dialog box.If you are creating a new form letter fordistribution click on the Address Block linkto open the Insert Address Block dialog box.Select the proper format and then check or uncheck any elements that you want included in theAddress Block.To hide any undesired elements remove the check mark from its location.Close the dialog box by clicking on the OK button. Word now inserts the code Address Blockwhere the insertion point was located.Add a Greeting LinePlace the insertion point where you want toadd the greeting, then click on the linkGreeting Line, shown in Step 4.Choose the proper salutation for yourdocument from the Greeting Line dialog boxand then click on the OK button.Word 2010 also provides the option ofadding a generic greeting for those addressesthat show an empty entry.Click on OK to add the Greeting Line code.Next press Enter twice and start typing yourletter.Special Note: Merge fields can be entered anywhere deemed appropriate. This is demonstratedon the next page.5
Inserting Merge Fields within the DocumentOpen the Insert Merge Field dialog box, then click on the button “Match Fields,” to verify thatthe naming conventions used in your data source match the merge fields in Word. Especially ifyou are using a data source that someone else created.1. Method 1 - click on the Insert Merge Field button located on the Mail Merge Toolbar.2. Method 2 - click on the link More Items displayed in Step 4.Check the circle (radio button) for either Address Fields or Database Fields. Address Fields existin your personal address book (Outlook) and Database fields are the traditional fields found in adatabase.To insert a field first select the field and then click on thebuttons Insert Close. Unfortunately, Word does not allow youplace a space between fields or press the Enter key when theInsert Merge Field dialog box is open.However, you can insert multiple fields and then go back andadd spacing or to move a field to a new line by pressing theEnter key. Just place the insertion point between the start andend arrows of the field that requires the space or move to a newline. Press the Spacebar or the Enter key to accomplish therequired task.Step 5Preview your letters – in Step 5 the Wizard allows you topreview you letters, edit the recipient list, or exclude a recipient.To finish click on the link Complete the merge.Check for ErrorsTo check for and report mail merge errors with a Mail Merge documentclick on the Check for Errors button located on Mail Merge Toolbar.Clicking on the button activates the Checking for and Reporting dialogbox, which provides the user with three personal preference options. Simulate the merge and report errors in a new document - this is asimulated test that only reports errors it finds and does not changethe working document. Complete the merge and report each error as it occurs - completesthe merge but stops the process at each error found.Complete the merge without pausing - reports the errors in a newdocument. 6
Merge OptionsThese options include Merge to New Document, Merge to Printer, Merge to E-mail, and Mergeto Fax. The latter requires a faxing system supported on your system such as Microsoft Fax orWinFax (Symantec) to name a few. The buttons for these options are located on the Mail MergeToolbar. Merge to New Document – Exactly as stated the mail merge is completed in a newdocument. Merge to Print – Print all records, Print displayed record, and From To. The first twooptions are self-explanatory. The third option From and To allows the user to definehow many letters will be printed at one time. Selecting this option preventsoverloading the spooling capacity of the printer. Make your selection based on thenumber of letters you are generating. Merge to E-mail – This option by default is configured to work with MicrosoftOutlook, which the University of Scranton does not support. Activating this linkwould allow the user to send the mail merge as an Attachment, HTML, or Plain Text.Printing Envelops and LabelsTo print a single envelope or label a Mail Merge is not required. Simply select the tab Mailings and then either Envelopes or Labels from the group Create. If you select the option Add toDocument this will add an envelope to the current document and both will print together.Creating a Data Source in Excel1. Open Excel and then enter the fields Salutation, First Name, Last Name, Address, City, State,and Zip Code as column headings. Populate the spreadsheet with five fictitious names andthen save the example file as My Data Source.2. Open Word and then start the Mail Merge Wizard using the earlier instructions.3. Repeat Steps 1 & 2 from the earlier instructions In Step 3 opt to use an existing list and thenclick on the button Browse. When the Select Data Source dialog box opens click on the downarrow and change the Files of type to All Files. Select the Excel file you created earlier fromthe list or navigate to the folder where the files were saved.4. Click on Open and another dialog box opens asking whether to use the Entire Spreadsheet ora Named Range within the spreadsheet. Choose to use the entire spreadsheet.Note: A named range contains a selected group of cells with an assigned name.5. Complete the Form Letter using the steps outlined earlier.7
Importing a Data Source into Excel (Text delimited file)To use a data source that was exported from Banner into a text file, you must import the file intoExcel.1. In an open worksheet, click the tab Data and then the commandGet External Data. In this example the source is a text filelocated within your Royal Drive account.Note - You must be logged into your Royal Drive account using the desktop client.2. Click the command “Existing Connections” and then the button “Browse for More.”3. Navigate to the R: Drive, the directory Users and then your named directory. Locate the textfile and select it.4. Click “Open” to start the Text Import Wizard, and choose Delimited as the type of the filethat best describes your data.5. Select the proper delimiter and review your data. Click “Next” to choose format options andthen “Finish”, to import the data.6. Select the cell where the data should be imported and then click OK.Creating a Mail Merge in Access1. Start Access and then open the database that is storing the desired information. Select theTable or Query that you will use for your data source.2. Click on the tab External Data and then in the Group Exportclick on the command “Word Merge”.3. Select the option Create a New Document and Link the Datato It, from the dialog box. Choosing this option creates a NewMerged Document using the fields from the selected Table orQuery.4. Click on the OK button and Microsoft Word will launch the NewMail Merge Document. Verify you data source from the InsertMerge Field List. Follow the same steps using in creating normalmail merge.Creating a DirectoryA directory is often used to keep a complete listing of all records inyour source file. Example directories include address books, preferredcustomers, etc.1. In this example create and save an Excel file named Directory forthe data source. Type the fields Name and Phone Number forcolumn headings. Type four or five fictitious names and phone numbers for data. Type thefirst and last name as one name.8
2. Click on the tab “Mailings” and then the icon “Start Mail Merge”.3. Choose either the icon “Letters” or the “Step by Step Mail Merge Wizard”. For this exampleselect the Step Mail Merge Wizard.4. In Step 1 choose Directory as the document type and then click on Next.5. In Step 2 elect to use the current document and then click on Next.6. In Step 3 under the label Select Recipients elect to use an existing list and then click on theBrowse button. When the Select Data Source dialog box opens choose the Excel data fileDirectory.7. In the next dialog box choose Sheet 1 as the data source and then click on the OK buttons.8. In Step 4 click on Arrange Your Directory and then type the label Name: followed bypressing the spacebar once. Insert the field called FName and then close the Insert MergeField dialog box. Press the spacebar once and then insert the field LName. Press the Enterkey once.9. Type the label Phone: and then press the spacebar. Open the Insert Merge Field dialog boxand insert the field Phone. Close the dialog box.10. Select the fields Name andPhone with the mouse pointer.Right click and chooseParagraph from the side menu.Set the spacing to “0” and linespacing to single. Click OK andthen press the Enter key twice.11. Click on the button Preview your document to view the document.Note: At this point you are viewing only one record in the document window, this changeswhen you complete the merge. Click on the button Next: Complete the merge.12. Click on the link To New Document in the Merge section. Click on themenu All and then OK to complete the merge.9
Click on the tab "Mailings" and then the icon "Start Mail Merge". 2. Choose either the icon "Letters" or the "Step by Step Mail Merge Wizard". For this example select the Step by Step Mail Merge Wizard. New users often prefer the Step by Step Mail Merge Wizard because it uses six steps to generate a merge document.
