Transcription
USER'S GUIDEExplorer series 8000 and 8300,PVR and PVR HDCongratulations! You have just acquired the best Personal Video Recorder (PVR) on the market!VIDÉOTRON’S EXPLORER SERIES 8000 OR 8300, PVR & PVR HD REVOLUTIONIZESTHE W Y YOU W TCH TV! ITS BUILT-IN H RD DRIVE ND TWO RECORDINGFE TURES LET YOU: Pause a live program and pick up where you left off without missing a single frame. Instantly replay the last 8 seconds watched. Record two programs at once, without needing a VCR or videocassettes, and view a previously recordedprogram. Record up to 50 (100 with PVR HD) hours of programming and transfer it onto videocassettes if necessary. Watch two programs at once using the Picture-In-Picture (PIP) feature. Get an overview of the next three days of programming via the Interactive Program Guide (IPG). Enjoy the benefits of Dolby Digital surround sound, CD-quality audio, and DVD-quality video. Block access to specific times, channels or TV programs using the Parental Control feature. Access hundreds of movies through Video-on-Demand technology (when available in your area).v3
IN THIS GUIDEIMPORT NT RULES FOR S FE OPER TION . . . . . . . . . . . . . . . . . . . . . . . . . . . . . . . . . . . . . . . . . . . . . . 1B SIC INST LL TION . . . . . . . . . . . . . . . . . . . . . . . . . . . . . . . . . . . . . . . . . . . . . . . . . . . . . . . . . . . . . . . . . 2CONNECTING THE EXPLORER 8000, PVR TO A TV - WITH OR WITHOUT A SPLITTER . . . . . . . . . . . . . . . . . . . . . . . 3CONNECTING THE EXPLORER 8300, PVR TO A TV - WITH OR WITHOUT A SPLITTER . . . . . . . . . . . . . . . . . . . . . . . 4CONNECTING THE EXPLORER 8000, PVR HD TO A TV - WITH OR WITHOUT A SPLITTER . . . . . . . . . . . . . . . . . . . . 5CONNECTING THE EXPLORER 8300, PVR HD TO A TV - WITH OR WITHOUT A SPLITTER . . . . . . . . . . . . . . . . . . . . 6EXPLORER SERIES 8000 & 8300 REMOTE CONTROLS ND P NEL . . . . . . . . . . . . . . . . . . . . . . . 7REMOTE CONTROL MODEL AT8400 BUTTONS . . . . . . . . . . . . . . . . . . . . . . . . . . . . . . . . . . . . . . . . . . . . . . . . . . . . . . . . 7PROGRAMMING THE AT8400 REMOTE CONTROL. . . . . . . . . . . . . . . . . . . . . . . . . . . . . . . . . . . . . . . . . . . . . . . . . . . . . . 8REMOTE CONTROL MODEL UR5-8400A BUTTONS . . . . . . . . . . . . . . . . . . . . . . . . . . . . . . . . . . . . . . . . . . . . . . . . . . . 10PROGRAMMING THE UR5-8400A REMOTE CONTROL. . . . . . . . . . . . . . . . . . . . . . . . . . . . . . . . . . . . . . . . . . . . . . . . . 11EXPLORER 8000, PVR AND PVR HD FRONT PANEL . . . . . . . . . . . . . . . . . . . . . . . . . . . . . . . . . . . . . . . . . . . . . . . . . . . 14EXPLORER 8300, PVR AND PVR HD FRONT PANEL . . . . . . . . . . . . . . . . . . . . . . . . . . . . . . . . . . . . . . . . . . . . . . . . . . . 14INTER CTIVE PROGR M GUIDE . . . . . . . . . . . . . . . . . . . . . . . . . . . . . . . . . . . . . . . . . . . . . . . . . . . . . . . 15P Y PER VIEW (PPV) . . . . . . . . . . . . . . . . . . . . . . . . . . . . . . . . . . . . . . . . . . . . . . . . . . . . . . . . . . . . . . . . . 16SETTINGS . . . . . . . . . . . . . . . . . . . . . . . . . . . . . . . . . . . . . . . . . . . . . . . . . . . . . . . . . . . . . . . . . . . . . . . . . . . 17QUICK SETTINGS . . . . . . . . . . . . . . . . . . . . . . . . . . . . . . . . . . . . . . . . . . . . . . . . . . . . . . . . . . . . . . . . . . . . . . . . . . . . . . . . 17GENERAL SETTINGS . . . . . . . . . . . . . . . . . . . . . . . . . . . . . . . . . . . . . . . . . . . . . . . . . . . . . . . . . . . . . . . . . . . . . . . . . . . . . 17PERSON L VIDEO RECORDER FE TURES . . . . . . . . . . . . . . . . . . . . . . . . . . . . . . . . . . . . . . . . . . . . . . . 18HOW TO CONTROL A LIVE PROGRAM YOU ARE WATCHING . . . . . . . . . . . . . . . . . . . . . . . . . . . . . . . . . . . . . . . . . . . . 18HOW TO RECORD AND STORE A PROGRAM . . . . . . . . . . . . . . . . . . . . . . . . . . . . . . . . . . . . . . . . . . . . . . . . . . . . . . . . . 19RECORDING OPTIONS. . . . . . . . . . . . . . . . . . . . . . . . . . . . . . . . . . . . . . . . . . . . . . . . . . . . . . . . . . . . . . . . . . . . . . . . . . . . 20PLAY BACK A RECORDED PROGRAM . . . . . . . . . . . . . . . . . . . . . . . . . . . . . . . . . . . . . . . . . . . . . . . . . . . . . . . . . . . . . . . 20SAVE TIME . . . . . . . . . . . . . . . . . . . . . . . . . . . . . . . . . . . . . . . . . . . . . . . . . . . . . . . . . . . . . . . . . . . . . . . . . . . . . . . . . . . . . . 21HOW TO DELETE A RECORDED PROGRAM OR A SCHEDULED RECORDING . . . . . . . . . . . . . . . . . . . . . . . . . . . . . . . 22PICTURE-IN-PICTURE (PIP) — HOW TO WATCH TWO PROGRAMS AT ONCE . . . . . . . . . . . . . . . . . . . . . . . . . . . . . . . . 22H RD DISK STOR GE C P BILITIES . . . . . . . . . . . . . . . . . . . . . . . . . . . . . . . . . . . . . . . . . . . . . . . . . . . 23FREQUENTLY SKED QUESTIONS . . . . . . . . . . . . . . . . . . . . . . . . . . . . . . . . . . . . . . . . . . . . . . . . . . . . . 24QUESTIONS & ANSWERS (GENERAL). . . . . . . . . . . . . . . . . . . . . . . . . . . . . . . . . . . . . . . . . . . . . . . . . . . . . . . . . . . . . . . . 24QUESTIONS & ANSWERS (PVR) . . . . . . . . . . . . . . . . . . . . . . . . . . . . . . . . . . . . . . . . . . . . . . . . . . . . . . . . . . . . . . . . . . . . 26LINE FUNCTION . . . . . . . . . . . . . . . . . . . . . . . . . . . . . . . . . . . . . . . . . . . . . . . . . . . . . . . . . . . . . . . . . . . . . 27
IN THIS GUIDETO OPTIMIZE SOUND ND IM GE QU LITY . . . . . . . . . . . . . . . . . . . . . . . . . . . . . . . . . . . . . . . . . . . . 24OTHER CONNECTIONS . . . . . . . . . . . . . . . . . . . . . . . . . . . . . . . . . . . . . . . . . . . . . . . . . . . . . . . . . . . . . . . 30EXPLORER 8000, PVR AND VCR . . . . . . . . . . . . . . . . . . . . . . . . . . . . . . . . . . . . . . . . . . . . . . . . . . . . . . . . . . . . . . . . . . . 30EXPLORER 8000, PVR AND HOME THEATRE . . . . . . . . . . . . . . . . . . . . . . . . . . . . . . . . . . . . . . . . . . . . . . . . . . . . . . . . . 31EXPLORER 8300, PVR PVR AND VCR . . . . . . . . . . . . . . . . . . . . . . . . . . . . . . . . . . . . . . . . . . . . . . . . . . . . . . . . . . . . . . . 32EXPLORER 8300, PVR AND HOME THEATRE . . . . . . . . . . . . . . . . . . . . . . . . . . . . . . . . . . . . . . . . . . . . . . . . . . . . . . . . . 33HOW TO USE PERIPHER LS . . . . . . . . . . . . . . . . . . . . . . . . . . . . . . . . . . . . . . . . . . . . . . . . . . . . . . . . . . 34CONNECTING THE EXPLORER 8000 OR 8300, PVR WITH VCR . . . . . . . . . . . . . . . . . . . . . . . . . . . . . . . . . . . . . . . . . 34CONNECTING THE EXPLORER 8000 OR 8300, PVR WITH HOME THEATRE . . . . . . . . . . . . . . . . . . . . . . . . . . . . . . . 35OTHER CONNECTIONS . . . . . . . . . . . . . . . . . . . . . . . . . . . . . . . . . . . . . . . . . . . . . . . . . . . . . . . . . . . . . . . 36EXPLORER 8000, PVR HD AND VCR . . . . . . . . . . . . . . . . . . . . . . . . . . . . . . . . . . . . . . . . . . . . . . . . . . . . . . . . . . . . . . . . 36EXPLORER 8000, PVR HD AND HOME THEATRE . . . . . . . . . . . . . . . . . . . . . . . . . . . . . . . . . . . . . . . . . . . . . . . . . . . . . . 37EXPLORER 8300, PVR HD AND VCR . . . . . . . . . . . . . . . . . . . . . . . . . . . . . . . . . . . . . . . . . . . . . . . . . . . . . . . . . . . . . . . . 38EXPLORER 8300, PVR HD AND HOME THEATRE . . . . . . . . . . . . . . . . . . . . . . . . . . . . . . . . . . . . . . . . . . . . . . . . . . . . . . 39HOW TO USE PERIPHER LS . . . . . . . . . . . . . . . . . . . . . . . . . . . . . . . . . . . . . . . . . . . . . . . . . . . . . . . . . . 40CONNECTING THE EXPLORER 8000 OR 8300, PVR HD WITH VCR . . . . . . . . . . . . . . . . . . . . . . . . . . . . . . . . . . . . . . 40CONNECTING THE EXPLORER 8000 OR 8300, PVR HD WITH HOME THEATRE . . . . . . . . . . . . . . . . . . . . . . . . . . . 41HDTV SECTION . . . . . . . . . . . . . . . . . . . . . . . . . . . . . . . . . . . . . . . . . . . . . . . . . . . . . . . . . . . . . . . . . . . . . . 42HDTV FAQ . . . . . . . . . . . . . . . . . . . . . . . . . . . . . . . . . . . . . . . . . . . . . . . . . . . . . . . . . . . . . . . . . . . . . . . . . . . . . . . . . . . . . . 42EXPLORER HDTV SETUP WIZ RD . . . . . . . . . . . . . . . . . . . . . . . . . . . . . . . . . . . . . . . . . . . . . . . . . . . . 45INTRODUCING THE SETUP WIZARD. . . . . . . . . . . . . . . . . . . . . . . . . . . . . . . . . . . . . . . . . . . . . . . . . . . . . . . . . . . . . . . . . 45PICTURE FORMATS . . . . . . . . . . . . . . . . . . . . . . . . . . . . . . . . . . . . . . . . . . . . . . . . . . . . . . . . . . . . . . . . . . . . . . . . . . . . . . 46SETTING UP YOUR HDTV WITH THE SETUP WIZARD . . . . . . . . . . . . . . . . . . . . . . . . . . . . . . . . . . . . . . . . . . . . . . . . . . . 50EASY SETUP INSTRUCTIONS. . . . . . . . . . . . . . . . . . . . . . . . . . . . . . . . . . . . . . . . . . . . . . . . . . . . . . . . . . . . . . . . . . . . . . . 54ADVANCED SETUP INSTRUCTIONS . . . . . . . . . . . . . . . . . . . . . . . . . . . . . . . . . . . . . . . . . . . . . . . . . . . . . . . . . . . . . . . . . . 55CHANGING THE SETTINGS WHILE WATCHING TV . . . . . . . . . . . . . . . . . . . . . . . . . . . . . . . . . . . . . . . . . . . . . . . . . . . . . . 56CLOSED CAPTIONING. . . . . . . . . . . . . . . . . . . . . . . . . . . . . . . . . . . . . . . . . . . . . . . . . . . . . . . . . . . . . . . . . . . . . . . . . . . . . 58LIST OF CODES . . . . . . . . . . . . . . . . . . . . . . . . . . . . . . . . . . . . . . . . . . . . . . . . . . . . . . . . . . . . . . . . . . . . . . 62REMOTE CONTROL SETUP CODES FOR AT8400 . . . . . . . . . . . . . . . . . . . . . . . . . . . . . . . . . . . . . . . . . . . . . . . . . . . . . . 62REMOTE CONTROL SETUP CODES FOR UR5-8400A . . . . . . . . . . . . . . . . . . . . . . . . . . . . . . . . . . . . . . . . . . . . . . . . . . 64CUSTOMER SERVICE. . . . . . . . . . . . . . . . . . . . . . . . . . . . . . . . . . . . . . . . . . . . . . . . . . . . . . . . . . . . . . . . . 66C BLE CONTR CT . . . . . . . . . . . . . . . . . . . . . . . . . . . . . . . . . . . . . . . . . . . . . . . . . . . . . . . . . . . . . . . . . . . 67
IMPORT NT RULES FOR S FE OPER TIONCarefully read through these rules for safe operation before hooking up the terminal.Placement and VentilationThe unit has openings for ventilation that protect it from overheating. Avoid obstructing these openings, and do not place other equipment, including televisions, lamps, books or any otherobject, on the unit. Do not place it in an enclosure such as a bookcase or equipment rack, unless the installation provides proper ventilation. Do not place the unit on a bed, sofa, rug or similar surface, or over a radiator or heat register. Place the unit on a stable surface able to support its size and weight.Accessories and CleaningDo not use accessories with this equipment unless recommended by your cable service provider.Do not open the cover of the unit. Unplug the unit and clean it with a damp cloth. Do not use a liquid or aerosol cleaner,or a magnetic/static cleaning device.Object and Liquid EntryDo not expose the unit to liquid or moisture, or spill liquids on or near it. Do not place the unit on a wet surface. Neverpush objects of any kind into the unit’s openings, as they may touch dangerous voltage points or cause short-circuits thatcould result in a fire or electric shock.Power SourcesA label on the unit indicates the correct power source for this equipment. Operate the unit only from an electrical outletthat has the voltage and frequency indicated on the label. Do not overload electrical outlets or extension cords, as thiscan result in a risk of fire or electric shock.Power Cord ProtectionArrange all power cords so that people cannot walk on the cords, or place objects on or against the cords, as this maydamage them. Pay particular attention to cords that are at plugs, at electrical outlets, connected to accessories, and atthe places where the cords exit the unit.GroundingThe Explorer terminal has a two-prong plug. Properly ground the unit by inserting the plug into a grounded electrical,two-socket outlet. If the plug is polarized, it has one wide prong and one narrow prong. This plug fits only one way.Caution! To prevent electric shock, match wide blade of plug to wide slot, then fully insert. If you are unable to insertthis plug fully into the outlet, contact an electrician to replace your obsolete outlet.ServicingThis unit is covered by a one-year warranty. Opening the case will void your warranty. Refer all servicing to a qualifiedVidéotron technician. Contact your cable service provider for instructions. Service should be referred to a Vidéotrontechnician when any of the following occurs: There is damage to the power cord or plug. Liquid enters the unit, or there is exposure to rain or water. A heavy object falls on the unit, or you drop the unit or damage the cabinet. Operation is not normal (the instructions in this guide describe the proper operation). The unit exhibits a distinct change in performance.1
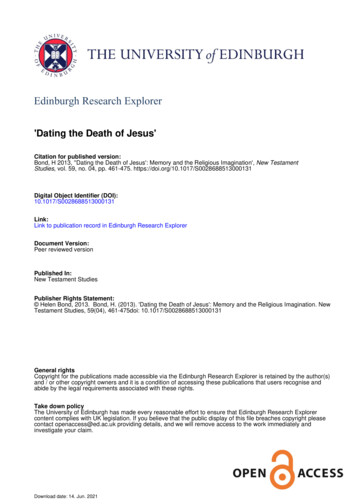
B SIC INST LL TIONBEFORE INSTALLING THE EXPLORER SERIE 8000 OR 8300, PVR OR PVR HD Read the Important Rules for Safe Operation on the previous page. Locate the serial number, which is on a bar code on the back panel of the unit. Write it down here:You may need this number if your system requires troubleshooting in the future. If the unit is plugged into an outlet that is controlled by a wall switch, make sure the switch is always in the ONposition to enable nightly updates to the Program Guide. It is recommended that you use a surge protector with the unit.IMPORTANT – For high-definition EXPLORER PVR terminals (8000 HD, 8300 HD):1. Turn off your PVR.2. Press and hold both the GUIDE and INFO buttons on the terminal’s front panel.Press the GUIDE and INFObuttons at the same timeEXPLORER 8300 PVR HDPress the GUIDE and INFObuttons at the same timeEXPLORER 8000 PVR HD3. Look at the terminal’s display: it indicates "HD" then changes to "SD" after about 10 seconds, then changes back to"HD", and so on.4. If you will be using your PVR HD with a high-definition TV, press the EXIT button when "HD" is displayed, and go on tothe next section of this guide.5. If you will be using your PVR HD with a standard TV for now, press the EXIT button when "SD" is displayed.This configures the terminal so that it works exactly like a standard PVR. You can then refer to the instructions for thestandard version of your terminal. The key point to keep in mind involves the output connections: the "Y" output ofthe terminal becomes your "video out", and the Pr and Pb outputs are disabled.2
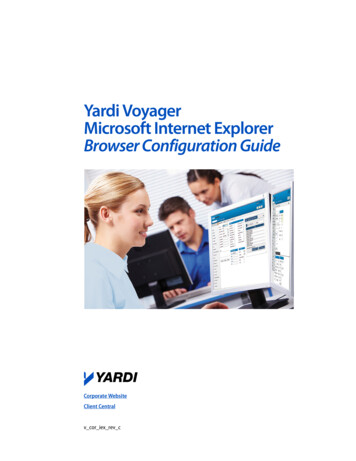
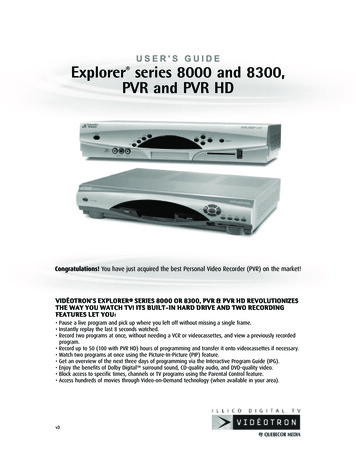
B SIC INST LL TION(CONTINUED)EXPLORER SERIE 8000, PVRCONNECTING THE EXPLORER TO TV - WITH OR WITHOUT SPLITTERExplorer 8000INPUT (AUX)CABLE OUTIRCABLEINTHIS DEVICE IS INTENDED TO BE ATTACHEDTO A RECEIVER THAT IS NOT USED TORECEIVE OVER-THE-AIR BROADCASTSIGNALS. CONNECTION OF THIS DEVICEIN ANY OTHER FASHION MAY CAUSEHARMFUL INTERFERENCE TO RADIOCOMMUNICATIONS AND IS IN VIOLATIONOF THE FCC RULES, PART 15.OUT 2 (VCR)OUT 1 (TV)USB1394 1394 S-VIDEOOUTCAUTIONRISK OF ELECTRIC SHOCKDO NOT OPEN120 VAC60HZ 80WAVIS: RISQUE DE CHOCELECTRIQUE NE PAS OUVRIRETHERNETCATV CONVERTERMADE IN MEXICO120 VAC60HZ 5ACABLETVAUDIOOUTA/V 1 INA/V 2 INAUDIOAUDIOCABLE/ANTENNALLLRRRVIDEOVIDEOS-VIDEO3
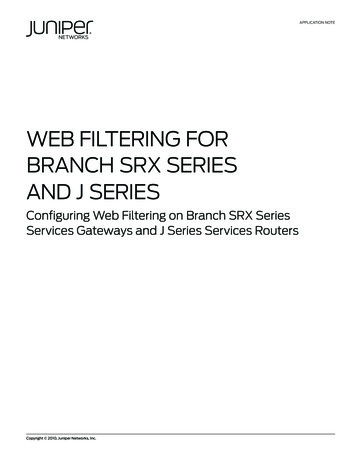
B SIC INST LL TION(CONTINUED)EXPLORER SERIE 8300, PVRCONNECTING THE EXPLORER TO TV - WITH OR WITHOUT SPLITTERExplorer 8300CAUTIONCABLEOUTCABLEINTHIS DEVICE IS INTENDED TO BE ATTACHEDTO A RECEIVER THAT IS NOT USED TORECEIVE OVER-THE-AIR BR OADCASTSIGNALS. CONNECTION OF THIS DEVICEIN ANY OTHER FASHION MAY CAUSEHARMFUL INTERFERENCE TO RADIOCOMMUNICATIONS AND IS IN VIOLATIONOF THE FCC RULES, PART 15.RISK OF ELECTRIC SHOCKDO NOT OPENOUT 12AVIS: RISQUE DE CHOCELECTRIQUE NE PAS OUVRIRLTVAUDIOIRRSATACATV CONVERTERMADE IN MEXICOVIDEO DIGITAL VIDEOAUDIO OUTCABLE120 VAC60HZ 5A120 VAC60HZ 80WS-VIDEOOUTTVAUDIOOUTA/V 1 INA/V 2 INAUDIOAUDIOCABLE/ANTENNALLLRRRVIDEOVIDEOS-VIDEO1. WARNING: Electric shock hazard! Unplug the TV and VCR before connecting or disconnecting any device cables.2. After the cable connections are made, connect the TV and VCR to AC power, turn on the TV, and select the VIDEO 1input on the TV.Do not press the Power key on the terminal yet! It takes two to three minutes for the terminal to be updated.Wait until the time is displayed on the front panel, then turn on the terminal. UDIO OUTPUT The audio output from CABLE OUT is mono (non-stereo). Audio output from AUDIO OUT LEFT and RIGHT is stereo. For better picture quality, we recommend that you use S-VIDEO OUT.If you decide to use this output, you must leave the RCA cables between the Explorer’s left and right AUDIO outputsand your TV connected.4
B SIC INST LL TION(CONTINUED)EXPLORER SERIE 8000, PVR HDCONNECTING THE EXPLORER TO TV - WITH OR WITHOUT SPLITTERExplorer - serie 8000, PVR HDHdtvDVIInput Video-AudioCABLE LAUDIOOUTLRCABLEINTHIS DEVICE IS INTENDED TO BE ATTACHEDTO A RECEIVER THAT IS NOT USED TORECEIVE OVER-THE-AIR BROADCASTSIGNALS. CONNECTION OF THIS DEVICEIN ANY OTHER FASHION MAY CAUSEHARMFUL INTERFERENCE TO RADIOCOMMUNICATIONS AND IS IN VIOLATIONOF THE FCC RULES, PART 15.CIRCATV CONVERTERMADE IN MEXICO120 VA60HZ 5ACAUTIONRISK OF ELECTRIC SHOCKDO NOT OPEN120 VAC60HZ 80WAVIS: RISQUE DE CHOCELECTRIQUE NE PAS OUVRIRHDTVAUDIOOUTA/V 1 INA/V 2 PrPbS-VIDEOYDVI5
B SIC INST LL TION(CONTINUED)EXPLORER SERIE 8300, PVR HDCONNECTING THE EXPLORER TO TV - WITH OR WITHOUT SPLITTERExplorer 8300 HDCABLEOUTCABLEINCAUTIONRISK OF ELECTRIC SHOCKDO NOT OPENOUT 12AVIS: RISQUE DE CHOCELECTRIQUE NE PAS OUVRIRLTHIS DEVICE IS INTENDED TO BE ATTACHEDTO A RECEIVER THAT IS NOT USED TORECEIVE OVER-THE-AIR BR OADCASTSIGNALS. CONNECTION OF THIS DEVICEIN ANY OTHER FASHION MAY CAUSEHARMFUL INTERFERENCE TO RADIOCOMMUNICATIONS AND IS IN VIOLATIONOF THE FCC RULES, PART 15.AUDIOIRR1394 1394HDMICATV CONVERTERMADE IN MEXICOVIDEO DIGITAL VIDEOAUDIO OUTETHERNETSATA120 VAC60HZ 5A120 VAC60HZ 80WS-VIDEOOUTCABLEHDTVAUDIOOUTA/V 1 INAUDIOA/V 2 OYDVINOTE : If you are using the HDMI output and the digital video input on your TV is DVI format, make sure thatinput supports the HDCP protocol. If necessary, you can connect the two devices using an HDMI to DVI adaptor.HOW TO W TCH PROGR M IN STEREO1. Turn on the Explorer series 8000 or 8300, PVR HD and your TV.Select COMPONENT by pressing INPUT SELECT, INPUT, AUX, AVX or TV/VIDEO on your TV remote control.2. Tune to a channel with your Explorer remote control.6
EXPLORER SERIES 8000 & 8300 REMOTE CONTROLS ND P NELTHE T8400 LLTOUCH REMOTE CONTROL FUNCTIONS S FOUR REMOTE CONTROLS IN ONE!Once programmed, it can control your TV, VCR, PVR, and an audio device.MODEL T8400 BUTTONSDisplays the InteractiveProgram Guide (IPG)Power ON/OFFThe 4 mode keysPerforms theselected actionProvides settingsinformation andprogram descriptionsMoves throughonscreen choicesExits to full-screen TVReplays the last 8seconds of a programDisplays a list of yourrecorded programsReturns to live programmingRewindsFast-forwardsPlays a program orresumes a paused oneStops recordinga programRecords a programPauses a programTurns PIP featureon or offThe 5 dedicated PIP keysSwaps PIP screenwith main screenSelects PIP channelsup and downMoves PIP screenThe remote requires two alkaline AA batteries. A diagram inside the compartment of the remote indicatesproper battery placement. Replace as needed, when the indicator light becomes dim or no longer illuminates.7
EXPLORER SÉRIES 8000 & 8300 R
cable in out 2 (vcr) 13941394 catv converter made in mexico out 1 (tv) s-video out input (aux) cable/ antenna a/v 1 in video s-video audio l r a/v 2 in video audio l r audio out l r cable explorer 8000 tv 3 bsic instlltion (continued) explorer serie 8000, pvr