Transcription
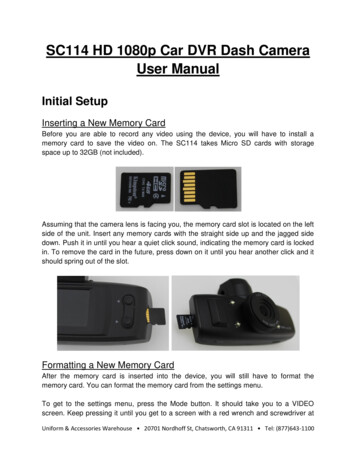
SC114 HD 1080p Car DVR Dash CameraUser ManualInitial SetupInserting a New Memory CardBefore you are able to record any video using the device, you will have to install amemory card to save the video on. The SC114 takes Micro SD cards with storagespace up to 32GB (not included).Assuming that the camera lens is facing you, the memory card slot is located on the leftside of the unit. Insert any memory cards with the straight side up and the jagged sidedown. Push it in until you hear a quiet click sound, indicating the memory card is lockedin. To remove the card in the future, press down on it until you hear another click and itshould spring out of the slot.Formatting a New Memory CardAfter the memory card is inserted into the device, you will still have to format thememory card. You can format the memory card from the settings menu.To get to the settings menu, press the Mode button. It should take you to a VIDEOscreen. Keep pressing it until you get to a screen with a red wrench and screwdriver atUniform & Accessories Warehouse 20701 Nordhoff St, Chatsworth, CA 91311 Tel: (877)643-1100
the top. Press the key until you have FORMAT highlighted. Press OK so select it andpress the to select YES. Press OK and the memory card will be formatted once thespinning circles disappear.WARNING: Formatting the memory card will erase any information already on it, somake sure there is no information that you need on it, or that you have a backup of thedata.Setting the TimeWhen you first turn on the unit, the time may be incorrect. The current time on thedevice can be seen on the bottom left of the main screen. If it is incorrect, you can go tothe settings menu to change it.To get to the settings menu, press the Mode button. It should take you to a VIDEOscreen. Keep pressing it until you get to a screen with a red wrench and screwdriver atthe top. Press the key until you have DATE highlighted. OK so select it and press and to adjust the year. Press OK to save the year and it should move on to themonth, and after that is saved it will move onto the day.Uniform & Accessories Warehouse 20701 Nordhoff St, Chatsworth, CA 91311 Tel: (877)643-1100
Once the date is set, you can move to the clock and use OK to select the hours, andafter you save that, you can set the minutes. The time is in 24 hour format (if you needto enter a time that is PM, then add 12 to the hours and enter that number instead).Once the clock is set correctly and saved, you can press MODE to go back to the mainscreen.Connecting to Your ComputerTo view the videos and photographs you have taken on the device on a larger screen,view the GPS data, make backups of the footage, charge the device, or empty space onthe memory card, you will have to connect the device to your computer using theincluded cable.The port used to connect to your computer is on the top of the device, on the left side,and is labeled as USB above it. Turn the device off and take the included USB cableand plug the larger end into your computer and the smaller end into your device. If youhave the suction cup attached, you will have to remove it first.A menu will appear with the options of OPEN, CHARGE, and MSC. You can select theoption you want using the and buttons and use OK to confirm the selection. OPENwill turn on the device as normal. CHARGE will keep the device off but recharge it. MSCwill put the device in USB mode and allow you to view the files on the memory card onyour computer.Uniform & Accessories Warehouse 20701 Nordhoff St, Chatsworth, CA 91311 Tel: (877)643-1100
The first time you are connecting the device to your computer, you will see a messageappear on your screen informing you that your computer is installing drivers needed forthe device to work properly. Please wait for a message telling you that they aresuccessfully installed before doing anything else.While the device is connected to your computer you should see USB Connected on thescreen of the device. An autoplay message should popup on your computer screen, andyou can click Open folder to view files. You should see the following: DCIM, MISC,codec, Player, user manual.Uniform & Accessories Warehouse 20701 Nordhoff St, Chatsworth, CA 91311 Tel: (877)643-1100
You should copy all files and folders on the memory card somewhere into a foldersomewhere on your computer. This makes a backup of the files and will make loadingtimes much lower. If you want to free up some space on the memory card you can alsodelete them from the memory card after you have copied them to your computer.Installing DependenciesTo play the files, you must first have Google Earth installed on your computer, as wellas the included codecs. If you already have these installed, you may skip this section.Google Earth is free to download and install, and you can find it at the following URL:http://www.google.com/earth/index.htmlWhen you go to the website, there should be a button saying Download Google EarthThe website may try and include Google Chrome with Google Earth, but this can bedisabled by simply unchecking the check boxes near the top of the page. To start thedownload, click on Agree and Download.Uniform & Accessories Warehouse 20701 Nordhoff St, Chatsworth, CA 91311 Tel: (877)643-1100
If the download does not start, there is a link on the page you can click to force it tostart. If prompted to Save or Run the program, you can simply Run it. If you Save itinstead, you will have to find where the file was saved and double click it.Uniform & Accessories Warehouse 20701 Nordhoff St, Chatsworth, CA 91311 Tel: (877)643-1100
An installer should open up once it has finished downloading (and after you double clickit if you Saved it). It should automatically take care of the whole installation.Once the installation is complete, the installer should automatically close and GoogleEarth should automatically open. You do not need to have it open so feel free to closethe window.Uniform & Accessories Warehouse 20701 Nordhoff St, Chatsworth, CA 91311 Tel: (877)643-1100
After that is installed, run the file codec.exe to install the last files you will need to usethe included player properly. When it opens, click on Next to start. You can install thecodec in Simple mode to make the process faster.The options on the next three screens can be kept as is, and you can simply click onNext each time until you reach the Ready to install screen. Click on Install when youget there.Uniform & Accessories Warehouse 20701 Nordhoff St, Chatsworth, CA 91311 Tel: (877)643-1100
Wait for the program to complete the installation process, and then click on Finish toclose the window. Everything needed to properly view your recordings on yourcomputer should now be installed.Uniform & Accessories Warehouse 20701 Nordhoff St, Chatsworth, CA 91311 Tel: (877)643-1100
Using the CameraUnderstanding the Main ScreenRecording VideoAssuming you have a properly formatted memory card installed. You should be able tosee a time at the top left of the Main Screen. This should show you how much recordingtime you have left on the current memory card. As long as it is not 0, you should be ableto record simply by pressing the REC button. In red letters at the top of the screen, RECshould appear indicating that the recording has started. To stop the recording, simplypress REC a second time.Uniform & Accessories Warehouse 20701 Nordhoff St, Chatsworth, CA 91311 Tel: (877)643-1100
If you want GPS information while you are recording, wait for the symbol directly to theright of the recording time to turn green. This indicates that a GPS is receiving a signal.If it fails to turn green, try moving to an area where nothing is above you (you may haveto take the device outdoors to get a signal). It may still take a minute or two to make theconnection.Taking a PhotographOn the top right of the device there should be a button with a small picture of a cameraabove it. This is the button used to take pictures. After you press it the screen shouldflicker and show a preview of the image you took and go back to the main screenimmediately after wards.Uniform & Accessories Warehouse 20701 Nordhoff St, Chatsworth, CA 91311 Tel: (877)643-1100
Using the PlayerPlayer LayoutTo view your recorded files, you will have to double-click on player.exe to open theincluded video player. If you use any other software to play your videos, you will not beable to see the GPS information.The saved files from the memory card should appear at the top right of the screen.Double-click on the one you want to view and it will automatically start playing.The video should play at the top left of the screen. The controls to the video player areat the bottom center of the screen. You can pause the video or adjust playback speedfrom here.Uniform & Accessories Warehouse 20701 Nordhoff St, Chatsworth, CA 91311 Tel: (877)643-1100
The map should follow the events in the video, and the readings from the GPS at thetime in the video are underneath. The bottom left of the screen you can see a graph ofthe speed and g-force of the camera.Uniform & Accessories Warehouse 20701 Nordhoff St, Chatsworth, CA 91311 Tel: (877)643-1100
Changing UnitsThe software may be using units of measurement different than what you need/knowwhen you first receive it, as the device supports the both Metric system (kilometers) andthe British system (miles).To change or check on the current units, click on View in the menu bar, and move yourmouse over Measurement. The units that are currently being used will have a blue dotnext to it. To select the units you want, simply click on the one you want.Uniform & Accessories Warehouse 20701 Nordhoff St, Chatsworth, CA 91311 Tel: (877)643-1100
Using the Included AccessoriesUsing the Suction CupThe device should come with a suction cup to securely hold the camera onto anysmooth flat surface (like a window).There should be a whole through the top of the camera that the suction cup can attachto. You will need to unscrew the nut on the suction cup and then hold the camera withthe hole lined up where the screw should go. Run the screw through both the suctioncup’s screw holes and the hole on the camera and tighten the nut it to keep bothtogether. You may want to make sure the nut goes on the side where it won’t cover thepower and camera buttons.Uniform & Accessories Warehouse 20701 Nordhoff St, Chatsworth, CA 91311 Tel: (877)643-1100
The suction cup should have a protective plastic disk that you will have to removebefore it will work.To use the suction cup once it is installed, simply press the cup onto the surface youwant it to stick to, and push the lever down. It should stick, but if it does not, then yoursurface may not be smooth or flat enough, or the suction cup may need to be cleaned.Uniform & Accessories Warehouse 20701 Nordhoff St, Chatsworth, CA 91311 Tel: (877)643-1100
Using the Video CablesThe device should include both an HDMI cable and a RCA cable to connect to a TV. Ifyou connect the device to a TV and it does not work, you may need to change the TVOUT settings in the settings menu. If you are in North America or East Asia, your TV willmost likely need NTSC. If you are in Europe, Australia, or West Asia, your TV will mostlikely need PAL. You should still try both settings if the most likely one does not work.You can get to the settings menu by pressing MODE until you reach a screen with ascrewdriver and wrench at the top of the screen. Press until you reach TV OUT, andyou can press OK to select it. You can select the option you want using the and buttons and use OK to confirm the selection.Uniform & Accessories Warehouse20701 Nordhoff StChatsworth, CA 91311Tel: (877) 643-1100Uniform & Accessories Warehouse 20701 Nordhoff St, Chatsworth, CA 91311 Tel: (877)643-1100
Uniform & Accessories Warehouse 20701 Nordhoff St, Chatsworth, CA 91311 Tel: (877)643-1100 SC114 HD 1080p Car DVR Dash Camera
