Transcription
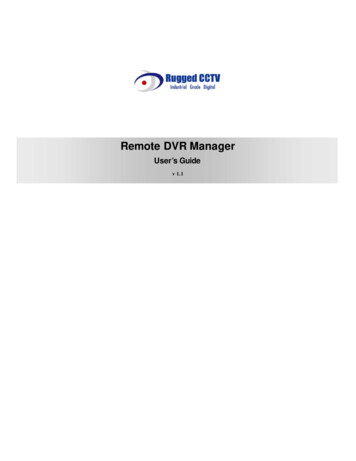
WPS-DVRQuick Start GuideIMPORTANT! - Read Before Heading to the Job SiteThe following items are required during the installation of a WPS-DVR. It is recommended that these itemsare reviewed before configuring the DVR. Preparing these items in advance will allow for the installation tobe performed smoothly.All Cameras and display devices that will be connected to the DVRNetwork Connection near the location of the DVRAdministrator rights to the computer that will be used to access the DVRRouter Details – Contact the network admin to obtain Admin Rights – Required to setup the network and port forwarding for remote access. Default gateway Net Mask Address DNS Address Static IP to assign to the DVRTable of Contents1. CONNECT AND CONFIGURE THE DVR. 22. CONFIGURE INTERNET EXPLORER FOR FIRST USE. 33. CONFIGURE RESOLUTION AND VIDEO STREAMING. 5
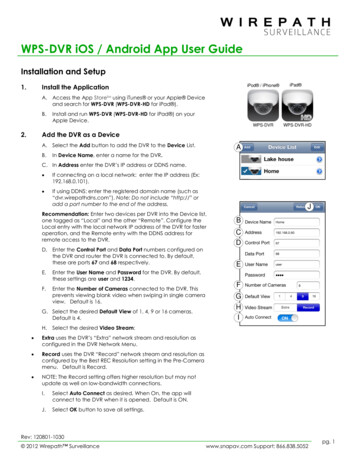
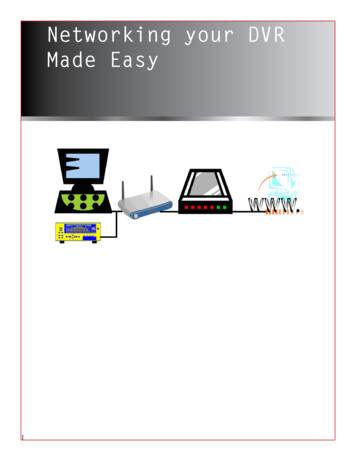
WPS-DVR Quick Start Guide1. CONNECT AND CONFIGURE THE DVRRouterCamera(s)1.1. CONNECT DEVICESBefore powering on the DVR, connect a VGA orcomposite monitor, cameras, and the mouse.Some models can be connected to a display viaHDMI as an alternative to VGA or composite.1.2. POWER ON THE DVRConnect the power cord and turn on the POWERswitch to begin the boot-up process. Somemodels do not have a power switch, on thesemodels the boot-up process will begin when thepower supply is connected.1.3. LOG INorLCD Monitor/Flat PanelTVCRT MonitorUSB MouseAC PowerWPS-CCTV-TESTERTo log into the DVR, move the mouse cursor to the bottom of the screen and select the menu icon, or “right-click”the mouse. Select Login/Logout The DVR is factory preset to ADMINISTRATOR level Login Name: user Password: 1234 (For security purposes, it’s recommended to change the default password to prevent unwanted access.)1.4. CONFIGURE DVR NETWORK SETTINGS1.4.1. Basic DVR Network ConfigurationA. From the main MENU, select Setupthen Network.B. Set the Net Type to Static IP.C. Enter the Static IP Address issued by the network admin.D. Enter the Net Mask for the network.(usually 255.255.255.0)E. Enter the Default Gateway.(Address used to access the router)F. Enter the DNS Address.(Same address as Default Gateway)G. Select Advanced to enter port settings.1.4.2. Advanced DVR Network ConfigurationA. Set Control Port (Default 67).B. Set Data Port (Default 68).C. Set HTTP Port (Default 80).D. EXIT SETUP and save the settings.The ports listed are the default ports used by networks. Due to the routers configuration, thesemay need to be changed. See CONFIGURE INTERNET EXPLORER FOR FIRST USE on Pg. 3.2
WPS-DVR Quick Start Guide2.CONFIGURE INTERNET EXPLORER FOR FIRST USE2.1. CONFIGURE THE ROUTER FOR PORT FORWARDINGConfirm the port forwarding in the router setup matches the ports you entered in Step 4 ofthe Initial Setup above (see the Router Setup Application Note found in the manual onthe included disc for more information).2.2. Complete Internet Explorer ConfigurationThis DVR supports Internet Explorer (32bit) on a Windows platform. Before opening Internet Explorer to initially setup the DVR, the PC user must have administrator rights for the PC. Run the Internet Explorer Browser interface asan administrator.A. Click on the Start Menu.B. Find Internet Explorer and right click on the icon.C. Select Run as Administrator.D. In the address bar, enter the IP address assigned to the DVR in Step 4 of theInitial Setup. The PC must be connected to the same network as the DVR. Theaddress will look similar to: http://###.###.###.###:PP/ie.htm###.###.###.### is the IP address entered into the DVR in Step 4 of the Initial Setup.PP is the HTTP port entered into the DVR in Step 4 of the Initial Setup and it must match the HTTP port forwarding set up in the router in Step 1 above./ie.htm is the extension for the DVR and must be included at the end of the IP address.E. Once connected to the DVR, a yellow dialogue box will appear at the top of the IE window regardingthe add-in. Right click on the yellow box at the top of the page and select Install This Add-on for All Userson This Computer.F. The web page will load and launch an Install request to install software. Select Install.3
WPS-DVR Quick Start GuideG. Select Yes to agree to the license.H. Select Install to install the .cab file.I. Enter the Username and Password for the DVR (see Step 3 inthe Initial Setup). Confirm the Control and Data Port settingsare populated with the correct port numbers entered in Step4 of the Initial Setup.J. The Internet Explorer user interface will be shown as below:Recommendation: If using a private computer, save the DVR address to the Favorites and Trusted Sites lists to easilyconnect to the DVR. It is also recommended to “drag” the web address to the desktop to create an icon to directlyconnect to the DVR.4
WPS-DVR Quick Start Guide3. CONFIGURE RESOLUTION AND VIDEO STREAMINGA. Select the Device Configicon from the Internet Explorer browser user interface.B. In the Device List, select the appropriate DVR you want to connect to from the list and click on Properties.Use the Pre-Camera tab to set Record Resolution and Compression - Best REC Resolution – How the DVRrecords the video depends on the internal hard drive. Options include: CIF 360x240 (Lowest Resolution, but offers the maximum amount of HDD storage) Half D1 (2CIF) 720x240 Full D1 (4CIF) 720x480 (Highest Resolution, but offers the minimum amount of HDD storage)Compression – Its recommended to keep the default “Normal” setting to the default of Normal as it offers theleast amount of compression and streams video at the highest resolution.- Use the Camera tab to name the cameras, adjust the record quality, and set the Frames Per Second.Record Quality – Options are a scale of 1-9. The higher the number, the higher the quality of the recording.Frames per Second (FPS) – Set the FPS for each camera individually.Note: The total FPS for all cameras cannot exceed DVRs maximum frame rate for the selected resolution.5
WPS-DVR Quick Start GuideSet the Video Stream in the Network tab. Video Stream is the quality of the video viewed remotely through InternetExplorer or on a Smartphone. This does not affect the quality of video being recorded to the DVR. Options include:Record – This matches the quality of the video in the settings made in the Pre Camera tab. Typically, this is higherquality, but based on the bandwidth capability of the network, the refresh rate of the image may be slow.QCIF – This setting will enable Dual Streaming for IE and Smartphones, and will improve the refresh rate of the video.It is recommended that this is set to QCIF Super Fine – Best QCIF Resolution.3.1.1. Recommended Settings for typical rdQualityVideo StreamNotesFiber /CableDSL / 3GSmartphoneD1D1CIFNormalNormalNormal951RecordQCIF SuperfineQCIF FairFor high quality videorecording to the DVRand smooth motionsteaming to mediumspeed networksFor the most efficientuse of hard drivespace and steamingto devices on a slownetworkThis setting providesthe MOST amount ofrecord time.For the best qualityvideo recording to theDVR and streaming toremote devices on ahigh speed networkThis setting providesthe LEAST amount ofrecord time.C. To save the settings, Upload to the DVR.D. Select Yes when asked to continue.E. Close the Device Properties Menu and close the Device List.DVR BASIC SETUP IS NOW COMPLETE6
WPS-DVR Quick Start Guide7
120314-1628 2012 Wirepath Surveillance
It is also recommended to "drag" the web address to the desktop to create an icon to directly connect to the DVR. 5 WPS-DVR Qick Start Gide - Use the Camera tab to name the cameras, . DVR and streaming to remote devices on a high speed network This setting provides the LEAST amount of record time. For high quality video recording to the DVR