Transcription
Table of ContentsINTRODUCTION .1How to Use This Guide . 1Software Editions Supported . 2HOW INTEGRATION WORKS .3INTEGRATION RULES. 4INTEGRATION SETTINGS . 7Send Settings. 7Get Settings. 9Account Assignment . 11Payroll Settings . 14INITIAL INTEGRATION . 15SECURITY PERMISSIONS . 15SCENARIO 1: NEW ENGINEEROFFICE-EXISTING QUICKBOOKS USER . 18SCENARIO 2: EXISTING ENGINEEROFFICE-NEW QUICKBOOKS USER . 22SCENARIO 3: EXISTING ENGINEEROFFICE-EXISTING QUICKBOOKS USER . 25SCENARIO 4: NEW ENGINEEROFFICE-NEW QUICKBOOKS USER . 26QUICK-CHECK. 35DAY-TO-DAY INTEGRATION SETTINGS . 40Master Information . 40Time Entries . 41Expense Entries . 42Invoices . 42Payments . 42BEST PRACTICES. 43
IntroductionIntroductionData integration between EngineerOffice (by BQE Software, Inc.) and QuickBooks (by Intuit) can makeyour time billing, accounting and financial management tasks easier. The full-featured EngineerOfficehelps you manage your company, whether your time, expense, billing and reporting needs are simple oryou require complex billing, reporting and management capabilities. With EngineerOffice, you areequipped with a powerful office and project management solution for engineers. QuickBooks is abusiness accounting software that provides solutions such as general accounting, accounts receivable,accounts payable, online banking, reporting, payroll, and other functions. Integrated, EngineerOffice andQuickBooks deliver a virtual application that ensures data accuracy, eliminates time-consumingduplicate manual entry, enhances flexibility, and increases control over your bottom line.Integration means data from one application transfers to another. This sharing offers many benefits.You control what data transfers to and from EngineerOffice using synchronization settings. Yourpreferences tell EngineerOffice exactly how you want it to interact with QuickBooks. EngineerOfficeautomatically creates smart connections using your settings and its built-in intelligence.The goal of the EngineerOffice QuickBooks Advanced Integration Guide is to help you effectivelyintegrate data between EngineerOffice and QuickBooks. EngineerOffice controls integration, enablingyou to choose accounts, what data flows between the applications, and much more.You can contact us at support@EngineerOffice.com to help you with thedata integration process. Check out EngineerOffice Training for a standard orcustom training course on data integration with QuickBooks. BQE Software alsooffers Consulting Services in these areas.How to Use This GuideThe How Integration Works section is written for users with a non-technical background, explaining theintegration rules and settings built into EngineerOffice. Understanding what type of data may be sharedand which rules apply during synchronization will help you visualize what is happening behind thescenes.The instructions guide you through the initial integration set up, whether you are a new or existingEngineerOffice or QuickBooks user. It covers a variety of Initial Integration scenarios. Use theinstructions for the scenario that best fits your company.The Quick Check section provides specific guidance on how to validate the accuracy of your data aftercompleting the synchronization process. Day-to-Day Integration Settings provides suggestions for finetuning your synchronization settings for normal, day-to-day sync and also points out the industry’s bestpractices.EngineerOffice QuickBooks Advanced Integration Guide 2013 v.2Page 1
IntroductionIf you have been using both EngineerOffice and QuickBooks and now plan to use them as integratedapplications, it is important that you develop a proper integration plan. You can use the EngineerOfficeQuickBooks Smart Match utility to match up records that need to be linked.Software Editions SupportedEngineerOffice 2013 integrates with the following QuickBooks editions: QuickBooks Pro/Premier/Enterprise Solutions editions, including the Accountant’s Edition (2008and later)QuickBooks Canadian edition (2006 and later)QuickBooks UK edition (2006 and later)We do not support QuickBooks Plus edition.EngineerOffice QuickBooks Advanced Integration Guide 2013 v.2Page 2
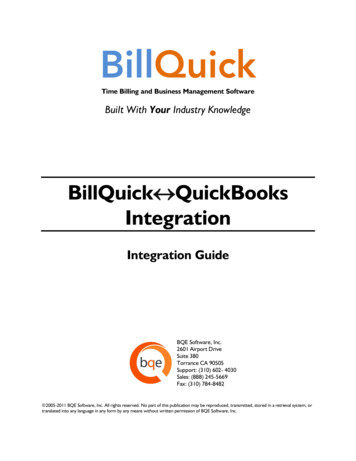
How Integration WorksHow Integration WorksIt is helpful to understand the basics of the EngineerOffice QuickBooks integration, whether or not youhave a technical background. This can help you visualize what is happening behind the scenes asEngineerOffice manages the transfer of data to and from QuickBooks.There are some differences between QuickBooks and EngineerOffice that need to be understood inorder to ensure a smooth and accurate data integration. EngineerOffice is project-centric and supports ahierarchical structure while QuickBooks is client-centric and uses a flat project structure. Each recordcommon to EngineerOffice and QuickBooks shares a unique Link ID that identifies them as related. Thisdoes not mean data in both databases is exactly the same, only that they share common data.EngineerOffice Project records contain data and options that QuickBooks Job records do not and viceversa. What is important for integration are that the two applications share key data.Back up your data in QuickBooks and EngineerOffice prior to data sync.The table below shows the direction data can potentially flow between EngineerOffice and QuickBooks.Whether it flows in one direction or the other (or both directions) depends on choices made on theEngineerOffice-QuickBooks Integration Settings screen. You can determine how data flows to and fromEngineerOffice and also which General Ledger accounts in QuickBooks are posted.EngineerOfficeTable NameDataflowQuickBooksTable NameJob Codes Service ItemsAccount Codes Other Charge ItemsContacts (Employees) * EmployeesContacts (Vendors)* VendorsContacts (Clients)* CustomersProjects JobsTime & Expense(Time Card) Time Tracking(Time Records)Time & Expense(Expenses) Bills/ChecksInvoices InvoicesTransactions(Payments) Payments*When the Billing option is checked, all Contacts transfer as Customers.Also see the EngineerOffice Help for EngineerOffice QuickBooksIntegration.EngineerOffice QuickBooks Advanced Integration Guide 2013 v.2Page 3
How Integration WorksAs you can see above, integration between EngineerOffice and QuickBooks is very comprehensive. Notonly are invoices sent to QuickBooks to post revenue and receivables, the virtual database for the twoapplications includes clients, projects, employees, vendors, job codes, etc.After initial integration, you may set integration rules so that master information transfers only fromEngineerOffice to your accounting package. You would choose ‘Do not Get Data’ (i.e. turn off the flow ofdata) in the Get Settings. In other words, you decide to maintain master data in EngineerOffice only. Itflows to your accounting package, updating its database and keeping information synchronized. You canbe just as specific when assigning General Ledger accounts to service, expense and invoice items.Bottom Line: The major benefit is that you do not have to re-enter EngineerOffice data into QuickBooks.EngineerOffice manages the process, using your synchronization settings.Integration RulesTo ensure accuracy and a successful data transfer, the EngineerOffice QuickBooks Integration uses thefollowing set of rules:Some of these rules may not be relevant for the first-time data transferbetween QuickBooks and EngineerOffice but will apply in future data sync.1. Operating System: EngineerOffice QuickBooks Integration works only on Windowsoperating system (PCs and not Mac).2. Company: Accounting systems accept the transfer of time, expense, invoice, andpayment records only if the record dates are after the start date of the Company.3. Date: When data is transferred from QuickBooks to EngineerOffice, the system date isconverted to Greenwich Mean Time (GMT) and is recorded in the Last Modified datefield for each record.4. Placeholder Data: Because QuickBooks does not require the same fields of data asEngineerOffice, and because it may not track the same data as EngineerOffice (does nothave the same fields), EngineerOffice inserts placeholder data in the required fields —‘FromQuickBooks’.5. Synchronization Order: When you send or get data on-demand, using the Send toQuickBooks or Get from QuickBooks options, follow the order of the listed menu items.For example, synchronize Clients before Projects and Invoices before Payments.6. LinkID: EngineerOffice automatically creates an internal unique identifier called‘QBLinkID’. It is saved in the database for the records that have been transferredbetween the two applications and are linked.7. Employees: QuickBooks employee records are transferred to EngineerOffice as contactswith their type set to Employee. A corresponding EngineerOffice User profile is alsoautomatically created. Employee contacts are transferred to QuickBooks as Employeeswith all details.EngineerOffice QuickBooks Advanced Integration Guide 2013 v.2Page 4
How Integration WorksIf the Billing option is selected for an EngineerOffice User or Employee,this record is transferred to QuickBooks as both a Customer and an Employeewith all details.8. Contacts: All Contacts that have the Billing option checked are sent to QuickBooks asCustomers irrespective of the Type.9. Vendors: Only contacts selected as Vendor Type on the EngineerOffice-QuickBooksIntegration Settings screen are transferred to QuickBooks as vendors.10. Address: In QuickBooks, addresses are entered in four one-line fields, while inEngineerOffice fields are assigned for each component of the address. To ensureaccuracy and consistency during data transfer, make sure your address in QuickBooks isentered according to the U.S. Postal Service Standard:Address Line 1Address Line 2 (optional)City, State, Zip Code (comma separation is optional)11. Service Items: Only Job Codes assigned to projects will be sent to QuickBooks. Description ofthe sent job codes will include the project to which it is assigned. New Service Items created in QuickBooks will be populated into the Preferencesscreen in EngineerOffice.12. Expense Items: QuickBooks Other Charge Items are transferred as Account Codes inEngineerOffice with the account type as ‘Expense’. They can be viewed in PreferencesBilling-Accounting screen.13. Projects: When sub-jobs or project phases are transferred from QuickBooks to EngineerOffice,they are saved as Project Phases in EngineerOffice. In EngineerOffice, every project has a phase and work is done only through phases.During sync, if a QuickBooks project does not have existing phases, a phase labeledLegacy will be created for the project in EngineerOffice, because, unlike QuickBooks,time and expenses can only be recorded against phases.If a QuickBooks project has phases but also has time and expenseallocated directly to the project, a Legacy phase will still be created inEngineerOffice during the sync process.Apart from this, the Service Items used in QuickBooks time entries for each phase areassigned as Job Codes to that phase in EngineerOffice. All Employees used in timeentries for each phase are assigned as Team Members for parent projects.o When Jobs are transferred from QuickBooks, a user ‘FromQuickBooks’ is automaticallyassigned to the project as a Project Leader. It is because when a check against thisproject is transferred, it will be recorded as an expense utilizing this Project Leader.14. Time Entry:o You cannot transfer a time-entry older than 01/01/1901 to EngineerOffice. If a timeentry older than this is sent to EngineerOffice it will be saved with the date 01/01/1901.EngineerOffice QuickBooks Advanced Integration Guide 2013 v.2Page 5
How Integration WorksoWhen a time entry or an invoice is transferred from EngineerOffice to QuickBooks, itcannot be transferred again. In other words, changes made to transferred invoices andtime entries will not be transferred to QuickBooks.o When transferring time entries to QuickBooks, only basic information like Project, JobCode and Hours is sent. The associated taxes can be seen as line items when we sendthe related invoices to QuickBooks.o When time entries are transferred from QuickBooks into EngineerOffice, followingscenarios are possible:- If time entry is against a Job, a Phase called ‘Legacy’ is created for thisproject and then that entry is recorded against it.- If time entry is against a Customer, a Project and a Phase called ‘Legacy’is created and then that entry is recorded against it.15. Expense Entry: Expenses can be marked as Billable or Non-Billable and transferred with theirstatus from QuickBooks to EngineerOffice. When payments are transferred from QuickBooks into EngineerOffice, followingscenarios are possible:- If expense entry is against a Job, a Phase called ‘Legacy’ is created forthis project and then that entry is recorded against it.- If expense entry is against a Customer, a Project and a Phase called‘Legacy’ is created and then that entry is recorded against it.- If expense entry is against a Vendor which is not assigned to a Job, thevendor is assigned to that Project on-the-fly.- If expense entry is against a Charge Item not assigned to a Job, a defaultAccount Code called ‘FromQB’ is used.16. Invoices: Only Hourly and Stipulated Sum invoices are transferred from EngineerOffice toQuickBooks. All invoices transferred from QuickBooks are recorded as Stipulated SumInvoices in EngineerOffice. When transferring invoices to QuickBooks, separate line items are created fortaxes, service amount and expense amount. Markup is added to the expenseamount. Pending invoices in QuickBooks cannot be transferred to EngineerOffice. Draftinvoices in EngineerOffice do not transfer to QuickBooks. If a discount is applied to an invoice using the ‘Discount and Credits’ option onthe Payment screen in QuickBooks, EngineerOffice will NOT transfer thispayment. We recommend that you use the Credit Memo option in QuickBooksto properly discount an existing invoice. While transferring invoices, details like associated items, units and rates can alsobe transferred from QuickBooks. Invoices and Payments in QuickBooks should be linked to Jobs, not Customers.This is because in EngineerOffice invoices and payments are associated withjobs and not directly with a client. In QuickBooks, you can associate invoices andpayments directly with the client. In order to get these invoices and payments,EngineerOffice will create a project on-the-fly based on the client and associateall these transactions to this project.EngineerOffice QuickBooks Advanced Integration Guide 2013 v.2Page 6
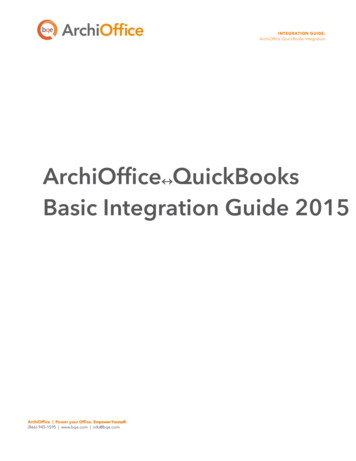
How Integration WorksIt is highly recommended that prior to the first sync, all invoices are movedto the project. Sync invoices directly from the client can result in complications.17. Retainers: When transferring retainers to QuickBooks, it saves them as Client Credits in aliability account.18. Payments: If a payment was applied to a client in QuickBooks and then invoices related tojobs were paid, it gets transferred as Client Payment and is associated to thecorrect job. Payments from QuickBooks do not transfer to EngineerOffice if there is noinvoice in EngineerOffice to which the payment amount was applied (the invoicedoes not exist in EngineerOffice). Similarly, payments from EngineerOffice donot transfer to QuickBooks if the invoice does not exist there. Credit type payments are transferred between EngineerOffice and QuickBooks.Retainer payments are sent as ‘check’ type by default. When paying an invoice in EngineerOffice using a retainer, EngineerOffice debitsthe liability account in QuickBooks. When we send one payment that pays two or more invoices to QuickBooks, it isnot sent as separate payments but rather a single payment.Integration SettingsIn EngineerOffice, you can specify data transfer rules and settings in the EngineerOffice-QuickBooksIntegration Settings screen. These settings are used as defaults when you choose to synchronize databetween EngineerOffice and QuickBooks.Using the EngineerOffice-QuickBooks Integration Settings screen, you can specify the following: Send SettingsGet SettingsAccount AssignmentPayroll SettingsSend SettingsThe send settings allow you to set rules for transferring data from EngineerOffice to QuickBooksdatabase. You can also restrict the data sent from EngineerOffice to QuickBooks using filters (e.g.,employees, job codes, etc.).The Send options change depending upon the module selected from thelist on the left of the screen.You can specify the following settings per module for sending data to QuickBooks:EngineerOffice QuickBooks Advanced Integration Guide 2013 v.2Page 7
How Integration WorksQuickBooks File: Your QuickBooks database is displayed here. By default, EngineerOffice will alwaysconnect to the currently open QuickBooks company file.Options: EngineerOffice provides some options for sending EngineerOffice data to QuickBooks: Do not Send Employee Data: Check this option if you don’t want EngineerOffice to send data forthe selected module. E.g., if you do not wish to send time entries to QuickBooks, check ‘Do notSend Time Data’ option.Ignore Last Sync Date: Checked, EngineerOffice ignores the date when it had last integrated withQuickBooks for the selected module. The Last Sync on date, displayed at the bottom of thescreen, is used for reference when we want EngineerOffice to sync data since this date.Active Only: Checked, only active EngineerOffice data is considered for transfer, e.g. activeemployees, clients, vendors, and so on.For Time Entries, you can specify additional options:EngineerOffice QuickBooks Advanced Integration Guide 2013 v.2Page 8
How Integration Works Map TE Notes to QB Notes: Check this option to map EngineerOffice time entry notes toQuickBooks time entry notes.For Vendors, you can specify additional options: Treat these contact types as vendors: From the ‘Select contact type’ dropdown list, check all thecontacts that you want to send as vendors to QuickBooks.Overwrite Rules for Duplicate Records: In this section, you can specify overwrite rules for the selectedmodule. For instance, if both EngineerOffice and QuickBooks have a record for employee John Doe: Never: Neither EngineerOffice’s nor QuickBooks’ version of field data will be updated. Thus, youwill have two versions of that record. E.g., if the employee record has different address in eachdatabase, those fields will not be updated upon sync.Always: EngineerOffice data will always overwrite the QuickBooks data in the Send mode. Again,if two different addresses exist, the employee address in EngineerOffice will replace that ofQuickBooks.Most Recent: EngineerOffice compares the Last Modified date-time stamps for QuickBooks andEngineerOffice fields. In Send operations, QuickBooks data is overwritten if the EngineerOfficerecord has a more recent modified date.Filters: allow you to restrict the data transferred between EngineerOffice and QuickBooks. For example,you may like to transfer only certain clients from EngineerOffice to QuickBooks. The filter fields keep onchanging depending upon the module selected. The intersection of data produced by applying all filtersis what will be transferred. Date Filters: Each linked record saves a ‘Last Modified’ date that is used to determine whichrecord is most recent. The date filters are useful and save time when you want to sync data for aspecific period.Other Filters: Depending upon the module selected, you can also apply other filters to restrictdata sent from EngineerOffice to QuickBooks. E.g., you can filter data by IDs for employees, jobcodes, projects, etc.Get SettingsGet settings are used to set rules for transferring data from QuickBooks to EngineerOffice database. Youcan also restrict the data received from QuickBooks into EngineerOffice using filters.The Get options change depending upon the module selected on the leftof the screen.You can specify the following settings per module for getting data from QuickBooks:QuickBooks File: Your QuickBooks database is displayed here. By default, EngineerOffice will alwaysconnect to the currently open QuickBooks company file.EngineerOffice QuickBooks Advanced Integration Guide 2013 v.2Page 9
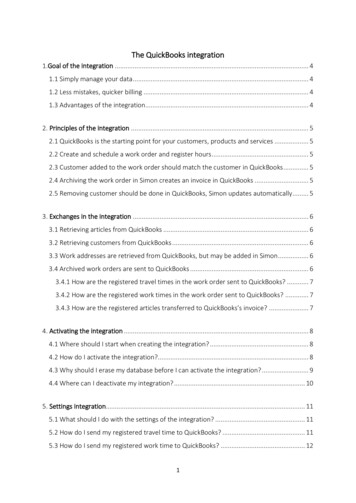
How Integration WorksOptions: EngineerOffice provides some options for getting QuickBooks data into EngineerOffice: Do not Get Employee Data: Check this option if you don’t want EngineerOffice to get data forthe selected module. E.g. if you do not wish to get employee data from QuickBooks, check ‘Donot Get Employee Data’ option. Vendor Related Expense Entries: Expense entries (i.e., Vendor Bills, Checks or Credit cardcharges) coming from QuickBooks that have vendors associated to them must be recordedagainst a Project Leader, Project Principal or Originator in EngineerOffice. The system firstattempts to record the entries against the Project Leader of the expense's project. If a Projectleader is not present, the Project Principal of the expense's project is used. If neither a ProjectLeader nor a Principal has been assigned, the Project Originator of the expense's project is used.If none of these three are present, then the expense entries are recorded against any user. Thevendor associated to the entries in QuickBooks will display in the notes/description field of theExpense Detail screen.EngineerOffice QuickBooks Advanced Integration Guide 2013 v.2Page 10
How Integration WorksMake a selection from this drop-down list to manually select the person against which vendorrelated expense entries will be recorded in EngineerOffice. Active Only: Checked, only active QuickBooks data is considered for transfer, e.g. activeemployees, clients, vendors, and so on.Overwrite Rules for Duplicate Records: In this section, you can specify overwrite rules for the selectedmodule. For instance, if both EngineerOffice and QuickBooks have a record for employee John Doe: Never: Neither EngineerOffice’s nor QuickBooks’ version of field data will be updated. Thus, youwill have two versions of that record. E.g., if the employee record has different address in eachdatabase, those fields will not be updated upon sync.Always: QuickBooks data will always overwrite the EngineerOffice data in the Get mode. Again,if two different addresses exist, the employee address in QuickBooks will replace that ofEngineerOffice.Most Recent: EngineerOffice compares the Last Modified date-time stamps for QuickBooks andEngineerOffice fields. In Get operations, EngineerOffice data is only overwritten if theQuickBooks record has a more recent modified date.Filters: allow you to restrict the data transferred between EngineerOffice and QuickBooks. For example,you may like to transfer only certain clients from QuickBooks into EngineerOffice. The filter fields keepon changing depending upon the module selected. The intersection of data produced by applying allfilters is what will be transferred. Date Filters: Each linked record saves a Last Modified date that is used to determine whichrecord is most recent. The date filters are useful and save time when you want to sync data for aspecific period.Other Filters: Depending upon the module selected, you can also apply other filters to restrictdata received from QuickBooks. E.g., you can filter data by IDs for employees, job codes,projects, and so on.Account AssignmentJob Codes (activities) in EngineerOffice are linked to Service Items in QuickBooks. Similarly, AccountCodes (expense items) in EngineerOffice are linked to Other Charge Items in QuickBooks. A key step inthe integration process is to assign general ledger (G/L) accounts to EngineerOffice codes and invoiceitems. In EngineerOffice, service and expense accounts are not required, except for the purpose of dataintegration with other accounting software that require G/L accounts for all items and transactions.For companies that integrate EngineerOffice with QuickBooks, they need to specify default GeneralLedger accounts for the service, expense and invoice items in EngineerOffice (prior to the sync). WhenEngineerOffice invoices are transferred to QuickBooks, by default it transfers the actual time andexpense line items and posts them to their respective accounts. However, when invoice details are nottransferred, EngineerOffice sends service and expense items as single line items. Normally, thetransactions debit or credit these accounts. You can assign G/L accounts to job codes, account codes andinvoice items on the EngineerOffice-QuickBooks Integration Settings screen.EngineerOffice QuickBooks Advanced Integration Guide 2013 v.2Page 11
How Integration WorksQuickBooks accounts are available for assignment in EngineerOffice onlyafter a connection has been established between the two applications.If you integrate with QuickBooks and GET service and other charge items, the associated G/L accountsalso carry to EngineerOffice. When a job code or expense is part of an invoice (associated time andexpense entries are relieved with the invoice), and you synchronize that invoice with QuickBooks, thecorrect G/L account will be updated there. This tracks your company’s income and expenses in theaccounting system.Service and expense accounts can be set up in two ways: EngineerOffice Accounting Option: You can assign accounts to EngineerOffice job and accountcodes via the EngineerOffice-QuickBooks Integration Settings screen. QuickBooks income andexpense accounts are available for assignment after a connection between EngineerOffice andQuickBooks is established.QuickBooks: If you integrate with QuickBooks and GET Service and Other Charge Items, theassociated G/L accounts also transfer to EngineerOffice.Use the EngineerOffice-QuickBooks Integration Settings screen to specify the desired QuickBooksaccount for EngineerOffice items.You can specify default accounts for EngineerOffice job codes (service items) and account codes(expense items). Besides these, you can also specify default accounts for summarized service andexpense line items that are invoiced.Default AccountsYou can make the following default account assignments:See the Initial Integration section for step-by-step instructions.EngineerOffice QuickBooks Advanced Integration Guide 2013 v.2Page 12
How Integration Works Default Account for Service Items: Every service item in QuickBooks must be assigned to anincome account. The QuickBooks income account selected here is assigned to all service itemsof EngineerOffice. By default, Other Income is selected but you can choose any other accountfrom the drop-down list.Default Account for Expense Items: Every expense item in QuickBooks must be assigned to anincome account. The QuickBooks income account selected here is assigned to all expense itemsof EngineerOffice. By default, Other Income is selected but you can choose any other accountfrom the drop-down list.Income Account for Services Invoiced: The QuickBooks income account selected here is wherethe service total of your EngineerOffice invoices will transfer upon sync. By default, OtherIncome is selected but you can select any other account from the drop-down list.Income Account for Expenses
custom training course on data integration with QuickBooks. BQE Software also offers Consulting Services in these areas. How to Use This Guide The How Integration Works section is written for users with a non-technical background, explaining the integration rules and settings built into EngineerOffice. Understanding what type of data may be shared