Transcription
USER MANUALMODEL:VIAIntegration into DNS and Microsoft Active DirectoryP/N: 2900-300658 Rev 1www.kramerAV.com
Contents11.11.21.3IntroductionMicrosoft Active Directory to LogonDNS Services are Central to VIA ApplicationsBenefits with VIA in Your Active Directory and DNS22.12.233.13.23.33.4Installation RequirementsWindows Server VersionSetting Up DNS and AD in your ServerConfiguring DNS & ADPrompt DHCPConfiguring Active Directory Domain ServicesEntering a New VIA Host into your DNSAdding an Active Directory Login to VIA Collage or Connect PROVIA DNS & AD Integration – Contents11123331717192632i
1Introduction1.1Microsoft Active Directory to LogonMicrosoft Active Directory (AD) is the distributed directory service and theinformation hub of Microsoft Windows Server 2008 and 2012 Server OS (operatingsystem). AD provides critical services such as Windows login, VIA login and alsosupports a wide range of directory services that support Microsoft applications.One of the most critical network services that the Active Directory uses, is theDomain Name System (DNS). DNS services are provided as part of MicrosoftActive Directory and are often deployed on Microsoft domain controllers (DC’s)along with other services, such as print and file sharing.This paper explains how VIA Collage, VIA Campus and VIA Connect PRO canbe implemented into your system and contains a full example installation forintegrating VIA in a Windows Server.The implementation of VIA Collage, Campus or Connect PRO enhances theavailability, performance and manageability of your VIA system. Improved logonand easy room names are the main topics.1.2DNS Services are Central to VIA ApplicationsThe Domain Name System is the backbone of Active Directory and the principalname resolution mechanism of Windows servers and clients. DNS is used to maphost names (e.g., via.berlin or meeting1) to IP addresses (e.g., 192.168.1.39 or10.10.1.100) and vice-versa, and can also be used to store and retrieve otherinformation about a host, such as which services it provides.VIA DNS & AD Integration – Introduction1
1.3Benefits with VIA in Your Active Directory and DNSThe following benefits are available after implementing the VIA into your AD/DNS.1.3.1DNS Mapped Host Names for your VIA SystemVIA systems are ready to use DNS services. Out of the box they have a DHCP IPor are configured to use a static address (192.168.1.39). This IP is always shownon your wallpaper. While integrating the VIA Collage, VIA Campus or VIAConnect PRO into your DNS you can replace this IP with an easy to enter namelike: “room1” or “via.berlin”. Also the integrated Web interface is now available foreveryone with this name.1.3.2Via Login with AD CredentialsThe VIA systems are able to read your login credentials and handshake everyuser with the VIA System.Every employee can now join the VIA system with the credentials that he/she usesdaily and doesn’t have to think about new ones. This makes it more productive,less stressful and comfortable for everyone inside the company.1.3.3VIA User / Manager Groups in ADDecide between the meeting leader and the participant. VIA is capable of handlingtwo groups to give your meeting more structure.Users are allowed to display themselves immediately after a manager‘sconfirmation.2VIA DNS & AD Integration - Introduction
2Installation Requirements Windows Server 2008 or 2012 is required for the setup. DNS – Domain Name System as central for Microsoft-based andnon-Microsoft based devices. 2.1AD – Microsoft Active Directory as database for Windows and VIA login.Windows Server VersionInstall or use the already installed version of Windows Server to proceed with thenext steps.This paper does not cover the installation of Windows Server on a machine as an operatingsystem (OS). For more information, consult your IT administrator or supporting company.2.2Setting Up DNS and AD in your Server2.2.1Changing Adapter SettingsChange your IP settings to make sure your server is running on a static address.1. Right-click the Network Settings icon and go to your adapter.VIA DNS & AD Integration – Installation Requirements3
2. Select Open Network and Sharing Center.3. Navigate to Change adapter settings on the right side of the new Window.4. Select your connected adapter and right-click to choose Properties.5. Go to Internet Protocol Version 4 and click Properties.4VIA DNS & AD Integration - Installation Requirements
6. Assign a static address and choose as the pre-selected DNS serveraddress:7. Confirm your changes by clicking OK and close all windows.2.2.2Adding Roles and Features by Wizard (Add DNS and AD)1. Click the Server Managers Icon next to the windows icon in the taskbar.VIA DNS & AD Integration – Installation Requirements5
2. The Server Manager now starts.Initially the Server looks empty.3. Click Add roles and features.6VIA DNS & AD Integration - Installation Requirements
4. Make sure that the server is updated and has a strong admin password.Click Next.5. Choose if you want to install on the local machine, remote machine, virtualmachine or an offline HDD. Once selected, click Next.VIA DNS & AD Integration – Installation Requirements7
8VIA DNS & AD Integration - Installation Requirements
6. Select the server upon which to install roles/features and click Next.7. Select the roles to add. Select:Active Directory Domain Services DNS Server DHCP ServerNote: After installing and running the DHCP Role you must deactivate anyother DHCP service in the same network. If you prefer to use DHCP from arouter or firewall, do not install the DHCP server.VIA DNS & AD Integration – Installation Requirements9
8. The Wizard prompts you to add features after clicking on one of the roles.Install them if needed by clicking Add Features.10VIA DNS & AD Integration - Installation Requirements
9. Add features for DHCP:10. Add features for DNS:VIA DNS & AD Integration – Installation Requirements11
11. After finishing and adding all the Roles and features, click Next.12VIA DNS & AD Integration - Installation Requirements
12. Add features like .NET Framework. This example is unchanged:13. Active Directory Domain Services (AD DS):VIA DNS & AD Integration – Installation Requirements13
14. Dynamic Host Configuration Protocol (DHCP), if added previously:15. Domain Name System (DNS):14VIA DNS & AD Integration - Installation Requirements
16. Confirm the installation of the selected roles and features. If required, selectto restart the Server automatically otherwise you are prompted to restartlater.17. Begin installation. This might take a few minutes.VIA DNS & AD Integration – Installation Requirements15
18. Results:19. Add your recent Roles to your Taskbar or Start for easy and quick accessto all of them.16VIA DNS & AD Integration - Installation Requirements
3Configuring DNS & AD3.1Prompt DHCP1. Select from the prompt inside your Server Manager. (This only appears ifyou selected to install the DHCP server):2. The install Wizard now opens.VIA DNS & AD Integration – Configuring DNS & AD17
3. Summary and close:18VIA DNS & AD Integration - Configuring DNS & AD
3.2Configuring Active Directory Domain Services1. Select this from your Server Manager:2. The Wizard appears:VIA DNS & AD Integration – Configuring DNS & AD19
3. Select Add a new forest as we are not part of one in this example.4. Choose a name for the domain. If you have a domain name, enter it here(example, google.com):5. Click Next to continue.6. If you setup Win Server 2012 R2 make sure that all the computers arecompatible and if not, you may install older legacy versions.20VIA DNS & AD Integration - Configuring DNS & AD
7. Enter the preferred DSRM password and click Next.VIA DNS & AD Integration – Configuring DNS & AD21
8. Since the DNS is not yet specified this error appears. Ignore it and continueby clicking Next. The DNS is added later.9. If you have legacy equipment, you may need this NetBIOS domain name. Itis chosen automatically like your domain name.22VIA DNS & AD Integration - Configuring DNS & AD
10. An active directory is a database. It asks where to store the information.Keep the default settings in this example.11. Review your settings and confirm by clicking Next.VIA DNS & AD Integration – Configuring DNS & AD23
12. The automatic installation begins and may take a few minutes.13. The server checks for the needed prerequisites. If there is no red STOPflag, continue since basic errors do not concern us now.Click Install to continue:24VIA DNS & AD Integration - Configuring DNS & AD
14. After installing you’re prompted to log off prior to restarting.15. The server is now basically ready to use.VIA DNS & AD Integration – Configuring DNS & AD25
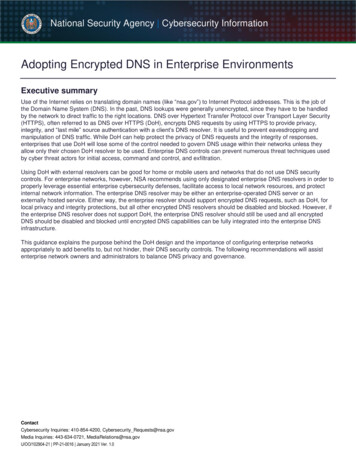
3.3Entering a New VIA Host into your DNS1. Select the zone to enter VIA.2. Right-click the free area or right-click the zone itself to select New Host (A orAAAA):26VIA DNS & AD Integration - Configuring DNS & AD
3. Name your host. Later on, this name appears on the VIA screen.4. Click OK to continue after creating the record.5. Go to the Web page of your VIA to implement the data.6. Select Manage Gateway Settings.VIA DNS & AD Integration – Configuring DNS & AD27
7. Login with your credentials or use the Admin access.User: suPassword: supassCaptcha28VIA DNS & AD Integration - Configuring DNS & AD
8. Navigate to Network Settings:9. Enter your IP related to the Host record and paste your DNS as well asGateway.VIA DNS & AD Integration – Configuring DNS & AD29
10. Click Apply Settings and move to System Configuration:11. Change the default address for the room name from 192.168.1.39 to yourhost record. In this example it is “berlin“.12. Click Apply and confirm your changes.30VIA DNS & AD Integration - Configuring DNS & AD
13. Scroll to the end of the page and click Reboot.14. Your Main display shows the correct room name “berlin” now.VIA DNS & AD Integration – Configuring DNS & AD31
3.4Adding an Active Directory Login to VIA Collage orConnect PRO1. Navigate to your active directory on the server.2. Create a new group for clients to join meetings on the VIA. Right-click Usersand create a new Group:Groups cannot be nested but OUs can.32VIA DNS & AD Integration - Configuring DNS & AD
3. Assign a group name that is easy to identify.4. Click OK to confirm. Repeat for the next group of moderators.VIA DNS & AD Integration – Configuring DNS & AD33
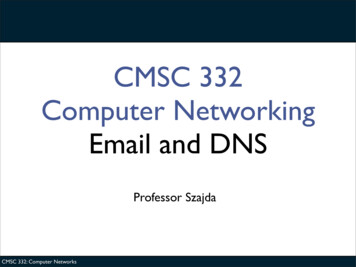
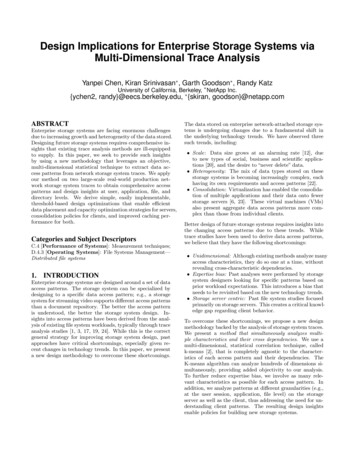
5. When finished, add users to the groups to ensure that each has access toVIA Collage, Campus or Connect PRO. Double-click the group and go tomembers.6. Click Add to add members to the group. The following window appears.Enter the name of a user or object inside the AD and click Check Names:7. After checking, the name is written in full text. Add more members or objectsto each group to populate with your employees. Click OK to finish.34VIA DNS & AD Integration - Configuring DNS & AD
8. Click Apply to apply the settings to your group and click OK to confirm andclose the window.9. After completing, go to your VIA Web pages. Enter the AD data into the VIACollage, Campus or Connect PRO.10. Select Manage Gateway Settings.11. Login with your credentials or use the admin access.User: suPassword: supassCaptchaVIA DNS & AD Integration – Configuring DNS & AD35
12. Navigate to Authentication:36VIA DNS & AD Integration - Configuring DNS & AD
13. Select Activate Moderator Mode, confirm the popup and choose ActiveDirectory.14. The side enlarges and you can enter the data to connect your clients andmoderators with the VIA Collage, Campus or Connect PRO system.15. Apply your changes.The system now reboots.VIA DNS & AD Integration – Configuring DNS & AD37
16. Change your Host file if needed.A. On your VIA unit, open the Features menu and click Settings.B. Enter the Super User name and Password, (defaults are su and supass).38VIA DNS & AD Integration - Configuring DNS & AD
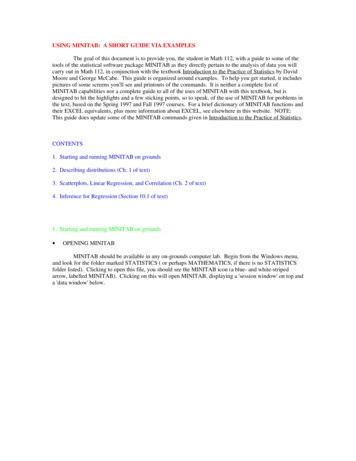
C. On the LAN Settings tab, click Host Configurator.D. Add the IP of your Server, followed by a TAB and the domain name, forexample:IP TAB Domain TAB #Description192.168.1.1 kramergermany.local #DNSVIA DNS & AD Integration – Configuring DNS & AD39
17. Click Save and then reboot after confirming the prompt window.18. Your login data is now available for VIA to use. Every user with an ADaccount can easily join any meeting on VIA.40VIA DNS & AD Integration - Configuring DNS & AD
For a better user experience you can disable the room code. Once disabled, users don’t need visible contactto the screen attached to your VIA.This guide covers only topics directly related to basic AD/DNS/DHCP setup forVIA. Several more options are available for the specific roles than are discussed inthis document. Consult your network administrator or contracted company fordeeper information related to this topic.VIA DNS & AD Integration – Configuring DNS & AD41
34 VIA DNS & AD Integration - Configuring DNS & AD 5. When finished, add users to the groups to ensure that each has access to VIA Collage, Campus or Connect PRO. Double-click the group and go to members. 6. Click Add to add members to the group. The following window appears. Enter the name of a user or object inside the AD and click Check Names: 7. After checking, the name is written in full text.