Transcription
Table of ContentsTable of ContentsProduct Overview. 3Package Contents. 3System Requirements. 3Introduction. 4Features. 5Hardware Overview. 6Front View. 6Rear Panel (Connections). 7Installation. 8Hardware Setup. 8Configuration. 11Easy Search Utility. 11Getting Started. 12Web UI. 17Setup. 18Wizard. 18LAN. 22Device Settings. 23Advanced. 24Users. 24Groups. 25Quotas. 26Network Access. 29FTP Server. 30D-Link DNS-323 User ManualUPnP AV Server. 33iTunes Server. 34DHCP Server. 36Tools. 37Admin. 37Time. 38System. 39Firmware. 40E-Mail Alerts. 41Disk Utilities. 44Power Management. 45RAID. 46Status. 48Device Info. 48Support. 49Mapping a Drive. 50Download Scheduling. 53Scheduling. 55Scheduling Settings. 56USB Print Server. 57Contacting Technical Support. 65Warranty. 66Registration. 70
Section 1 - Product OverviewProduct OverviewPackage Contents D-Link DNS-323 Network Enclosure CD-ROM with Manual and Software Quick Installation Guide Power Adapter (12V; 3A , 5V; 3A) Power Cable Clip Cat 5 Ethernet CableNote: Using a power supply with a different voltage than the one included with the DNS-323 will cause damage and voidthe warranty for this product.If any of the above items are missing, please contact your reseller.System RequirementsFor best results, the following System Requirements are recommended: Computer with: 1Ghz processor / 512 MB RAM / 200 MB available space / CD-ROM drive Internet Explorer version 6.0 or Mozilla Firefox 1.0 and above 3.5” SATA Hard Drive Windows XP SP2 or Windows 2000 SP6D-Link DNS-323 User Manual
Section 1 - Product OverviewIntroductionThe D-Link DNS-323 2-Bay Network Storage Enclosure shares your documents, photos, music, and videos acrossthe network and on the Internet (via FTP server) so family members, friends, or employees can access them. Thisenclosure, which can hold two 3.5” SATA hard drives of any capacity1, creates a central network point for backing upvaluable files. The built-in RAID 12 mirroring technology protects these files from drive failure. Other options such asStandard, JBOD, and RAID 0 are also available.The DNS-323 shares files over the Internet via the built-in FTP server3. Users and groups can be created and assignedto folders with either read or read/write permissions. Quotas can be set per user or group to restrict space usage.In addition, the DNS-323 can be used to stream photos, music, and videos to UPnP AV compatible network mediaplayers4.The included CD contains D-Link’s Easy Search Utility. This utility allows you to locate the DNS-323 on the networkand map drives to your computer. Backup software is also included on the CD. This software allows you to backupyour files from a computer to the DNS-323 manually, by a schedule, or in real-time. Real-time backups are a great wayto safeguard against unfortunate accidents that may result in the loss of important files.Combining ease of use with practical, high performance features, the DNS-323 is an organized solution for any network.Free up disk space on computers and centralize data on your network with the DNS-323 2-Bay Network StorageEnclosure!1Hard Drive(s) not included.2RAID 1 mirroring requires the use of 2 internal SATA drives.3Note that use of an FTP Server to access files over the Internet does not provide for secure or encrypted transmissions.4D-Link cannot guarantee full compatibility or proper playback with all codecs. Playback capability depends on the codec support of the UPnP AV media player.D-Link DNS-323 User Manual
Section 1 - Product OverviewFeaturesThe DNS-323 is designed for easy installation and allows remote access to important data via the LAN or WAN: 12345Two Hard Drive Bays for 3.5” SATA Hard Drives of Any Capacity1Simplified Hard Drive Installation Process – No Tools RequiredFour Hard Drive Configurations: Standard, JBOD (Linear), RAID 0, and RAID 12High Performance Gigabit Ethernet Connectivity (Up to 23/15MBps or 184/120Mbps Read/Write)3Built-in FTP Server for File Access from Over the Internet4Scheduled Downloads from Web or FTP SitesFull or Incremental BackupsReal Time Backups With the Included Backup SoftwareUsers and Groups Can Be Assigned to Folders with Read or Read/Write PermissionsQuotas For Users and GroupsAutomatic E-Mail NotificationsScandisk and Defragment UtilitiesPower Management for Conserving Energy and Extending Hard Drive LifeUPnP AV Server for Streaming Music, Photos, and Video to Compatible Media Players5iTunes Software will be able to automatically find and play music directly from the DNS-323Built-in USB Print Server for printing from any PC on the NetworkD-Link Easy Search UtilityConfigurable by Web BrowserHard Drive(s) not included.RAID 1 mirroring requires the use of 2 internal SATA drives.Speed results will vary depending on the benchmark utility, hard drive configuration, and the network environment used for testing.Note that use of an FTP Server to access files over the Internet does not provide for secure or encrypted transmissions.D-Link cannot guarantee full compatibility or proper playback with all codecs. Playback capability depends on the codec support of the UPnP AV media player.D-Link DNS-323 User Manual
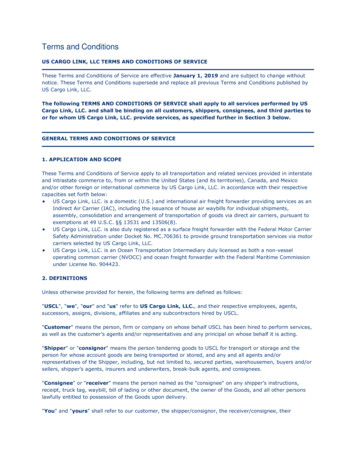
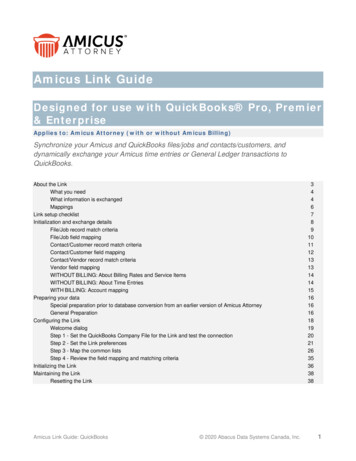
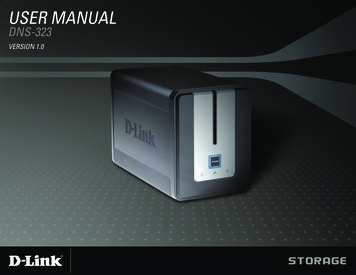
Section 1 - Product OverviewHardware OverviewFront ViewPower ButtonDrive LEDDrive LEDActivity LEDPower Button:Press once to power on the DNS-323. Press and hold the button until it begins to blink to power down the DNS-323.Drive LEDs:These LEDs will be solid BLUE when drives are connected but inactive. The LEDs will blink when the drives are beingaccessed, formatted or synchronized. They will illuminate AMBER if a drive has failed.Activity LED:The Activity LED will be solid BLUE when there is an Ethernet connection. It will blink to indicate LAN traffic.D-Link DNS-323 User Manual
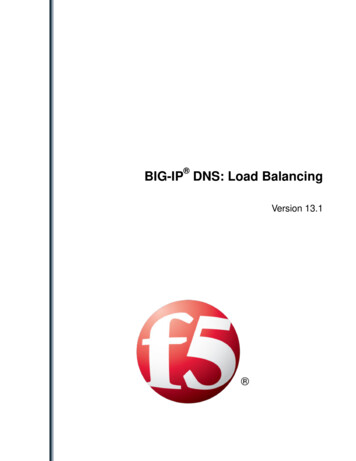
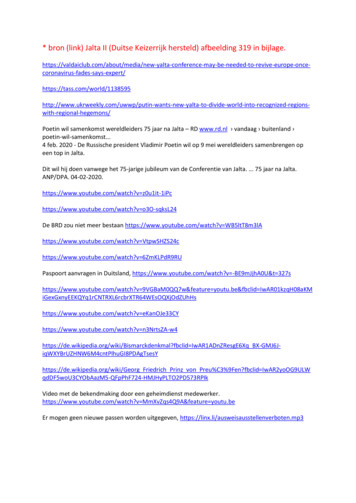
Section 1 - Product OverviewRear Panel (Connections)Drive Eject LeverDrive Eject LeverEthernet PortPower RecpetacleUSB PortPower Receptacle:The 12V 3A / 5V 3A power supply connects here.Ethernet Port:A Gigabit Ethernet port that connects the DNS-323 to the local network.USB Port:USB Print Server port for connecting a USB printer.Drive Eject Lever:Use the provided levers to eject the hard drives. The front panel must be removed before ejecting the drives.D-Link DNS-323 User Manual
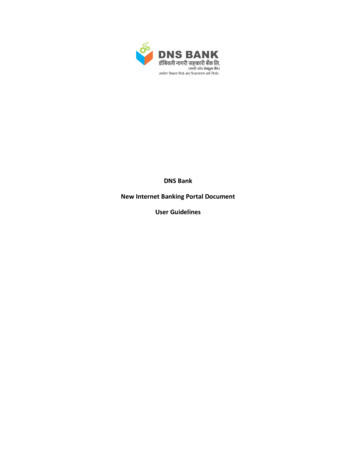
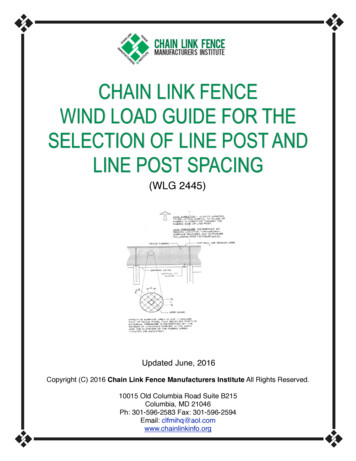
Section 2 - InstallationInstallationHardware SetupThis section provides unpacking and installation information for the DNS-323. Open the shipping carton for theDNS-323 and carefully unpack its contents. To install the DNS-323 on your local network, refer to the steps below:1. Access the drive bays by sliding the faceplateup until it unlatches from the device.2. Once the faceplate is unlatched, pull it off thedevice, exposing the drive bays.D-Link DNS-323 User Manual
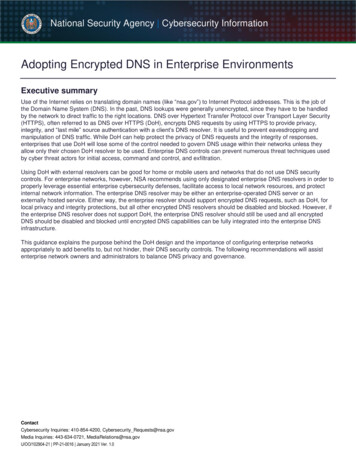
Section 2 - Installation3. Insert a 3.5” SATA hard drive into eachavailable drive bay. Make sure to align the driveconnectors to the endpoints in the DNS-323.Gently push the drive in until it connects.4. Attach the faceplate to the front of the device.D-Link DNS-323 User Manual
Section 2 - Installation5. Connect an Ethernet cable into the availableEthernet port. This cable should connect theDNS-323 to your local network or directly to acomputer for configuration.6. Finally, connect the power adapter to the powerreceptacle.D-Link DNS-323 User Manual10
Section 3 - ConfigurationConfigurationEasy Search UtilityWhen first powered on, during the initial boot sequence, the DNS-323 will wait to be assigned an IP address via DHCP.If it does not receive a DHCP assigned IP address, by default it will have a self-assigned IP address of 192.168.0.32.It is recommended to use the included D-Link Easy Search Utility when accessing and configuring the DNS-323 for thefirst time. If you want to change this IP address before logging in or are unable to connect to the DNS-323 IP address,you can use the Easy Search Utility provided on the product CD to locate the device on your network and make anyneeded changes.NetworkStorage DeviceRefreshThe Easy Search Utility displaysany DNS-323 devices it detects onthe network here.Refreshes the device list.ConfigurationClick Configuration to access theWeb UI of the DNS-323.LANConfigure the LAN Settings for theDNS-323 here.ApplyClick Apply to save changes to theLAN Settings.Drive MappingVolumes available for mapping aredisplayed here.AvailableDrive LettersChoose an available drive letter.Click Connect to map the selectedvolume. Click Disconnect todisconnect the selected mappedvolume.ExitClick Exit to close the utility.D-Link DNS-323 User Manual11
Section 3 - ConfigurationGetting StartedTo run the Easy Search Utility, insert the DNS-323 CD into your CD-ROM drive:Click Easy SearchUtility.Highlight an available DNS-323and click Configuration to accessthe web-based utility.D-Link DNS-323 User Manual12
Section 3 - ConfigurationThe Login screen will appear:Type admin for the username andleave the password field blank.Click ConfigWhen logging into the DNS-323 for the first time, you will be asked to choose a drive configuration and format the drives.There are four options, Standard, JBOD, RAID 0 and RAID 1. Standard configures each disk as a separate volume, whileJBOD combines both disks into a single volume. See page 46 for more details on using the RAID configurations.You will also need to select the disk format type. Available options are Ext2 and Ext3, with Ext2 providing betterperformance and Ext3 providing better support for crash recovery.Note: All data will be erased during the format process.D-Link DNS-323 User Manual13
Section 3 - ConfigurationWhen prompted to configure the Hard Drive Settings:Select the type of hard drive configuration, Standard,JBOD, RAID 0 or RAID 1.A warning message appears informing you that yourdrives will be formatted and all data erased. ClickOK to continue.D-Link DNS-323 User Manual14
Section 3 - ConfigurationSelect the disk format type, EXT2 or EXT3.When formatting of the drive completes, the DNS-323 will restart. A restart countdown screen will appear, and whenthe restart is complete, the login screen will appear:Type admin for the username andleave the password field blank.Click ConfigNote: After logging in to the DNS-323 for the first time it is recommended to add a password to the admin account.(See p. 37 for details.)D-Link DNS-323 User Manual15
Section 3 - ConfigurationAfter logging in, you will be redirected to the DNS-323 web UI:D-Link DNS-323 User Manual16
Section 3 - ConfigurationWeb UIThe DNS-323 web UI defaults to the Setup page. The main categories for configuration are located in the menu tabsat the top of the page. These categories include: Setup - Contains the DNS-323 setup wizard, as well as the LAN configuration settings and devicesettings. Advanced - Allows the DNS-323 administrator to configure users, groups of users and their storagequotas. The UPnP AV server, iTunes server, FTP server and DHCP server settings are all containedhere as well. Tools - Contains configuration options for the Admin account, the time and system settings, and e-mailalerts. Disk utilities, power management options and RAID configuration options are also available fromthe Tools page. Status - Contains a summary of DNS-323 information. Support - Contains the DNS-323 help files. Logout - Clicking this button will log the admin out and end the DNS-323 configuration session.These pages and their configuration options will be discussed in detail in the following pages of this manual.D-Link DNS-323 User Manual17
Section 3 - ConfigurationSetupWizardThe DNS-323 has a setup Wizard that allows you to quickly configure some of the basic device settings.When running the DNS-323 setup wizard, thewelcome screen details the five steps of the wizard.Click Next to continue.It is recommended you set an admin passwordhere. Enter the new password and re-enter it forconfirmation. Click Next to continue.D-Link DNS-323 User Manual18
Section 3 - ConfigurationSet the appropriate Time Zone and click Next tocontinue.Edit or change the DNS-323 LAN information, or tokeep the current settings, click Next to continue.D-Link DNS-323 User Manual19
Section 3 - ConfigurationEnter a workgroup, name, and description for theDNS-323, or leave the default values and click Nextto continue.When the wizard completes, click Back to go back andmake changes or click Restart to restart the DNS-323and save the configuration.D-Link DNS-323 User Manual20
Section 3 - ConfigurationWhile the DNS-323 is restarting, a countdown willappear.When the login prompt appears, login using the newadministrator password.D-Link DNS-323 User Manual21
Section 3 - ConfigurationLANThe Local Area Network settings for the DNS-323 are configured on the LAN page.Link SpeedThe LAN Link Speed is set to Autoby default, but can be manually setto 100Mbps or 1000Mbps.DHCP ClientSelecting DHCP Client will causethe DNS-323 to obtain an IP addressfrom the local DHCP server.Static IPSelecting Static IP requires the userto assign the IP information for theDNS-323 manually.D-Link DNS-323 User Manual22
Section 3 - ConfigurationDevice SettingsThe device settings page allows you to assign a workgroup, name and description to the DNS-323.WorkgroupAssigns a workgroup name to theDNS-323.NameAssigns a name to the DNS-323.The name can be used to accessthe device from a web browserinstead of the IP address, forexample, http://DNS-323.DescriptionAssigns a unique device descriptionto the DNS-323.D-Link DNS-323 User Manual23
Section 3 - ConfigurationAdvancedUsersThe DNS-323 supports up to 64 unique users. The users can be specified by group, or created individually. The usersare created to allow access to specific folders on the DNS-323, via FTP or the local network.Create a UserThis section contains requiredattributes for a new user, includinggroup, user name and password.GroupSelect a previously created Groupfor the user to join.User NameSet a unique name for the user.PasswordSet a unique password for theuser.ConfirmPasswordConfirm the assigned password forthe user.User ListUsers and their groups are displayedin this list.D-Link DNS-323 User Manual24
Section 3 - ConfigurationGroupsThe DNS-323 supports up to 10 unique groups. Users can be assigned to Groups for ease of management, and to aidin organization when setting up access rules and quotas.Create AGroupCreate a new Group by assigninga unique group name.Groups ListAll created groups are displayedhere.D-Link DNS-323 User Manual25
Section 3 - ConfigurationQuotasThe DNS-323 supports storage quotas for both groups and individual users. Assigning a quota to a group or user willlimit the amount of storage they are allocated. By default, users and groups do not have a quota.User QuotaSettingsUser quotas are displayed here.Quotas can be edited by clickingon the notepad icon.Group QuotaSettingsGroup quotas are displayed here.Quotas can be edited by clicking onthe notepad icon.Quota StatusDisplays the current status of thequota feature. The quota functioncan be started or stopped here.D-Link DNS-323 User Manual26
Section 3 - ConfigurationConfiguring QuotasBy default, all users and groups are displayed on the Quota Settings page. Users and groups are automatically listedon this page, and cannot be deleted. The default quota setting is “Unlimited”.To add a quota:Click the notepad icon of the useryou want to add a quota to.Set a quota amount (MB) for theuser and click Apply.D-Link DNS-323 User Manual27
Section 3 - ConfigurationThe user, their amount of storageused, and their storage limit aredisplayed.D-Link DNS-323 User Manual28
Section 3 - ConfigurationNetwork AccessThe Network Access settings allow you to assign users and groups to specific folders or volumes. By default, all usersare allowed Read/Write access to all volumes. Before specific user or group rules can be created, the default rulesmust be deleted.NetworkAccessSettingsAssign permissions for users andgroups on the local network here.CategoryDetermines whether the access rulewill apply to a group or individualuser.Group / UserSelect the group or user the accessrule will apply to.FolderBrowse to and select the folder ordirectory you are controlling accessto.PermissionSet the user or group permission toRead Only or Read/Write.CommentEnter a comment for reference ordescription of the rule.NetworkAccess ListLists all defined access rules.D-Link DNS-323 User Manual29
Section 3 - ConfigurationFTP ServerThe DNS-323 is equipped with a built in FTP Server. The server is easy to configure and allows users access toimportant data whether they are on the local network or at a remote location. The FTP server can be configured toallow user access to specific directories, and will allow up to 10 users to access the DNS-323 at a time.FTP ServerSettingsThis section contains theconfiguration settings for theDNS-323 FTP Server. Click Applyto save the settings.FTP ServerStatusThe current settings and statusof the DNS-323 FTP Server aredisplayed here.D-Link DNS-323 User Manual30
Section 3 - ConfigurationFTP Server SettingsCategoryDetermines whether the FTPserver rule will apply to a group orindividual user.Group / UserSelect the group or user the FTPserver rule will apply to.FolderBrowse to and select the folderor directory you are grant
Jun 14, 2006 · quotas. The UPnP AV server, iTunes server, FTP server and DHCP server settings are all contained here as well. Tools - Contains configuration options for the Admin account, the time and system settings, and e-mail alerts. Disk utilities, power management options and RAID conf