Transcription
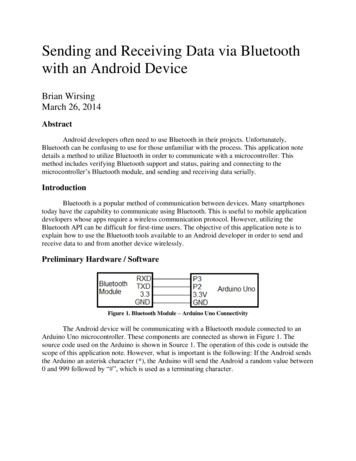
Sending and Receiving Data via Bluetoothwith an Android DeviceBrian WirsingMarch 26, 2014AbstractAndroid developers often need to use Bluetooth in their projects. Unfortunately,Bluetooth can be confusing to use for those unfamiliar with the process. This application notedetails a method to utilize Bluetooth in order to communicate with a microcontroller. Thismethod includes verifying Bluetooth support and status, pairing and connecting to themicrocontroller’s Bluetooth module, and sending and receiving data serially.IntroductionBluetooth is a popular method of communication between devices. Many smartphonestoday have the capability to communicate using Bluetooth. This is useful to mobile applicationdevelopers whose apps require a wireless communication protocol. However, utilizing theBluetooth API can be difficult for first-time users. The objective of this application note is toexplain how to use the Bluetooth tools available to an Android developer in order to send andreceive data to and from another device wirelessly.Preliminary Hardware / SoftwareFigure 1. Bluetooth Module – Arduino Uno ConnectivityThe Android device will be communicating with a Bluetooth module connected to anArduino Uno microcontroller. These components are connected as shown in Figure 1. Thesource code used on the Arduino is shown in Source 1. The operation of this code is outside thescope of this application note. However, what is important is the following: If the Android sendsthe Arduino an asterisk character (*), the Arduino will send the Android a random value between0 and 999 followed by “#”, which is used as a terminating character.
#include SoftwareSerial.h const int RX PIN 2;const int TX PIN 3;SoftwareSerial serial(RX PIN, TX PIN);char commandChar;void setup (){serial.begin (9600);andomSeed(analogRead(0))}void loop (){if(serial.available()){commandChar serial.read();switch(commandChar){case '*':serial.print(random(1000) "#");break;}}}Source 1. Arduino source codeThe programming environment used to program the Android is Eclipse, which isincluded in the Android Development Tools (ADT) bundle [1]. Other IDE’s may also work, butEclipse is already configured correctly in the ADT bundle, so it is easier to use, as well as beingproven to work already.IssuesThere are several issues that must be overcome before the Android device cansuccessfully transmit and receive data via Bluetooth. First, the Android must determine if itsupports Bluetooth, and if it does, if Bluetooth is turned on. Then, it must pair and connect withthe Bluetooth module on the Arduino. Finally, the Android must actually send and receive data.Receiving data will be particularly troublesome.StepsIn order for this method to work, the Android will have to be paired with the Arduino’sBluetooth module. To do this, find the Android’s Bluetooth settings and select the Arduino’sBluetooth module in order to pair with it. If the Bluetooth module does not appear, verify that itis connected to the Arduino correctly, and make sure that the Arduino is receiving power. Also,to ensure that the two devices connect correctly, unpair with all other Bluetooth devices.
package com.example.bluetoothconnection;import android.support.v7.app.ActionBarActivity;import android.os.Bundle;public class MainActivity extends ActionBarActivity {@Overrideprotected void onCreate(Bundle savedInstanceState) (R.layout.activity main);}}Source 2. Starting codeThe first programming step is to create a new Android Application Project in Eclipse.Doing so will generate code similar to that in Source 2. The first thing the program should do isdetermine if the Android device supports Bluetooth. To do this, create a BluetoothAdapter objectusing the function getDefaultAdapter(). If this returns null, then the Android device does notsupport Bluetooth. Source 3 shows how to do this. Add this code to OnCreate().mBluetoothAdapter BluetoothAdapter.getDefaultAdapter();if (mBluetoothAdapter null) {// Device does not support Bluetooth}Source 3. Determine if Android supports BluetoothIf getDefaultAdapter does not return null, then the Android supports Bluetooth. The nextstep is to determine if Bluetooth is enabled, and if it is not enabled, to enable it. Source 4accomplishes this task, checking if the BluetoothAdapter is enabled and reacting accordingly.Add it after Source 3.if (!mBluetoothAdapter.isEnabled()) {Intent enableBtIntent new Intent(BluetoothAdapter.ACTION REQUEST ENABLE);startActivityForResult(enableBtIntent, 1);}Source 4. Turn on Bluetooth if disabledNext, the program has to retrieve the actual Bluetooth device it will communicate with, inthis case the Arduino’s Bluetooth module. The BluetoothAdapter’s getBondedDevices() functionwill do this. This function puts all of the Android’s currently-paired devices into a storagestructure called a “Set”. Since only the Arduino’s Bluetooth module is paired with the Android(which was done at the beginning of these instructions), only this device will be in the Set.Assign this device to a BluetoothDevice variable. Source 5 demonstrates these steps. Add it afterSource 4.
Set BluetoothDevice pairedDevices mBluetoothAdapter.getBondedDevices();if (pairedDevices.size() 0) {for (BluetoothDevice device : pairedDevices) {mDevice device;}}Source 5. Get the Bluetooth module deviceAt this point, the Android has the Arduino’s Bluetooth module stored in aBluetoothDevice object. The next objective is to form the connection between the Android andthe Arduino. This work should take place in separate thread. This is because forming aconnection can block a thread for a significant amount of time. Up until now, all of theprogram’s code has been written in the main thread, or “user interface thread” (UI thread). TheUI thread should never be blocked. Therefore, create a new thread class where the connectionwill form. Source 6 shows the code to accomplish this. Add it as an inner class of the main class.private class ConnectThread extends Thread {private final BluetoothSocket mmSocket;private final BluetoothDevice mmDevice;private static final UUID MY UUID fb");public ConnectThread(BluetoothDevice device) {BluetoothSocket tmp null;mmDevice device;try {tmp device.createRfcommSocketToServiceRecord(MY UUID);} catch (IOException e) { }mmSocket tmp;}public void run() {mBluetoothAdapter.cancelDiscovery();try {mmSocket.connect();} catch (IOException connectException) {try {mSocket.close();} catch (IOException closeException) { }return;}}public void cancel() {try {mmSocket.close();} catch (IOException e) { }}}Source 6. Thread used for connecting Bluetooth devices
This thread requires a BluetoothDevice as a parameter and uses it to create aBluetoothSocket. This socket is what Bluetooth uses to transfer data between devices. The UUIDused in Source 6 tells the socket that data will be transferred serially, which means one byte at atime. To use this thread, add the code in Source 7 to the end of onCreate().mConnectThread new ce 7. Creating the connection threadThe code will now connect the Arduino’s Bluetooth module with the Android. The lastobjective is to send and receive data using this connection. Like connecting, transferring data istime-intensive and can block the thread, so this work should also take place in a separate thread.Create another inner thread class like that shown in Source 8. This is the most complex code inthe program. The thread requires a BluetoothSocket as a parameter and uses it to create anInputStream and and OutputStream. The InputStream is used for reading data coming from theArduino, and the OutputStream is used for sending data to the Arduino.Writing data is easier than reading data. The only data this program has to send is theasterisk character, for when it wants to receive a random number from the Arduino. To do so,convert “*” to a byte using the String class’s getBytes() function. Then, call theConnectedThread’s write(byte[]) function, using the converted “*” as the parameter. This willput the “*” into the Android’s OutputStream, which will send “*” to the Arduino’s InputStream.In turn, the Arduino will send a random number between 0 and 999 followed by “#”, which willarrive in the Android’s InputStream.Reading the InputStream is much tougher than writing. This is because multiple samplesof data can arrive in the InputStream between readings. This is why the “#” terminating characteris required. When data is read in the InputStream, it is moved to the end of a buffer. After thishappens, the buffer is iterated through, beginning at the location after the last “#” was found (thismay have happened before this InputStream reading). If another “#” is found, the program“handles” the data between the previously-found “#” and this new “#”. This process continuesuntil the end of the buffer. If the last character in the buffer is a “#”, the buffer is cleared after thedata between the last 2 “#”s is handled.When the program obtains the data between 2 “#”s, it is often desired to use it in the UIthread. In order to send data from a separate thread to the UI thread, a Handler must be used.Source 9 shows the handler code to manage this data. Add this to the main class. This Handlerconverts the entire buffer’s contents from a byte array to a string, and then saves the correctportion of it into writemessage. This writemessage string stores the random number generatedand sent from the Arduino.
private class ConnectedThread extends Thread {private final BluetoothSocket mmSocket;private final InputStream mmInStream;private final OutputStream mmOutStream;public ConnectedThread(BluetoothSocket socket) {mmSocket socket;InputStream tmpIn null;OutputStream tmpOut null;try {tmpIn socket.getInputStream();tmpOut socket.getOutputStream();} catch (IOException e) { }mmInStream tmpIn;mmOutStream tmpOut;}public void run() {byte[] buffer new byte[1024];int begin 0;int bytes 0;while (true) {try {bytes mmInStream.read(buffer, bytes, buffer.length - bytes);for(int i begin; i bytes; i ) {if(buffer[i] "#".getBytes()[0]) {mHandler.obtainMessage(1, begin, i, buffer).sendToTarget();begin i 1;if(i bytes - 1) {bytes 0;begin 0;}}}} catch (IOException e) {break;}}}public void write(byte[] bytes) {try {mmOutStream.write(bytes);} catch (IOException e) { }}public void cancel() {try {mmSocket.close();} catch (IOException e) { }}}Source 8. Thread used for transferring data
Handler mHandler new Handler() {@Overridepublic void handleMessage(Message msg) {byte[] writeBuf (byte[]) msg.obj;int begin (int)msg.arg1;int end (int)msg.arg2;switch(msg.what) {case 1:String writeMessage new String(writeBuf);writeMessage writeMessage.substring(begin, end);break;}}};Source 9. Handler codeThe program is almost complete. The last step is to create and start the data thread. Add the codein Source 10 to the end of ConnectThread’s run() function.mConnectedThread new ;Source 10. Creating the data transfer threadResultsWith the completed code, the program will run correctly. When the Android program isfirst opened, it determines if Bluetooth is supported by the device, as well as whether or notBluetooth is enabled. After this, it finds the Arduino’s Bluetooth module paired with the Androidand uses it to form a connection. This connection process creates a socket that both devices willuse to receive and transmit data. When the Android sends the Arduino a “*” character, theArduino sends back a random number between 0 and 999, followed by a “#” character. TheAndroid parses the incoming data and stores only the number portion in a string calledwritemessage. Thus, data transmission using Bluetooth is achieved.ConclusionsUtilizing Bluetooth in Android applications can be daunting for those unfamiliar with theprocess. However, prior experience with Android’s Bluetooth API can reduce the learning curvetremendously. This application note can help Android developers gain this experience. This ishelpful because Bluetooth is a popular, well-supported, and effective protocol for wirelesscommunication, and can enhance mobile apps that require such a protocol.References[1] http://developer.android.com/sdk/index.html
included in the Android Development Tools (ADT) bundle [1]. Other IDE’s may also work, but Eclipse is already configured correctly in the ADT bundle, so it is easier to use, as well as being proven to work already. Issues There are several issues that must be overcome before the Android device can successfully transmit and receive data via Bluetooth. First, the Android must determine if it .