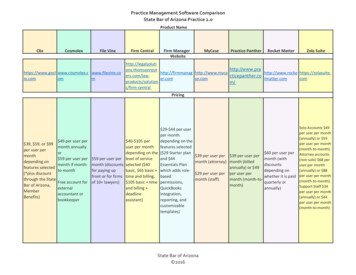
Transcription
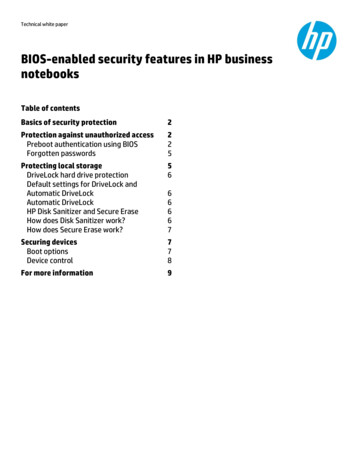
Technical white paperBIOS-enabled security features in HP businessnotebooksTable of contentsBasics of security protection2Protection against unauthorized accessPreboot authentication using BIOSForgotten passwords225Protecting local storageDriveLock hard drive protectionDefault settings for DriveLock andAutomatic DriveLockAutomatic DriveLockHP Disk Sanitizer and Secure EraseHow does Disk Sanitizer work?How does Secure Erase work?56Securing devicesBoot optionsDevice control778For more information966667
Basics of security protectionA computer system is only as secure as its weakest component. Creating a secure system involves looking at all areas ofvulnerability and creating solutions to address each of those areas. A typical computer system stores sensitive data on alocal hard drive and may have access to network resources containing sensitive information. Therefore, the followingareas of vulnerability must be addressed: User authentication—Ensuring that an unauthorized person does not access the computer Data on local storage—Ensuring that no one can access information simply by removing the hard drive from a securecomputer and inserting it into a nonsecure computer or by accessing data after a computer is disposed of Device security—Ensuring that the computer does not boot using a device other than the primary hard drive, therebyallowing access to sensitive information by completely bypassing the OS authenticationHP has devoted considerable resources to building security capabilities into the BIOS firmware of HP businessnotebooks. This document explores the following capabilities: Protection against unauthorized access—Preboot authentication Data protection—DriveLock, Disk Sanitizer, and Secure Erase technology Device security—Boot options and device controlHP integrates BIOS capabilities and the HP ProtectTools software, a rich set of security features that works in Windowsto enable enhanced security. This document discusses ProtectTools only as it interacts with the BIOS securitycapabilities. For more information about the ProtectTools software, see the HP website.Protection against unauthorized accessTo help protect the computer from unauthorized access, HP adds preboot authentication to its business notebooks.Preboot authentication is required immediately after turning on the computer and before the OS boots. Prebootauthentication also provides protection against attacks that take advantage of the ability to boot from a device otherthan the primary hard drive.Preboot authentication can be configured by using the BIOS setup or the ProtectTools software. BIOS setup—A user configures a password for authentication. At power-on, the system prompts the user for thepassword and allows the boot process to continue if the correct password is entered. If the user configures thepreboot authentication password using the BIOS, the password is independent of the user’s Windows logon passwordand does not allow the One-Step Logon process that is available in ProtectTools. ProtectTools—Password authentication or other biometric authentication, such as fingerprint or facial recognition, isconfigured. This authentication enables the One-Step Logon process for preboot and Windows authentication.If a strong password is chosen, password authentication is an effective way to enhance system security and help protecta system against unauthorized access. To ensure that an authentication password cannot be easily guessed, createpasswords by adhering to established security guidelines, not by using personal information.Preboot authentication using BIOSOn typical computers, the drawback to preboot authentication passwords is that a computer can have only one, so thesystem is restricted to one user. However, HP has implemented a multiuser architecture in the notebook BIOS to solvethis issue.2
Multiuser architecture in BIOSMultiuser architecture relies on role-based user groups. The BIOS can separate functions and access among thesedifferent user groups. The separation promotes higher security in the following ways: Users no longer need to share passwords. BIOS administrators do not have to share setup passwords with users. BIOS administrators can assign granular control of setup features to users.Currently the BIOS defines two user types. BIOS Administrator—Privileges include management of other BIOS users, full access to f10 BIOS settings, and theability to control f10 access of other users and unlock the system when other BIOS users fail the prebootauthentication. BIOS User—Privileges include the ability to use an authentication password to boot the BIOS and access f10 BIOSsettings as defined by the BIOS administrator.Enabling BIOS preboot authenticationBefore a BIOS user can be provided with preboot authentication, a BIOS administrator password must be created.1.2.Boot the system, and press f10 to enter the BIOS setup.Select Setup BIOS Administrator Password from the Security menu.3.Follow the prompts to create and confirm the new administrator password.The BIOS administrator sets up the BIOS user password as follows:1.2.3.4.Boot the system, and then press f10 to enter the BIOS setup.Select User Management from the Security menu. To add a BIOS user, select Create new BIOS User account.Follow the steps on the screen to create the user ID, and then press Enter to continue. By default, the BIOS userpassword is the same as the BIOS user ID. For example, if the BIOS administrator creates a “user1” ID, then thedefault password is also “user1”.Repeat the steps to create a BIOS User account for each new user.The BIOS will now prompt for a BIOS user password during boot. The BIOS user can change the default password asfollows:1.2.Boot the system, and then press f10 to enter the BIOS setup.Select Change Password from the Security menu and follow prompts to change to a new password.NOTE: For maximum system protection, strong BIOS administrator and BIOS user passwords must be selected, and theBIOS administrator password must be different from the user password.If an incorrect password is entered three times, the system prevents any further retries until the system is powereddown and restarted. This feature further protects the system from unauthorized access by forcing the user to enter thepassword manually, thereby preventing dictionary attacks. Users can set up HP SpareKey to regain access if credentialsare lost or forgotten. HP SpareKey allows users to answer a series of questions (established during the HP SpareKeyenrollment process) to access their notebooks. See the Forgotten passwords section for more information about HPSpareKey.Preboot authentication using ProtectToolsAnother way to enable BIOS preboot authentication is to use ProtectTools Security Manager within Windows. TheProtectTools Security Manager wizard enables various security levels to protect the computer system and the data.ProtectTools users can set the following security levels: Preboot Security—Protects the system before it boots to the OS. This ProtectTools function initiates the BIOS prebootauthentication process. HP Drive Encryption—Protects computer data by encrypting the hard drive.3
HP Credential Manager—Protects the Windows account.The ProtectTools user can select security levels, as well as the type of security authentication required at each securitylevel. Either a Windows password or a fingerprint can be used for authentication.NOTE: Fingerprint authentication can be enabled only through the ProtectTools software.ProtectTools user privileges include the following: Using the Windows password and other security tokens to authenticate and boot the BIOS. If enabled, the One StepLogon feature lets the user log all the way into Windows using the Windows password or security tokens. Using the Windows password to access f10 BIOS setup, based on permissions set up by the BIOS administrator.Enabling BIOS preboot authentication with ProtectToolsA ProtectTools user can boot to Windows and open ProtectTools Security Manager in one of the following ways: Select Set up now from the HP ProtectTools gadget, as shown in Figure 1, and then open ProtectTools SecurityManager.Figure 1: HP ProtectTools gadget Open the Start menu by clicking the Start icon in the lower-left corner of your screen. Select All Programs, selectSecurity and Protection, and then open HP ProtectTools Security Manager, as shown in Figure 2.Figure 2: Accessing HP ProtectTools from the Start menu Double-click the HP ProtectTools icon in the notification area, at the far right of the taskbar, and then openProtectTools Security Manager.To set up preboot authentication:1.2.4Follow the prompts in the Security Manager setup wizard to set up passwords, HP SpareKey, and biometricauthentication such as fingerprint recognition.Enable preboot authentication for the BIOS. You can also enable Drive Encryption for HP ProtectTools using thesame wizard.The BIOS will now prompt the ProtectTools user for a Windows password or fingerprint during boot.
To set up the fingerprint reader, review the ProtectTools user guide df.Use HP ProtectTools Administrative Console to modify the logon policy, credential requirements, or other managementsettings that have been configured in the Security Manager setup wizard.Authentication if the system has both BIOS and ProtectTools usersIf there are both BIOS users and ProtectTools users within BIOS, and preboot security is enabled within ProtectTools, theBIOS will prompt with a list of all current BIOS users and ProtectTools users. If a BIOS user is selected from the list, theBIOS authenticates the user with the appropriate BIOS user password, and the user must log in again to Windows. If aProtectTools user is selected from the list, the BIOS authenticates the user according to the policy set withinProtectTools, enabling the user to log in all the way to Windows.Forgotten passwordsForgotten passwords can be recovered by all categories of users: BIOS User, BIOS Administrator, and ProtectTools User.BIOS userTwo possibilities apply for a BIOS user who forgets the password: If the BIOS user has set up HP SpareKey but fails to enter the correct password, the system opens a HP SpareKeyRecovery screen. The user can answer the HP SpareKey questions to create a new password and regain access to thesystem. A BIOS user can set up HP SpareKey within the f10 BIOS setup. A BIOS administrator can go to the f10 BIOS setup to remove and re-add the BIOS user, effectively supplying the userwith a new password.BIOS administratorA BIOS administrator who forgets the administrator password and has set up HP SpareKey can use the HP SpareKey toboot the system.If the BIOS administrator has not set up HP SpareKey, HP Services can reset the system to factory default (for 2009 andnewer commercial notebook platforms).ProtectTools userIf a ProtectTools user forgets the password and there is a BIOS administrator, the BIOS administrator can use theadministrator password at the BIOS authentication screen. However, the user will have to authenticate again at the nextsecurity domain, either Drive Encryption or Windows.If the ProtectTools user forgets the Windows password and has set up HP SpareKey, he can use the HP SpareKey to bootthe system.If the ProtectTools user forgets the password, has not set up HP SpareKey, and there is no BIOS administrator, theProtectTools user can enter f10 as Guest User, define a new BIOS administrator, and remove the ProtectTools useraccount. Or, as an alternative, HP Services can reset the system to factory default.Protecting local storageWithout local storage protection, it is possible to bypass strong user authentication by removing an unprotected harddrive from a secure system and inserting it into an unsecure system. This allows virtually all data to become accessible.HP business notebooks include a hard drive security feature called DriveLock or Automatic DriveLock (for multiusersystems) that locks the hard drive with a password.Another security threat often not considered is the vulnerability of information that is left on a hard drive when a systemis recycled or disposed of. Large enterprises tend to use external services that wipe hard drives before they are disposedof, but many customers have no such processes or solutions in place. To counter this threat, HP includes Disk Sanitizer(for hard disk drives) and Secure Erase (for solid-state drives and hard disk drives that support it) as a standard BIOSfeature in all HP business notebooks. HP added Secure Erase to the standard BIOS in Q3 2011, and systems sold in 2009or later can upgrade their BIOS to include the capability.5
DriveLock hard drive protectionA hard drive protected with a DriveLock password stays protected, even if the drive is removed from one system andinserted into another. At power-on, the system prompts the user for the DriveLock password. If an incorrect password isentered, the information on the hard drive is inaccessible.The DriveLock password is stored inside the hard drive itself and cannot be read; it can only be authenticated against.Therefore, an unauthorized user cannot obtain the DriveLock password from the hard drive itself.To enable DriveLock:1.2.3.Boot the system.Press f10 to enter the BIOS setup.Select DriveLock Passwords from the Security menu, and then select Enable.4.Follow the system prompts to create a DriveLock password.NOTE: If the user forgets the DriveLock password, the drive cannot be recovered.Default settings for DriveLock and Automatic DriveLockTwo types of DriveLock protection are available: DriveLock and Automatic DriveLock. The BIOS settings for DriveLockprotection are disabled by default. DriveLock and Automatic DriveLock settings are mutually exclusive, so only one ofthe options can be enabled.Automatic DriveLockWhen Automatic DriveLock is enabled, the BIOS automatically generates a user DriveLock password, and the BIOSadministrator password is used as the master DriveLock password. After the BIOS successfully authenticates the userduring preboot authentication, the BIOS unlocks the drive.If the user fails to authenticate, the BIOS displays a warning message that prompts for the BIOS administrator password.If the correct BIOS administrator password is entered, the BIOS unlocks the drive and the user can boot and access thedrive; otherwise, the system locks the drive and displays a non system disk error.HP Disk Sanitizer and Secure EraseDisk Sanitizer removes or destroys data on the notebook primary hard drive using a data removal algorithm that isdocumented in the Department of Defense (DOD) 5220.22-M specification.Overwrite-based tools like Disk Sanitizer are effective for only hard disk drives. Therefore, the Disk Sanitizer option doesnot display in menus for solid-state drives (SSDs). Secure Erase works on solid-state drives and hard disk drives thatsupport it. (As mentioned earlier, HP added Secure Erase to the standard BIOS in Q3 2011, and systems sold in 2009 orlater can upgrade their BIOS to include the capability.)How does Disk Sanitizer work?Disk Sanitizer eliminates data without damaging the hard drive. Disk Sanitizer writes multiple patterns on every sector,cluster, byte, and bit of the hard drive (Table 1). The user can configure the number of Disk Sanitizer cycles. After DiskSanitizer is run, even advanced tools and techniques, such as Forensic Recovery of Evidence Device or DriveSpy, cannoteasily recover the data.6
Table 1: Data written to the drive on each cycleDisk Sanitizer cycleData written to driveFirst cycle00000000 (all zeros)Second cycle11111111 (all ones)Third cyclerandom writes of 1 or 0 and verifyFourth cycle00000000 (all zeros)Enabling Disk SanitizerAccess Disk Sanitizer by pressing the f10 key as the system starts. Select Disk Sanitizer from the Security Menu. You canrun Disk Sanitizer in one of three modes: Fast: Writes one cycle Optimum: Writes three cycles Custom: Writes the number of cycles configured by the userThe US Department of Defense internal process requires five cycles. For most users, the Fast or Optimum cycle issufficient.The amount of time needed for Disk Sanitizer to run depends on both the hard drive size and the number of cycles. On a40 GB hard drive, a single pass can take up to three hours, so HP recommends that you plug the notebook into an ACoutlet before you start Disk Sanitizer.How does Secure Erase work?Secure Erase relies on an ATA command called “Security Erase Unit” that is defined in the American National StandardsInstitute (ANSI) ATA and SCSI disk drive interface specification.Secure Erase runs inside the drive hardware to overwrite data contained on the drive. Manufacturers of industrystandard SSDs that are approved for use in HP business notebook products have informed HP that running the SecureErase command on their SSDs will fully remove all user data so that it cannot be recovered.A BIOS administrator configures Secure Erase as follows:1.2.Boot the system, and press f10 to enter the BIOS setup.Select Secure Erase from the Security menu.3.4.Select the drive that you want to erase.A warning screen requires that you approve or cancel the erasure.Securing devicesIf a computer boots from a device other than the primary hard drive, the user authentication built into the OS can beeasily bypassed. Therefore, HP business notebooks provide sophisticated functionality that gives users control overmultiboot capability and boot order. HP business notebooks also allow users to enable and disable individual ports.Boot optionsThis BIOS feature allows users to enable or disable booting the system from the following devices: Optical device Diskette drive USB device SD Card Network (PXE) boot eSATA device7
Upgrade Bay Hard Drive (A hard disk inserted in the optical drive bay)To access the boot options, boot the system, and enter the f10 BIOS setup. Select Boot Options from the SystemConfiguration menu, and then select the devices to enable or disable.Unless it is routinely necessary to boot from devices other than the primary hard drive, disable all other bootcapabilities.The user can also choose the boot order of enabled devices.1.2.Boot the system, and press f10 to enter the BIOS setup.Select Boot options from the System Configuration menu.3.Select an item from the boot order, and then use the or – keys to move the item up or down in the priority list(see Figure 3). You can prioritize the following devices:oooooHard drive (primary, secondary)Diskette driveOptical driveUSB storage devices (hard drive, diskette drive, optical drive)NetworkFigure 3: BIOS screen showing how to prioritize the boot order of devicesDevice controlDevice control options give users control over the computer’s external ports. Disabling an external port helps ensurethat an unauthorized user does not use the port to transfer sensitive information from the system or to gainunauthorized access to the system.Users can disable ports using f10 BIOS setup or the BIOS Configuration module of ProtectTools. You can disable thefollowing ports if they exist on your system: Serial port Parallel port Flash Media reader Card bus slot (ExpressCard slot) 1394 port8
USB ports Smart Card eSATAFor more informationTo read more about HP ProtectTools, go to 25-121.html.Related papers:HP Business Notebook PC F10 Setup upport/SupportManual/c02950079/c02950079.pdfHP Business Notebook Password Localization /support/SupportManual/c01944819/c01944819.pdfHP ProtectTools User 2.pdfGet connectedhp.com/go/getconnectedCurrent HP driver, support, and security alertsdelivered directly to your desktop Copyright 2012 Hewlett-Packard Development Company, L.P. The information contained herein is subject to change without notice. The onlywarranties for HP products and services are set forth in the express warranty statements accompanying such products and services. Nothing hereinshould be construed as constituting an additional warranty. HP shall not be liable for technical or editorial errors or omiss ions contained herein.Windows is a U.S. registered trademark of Microsoft Corporation. 706788-001, Created August 20129
drive from a secure system and inserting it into an unsecure system. This allows virtually all data to become accessible. HP business notebooks include a hard drive security feature called DriveLock or Automatic DriveLock (for multiuser systems) that locks the hard drive with a password.