Transcription
McAfee SIEMIPMI / RMM Setup and Configuration GuideV1.3November 2015
IntroductionThis document is designed to provide the reader with all the steps and information onimplementing and using the Intelligent Platform Management Interface (IPMI) and RemoteManagement Monitor capabilities supported in the McAfee SIEM operating environmentv9.4 and later.The Intelligent Platform Management Interface (IPMI) is a standardized computersystem interface used by system administrators for out‐of‐band management of computersystems and monitoring of their operation. It is a way to manage a computer that may bepowered off or otherwise unresponsive by using a network connection to the hardwarerather than to an operating system or login shell.IPMI information is exchanged though Baseboard Management Controllers (BMCs), whichare located on IPMI‐compliant hardware components. The BMC is a specializedmicrocontroller embedded on the motherboard of a computer, generally a server. The BMCmanages the interface between system management software, in this case RMM andplatform hardware. Using low‐level hardware intelligence instead of the operating systemhas two main benefits: First, this configuration allows for out‐of‐band server management;Second, the operating system is not burdened with transporting system status data.IPMI functions are designed to work in any of three scenarios: Before an OS has booted (allowing, for example, the remote monitoring orchanging of BIOS settings) When the system is powered down (but still attach to power) After OS or system failure – the key characteristic of IPMI compared with in‐band system management such as by remote login to the operating systemusing SSHRemote monitoring and management (RMM) is a collection of information technologytools that are found on workstations and servers. These tools gather information regardingthe applications and hardware operating within an environment as well as supply activityreports allowing administrators to resolve any issues. RMM usually provides a set of ITmanagement tools like trouble ticket tracking, remote desktop monitoring, support, and userinformation through a complete interface.Within the McAfee SIEM appliance family, IPMI is provided through the Intel RMM4 moduleinstalled into every McAfee GEN4 SIEM Appliance.
IPMI and RMM Setup and Configuration GuideMcAfee SIEMRevision HistoryAugust 2014V1.0First Public ReleaseNovember 2014V1.1 August 2015V1.2 Updated link to motherboard manual.November 2015V1.3 Added disclaimer on IPMI being disabled for security concerns. Added steps to enable or disable via IPMItoolAdded Revision History SectionAdded links to motherboard SDR return codes.Corrected page numberCorrected password on page 103
IPMI and RMM Setup and Configuration GuideMcAfee SIEMTable of ContentsBIOS Update5Enabling IPMI15IPMItool20Updating your appliance(s) to enable IPMI and RMMTurning on IPMI via ESM Management InterfaceCommand line IPMI syntax and examplesBMC Web Console32Appendix A51Appendix B53Using the web console interfaceCommand line arguments for IPMItoolCommand syntax for IPMItoolAppendix C60SDR Entity ValuesAppendix DSDR Type Values614
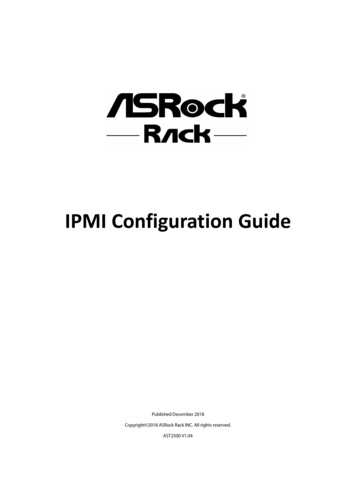
IPMI and RMM Setup and Configuration GuideMcAfee SIEMBIOS UpdateIPMI and RMM capabilities are only supported on the Generation 4 (GEN4) SIEM appliances. Beforeproceeding with this document, make sure you have GEN4 appliances. The two images below highlight thestark differences between Generation 3 and Generation 4 SIEM appliances. While the examples belowdisplay the 2U Gen4 appliance and the 3U Gen3 appliance, the orange bezel is always indicative of a Gen3appliance.GEN4 ApplianceGEN3 ApplianceWithin the Gen4 SIEM appliance family, there are some exceptions on which platforms support IPMIcapabilities. Below is a table of what is and is not supported.IPMI SupportedIPMI NOT SupportedAll Standalone ESM ModelsAny DAS Models(These devices do not have an IPMI port)All Combination ESM ModelsAny Receiver (ERC) in HA mode regardless of Model(All available ports are used to configure HA)All Non-HA Receivers (ERC)All ACE AppliancesAll ADM AppliancesAll DEM Appliances5
IPMI and RMM Setup and Configuration GuideMcAfee SIEMBIOS UpdateBefore IPMI and Remote Management can be supported within the McAfee SIEM environment, the BIOS foreach appliance must be at a specific release to enable capabilities within the SIEM Management interface andSIEM operating environment. As outlined in the previous section, remote management is only available onGeneration 4 and later appliances as well as operating environment v9.4 and later. See previous section for adescription of the appliances to ensure you have a GEN4 appliance.Check current appliance versionIPMI and RMM capabilities are only supported in the SIEM operating environment v9.4 and above. To checkwhich McAfee SIEM Operating Environment version your appliance(s) are currently at, log into your ESMusing any flash capable browser. Once the login screen appears, check the lower left corner of the browserfor the version number. It should be version 9.4.0 or greater. See Figure 1 for an example. If your appliancedoes not have this version, access the McAfee download page to obtain the latest release. Once it has beenupgraded, continue with the steps following this topic.The download link is: igure 1While all McAfee SIEM appliances should be on the same operating environment release, it is possible thatthis may not be the case in your environment. We recommend checking each appliance’s SIEM OperatingEnvironment version. To do this, select the appliance and click the Properties icon (White Square in icon barabove device tree display) and the resulting dialog will display the version. An example of this is in Figure 2.Figure 2Check current appliance BIOS versionOnce you have identified your appliance as GEN4 hardware and that you are on the proper SIEM operatingenvironment version, you should check your BIOS version to ensure that it requires a BIOS update.Depending on when you received your appliance(s), its BIOS may have already been updated.6
IPMI and RMM Setup and Configuration GuideMcAfee SIEMBIOS UpdateTo check the BIOS version, SSH into the appliance and issue the following command:McAfee-ETM-6000 # dmidecode –t 0Figure 3 displays an example of the output the command will generate.McAfee-ETM-6000 # dmidecode -t 0# dmidecode 2.10SMBIOS 2.6 present.172 structures occupying 10014 bytes.Table at 0x000EB570.Handle 0x0000, DMI type 0, 24 bytesBIOS InformationVendor: Intel Corp.Version: SE5C600.86B.02.02.0002.122320131210Release Date: 12/23/2013Address: 0xF0000Runtime Size: 64 kBROM Size: 8192 kBCharacteristics:PCI is supportedBIOS is upgradeableBIOS shadowing is allowedBoot from CD is supportedSelectable boot is supportedEDD is supported5.25"/1.2 MB floppy services are supported (int 13h)3.5"/720 kB floppy services are supported (int 13h)3.5"/2.88 MB floppy services are supported (int 13h)Print screen service is supported (int 5h)8042 keyboard services are supported (int 9h)Serial services are supported (int 14h)Printer services are supported (int 17h)ACPI is supportedUSB legacy is supportedBIOS boot specification is supportedTargeted content distribution is supportedBIOS Revision: 4.6McAfee-ETM-6000 #Figure 3The correct BIOS version release date should be at or later than the example highlighted (yellow) above.If yours is not, continue with the steps on the following pages. If your BIOS version is at or later than thisrelease date, continue onto the ESM Setup section on page 16.If your appliance BIOS Release date is before 12/23/2013 AND you are running v9.5.0 The IPMIdialogs are disabled within the GUI. To correct, you will have to perform the BIOS upgrade steps inthe following pages.7
IPMI and RMM Setup and Configuration GuideMcAfee SIEMBIOS UpdateObtaining the BIOS update packageTo upgrade the appliance BIOS you will need extract the proper Intel Security BIOS update package to a USBflash drive. These compressed packages are located on the ESM appliance in the following directory:/etc/areca/system bios update/The BIOS packages located here are specific Intel Security (McAfee) SIEM Appliances. Do notattempt to use any other BIOS packages other than what is located here.The directory will contain files similar, but not exactly, as the ones below:850-1773-03 032514.zip850-1904-00 012714.zipContents-README.txtBecause BIOS packages may change between SIEM operating environment releases, please refer tothe Contents-README.txt file for the correct package that is to be used for the appliance youare upgrading.After you have identified which ZIP package is appropriate for the appliance you are upgrading, use anapplication like SCP or WinSCP to download the ZIP package. If your environment requires both zippackages, please extract each zip to its own properly labeled USB flash drive. Mixing the packages couldrender an appliance un‐bootable.Once you have downloaded the zip package, unzip it to the root of your USB flash drive. The drive you useshould be empty, should be a 4GB drive or less and can be formatted using Windows or Linux file systems. Italso does not have to be bootable. The directory on the USB flash drive will look similar to Figure 4 below.Figure 48
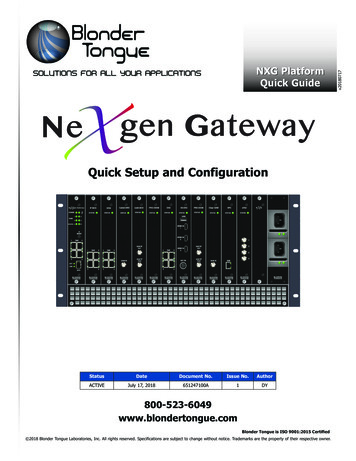
IPMI and RMM Setup and Configuration GuideMcAfee SIEMBIOS UpdateNext, insert the USB flash drive into an unused USB port on the back of the appliance being upgraded. Therear of both appliances (1U and 2U), and their respective USB ports, are highlighted in Figure 5.Figure 5Once the USB flash drive has been attached, re‐boot the appliance. To ensure a proper shutdown, use eitherthe SIEM Administrative interface (browser‐based GUI) or a monitor and keyboard attached to the system toaccess the LCD emulator in the upper left corner of the console. The shutdown process may take severalminutes so that it can safely complete any outstanding task. Please be patient.Once the system boots normally, it will display the McAfee Boot Splash screen as shown in Figure 6.Do not make a selection. Let the system boot as normal. It will auto recognize that the USB drive isattached and boot from it. The McAfee Splash screen may take up to 60 seconds before proceeding.Figure 69
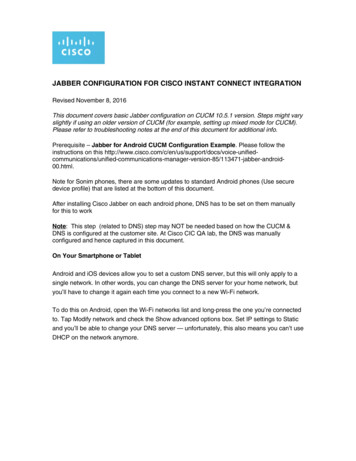
IPMI and RMM Setup and Configuration GuideMcAfee SIEMBIOS UpdateAfter the McAfee boot splash clears, the system willrecognize the USB and will start to boot. However,depending on when you received your SIEM appliance,there may have been a BIOS password set and it willneed to be entered in order for the automated BIOSupdate process to start. If this is the case in yourenvironment, the example in Figure 7 will appear. Thepassword you enter will depend on the type of applianceyou are updating.For 1U Appliances use:For 2U Appliances use:Figure 7appl1an@ppl1@nc3Once you have successfully entered the BIOS password, you should see a screen similar to Figure 8.Figure 8At this point it should start updating the system automatically and you will see messages scroll across thescreen. The entire process can take as much as 15 to 20 minutes to complete. There are multiple phases ofthe update process as the various subsystems of the motherboard are updated. You may notice that theappliance cooling system power cycle a number of times, this is normal. You may also notice messagesindicating password failures, this also is normal.Do not interrupt or reset the update process, remove power to the system, or use the keyboard(unless prompted) while the update is taking place. Doing so could result in an unbootablesystem.10
IPMI and RMM Setup and Configuration GuideMcAfee SIEMBIOS UpdateThe update process should end successfully with a message similar to Figure 9. It will indicate that the USBflash drive should be removed and the system rebooted using the front‐panel reset button.Update file configuration: Revision S2600GZ.112FRU & SDR Update Package for Intel (R) Server Board S2600GZ/GLCopyright (c) 2013 Intel Corporation.Auto-detecting chassis model and attached hardware.This may take up to 1 minute to complete.FRUSDR update completed.Setting BIOS Admin and User PasswordSuccessfully CompletedSuccessfully CompletedBIOS Admin and User Password SetUpdates Completed. Please remove the USB key and reboot using the front panel buttonFs0:\ Figure 9TroubleshootingYou may not always get the display in Figure 9 on your first attempt at updating the BIOS. This could be dueto issues where the FRU flags a few messages or recoverable errors have occurred. The following page(s)will provide guidance on how to handle some of these issues should they arise.11
IPMI and RMM Setup and Configuration GuideMcAfee SIEMBIOS UpdateChassis SelectionIn some instances, after the BIOS appears to have successfully updated, an FRU message indicating anissue detecting the backplane has occurred (figure 10) and it asks you to determine which chassis is inuse.ME firmware update completed.FRUSDR 1.12 is being installed.Update file Configuration: Revision S2600GZ 112FRU & SDR Update Package for Intel(R) Server Board S2600GZ/GLCopyright (c) 2013 Intel CorporationAuto-detecting chassis model and attached hardware.This may take up to 1 minute to complete.Hot-swap HDD backplane detected but its FRU details either corrupted or blank.Falling back to User chassis selection as auto detection is not possible.!Select the Chassis1Intel(R) Server Chassis R10002Intel(R) Server Chassis R20003Other ChassisFigure 10For all McAfee SIEM Appliances, choose option 2 Intel(R) Server Chassis R2000.Once that is selected, an R2000 Chassis type message (Figure 11) will appear.Hot-swap HDD backplane detected but its FRU details either corrupted or blank.Falling back to User chassis selection as auto detection is not possible.!Select the Chassis1Intel(R) Server Chassis R10002Intel(R) Server Chassis R20003Other ChassisSelect the R2000 chassis type1R2208/R2216/R2308 chassis2R2224 chassis3R2312 chassis4Intel(R) Server Chassis R2000 with Aux PCIeFigure 11Choose option 3 R2312 ChassisOnce you’ve made the selections, the process should continue. However, the process may also stall. If theprocess stalls, we recommend rebooting the appliance and perform the BIOS upgrade again. This secondBIOS upgrade should complete successfully and will end with the display similar to page 11.12
IPMI and RMM Setup and Configuration GuideMcAfee SIEMBIOS UpdatePassword Set FailureIn some instances, after the BIOS appears to have successfully updated, one or more errors indicatingthat a Password mismatch has occurred. It may appear like the example in Figure 12.Update file configuration: Revision S2600GZ.112FRU & SDR Update Package for Intel (R) Server Board S2600GZ/GLCopyright (c) 2013 Intel Corporation.Auto-detecting chassis model and attached hardware.This may take up to 1 minute to complete.FRUSDR update completed.Setting BIOS Admin and User PasswordError: Password Mismatch:entered password doesn’t match with current passwordError: Password Mismatch:entered password doesn’t match with current passwordBIOS Admin and User Password SetFigure 12This error(s) should not affect the process and the admin and user passwords will ultimately get setproperly.BMC Firmware is not TransitioningIn some instances, after the firmware has successfully updated, a message similar to Figure 13 willappear.BMC Firmware update SuccessfulBMC Firmware is not transitioning to operating modeCould not exit FW transfer modeAn Error occurredTo save the error to a fileY,N,ESCFigure 13If this occurs, press Y. Shortly after, you should receive an Updates Completedmessage similar to Figure 9. However, it has been reported that once the USBdrive has been removed and the power switch pressed, the appliance does notreboot. At this point you have two options. First, press and hold the reset button(Figure 14) for 20 seconds. If the appliance still does not reboot, it isrecommended that power be removed from the appliance.In either situation, it is recommended that the BIOS update be performed a secondtime. On this second attempt the update should complete without error.Figure 1413
IPMI and RMM Setup and Configuration GuideMcAfee SIEMBIOS UpdateIf you run into issues not previously highlighted, the update process stalls or prompts you for an entry ofsome nature which you do not have the answer for.DO NOT SHUT OFF THE APPLIANCEContact McAfee support at http://mysupport.mcafee.com; or at 800‐937‐2237; or your McAfee PlatinumSupport representative.14
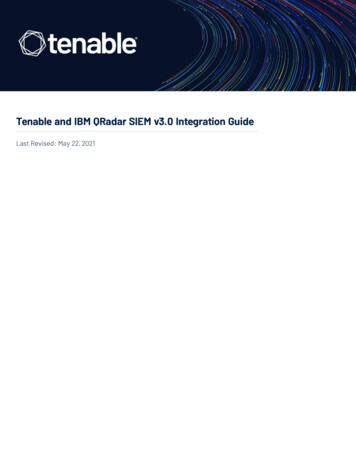
IPMI and RMM Setup and Configuration GuideMcAfee SIEMEnabling IPMIOnce the appliance(s) have the proper BIOS level, you will need to connect and config each appliance’s IPMIinterface to your network. The IPMI capabilities outlined in the following pages are only supported via theIPMI interface. McAfee SIEM appliances do not support Remote Management via the traditional MGMT1 orMGMT2 ports.Depending on the BIOS version your appliance was shipped with, IPMI may be disabled or possiblyenabled on interfaces other than the IPMI interface (highlighted below). Enabling IPMI on anyinterface but the IPMI interface can cause connectivity issues to the appliance. If you believe thatyour appliance has been incorrectly configured for IPMI, below are a few troubleshooting steps.Use only if all other connectivity options have failed.To disable IPMI on the MGMT1 interfaces cAfee-ETM-6000McAfee-ETM-6000 nlanlanlansetsetsetsetset11111ipsrc staticipaddr 0.0.0.0netmask 0.0.0.0defgw ipaddr 0.0.0.0access offlanlanlanlanlansetsetsetsetset33333ipsrc staticipaddr x.x.x.xnetmask x.x.x.xdefgw ipaddr x.x.x.xaccess on(Replace 1 with 2 for MGMT2)To enable the IPMI interfaces cAfee-ETM-6000McAfee-ETM-6000 e the IP, Netmask and Gateway are setting appropriately for your environment)The Figure 15 highlights the IPMI port location on each style (1U or 2U) of SIEM appliance. A standard CAT5or CAT6 cable can be used and there is no need to use a cross‐over cable, as a standard Ethernet cable willwork.Figure 15There are several security issues to be considered before enabling the IPMI LAN interface. Aremote station has the ability to control a system’s power state as well as being able to gather ormodify certain platform information. To reduce vulnerability it is strongly advised that the IPMILAN interface only be enabled in 'trusted' environments where system security is not an issue orwhere there is a dedicated secure 'management network.15
IPMI and RMM Setup and Configuration GuideMcAfee SIEMEnabling IPMIOnce logged into the ESM using the NGCP account, navigate to one of these locations depending on whichappliance you need to enable Remote Management on. Each appliance type sets the IP address differently.Please make sure you follow the instructions for the appropriate appliance.Setting IP address for ESM or All‐in‐One Appliances:Select System Properties and then Network Settings. Next, select the Advanced taband the dialog in Figure 16 will appear.Setting IP address for a Receiver, ACE, ELM, ADM, or DEM:Select Device Properties and then Device Configuration. Next, select the Interfacebutton and then the Advanced tab and a dialog similar to Figure 16 will appear.Figure 16 is specific for an ESM, but each device (ERC, ACE, ELM, etc.,.) will have asimilar dialog with the exact same IPMI values.Figure 16If for some reason your BIOS update did not complete successfully, the Enable IPMI Settings sectionwill not appear.16
IPMI and RMM Setup and Configuration GuideMcAfee SIEMEnabling IPMIRegardless of which appliance you are configuring, the steps outlined here will be the same for allappliances.Check the Enable IPMI Settings check box and then fill in the appropriate network settings
IPMI and RMM Setup and Configuration Guide McAfee SIEM 8 The BIOS packages located here are specific Intel Security (McAfee) SIEM Appliances. Do not attempt to use any other BIOS packages other than what is located here. Because BIOS packages may change between SIEM operating environment releases, please refer to