Transcription
plSame
SamplFirst EditioneA (220-901)LearnKey provides self-paced training courses and online learning solutions to education, government, business, and individualsworld-wide. With dynamic video-based courseware and effective learning management systems, LearnKey provides expertinstruction for popular computer software, technical certifications, and application development. LearnKey delivers content onthe Web, by enterprise network, and on interactive CD-ROM. For a complete list of courses visit:http://www.learnkey.com/All rights reserved. No part of this book may be reproduced or transmitted in any form or by any means now known or to beinvented, electronic or mechanical, including photocopying, recording, or by any information storage or retrieval system withoutwritten permission from the author or publisher, except for the brief inclusion of quotations in a review. 2016 LearnKey www.learnkey.com104161
Table of ContentsIntroductionUsing this Workbook 6Best Practices Using LearnKey’s Online Training 7A (220-901) Introduction 9Skills Assessment 10A (220-901) Time Tables 12A (220-901) Domain 1: HardwareSampleFill-in-the-Blanks 14Checking for a Firmware Upgrade 17BIOS Component and Configuration Information 19BIOS Configurations and Diagnostics 22BIOS Monitoring 23An Introduction to Motherboards 24Expansion Slots 25CPU Sockets and Chipsets 26CMOS Battery 27Power and Fan Connectors 28Front Panel Connectors and Indicators 29Bus Speeds 30RAM Types 31RAM Speeds and Compatibility 33Installing PC Expansion Cards 35Installing an Optical Drive 37Magnetic Hard Drives 39Solid-State and Flash Drives 41RAID Types 43Tape Drives and Media Capacity 44CPU Installations and Socket Types 45CPU Characteristics 47CPU Cooling 49Video and Network Connectors 50Wireless Connections 52Connection Characteristics 54Power Supply Connectors 56Power Supply Specifications 57Custom PC Configurations 58Refresh Rates and Screen Resolution 60Other Display Device Features 62Display Cables and Connectors 64
Universal Serial Bus (USB) and PS/2 Connections 66FireWire and SATA Connectors 68Audio Connectors 70Computer Adapters and Converters 71Input Devices 72Output Devices and Input and Output Devices 74Installing and Configuring Printers 76Printer and Device Sharing 78Laser Printer Technologies 80Inkjet Printer Technologies 82Thermal and Impact Printer Technologies 83Virtual Printing 84Maintaining Printers 85A (220-901) Domain 2: NetworkingSampleFill-in-the-Blanks 88Fiber Cables 91Twisted-Pair Cables 93Coaxial Cables 95IPv4 vs. IPv6 Addressing 96IP Address Types 98Setting IP Addresses 99Subnet Masks and CIDR 101TCP and UDP Ports 103Protocols 105Wireless Network Standards and Encryption Types 106Installing and Configuring a Wireless Router 108Internet Connection Types 110Network Types 112Hub, Switches, and Routers 113Other Network Devices 114A (220-901) Domain 3: Mobile DevicesFill-in-the-Blanks 117Laptop Expansion Options 119Installing Laptop Hardware 121Types of Display Devices 123Laptop Components 125Laptop Function Keys 126Laptop Accessories 128Other Mobile Devices 129Mobile Device Connection Types 131Mobile Device Accessories 133
A (220-901) Domain 4: Hardware and Network TroubleshootingFill-in-the-Blanks 135Common Hardware Problems 138Hardware Troubleshooting Tools 140Common Hard Drive Problems 142Hard Drive Troubleshooting Tools 144Common Display Problems 146Wired and Wireless Network Symptoms 148Using Hardware Tools in Building and Troubleshooting Networks 150Command Line Tools 152Common Mobile Device Symptoms 155Mobile Device Disassembling Processes 157Common Printer Problems 158Printer Tools for Troubleshooting 160AppendixSampleA (220-901) Domain 1: Hardware Course Map 162A (220-901) Domain 2: Networking Course Map 168A (220-901) Domain 3: Mobile Devices Course Map 170A (220-901) Domain 4: Hardware and Network Troubleshooting Course Map 172A (220-901) Domain 1: Hardware Outline 175A (220-901) Domain 2: Networking Outline 176A (220-901) Domain 3: Mobile Devices 177A (220-901) Domain 4: Hardware and Network Troubleshooting 1788 Week Sample Lesson Plan 1799 Week Sample Lesson Plan 18010 Week Sample Lesson Plan 181
Fill-in-the-BlanksInstructions: While watching A (220-901) Domain 1: Hardware Training, fill in the missing words according to the informationpresented by the instructor. [References are found in the brackets.]The BIOS1.Depending on the computer’s BIOS, devices can be enabled and disabled,and the computer’s clock speed can be altered. [BIOS Diagnostics and Monitoring]support can be utilized,Everything about Motherboards2.Anmotherboard is usually 12 x 9.6 inches. [Motherboard Sizes]3.A4.Bus speeds are measured inchip interacts with the CPU, RAM, and a slot dedicated for graphics. [Chipsets]. [Bus Speeds]6.RAM is only used in high-end machines since it is expensive. [RAM Characteristics]. [RAM Compatibility]In order to determine the PC speed, multiply the number of MHz bySamInstall and Configure Expansion Cards7.pl5.eRAM FeaturesA storage card sometimes has built-insupport. [Other Expansion Cards]Storage Devices8.An optical disc can beMemory or Rewritable. [Install an Optical Drive]9.Magnetic hard disk drive speeds are measured in. [Magnetic Hard Drives]drive uses traditional HDD technology, however it uses a solid-state drive for cache purposes10. Ato speed up overall performance. [Solid-State Drives]11. One method of backing up data to tapes is the,,method.[Tape Drive]CPUs and Cooling12. BGA andare two types of CPU sockets. [Socket Types]13. A CPU cache stores data the CPU will need again later in14. Multiple15.14 Domain 1: Hardware. [CPU Characteristics]in a computer device does not mean it has multiple processors. [CPU Characteristics]can be cleaned off of a CPU using isopropyl alcohol. [CPU Cooling]A (220-901) Project Workbook
PC Connection Interfaces16. The shorter thecable, the higher data transfer speeds can be. [Physical Connections]cable can be used to transfer data and provide power to a device. [Physical17. A 6-pin or 9-pinConnections]18.Connections]connectors can transfer both audio and video data digitally. [Audio, Video, and Networkconnectors. [Audio, Video, and Network Connections]19. Ethernet cables connect using 8-pin. [Wireless Connections]20. Bluetooth devices are usuallyas 1s and 0s. [Interface Characteristics]21. Digital data is sent inInstall a Power Supplyconnectors are used to power hard disk drives. [Power Supply Connector Types]e22.plCustom PC Configurations23. A virtualization workstation utilizes VM software such asWorkstation], VMware, or Virtual Box. [Choosing aSam24. Gaming PCs require a sound card which is compatible with at least a[Choosing a Workstation]surround system.Display Devices25. LCD monitors use two types of monitor panels, Twisted Nematic or26.resolution is the default and recommended resolution of a monitor. [Resolution]. [Brightness]27. Brightness is measured in28. [Types of Displays]is the standard analog interface. [Analog vs. Digital]environments. [Privacy/Anti-Glare Filters]29. Privacy filters are essential in30. Currently the most common aspect ratio is. [Aspect Ratios]PC Connector Types31.32. Up to33. USB A,Connectors]15 Domain 1: Hardwareis compatible with VGA. [Display Connector Types]USB devices can be connected to one port using hubs. [Device Cables and Connectors], Mini, andare USB connector types. [Device Cables andA (220-901) Project Workbook
Peripheral Devices34. Ais usually part of a multi-function printer. [Input Devices]device. [Input and Output Devices]35. Apple TV and Chromecast are examples of aInstall Printers36.can be used to connect a printer to a device up to 10 meters away. [Remote Printing]is embedded memory which acts as a buffer between the computer and the platter used for37. Astorage. [Share Devices]Printer Technologies and Processes38. A laser printer consists of pickup rollers, separate pads,assembly. [Laser Printer Parts], transfer rollers and belts, and a fuserstep. [Lasere39. During the laser printer image process, toner is applied to the paper during thePrinter Process]process. [Inkjet Printer Processes]pl40. Inkjet printing can be performed using a thermal or aare used to heat the thermal paper used in a thermal printer. [Thermal Printer Processes]41.on the sides. [Impact Printer Processes]Sam42. An impact printer uses paper withPrinter Maintenance43. A thermal printer has a[Thermal Printer Maintenance]which will need to be cleaned once in a while using isopropyl alcohol.44. If the pins inside of an impact printer stop working, theMaintenance]16 Domain 1: Hardwarewill need to be replaced. [Impact PrinterA (220-901) Project Workbook
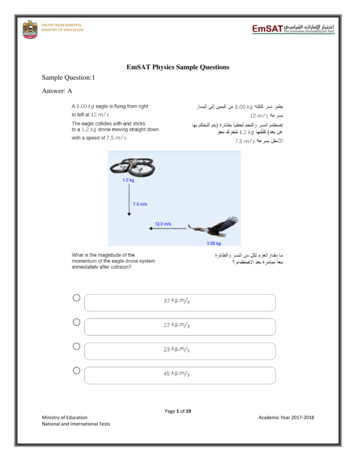
Checking for a Firmware UpgradeDescription:Each BIOS manufacturer has a set way for upgrading the firmware on a machine. The most common reason for upgrading a BIOS isto get a feature enhancement only available in the BIOS. For example, a firmware upgrade may be necessary to support a larger harddrive or hard drive partition. Or a feature such as intrusion detection may be available as a result of a firmware upgrade.The most important step in upgrading firmware is to follow the manufacturer’s instructions for downloading and upgrading firmware.Some upgrades can only be done on a machine reboot. Others can be done right from Windows. Most of the time, the most importantinstruction given will be to not turn off or unplug the machine during the firmware upgrade.The most common steps for performing a firmware upgrade are:1. Checking the version number of the current BIOS.2. Going to the website of the BIOS manufacturer to see if there is an upgrade available. In this step, the version number of theBIOS is the key component.3. If an upgrade is needed, downloading and installing the upgrade.Given that manufacturers vary widely in how they handle a firmware upgrade, this project will focus primarily on obtaining the BIOSversion on a computer and then checking the manufacturer’s website to see if a newer version is available.Steps for Completion:On a Windows machine, click the Start button or press the Start key on the keyboard.Type: msinfo32.If you are on a Windows Vista or Windows 7 machine, press the Enter key. If you are on a Windows 8 machine, click themsinfo32.exe program link. You will see the following:4.5.6.7.Look for the BIOS Version/Date information in the middle of the screen.Open Internet Explorer.Navigate to the website of your computer manufacturer. Again, the actual website you browse to will vary.Find a support section. In many cases, the site will be support. your computer manufacturer .com.Sample1.2.3.17 Domain 1: HardwareA (220-901) Project Workbook
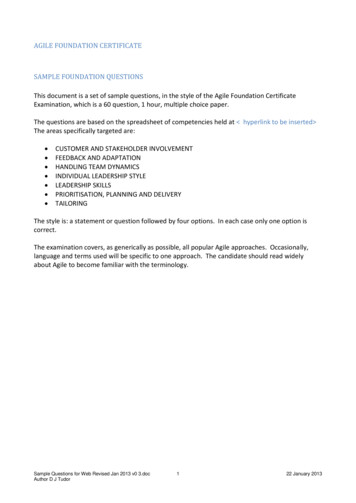
8.Find the area that contains the driver downloads for your particular device. Here is an example of what one looks like:9.If the version number and/or date of the BIOS on the website is newer than the one on your computer, take the time to first readany instructions for updating the BIOS and then download and run the BIOS update.Points to Remember: The first step in possibly upgrading firmware is finding out the current version of the computer BIOS.When upgrading firmware, be sure to follow the manufacturer’s instructions exactly as stated.Reference:Difficulty: IntermediateeLearnKey’s A 220-901 Training, Domain 1, Session 1The BIOS: BIOS Flash UpdateRequired Materials: A Windows machineSamObjectives:1.0 Hardware1.1 Given a scenario, configure settings and use BIOS/UEFI tools on a PC1.1.a Firmware upgrades – flash BIOSplEstimated Time to Complete: 15 minutes [45 if one goes through with the BIOS update]18 Domain 1: HardwareA (220-901) Project Workbook
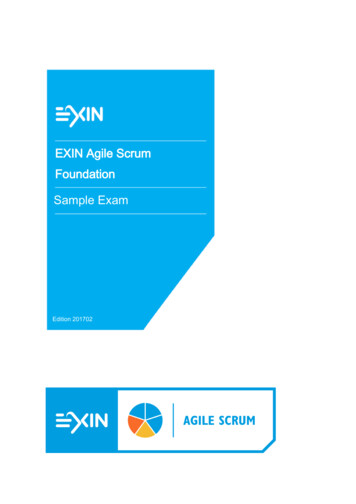
BIOS Component and Configuration InformationDescription:The Basic Input Output System (BIOS) is code, embedded into a computer’s hardware, which provides a computer with basic startupinstructions. The BIOS is responsible for making sure a computer has the hardware it needs (CPU, RAM, hard disks, video, and inmost cases, a network card) in order to start up and then load an operating system.Occasionally, the BIOS needs to be configured. Sometimes, it is a matter of enabling a new hardware device or disabling one no longerin use. Sometimes, it is a matter of setting a password just to start up a computer or deleting a password when one is no longer neededjust to start up a computer.In this project, you will explore the basic components of a BIOS. Different computers will have different BIOS screens, so the actualproject steps may vary. However, the different BIOS types do have the following in common:You will need to use the keyboard to navigate through the BIOS. The mouse will not work in a BIOS screen.The BIOS is reached through pressing a key (usually F2, F12, or Delete) when the computer starts up. If you see a Windows logo,it is too late. Shut down, restart the computer, and try again. For most BIOS settings, once the setting has focus, pressing the Enter key will open the setting options. Then the arrow keys orthe plus or minus keys on the keyboard will allow for changes in those settings.The screen shots for this project were taken from a virtual machine installation of Windows 8. Again, your screens may vary.Steps for Completion:Restart (or start) a Windows computer. When you see the splash screen, look for the key to press to enter the setup screen. If youpress the key in time, the BIOS will appear. If not, restart the computer and try again. The BIOS startup screen will appear andwill look similar to this:Sampl1.e 19 Domain 1: HardwareA (220-901) Project Workbook
6.epl3.The Main tab will tell youthe system date and time,the hard disk(s) in use, theoptical drives in use, andthe amount of RAM onthe machine. Sometimesthe disks will not showunless the disk is selected.Press the arrow keydownward until you seethe Primary Master driveselected and then press theEnter key to see a screensimilar to the screen on theright:You may notice that thespecifications for the diskappear, such as the type(regular hard drive orsolid-state drive) and thedisk size. Or, as seen in thescreen above, the type maybe set to Auto, as in anautomatic detection of thehard drive. Press the Esckey on the keyboard to exitthe hard drive screen.Sam2.Press the Enter key to examine the I/O configuration screen, as seen here:20 Domain 1: Hardware4.5.Press the right arrowkey on the keyboard tonavigate to the Advancedscreen. Here you will seeprocessor, operating system(if applicable), and deviceconfiguration, as seen onthe left:Press the down arrow keyon the keyboard until theI/O Device Configuration(meaning input/outputdevice configuration) area ishighlighted.A (220-901) Project Workbook
On this screen, you will see which ports are enabled and which ones are disabled. A common real-life setting to change hereinvolves enabling or disabling USB ports. When you are done viewing this screen, press the Esc key on the keyboard to return tothe Advanced screen.8. Press the right arrowkey on the keyboardto move to theSecurity tab. You willsee the screen on theright:9. On the Securitytab, you will seeinformation forsetting up BIOS passwords, if applicable. You may also see informationon intrusion/detection notification, which notifies a user that thecover has been removed from the computer. When you have finishedexamining the security area, press the right arrow on the keyboard tomove to the Boot screen. You will see a screen that looks similar to thescreen on the right:10. On the Boot screen, you can control the boot order of the computer. For example, if Removable Devices is the first disk type listedin the boot order, and you want the hard drive to be the first disk in the boot order, press the minus key on the keyboard to moveremovable devices down in the boot order list (or the key the screen instructions tell you to press to move the disk type down inthe boot order).11. To move to the Exit screen, press the right arrow key on the keyboard. A typical exit screen looks like this:Sample7.12. From this screen, you can save any changes to the BIOS or discard those changes. Press the down arrow key on the keyboard untilthe Exit Discarding Changes setting is highlighted.13. Press the Enter key. If you are prompted to continue, press the Enter key again. Your system will reboot.Points to Remember: BIOS settings vary from computer to computer.Take the time to go through the BIOS settings on one or more computers and make sure to experiment with topics under the testobjectives.You always have a chance to discard BIOS changes before making them permanent.Reference:LearnKey’s A (220-901) Domain 1: Hardware TrainingThe BIOS: BIOS Tour; BIOS ConfigurationDifficulty: BeginnerEstimated Time to Complete: 30 minutes [This will depend upon how many changes one makes to the BIOS and thenexamines those changes after a restart.]Required Materials: A computerObjectives:1.0 Hardware1.1 Given a scenario, configure settings and use BIOS/UEFI tools on a PC1.1.b BIOS component information1.1.b.i RAM1.1.b.ii Hard drive1.1.b.iii Optical drive1.1.c BIOS configurations1.1.c.i Boot sequence1.1.c.ii Enabling and disabling devices1.1.c.iii Date/time21 Domain 1: HardwareA (220-901) Project Workbook
BIOS Configurations and DiagnosticsDescription:In addition to displaying component information, many computer BIOSes also provide for the ability to configure items such as clockspeeds, virtualization support, and diagnostics. Here is an example of what one may find when in a BIOS:ItemCentral ProcessingUnit (CPU)Virtualization SupportDrive EncryptionWhat it DoesShows the speed of the CPU on the system. Some BIOS versions give people the ability to set clockspeeds for the CPU. A faster clock speed can mean better performance but it also tends to dissipate moreheat into the system, which could harm the computer’s components.If available and enabled, the computer can host 64-bit virtual machines. Without this, a computer can atbest host 32-bit virtual machines.Enabling drive encryption requires a password to access any data on the drive should the drive be movedto another machine. A Trusted Platform Module (TPM) chip is a chip that stores encryption keys forhardware authentication.LoJackA device that can makes a computer locatable should it be stolen.Secure BootNew in Windows 8. This will prevent a computer from starting up if the boot loader is not digitally signedby Microsoft. This feature is enabled by default on Windows 8 computers.On many computers, a memory diagnostics test can be run in the BIOS.eDiagnosticsIn this project, you will identify the feature that needs to be enabled in the BIOS given a situation.For each situation, identify the BIOS feature that needs to be enabled:a.A tester needs to install a 64-bit edition of Windows 7 as a virtual machine:b.An executive wants to make sure a laptop can be located if it is stolen:Sam1.plSteps for Completion:c. A technician needs to run a memory test on a PC:2. On a computer, boot into the BIOS and list each feature from the feature list described in this project:Points to Remember: Changing the clock speed in the BIOS can have an adverse effect on the cooling inside of the computer.Drive encryption is usually made possible through a Trusted Platform Module (TPM) chip inside of the computer.Secure boot ensures that the boot loader in Windows 8 (or 8.1) is digitally signed.Reference:LearnKey’s A (220-901) Domain 1: Hardware TrainingThe BIOS: BIOS Tour; BIOS Configurations; BIOS Diagnostics and MarketingDifficulty: BeginnerEstimated Time to Complete: 20 minutesRequired Materials: A computerObjectives:1.0 Hardware1.1 Given a scenario, configure settings anduse BIOS/UEFI tools on a PC22 Domain 1: Hardware1.1.b BIOS component information1.1.b.iv CPU1.1.c BIOS configurations1.1.c.iv Clock speeds1.1.c.v Virtualization support1.1.c.vi BIOS security (passwords, driveencryption: TPM, LoJack, secure boot)1.1.d Built-in diagnosticsA (220-901) Project Workbook
BIOS MonitoringDescription:One function of the BIOS is the ability to monitor crucial computer functions. For example, many BIOSes can monitor temperature,fan speeds, bus speeds, voltage readings, and whether the cover has been removed from the computer case. Here are some details onwhat some BIOSes will display, and the settings to look for when viewing these monitoring features:FeatureTemperature MonitoringFan SpeedsIntrusion Detection/NotificationVoltageShows the computer fans and the speeds at which they are operating. If one fan is much slower than therest of the fans, it may be a sign that the fan needs to be cleaned or replaced.A feature to alert the next person who starts up the computer that the case cover has been lifted from thecomputer.Shows voltage settings for 3V (volts), 5V, and 12V wires in the computer. A voltage reading within fivepercent of the given standard for a wire is considered acceptable.Shows the clock speed of the CPU. If the clock speed is faster than the advertised clock speed of theCPU, the system has been set to overclock and special attention needs to be paid to the system temperature to make sure it is not overheating the system.eClockDetailsShows the degrees, usually in Celsius, of the CPU and the hard drive(s) in the computer. For most systems, 40 degrees Celsius or less is ideal. If the temperature is in Fahrenheit, subtract 32 and then divideby 1.8 to get the Celsius equivalent.Bus SpeedShows the speed of the system bus. The bus speed x the multiplier the overall CPU speed.plIn the project exercise, you will explore real-life situations using the BIOS monitoring tools.Steps for Completion:For a 12V wire, what would be considered the lowest acceptable voltage?2.For a 12V wire, what would be considered the highest acceptable voltage?3.4.A system BIOS indicates the temperature of the CPU is 100 degrees Fahrenheit. Is this too high?Explore the BIOS in a computer. Use the space below to write down any monitoring tools you discover.Sam1.Points to Remember: BIOS monitoring can monitor temperature, fan speeds, voltage, clock speeds, and bus speeds.BIOS monitoring can also contain an intrusion detection/notification feature to notify the person booting up the system that thecase cover has been removed.Reference:LearnKey’s A (220-901) Domain 1: Hardware TrainingThe BIOS: BIOS Tour; BIOS Diagnostics and MonitoringDifficulty: BeginnerEstimated Time to Complete: 20 minutesRequired Materials: A computerObjectives:1.0 Hardware1.1 Given a scenario, configure settings anduse BIOS/UEFI tools on a PC23 Domain 1: Hardware1.1.e Monitoring1.1.e.i Temperature monitoring1.1.e.ii Fan speeds1.1.e.iii Intrusion detection/notification1.1.e.iv Voltage1.1.e.v Clock1.1.e.vi Bus speedA (220-901) Project Workbook
An Introduction to MotherboardsDescription:Motherboards (also known as system boards) are the electrical circuit boards which sit inside of computers of all types. Motherboardsare found in desktops, laptops, home theater systems, tablets, smartphones, and many other types of computing devices
LearnKey’s A 220-901 Training, Domain 1, Session 1 The BIOS: BIOS Flash Update Difficulty: Intermediate Estimated Time to Complete: 15 minutes [45 if one goes through with the BIOS update] Required Materials: A Windows machine Objectives: 1.0 Hardware 1.1 Given a sce