Transcription
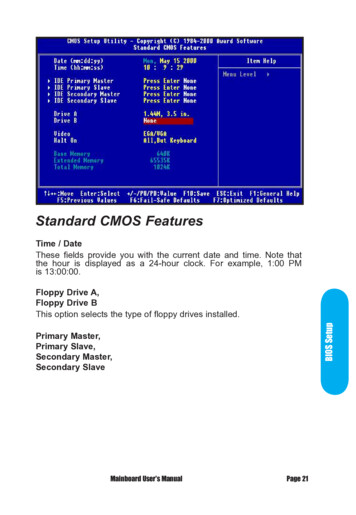
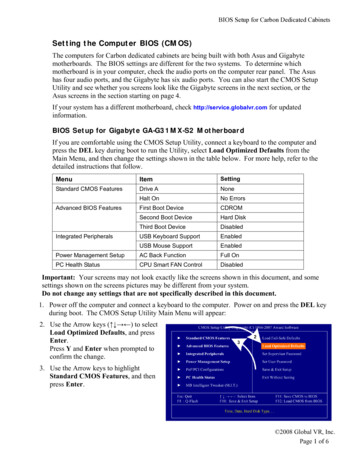
BIOS Setup for Carbon Dedicated CabinetsSetting the Computer BIOS (CMOS)The computers for Carbon dedicated cabinets are being built with both Asus and Gigabytemotherboards. The BIOS settings are different for the two systems. To determine whichmotherboard is in your computer, check the audio ports on the computer rear panel. The Asushas four audio ports, and the Gigabyte has six audio ports. You can also start the CMOS SetupUtility and see whether you screens look like the Gigabyte screens in the next section, or theAsus screens in the section starting on page 4.If your system has a different motherboard, check http://service.globalvr.com for updatedinformation.BIOS Setup for Gigabyte GA-G31MX-S2 MotherboardIf you are comfortable using the CMOS Setup Utility, connect a keyboard to the computer andpress the DEL key during boot to run the Utility, select Load Optimized Defaults from theMain Menu, and then change the settings shown in the table below. For more help, refer to thedetailed instructions that follow.MenuItemSettingStandard CMOS FeaturesDrive ANoneHalt OnNo ErrorsFirst Boot DeviceCDROMSecond Boot DeviceHard DiskThird Boot DeviceDisabledUSB Keyboard SupportEnabledUSB Mouse SupportEnabledPower Management SetupAC Back FunctionFull OnPC Health StatusCPU Smart FAN ControlDisabledAdvanced BIOS FeaturesIntegrated PeripheralsImportant: Your screens may not look exactly like the screens shown in this document, and somesettings shown on the screens pictures may be different from your system.Do not change any settings that are not specifically described in this document.1. Power off the computer and connect a keyboard to the computer. Power on and press the DEL keyduring boot. The CMOS Setup Utility Main Menu will appear:2. Use the Arrow keys ( ) to selectLoad Optimized Defaults, and pressEnter.Press Y and Enter when prompted toconfirm the change.3. Use the Arrow keys to highlightStandard CMOS Features, and thenpress Enter. 2008 Global VR, Inc.Page 1 of 6
BIOS Setup for Carbon Dedicated Cabinets4. A screen similar to the following will appear:5. Use the Arrow keys to highlight thesetting for Drive A and press Enter.Use the Page Up and Page Down keysto change the setting to None.6. Change the setting for Halt On to NoErrors the same way.Press ESC to go back to the MainMenu.7. Now use the Arrow keys to highlight Advanced BIOS Features and press Enter. A screen similarto the following will appear:8. Use the Arrow keys to highlight thesetting for First Boot Device andpress Enter. Use the Page Up andPage Down keys to change the settingto DVDROM.9. Change the setting for Second BootDevice to Hard Disk the same way.10. Change the setting for Third BootDevice to Disabled the same way.Press ESC to go back to the MainMenu.11. Now use the Arrow keys to highlight Integrated Peripherals and press Enter.A screen similar to the following willappear:12. Use the Arrow keys to highlight thesetting for USB Keyboard Supportand press Enter.Use the Page Up and Page Down keysto change the setting to Enabled.13. Use the Arrow keys to highlight thesetting for USB Mouse Support andpress Enter.Use the Page Up and Page Down keysto change the setting to Enabled.Press ESC to go back to the MainMenu.Need for Speed CarbonPage 2 of 6
BIOS Setup for Carbon Dedicated Cabinets14. Now use the Arrow keys to highlight Power Management Setup and press Enter.A screen similar to the following willappear:15. Use the Arrow keys to highlight thesetting for AC Back Function andpress Enter.Use the Page Up and Page Down keysto change the setting to Full-On.Press ESC to go back to the MainMenu.16. Now use the Arrow keys to highlight PC Health Status and press Enter.A screen similar to the following willappear:17. Use the Arrow keys to highlight thesetting for CPU Smart FAN Controland press Enter.Use the Page Up and Page Down keysto change the setting to Disabled.Press ESC to go back to the MainMenu.18. Now that all settings are correct, press F10. The following prompt will appear:Save to CMOS and EXIT (Y/N) Y19. Make sure "Y" shows at the end of the prompt (use the arrow keys to select, if necessary), and pressEnter to save the settings and exit. 2008 Global VR, Inc.Page 3 of 6
BIOS Setup for Carbon Dedicated CabinetsBIOS Setup for Asus P5N-MX MotherboardIf you are comfortable using the CMOS Setup Utility, connect a keyboard to the computer andpress the DEL key during boot to run the Utility. Select Load Setup Default from the ExitMenu first, and then check all of the settings shown in the table below. For more help, refer tothe detailed instructions that follow.ItemSettingExitLoad Setup Default(Not applicable)MainLegacy Diskette A:DisabledPrimary IDE MasterWDC WD400BBPrimary IDE SlaveSony DVD-ROM1st Boot DeviceCDROM2nd Boot DeviceHard Disk3rd Boot DeviceDisabled4th Boot DeviceDisabledBoot Settings ConfigurationHalt OnNo ErrorsAPM ConfigurationRestore on AC Power LossPower OnHardware MonitorQ-FAN FunctionDisabledMenuBootPowerSubmenu (if applicable)Boot Device PriorityImportant: Your screens may not look exactly like the screens shown in this document, and somesettings shown on the screens pictures may be different from your system.Do not change any settings that are not specifically described in this document.1. Power off the game and connect a keyboard to the computer. Power on and press the DEL keyduring boot. The CMOS Setup Utility will start:2. Use the Arrow keys ( ) tohighlight Exit from the top of thescreen, and the Exit menu will appear.3. Use the Arrow keys (qr) to selectLoad Setup Default, and press Enter.4. A prompt will appear saying LoadSetup Defaults (Y/N)? Make sureYES is highlighted and press Enter toconfirm the change.Need for Speed CarbonPage 4 of 6
BIOS Setup for Carbon Dedicated Cabinets5. Use the Arrow keys ( ) tohighlight Main from the top of thescreen, and the Main Menu willappear.6. Use the Arrow keys (qr) to highlightLegacy Diskette A: and then use the and keys to change the setting toDisabled.7. Verify Primary IDE Master is the harddisk (WDC WD400BB) and PrimaryIDE Slave is the DVD-ROM.8. Use the Arrow keys ( ) tohighlight Power from the top of thescreen, and the Power menu willappear.9. Use the Arrow keys to highlight APMConfiguration and press Enter.The APM Configuration menu willappear.10. Use the Arrow keys (qr) to highlightRestore on AC Power Loss and thenuse the and keys to change thesetting to Power-On.11. Press Esc to return to the Powermenu.12. Use the Arrow keys to highlightHardware Monitor and press Enter.The APM Configuration menu willappear.13. Use the Arrow keys (qr) to highlightQ-Fan Function and then use the and keys to change the setting toDisabled. 2008 Global VR, Inc.Page 5 of 6
BIOS Setup for Carbon Dedicated Cabinets14. Use the Arrow keys ( ) tohighlight Boot from the top of thescreen, and the Boot menu will appear.15. Use the Arrow keys (qr) to highlightBoot Device Priority and press Enter.The Boot Device Priority menu willappear.16. Use the Arrow keys (qr) to highlight1st Boot Device, and then use the and keys to change the setting toCDROM.17. Do the same step to change 2nd BootDevice to Hard Disk, and 3rd and 4thBoot Device to Disabled, as necessary.18. Press Esc to return to the Boot menu.19. Use the Arrow keys (qr) to highlightBoot Settings Configuration andpress Enter.The Boot Settings Configurationmenu will appear20. Use the Arrow keys (qr) to highlightHalt On and then use the and keysto change the setting to No Errors.21. Press Esc to return to the Boot menu.22. Now that all settings are correct, press F10. The following prompt will appear:Save configuration changes and exit now?[YES]NO23. Make sure YES is highlighted (use the arrow keys to select, if necessary), and press Enterto save the settings and reboot the computer.Need for Speed CarbonPage 6 of 6
Standard CMOS Features Drive A None Halt On No Errors First Boot Device CDROM Second Boot Device Hard Disk Advanced BIOS Features Third Boot Device Disabled Integrated Peripherals USB Keyboard Support Enabled USB Mouse Support Enabled Power Management Setup AC Back Function Full On PC Health Status CPU Smart FAN Control Disabled